
Killing Floor Low-Memory Client Profile - Fix Texture and Video Memory Crashes
This guide is for Killing Floor players whose client crashes with memory-related errors, especially on custom maps, during a map change, or after several maps in one session.
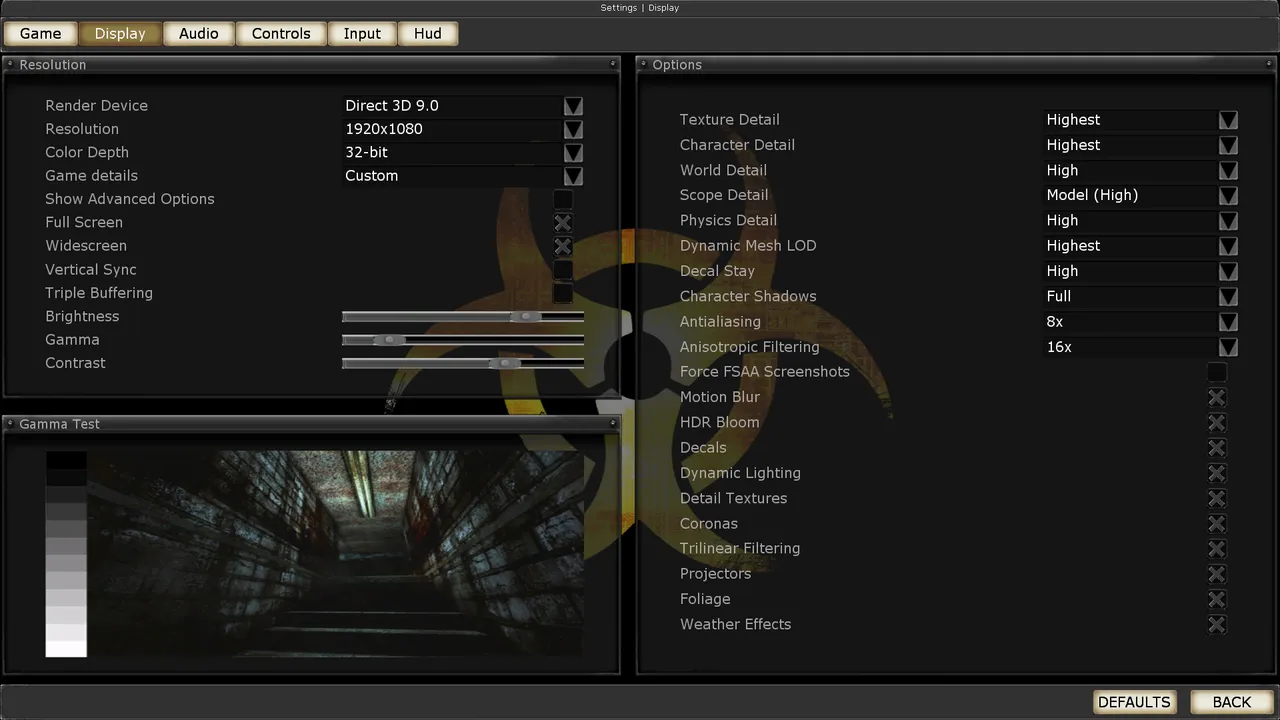 The Killing Floor Display menu: render device, resolution and detail levels. Screenshot: PCGamingWiki.
The goal is stability. The profile below reduces precaching, texture pressure, sound pressure, and heavy visual detail. The game will look simpler, but it should survive more map loads on older or memory-limited clients.
Symptoms This Profile Targets
| Error or symptom | What it usually means |
|---|---|
CreateTexture failed(8007000E) | The client failed to allocate texture memory |
D3DERR_OUTOFVIDEOMEMORY | Direct3D could not allocate enough video memory |
IDirect3DVertexBuffer9::Lock failed | The renderer failed to lock or allocate a D3D buffer |
CreateVertexBuffer failed | Mesh or render buffers could not be created |
Virtual memory exhausted | The 32-bit process ran out of address space |
General protection fault during texture, sound, static mesh, or map loading | A package load failed while the client was under memory pressure |
Killing Floor is an older 32-bit Unreal Engine 2 game. A server can reduce crashes by avoiding extremely heavy maps, but it cannot remove the client's memory limit completely. The client configuration still matters.
Quick Checklist
- Close Killing Floor.
- Find your client
KillingFloor.ini. - Make a backup.
- Disable sound and renderer precaching.
- Lower texture detail to
Normal. - Enable
bNeverPrecache=true. - Save the file and test several map changes.
Where To Find KillingFloor.ini
| Install type | Path |
|---|---|
| Steam | C:\Program Files (x86)\Steam\steamapps\common\KillingFloor\System\KillingFloor.ini |
| Non-Steam or portable client | <Killing Floor folder>\System\KillingFloor.ini |
| Windows VirtualStore fallback | %LOCALAPPDATA%\VirtualStore\Program Files (x86)\Steam\steamapps\common\KillingFloor\System\KillingFloor.ini |
If Steam is installed somewhere else, open Steam, find Killing Floor, use the local files option, and go to the System folder.
Make A Backup First
KillingFloor.iniKillingFloor.ini.backupIf the result is worse or the visuals become too poor, restore the backup and restart the game.
Recommended Low-Memory Profile
Open KillingFloor.ini, find each section, and change only the listed keys. If a key is missing, add it under the correct section.
1. Engine Cache
[Engine.GameEngine]CacheSizeMegs=32Do not raise this value to solve out-of-memory crashes. A larger cache can make the situation worse because the 32-bit client already has limited address space.
2. Audio Precache
[ALAudio.ALAudioSubsystem]UsePrecache=False
LowQualitySound=True
Channels=24What it does:
UsePrecache=Falsereduces up-front sound loading.LowQualitySound=Truelowers pressure from audio assets.Channels=24lowers the number of simultaneous sound channels.
Channels=323. Direct3D 9 Renderer
Most players use the D3D9 renderer. This is the most important section for texture and video memory crashes.
[D3D9Drv.D3D9RenderDevice]DetailTextures=False
HighDetailActors=False
SuperHighDetailActors=False
UsePrecaching=False
UseTrilinear=False
ReduceMouseLag=False
UseCubemaps=False
UseCompressedLightmaps=True
UseVSync=False
LevelOfAnisotropy=0
DetailTexMipBias=0.0
DefaultTexMipBias=0.0UsePrecaching=False
HighDetailActors=False
SuperHighDetailActors=False
ReduceMouseLag=FalseNotes:
UsePrecaching=Falsereduces up-front renderer resource loading.ReduceMouseLag=Falsecan reduce pressure on D3D buffers.UseCompressedLightmaps=Trueis usually better for memory than uncompressed lightmaps.DefaultTexMipBias=0.0is the safe starting point. If the client still crashes, try0.5or1.0; textures will become blurrier.
4. OpenGL Renderer
Only edit this section if you know you are using OpenGL.
To switch the game to OpenGL, open KillingFloor.ini, section [Engine.Engine]: comment out the current RenderDevice= line with a semicolon and uncomment the OpenGL one. The killingfloor.ru forum ("Optimising video settings for FPS" thread, based on a UT2004 guide) suggested it as the first step for weak PCs; check the result on your own machine.
;RenderDevice=D3DDrv.D3DRenderDevice
;RenderDevice=D3D9Drv.D3D9RenderDevice
RenderDevice=OpenGLDrv.OpenGLRenderDevice[OpenGLDrv.OpenGLRenderDevice]DetailTextures=False
HighDetailActors=False
SuperHighDetailActors=False
UsePrecaching=False
UseCompressedLightmaps=True
UseTrilinear=False
ReduceMouseLag=False
LevelOfAnisotropy=0If you are not sure, you are probably using D3D9 and can leave this section alone.
5. Visual Detail
[WinDrv.WindowsClient]Decals=False
Coronas=False
DecoLayers=False
Projectors=False
NoDynamicLights=True
TextureDetailInterface=Normal
TextureDetailTerrain=Normal
TextureDetailWeaponSkin=Normal
TextureDetailPlayerSkin=Normal
TextureDetailWorld=Normal
TextureDetailRenderMap=Normal
TextureDetailLightmap=Normal
WeatherEffects=False
DrawDistanceLOD=0.700000What it does:
TextureDetail...=Normallowers the size of loaded texture resources.Projectors=FalseandDecals=Falsehelp on maps with many blood marks, bullet marks, and projected effects.WeatherEffects=Falsehelps on custom maps with heavy weather effects.DrawDistanceLOD=0.700000lowers far-distance detail.
DrawDistanceLOD=0.8500006. Level Loading And Preload
[Engine.LevelInfo]PhysicsDetailLevel=PDL_Medium
MeshLODDetailLevel=MDL_Medium
bLowSoundDetail=True
DecalStayScale=0.0
bNeverPrecache=true
bShouldPreload=False
bDesireSkinPreload=FalsebNeverPrecache=trueThis reduces the risk of out-of-memory crashes during level loading. The tradeoff is that you may see small stutters when some enemies, weapons, or effects appear for the first time.
Full Copy-Paste Profile
Do not delete your whole KillingFloor.ini. Find the existing sections and set these values inside them.
[Engine.GameEngine]
CacheSizeMegs=32
[ALAudio.ALAudioSubsystem]
UsePrecache=False
LowQualitySound=True
Channels=24
[D3D9Drv.D3D9RenderDevice]
DetailTextures=False
HighDetailActors=False
SuperHighDetailActors=False
UsePrecaching=False
UseTrilinear=False
ReduceMouseLag=False
UseCubemaps=False
UseCompressedLightmaps=True
UseVSync=False
LevelOfAnisotropy=0
DetailTexMipBias=0.0
DefaultTexMipBias=0.0
[WinDrv.WindowsClient]
Decals=False
Coronas=False
DecoLayers=False
Projectors=False
NoDynamicLights=True
TextureDetailInterface=Normal
TextureDetailTerrain=Normal
TextureDetailWeaponSkin=Normal
TextureDetailPlayerSkin=Normal
TextureDetailWorld=Normal
TextureDetailRenderMap=Normal
TextureDetailLightmap=Normal
WeatherEffects=False
DrawDistanceLOD=0.700000
[Engine.LevelInfo]
PhysicsDetailLevel=PDL_Medium
MeshLODDetailLevel=MDL_Medium
bLowSoundDetail=True
DecalStayScale=0.0
bNeverPrecache=true
bShouldPreload=False
bDesireSkinPreload=FalseMore Aggressive Profile
Use this only if the recommended profile helped but did not solve the crashes.
[WinDrv.WindowsClient]
TextureDetailInterface=Lower
TextureDetailTerrain=Lower
TextureDetailWeaponSkin=Lower
TextureDetailPlayerSkin=Lower
TextureDetailWorld=Lower
TextureDetailRenderMap=Lower
TextureDetailLightmap=Lower
DrawDistanceLOD=0.500000
MinDesiredFrameRate=45.000000

[D3D9Drv.D3D9RenderDevice]
DefaultTexMipBias=1.0
DetailTexMipBias=1.0
Tradeoffs:
- textures become noticeably blurrier;
- far objects look worse;
- object pop-in can become more visible.
Experimental NVIDIA And Video Memory Settings
This is optional. Try it only if:
- you use an NVIDIA GPU;
- the main low-memory profile did not help enough;
- you know how to roll back the change.
[Engine.Engine]NVidiaGPU=True
DetectedVideoMemory=1024DetectedVideoMemory=512Do not set a huge value just because your GPU has more VRAM. The 32-bit client can still hit the process memory limit.
Large Address Aware
Large Address Aware, or LAA, is a Windows executable flag that can let a 32-bit process use more virtual address space on 64-bit Windows.
For older Unreal Engine 2 games it can sometimes help, but it is not a server-side fix and it is not a normal INI setting. It modifies the client executable.
Consider LAA only if all of these are true:
- you use 64-bit Windows;
- the low-memory profile reduced crashes but did not remove them;
- you often crash on heavy custom maps;
- you understand how to restore the original
KillingFloor.exe.
Risks:
- Steam can restore the original executable during verify or update.
- Some anti-cheat setups or server configurations may dislike modified executables.
- Non-Steam builds differ, so there is no universal instruction for every client.
- Keep a clean backup of the original executable.
Rollback:
- Close the game.
- For Steam, verify game files.
- For Non-Steam clients, restore the backed-up executable or reinstall from the original installer/archive.
What This Profile Will Not Fix
This profile reduces memory pressure. It does not turn Killing Floor into a 64-bit game and it cannot guarantee a fix when the real problem is:
- a broken or poorly packed custom map;
- missing redirect downloads;
- a corrupted
.utx,.uax,.usx, or.ukxpackage; - a disabled or tiny Windows pagefile;
- an unstable GPU driver;
- overheating or unstable overclocking;
- a map that is too heavy for the client;
- a long session without restarting the game.
Additional Windows Checks
If crashes continue:
- Make sure the Windows pagefile is enabled.
- Keep several GB free on the system drive.
- Close browser tabs, Discord overlay, recording software, other games, and heavy background apps.
- Update the GPU driver.
- If a new driver is unstable, try an older stable driver version.
- Restart Killing Floor after several heavy custom maps.
- Avoid joining a heavy map immediately after the client has been running for hours.
How To Test
After editing:
- Start Killing Floor.
- Join a server on a normal map.
- Play one map.
- Change to a custom map.
- Change to one more map.
- If stable, test the server or map that used to crash.
A good result is several map changes without CreateTexture failed, D3DERR_OUTOFVIDEOMEMORY, or Virtual memory exhausted.
A bad result is a crash on the same map every time, especially when the crash log points to the same texture, sound, static mesh, or map package. In that case, the map or package may be the root cause.
Roll Back INI Changes
If the game looks too bad or becomes less stable:
- Close Killing Floor.
- Delete the modified
KillingFloor.ini. - Rename
KillingFloor.ini.backupback toKillingFloor.ini. - Start the game again.
If you did not make a backup:
- Steam: verify game files.
- Non-Steam: restore the file from the installer or archive.
- Some builds can recreate
KillingFloor.iniafter you delete it and launch the game.
Short Message For Players
If Killing Floor crashes with CreateTexture failed, D3DERR_OUTOFVIDEOMEMORY, or "Virtual memory exhausted":
1) Close the game
2) Back up System\KillingFloor.ini
3) Set UsePrecache=False and UsePrecaching=False
4) Set bNeverPrecache=true
5) Lower TextureDetail... values to Normal
6) Restart the client after several heavy custom maps