
KF2 Perk Skills Guide for Hell on Earth: Best Builds (2024)
This guide comes from roughly 600 hours of play, mostly vanilla Hell on Earth with six players. The skill choices aim to work equally well against small and large Zeds, leaning toward large ones. It does not cover weapons, buying or economy in detail; that is a separate guide (see weapons and economy and the general perks overview). It assumes you already played HoE and feel fine on Suicidal; it is not for newcomers. The screenshots show the author's final builds on the skill screen.
Philosophy
No skill choice helps if you play without a Medic alongside a team that does not coordinate. Your chances rise with every player you bring into voice chat. The Medic should be the first person in your voice channel, and there must be exactly one: the Medic pulls the team out of trouble more than anyone.
General tips
- If a SWAT, Sharpshooter, Demolitionist or anyone who can stun a large Zed without aggro is on your line, let them do it before you start shooting.
- If an aggroed Fleshpound runs at you, pull out the knife and try to parry its hit, preferably mid-jump. You push away from it, lose minimal HP and it drops aggro. Bosses work the same way.
- Reload when one round is left in the magazine: lower is better, but not zero. This noticeably raises DPS.
- Animations can be skipped. A Medic emptied the magazine and a teammate is dying: switch weapons or press push (V by default) to cancel the reload. A Doomstick with fast reload takes about 5 seconds, but when the counter shows 4, push and shoot at once: it saves about a second.
- Do not pick duplicate perks: why a second Gunslinger when the team has no Commando?
- Shooting crouched or from the shoulder lowers spread and recoil, which is why SWATs crab-walk.
- Support and Demolitionist, move as far from the trader as possible; otherwise teammates cannot take ammo from you during shopping.
- With fewer than 4 players do not stand still; keep moving. Holding a position works from 4 players, one of whom must be a Medic and preferably one a Firebug.
- Do not be shy to ask for dosh when you cannot afford a weapon or ammo, but state the amount. Ammo beats upgrading or buying a weapon: two nearly empty guns at the start of a wave is bad.
- Do not buy armor every wave, especially with a Medic: 300 dosh wasted at round start.
- King Fleshpound fires from the chest: you must crouch, and if you are even slightly taller than its line you die. Against Matriarch, after the shield destroy the cannon on her left arm first, then finish her. When bosses summon minions, kill the minions first: they are not infinite.
- Try weapons you have not used, at least two solo games with each; SomeTestMap works for theory.
Resistances and weaknesses
Scrake resists explosives and is weak to bullets, but if an explosive projectile does not detonate (impact on contact) the damage is huge, up to x4 to the head. Fleshpound is the opposite: resists bullets, weak to explosions. Bosses have almost no weaknesses and resist nearly every damage type, though you will hardly feel it.
Berserker
A tank that can hold one direction for a long time; a Scrake nightmare and a thorn for the Fleshpound. Great only with a pocket healer and pointless without a Medic. Passives: resistances (10% at level 25) and self-heal; Dar robots can still grab you. Grenades do slightly more than a 9mm pistol: use them on a surrounded teammate or under a Husk or Bloat.
| Level | Choices | Author's pick |
|---|---|---|
| 5 | Dreadnought (200 HP) / Skirmisher (+20% speed without sprint, +25% sprint, 1 HP/s) | Dreadnought; retreat at 50 HP |
| 10 | Vampire (3 HP per kill with perk weapon, +20% attack speed) / Butcher (+20% damage, +20% attack speed) | Butcher: 3 HP is a drop in the sea |
| 15 | Resistance (15% to all, +15% to poison and siren screams) / Parry (30% less damage from the blocked hit, +5% speed, +35% damage for 8 s) | Parry if you can parry; Resistance with a Sharpshooter and Demo behind you |
| 20 | Smash (+50% heavy attack, +25% head damage, +200% stumble chance) / Massacre (+30% light attack, +5% speed) | Both useful: Massacre with the katana, Smash with the gloves from about wave 5 |
| 25 | Rage (instantly restores 50% HP, scares off) / Spartan (move and attack in real time during Zed Time) | Spartan with a pocket healer |
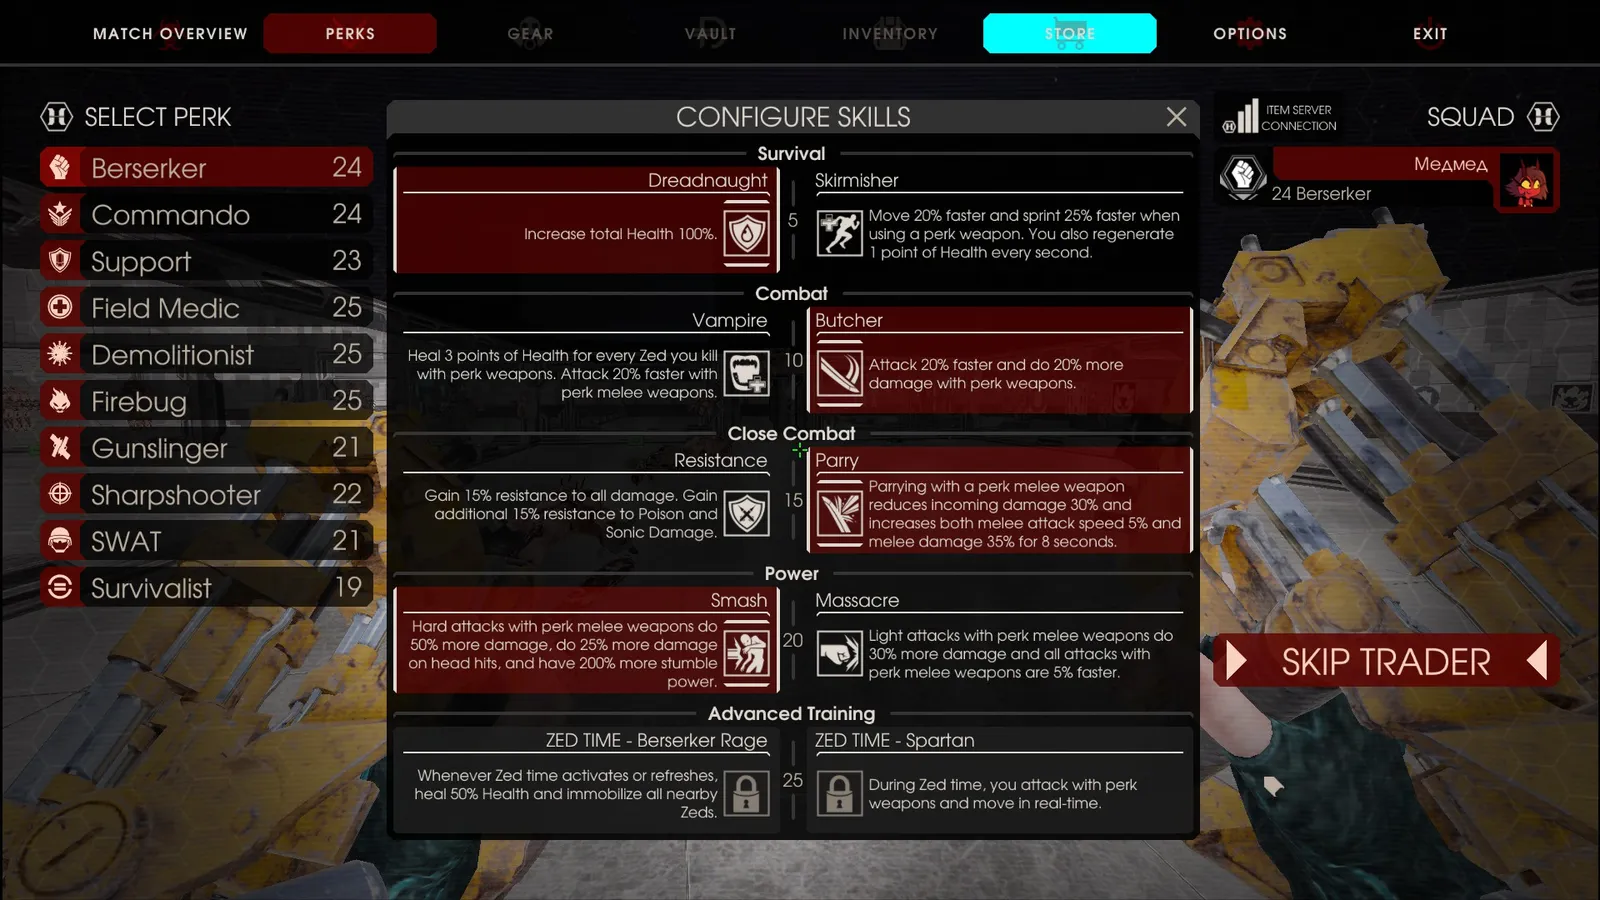 The author's current Berserker build, swapping Massacre for Smash near wave 5.
Commando
Role: extend Zed Time (yet often stuck reloading during it). During Zed Time keep killing any way you can, even with a second gun, aiming at small Zeds' heads. Ideally you should not be the first to damage Scrakes and Fleshpounds; leave that to SWAT, Demolitionist, Sharpshooter and Gunslinger. Your highest-DPS guns are SCAR and FN FAL. Against large Zeds this is the most disadvantaged class, but it makes kills comfortable for the others; solo it cannot handle two or more Fleshpounds.
Passive: 50% recoil reduction at level 25, which removes both camera climb and spread needed to pin a Scrake. Grenade: scatters crowds (at your feet without armor it will probably kill you). Best test result on a Fleshpound was 558 per grenade at its feet (HP 5310 on 6-player HoE), so five grenades take about half, but the M16 underbarrel is better.
| Level | Choices | Pick |
|---|---|---|
| 5 | Reload / Extended Magazines (+50%) | Reload (test: 65 vs 66 seconds to empty a full SCAR load; reload only matters on machine guns) |
| 10 | Fallback (+85% pistol and knife damage, +50% weapon switch) / Impact Rounds (+150% stumble) | Fallback: stumble lengthens kills |
| 15 | Fortitude (125 HP and armor) / Readiness (+20% max ammo) | Readiness |
| 20 | Expansive Rounds (+30% damage) / Double Magazines (x2 mags) | Damage: a Scrake dies to 14 SCAR bullets instead of 18 |
| 25 | Tactician (real-time reload, 2x swap) / Machinegunner (+3% damage, 3x fire rate) | Machinegunner |
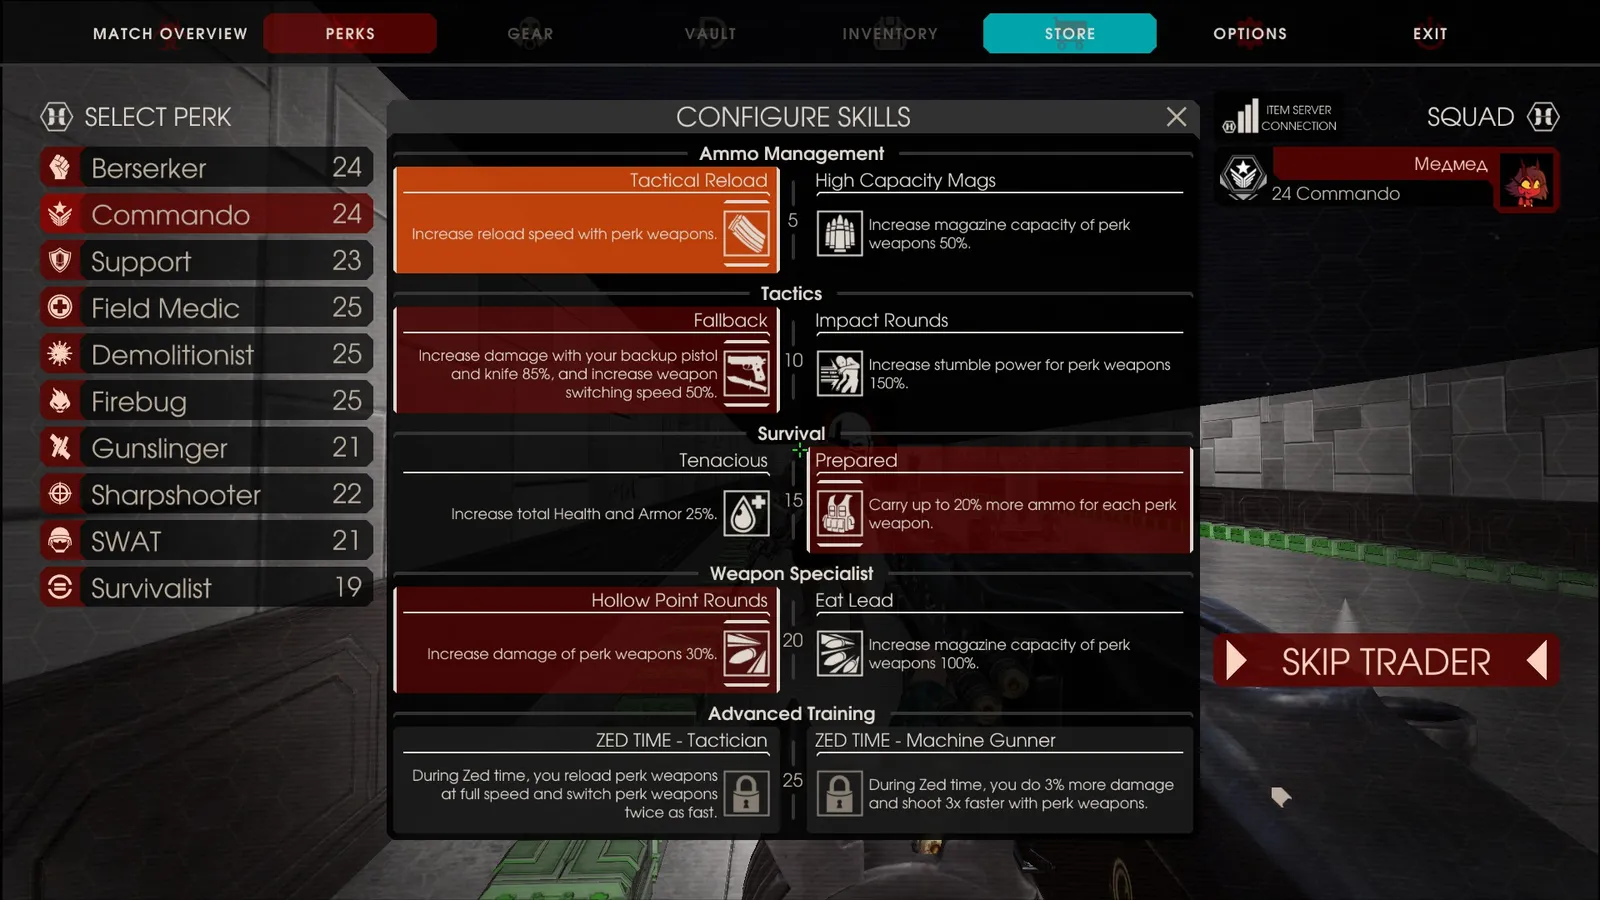 Final Commando build.
Support
Huge damage and excellent crowd control. First rule: get far away from the trader and shop calmly while the team takes your ammo. You can give an extra ammo refill by picking up a friend's weapon. In theory it can survive 3 or more Fleshpounds. The passive is welding and repairing doors: better break doors at the start and weld only when the whole team begs you, and welding is for map objectives. Grenades are close to the Commando's, a little more or less damage on a Fleshpound.
| Level | Choices | Pick |
|---|---|---|
| 5 | Extended Magazines (not all shotguns) / Reload (all shotguns) | Reload; magazines for a single-line map with AA-12 and Shotgun |
| 10 | Fortitude (150 HP, about 10% resistance) / Salvo (+30% damage) | Salvo: without it a Scrake does not die to one shot |
| 15 | Penetration (+10% damage) / Tight Choke (spread -50%) | Tight Choke |
| 20 | Ammo Pack (+10% resupply for teammates, 30% total, 20% armor, +20% your max ammo) / Stun Rounds (+150% stumble) | Ammo Pack; Stun Rounds only with Ballistic Bouncer on Suicidal |
| 25 | More penetration and real-time reload / Real-time fire barrage | Left with Doomstick; right with AA-12 and Shotgun |
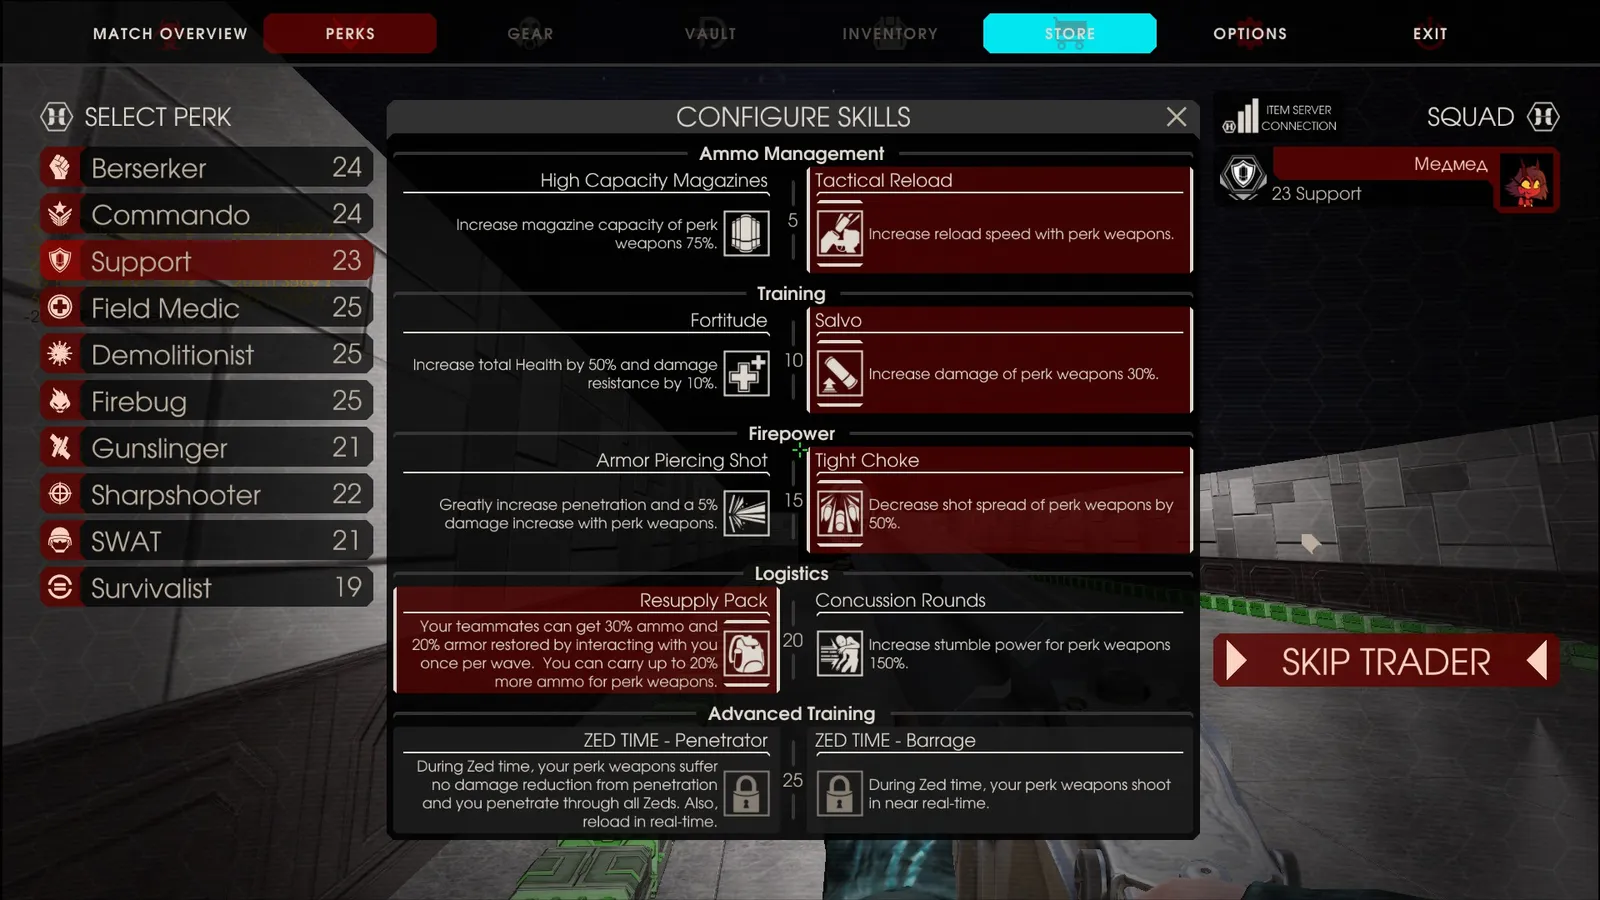 Final Support build.
Field Medic
Main duty: heal, watch the team's HP and where the Fleshpounds are, not shoot; keep Tab pressed to see everyone's health. Do not use Battle Surgeon except when leveling solo. The most unkillable class in terms of resistances, though few use them. Passive: 50% resistance to Bloat bile at level 25. Grenades (must be 5/5 before every wave) heal by splash; guard them, since the Berserker loves them. The first wave is the hardest: the pistol has a very long cooldown and the syringe on Q also heals teammates. Try to hit the team with syringes as they run to the trader: it buffs everyone. Medic weapons are weak against their equivalents; if you want to shoot, play SWAT. The team has one Medic: either impact or healing.
| Level | Choices | Pick |
|---|---|---|
| 5 | Symbiotic Health (+25% HP, healing returns 6% to you) / Resilience (+1% resistance per HP lost, up to 30%) | Resilience; the author later considered Symbiotic for 6 players (update from 16.02.2024) |
| 10 | Adrenaline Shot / Combatant Doctor | Adrenaline Shot: boosts a teammate when a Fleshpound rushes |
| 15 | Focus Injection / Acidic Rounds | Left branch |
| 20 | Coagulant Booster / Battle Surgeon | Left branch |
| 25 | Airborne Agent / Zedative | Left branch |
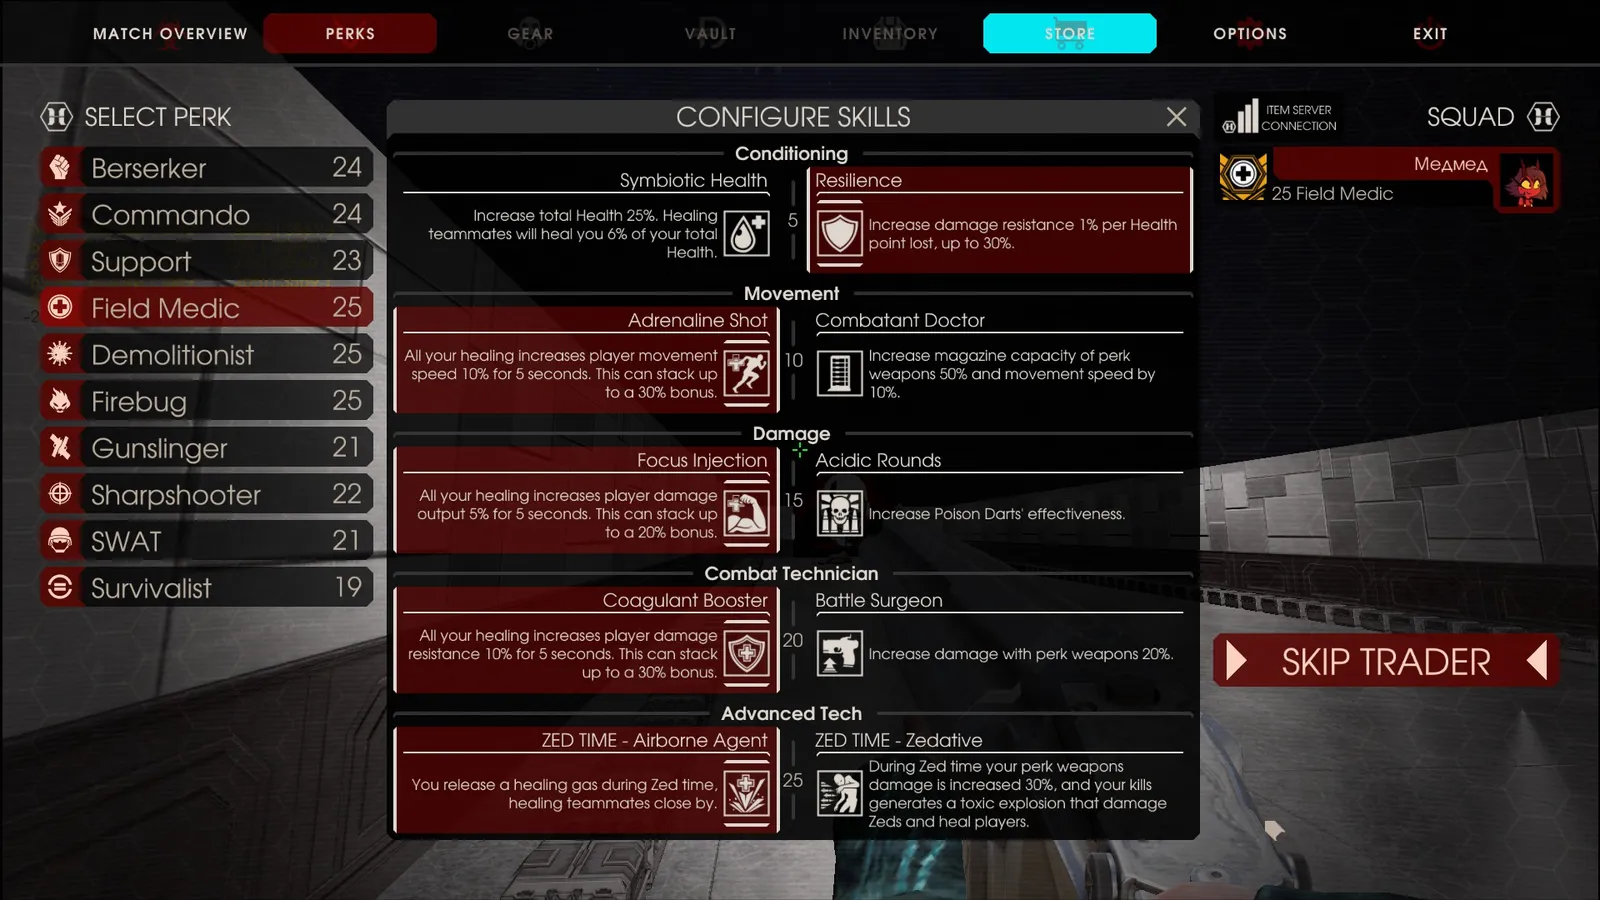 Medic skills screen with the chosen skills highlighted in red.
Demolitionist
Blows up everything around, including itself when a Slasher is in your face and the grenade goes off on it. Against Scrake: if you play the RPG, never shoot it at small Zeds; get right up to a Scrake and give it a rocket in the face without detonation (impact): huge damage but not a one-shot. You may try pistol headshots (8 bullets), then an impact to the head. Barely survives solo, but in a team it clears small Zeds well (worse than the Firebug) and large ones too; indispensable on the boss. Do not stand by the trader. You can weld a door, but do not finish welding while it is being attacked: when broken it explodes and hurts the attackers. Reactive armor: if it triggers, you are almost certainly dead. Grenades always stun a Scrake on a direct hit; a Fleshpound is stunned only without aggro.
| Level | Choices | Pick |
|---|---|---|
| 5 | Bombardier (+25% damage, applies to impact) / Shock Trooper (faster reload, +10% knockdown) | Damage: with reload a Fleshpound needs 4 rockets instead of 3 |
| 10 | Heavy damage rounds (+25% direct hit damage) / Extra ammo (+10 max ammo, not C4) | Damage |
| 15 | Sonic-proof rounds (projectiles no longer vanish in a siren scream) / Fragmentation rounds (+50% blast radius) | Fragmentation |
| 20 | Armor Piercing (+50% to weak points) / Concussion rounds (+50% stun, knockdown, stumble) | Left for reliably killing Scrakes; right makes a Scrake always fall but makes an RPG one-shot harder. Almost no effect on a Fleshpound: chest hit 371+1629 with left, 289+1672 with right (impact plus blast) |
| 25 | World Destroyer (nuclear blast and poison in Zed Time) / Mad Bomber (near real-time fire and reload, +25% radius, no self damage) | World Destroyer lets you two-shot a Fleshpound; with a good Commando take reload (update 03.08.2024) |
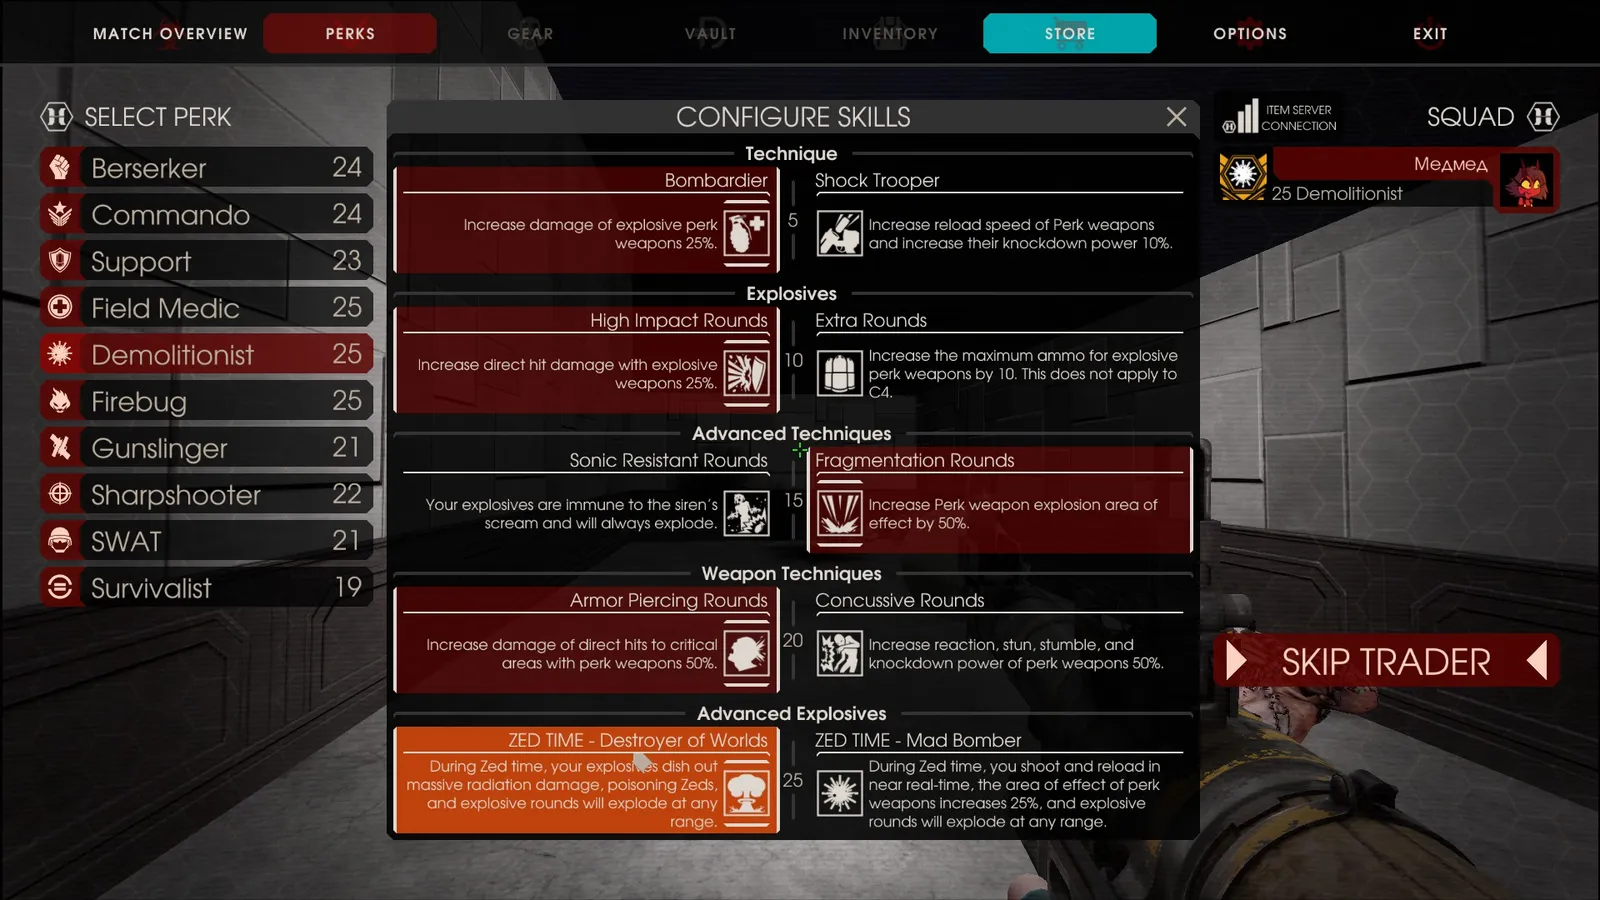 Final Demolitionist build.
Firebug
The damage dealer: a good Firebug tops kills and damage and can lead the runner-up by 2-3 times. The easiest perk to learn, with the only weakness being setting yourself on fire until level 10. The weapons you buy matter more than anything. On wave 1 do not spam the flamethrower; damage with fire on the ground, which can kill over 100 enemies in the first wave.
| Level | Choices | Pick |
|---|---|---|
| 5 | Damage +35% / Large tanks (magazines x2, except Dragon's Breath and the single-shot flare gun) | Damage |
| 10 | Barbecue (burn +150%, damage grows over time) / Fire on the ground (blue fire, x3 damage, -30% Zed speed) | Ground fire |
| 15 | Napalm (burning Zeds ignite others, +150% duration) / Zed Shrapnel (30% chance to explode on death, stuns or kills) | Zed Shrapnel |
| 20 | Heat wave (stumble close Zeds) / Firestorm (+range, +20% ground fire duration) | Firestorm: pushing a Fleshpound while shooting point blank can save you in a corner |
| 25 | Pyromaniac (real-time, infinite fire in Zed Time) / Inferno (fire spreads to nearby Zeds) | Pyromaniac; almost nobody uses Inferno |
Note: left-hand skills at levels 10 and 15 with Zed Time and infinite Spitfire lose to the right-hand ones without Zed Time.
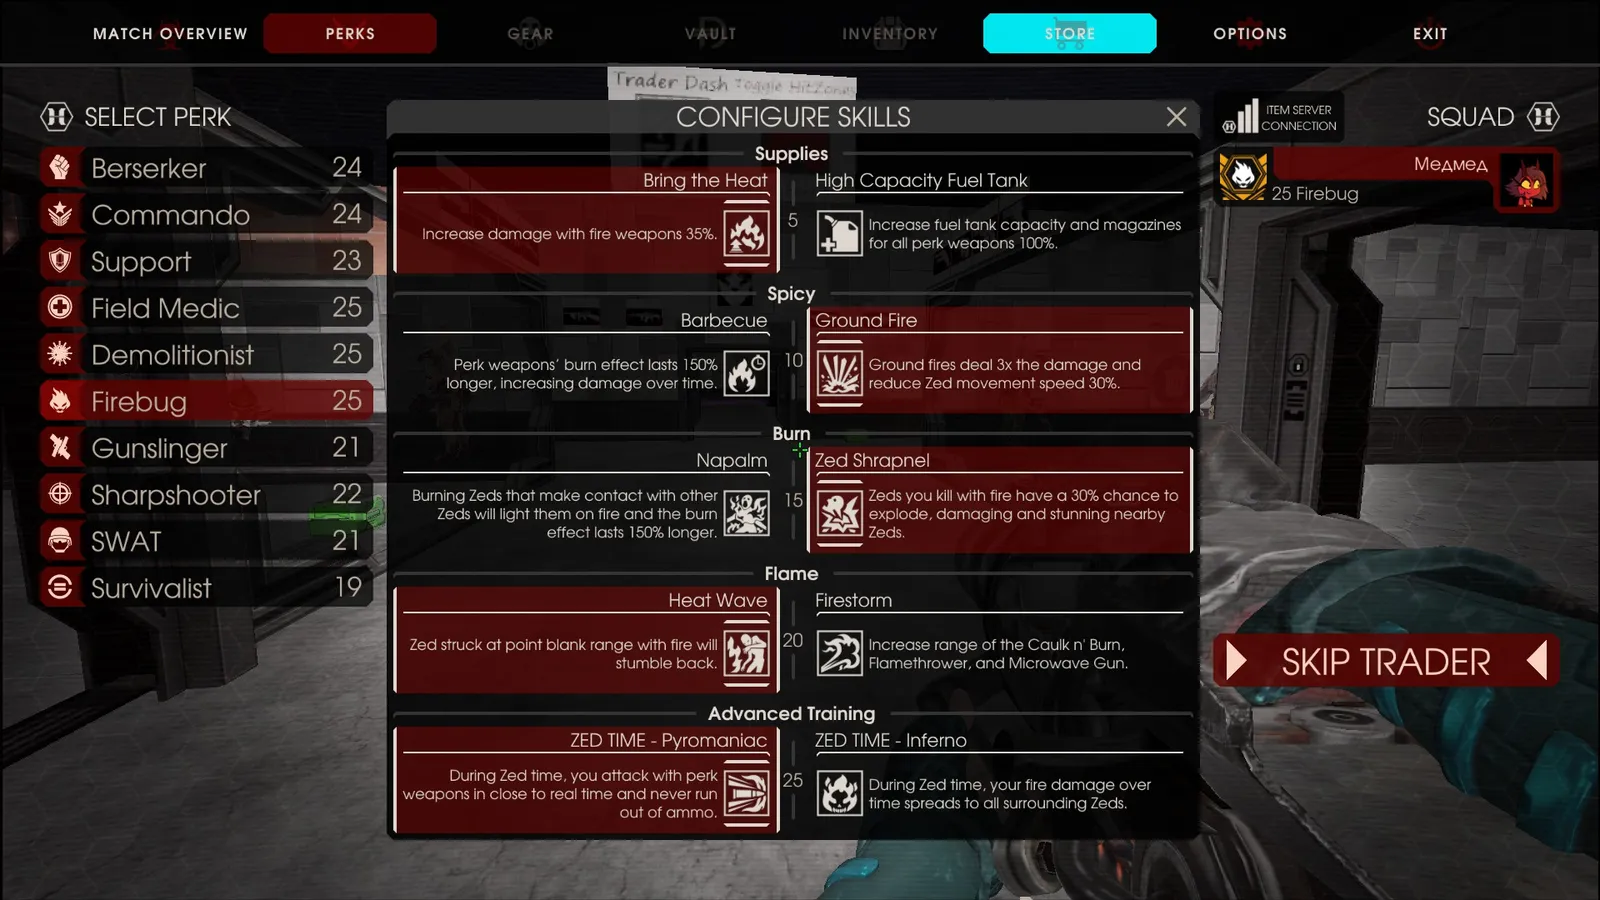 Final Firebug build.
Gunslinger
The most universal and most skill-dependent perk: it can survive anything solo, a nightmare for the Fleshpound, and a Scrake would rather kill itself than you. Fire from the hip; the dual-pistol scopes are poor. Grenades always stun a Scrake when thrown correctly.
| Level | Choices | Pick |
|---|---|---|
| 5 | Shoulder (+7.5% damage, no sway or slowdown) / Hip (less recoil from the hip, +5% speed, +50% weapon swap) | Hip, with the arcade crosshair |
| 10 | Bring It On (+10% per headshot up to +50%, about 5 s) / Bone Breaker (+20% damage, +30% to arms and legs) | Bring It On |
| 15 | Penetration / Reload | Reload; Penetration (up to 6 small Zeds) if you are lucky |
| 20 | Skull Crusher (-30% Zed speed on headshot) / Knockdown (stun and knock on leg shots, stumble on chest shots) | Skull Crusher, though Knockdown is easier if you are not perfect |
| 25 | Lead Storm (no ammo use in Zed Time) / Rapid Fire (3x fire rate, real-time reload) | Rapid Fire |
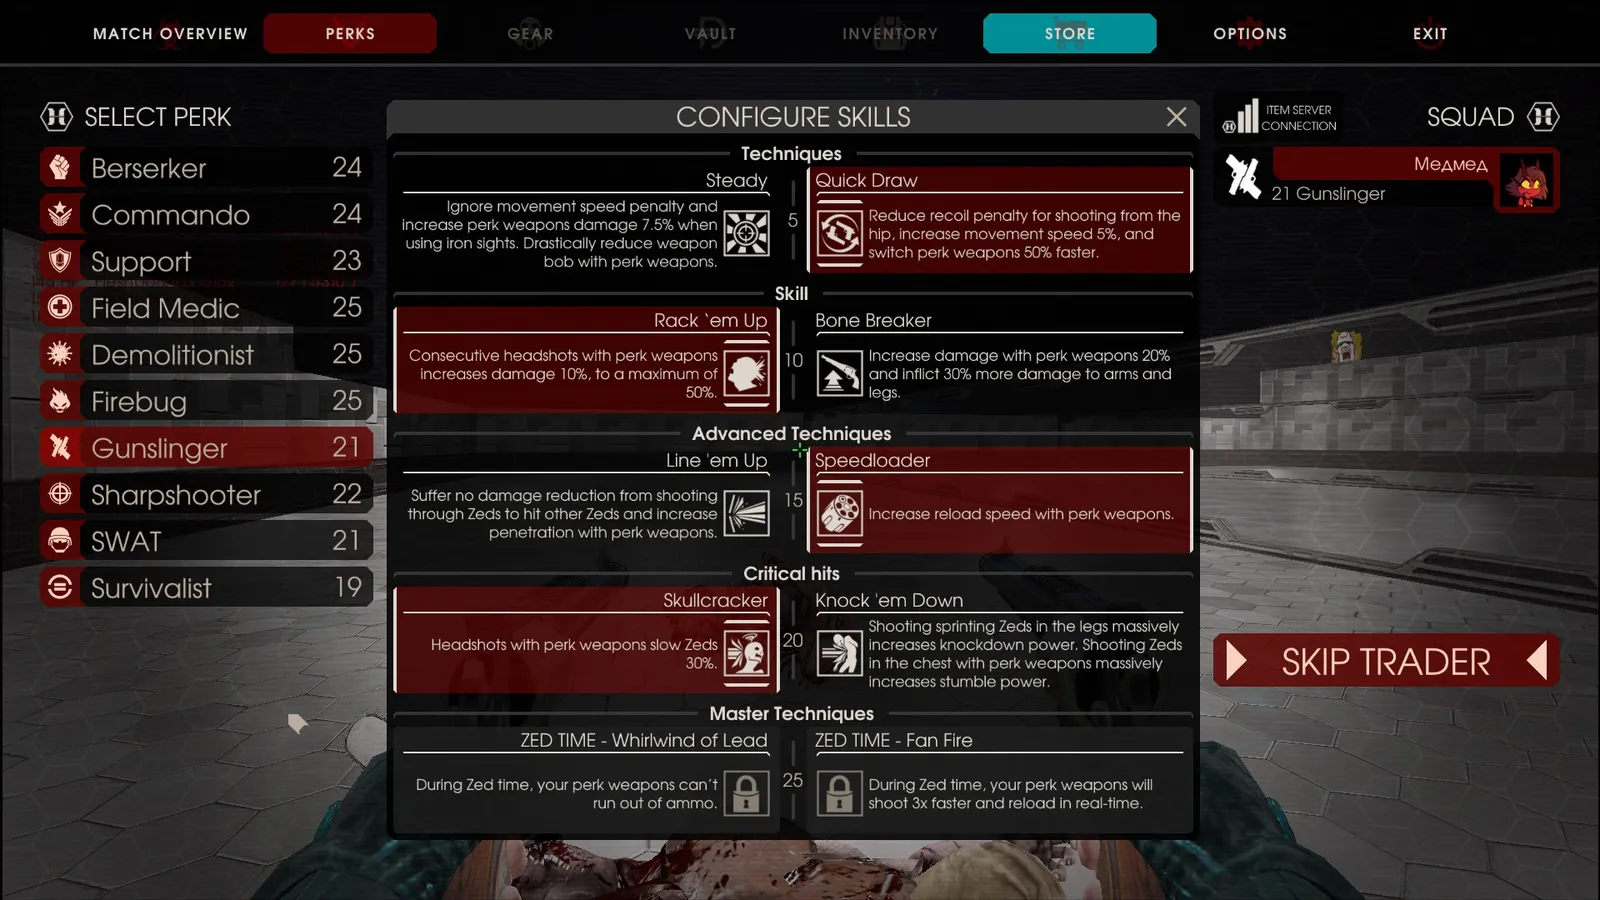 Final Gunslinger build.
Sharpshooter
A timeless classic, slightly behind the Demolitionist against large Zeds. A babysitter helps while you sneak up to a Fleshpound and drop a grenade under it; it kills the Fleshpound before it roars. Pick it only in a full team on defense. Aimed fire is worse than the Gunslinger's; the author shoots from the hip. The grenade freezes: do not aggro a Scrake or Fleshpound when a Sharpshooter is on your line, let them throw it.
| Level | Choices | Pick |
|---|---|---|
| 5 | Sniper (+25% damage when stationary) / Marksman (+25% fire rate, +10% movement) | Sniper; Marksman only while leveling solo |
| 10 | Steadiness (+30% damage, +50% speed, +20% reload while crouched) / Ballistic Shock (x2 stun chance) | Steadiness: stun works on the crossbow and bow, and a Fleshpound is stunned once |
| 15 | Bring It On (+10% per headshot up to 50%) / Reload | Reload for single-shot weapons (carbines, M99, rail gun), multiplier for magazine rifles (M14, FN FAL); update 12.02.2024 |
| 20 | Eagle Eye (-10% recoil, +10% head damage with scope) / Always Ready (+25% max ammo, +1 grenade) | Always Ready: scopes are poor; the only decent one is on the Storm Cannon (DLC) |
| 25 | Assassin (5% Zed Time chance on headshot, +35% head damage) / Ranger (5% Zed Time chance, headshots stun) | Damage |
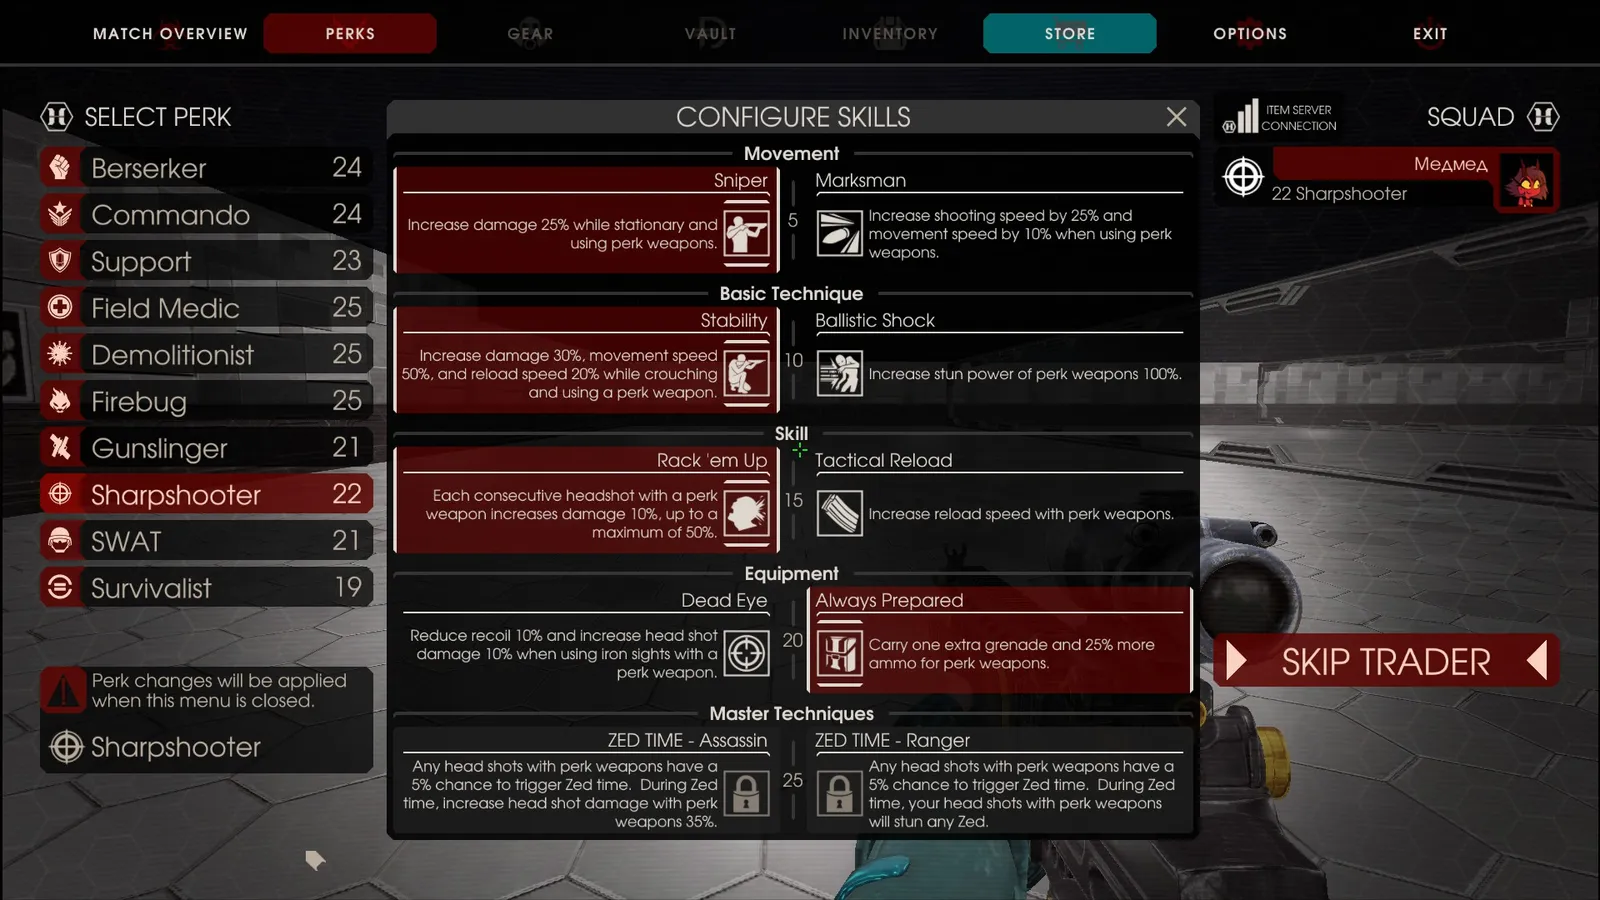 Final Sharpshooter build.
SWAT
The author's best class and the easiest: it clears a lane fast and leaves crab-walking. It can dodge 2-3 Fleshpound attacks while Demolitionist and Sharpshooter land a rocket and a shot. Ammo is poor: without Support it runs out slightly after mid-wave. Ideal against Scrakes and a friend of the Commando. Bullet resistance hardly matters (only Patriarch and Hans shoot bullets). The grenade stuns and saves you when surrounded, saving 50 HP or more.
| Level | Choices | Pick |
|---|---|---|
| 5 | Armor (damage goes to armor, cannot be grabbed, start with 50% armor) / Movement (speed, no penalty when shooting from the shoulder or crouched) | Movement, especially if you must back off a Fleshpound |
| 10 | Melee (x2 knife and pistol damage, start with 2 pistols) / Reload | For the economy trick take the first three left-hand skills; then Reload |
| 15 | Suppressing Rounds (+100% stumble) / Unload (+30% max ammo) | Unload |
| 20 | More Armor (+50% max armor) / Cripple (-30% target speed) | Cripple |
| 25 | Battering Ram (faster in Zed Time, stuns and knocks down all) / Fast Assault (no ammo use, real time, +100% stumble) | Fast Assault |
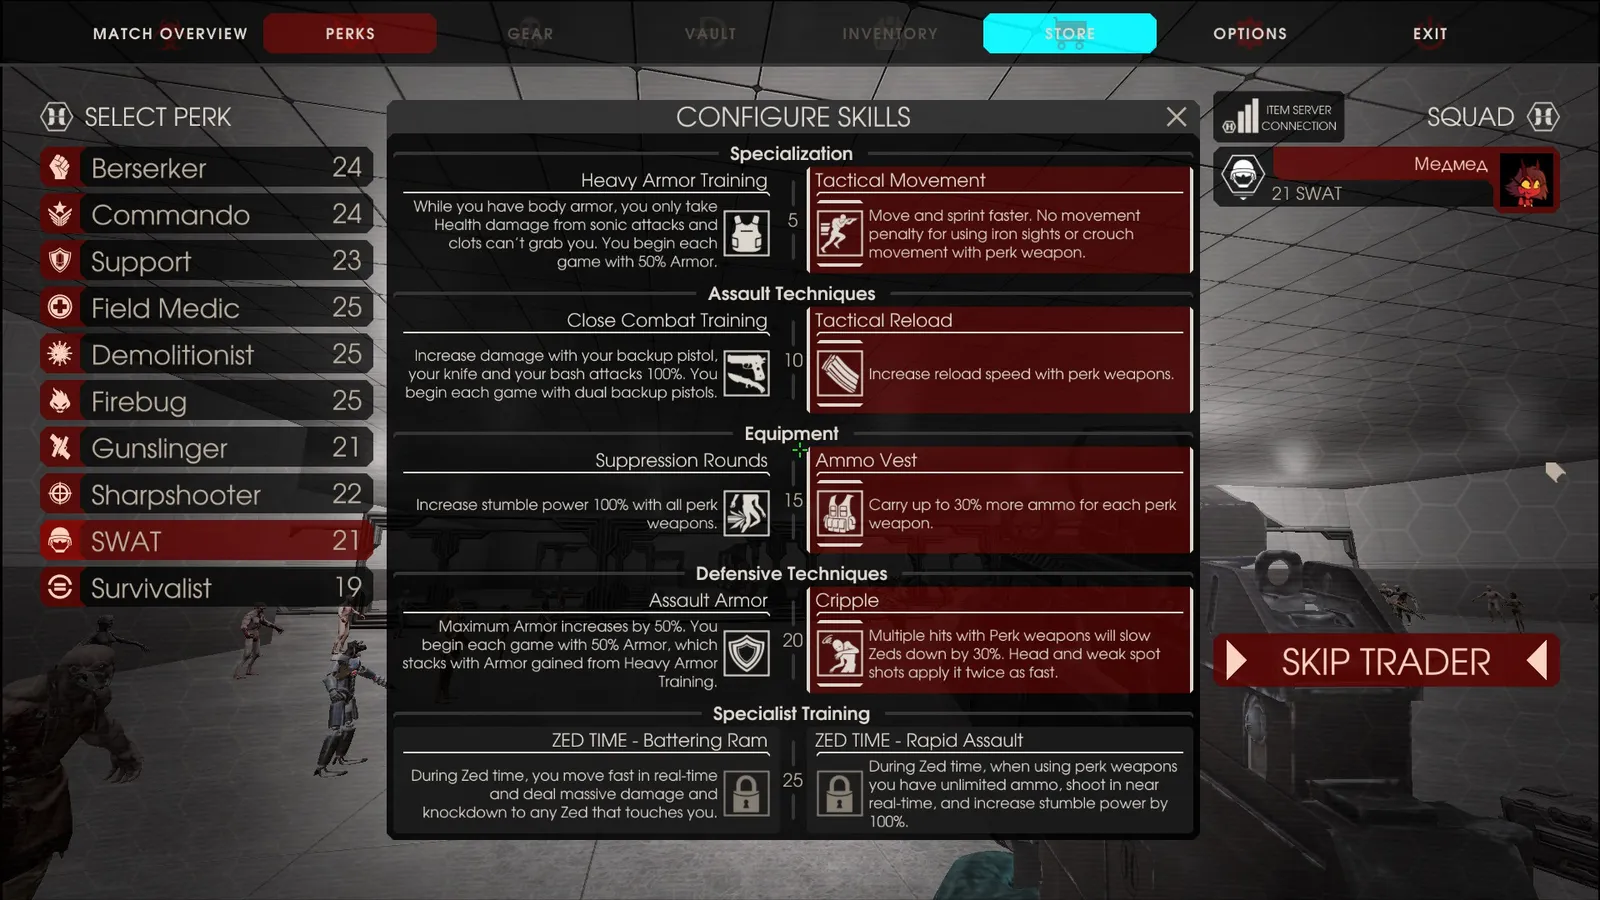 Final SWAT build.
Conclusion
There is no Survivalist section because the author barely played it. On vanilla HoE with 6 players the game is always about holding a position. Firebug with Demolitionist kills any number of Zeds; without them Commando and SWAT do slightly worse. If a Scrake arrives on wave 1, leave it for last, take the Support's backpack and kill it with the team. A raging Fleshpound can be frozen by Sharpshooter grenades and stunned by SWAT flashbangs, but it takes at least 4 grenades per Fleshpound. The author wrote the original in one 20-hour session and spent 3 more hours polishing it.
FAQ
- Which level 5 skill should a Berserker take?
- The author recommends Dreadnought (200 HP instead of 100). Skirmisher gives only 1 HP per second of regeneration plus a little speed.
- How many Medics should a team have on Hell on Earth?
- One. Surviving HoE without a Medic is very hard, but a second Medic is not needed.
- Fortitude or more ammo for Commando at level 15?
- The author prefers the ammo skill (+20% max ammo): 125 HP and armor do not pay off, and one weapon rarely lasts a whole wave.
