
KF2 Gunslinger In-Depth Guide: Skills, Loadouts, Shot Counts
This guide treats the Gunslinger as the all-round headshot specialist of Killing Floor 2: fast, deadly against big zeds and capable of the highest damage per second during Zed Time. It covers the role, skill choices, loadouts, kill-count tables and advanced techniques, with credit to community players Simple Rabbit and IceBeam. For other takes see the BO1KS Gunslinger guide and Dodo's Gunslinger perk guide.
Part 1 - The role of the Gunslinger
- Big zed hunter. Your top priority is the large zeds (Scrake, Quarter Pound, Fleshpound). Together with the Sharpshooter you should start the big zed takedowns.
- Destroyer of small and medium zeds. You are pretty good at killing everything.
- Laning. A Gunslinger can hold a lane alone, even when several big zeds appear, and keeps the aggro so their heads face you. Pair with precision perks such as Commando, SWAT, Sharpshooter or Support; avoid laning with AoE perks like Berserker, Firebug and Demolitionist.
- Memorise shot counts for your usual arsenal (see Part 4).
- Use Zed Time. The Gunslinger is the only perk with the maximum possible DPS during Zed Time, which is what makes him necessary on higher difficulties.
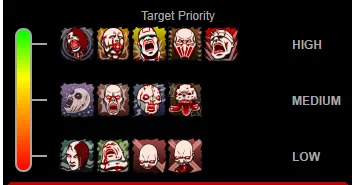 Target priority suggested by Tripwire. Deal with the big zeds first, but watch the others that can interrupt your takedown.
Part 2 - Skill choices
From wave 1 to wave 10 the skill tree usually stays the same.
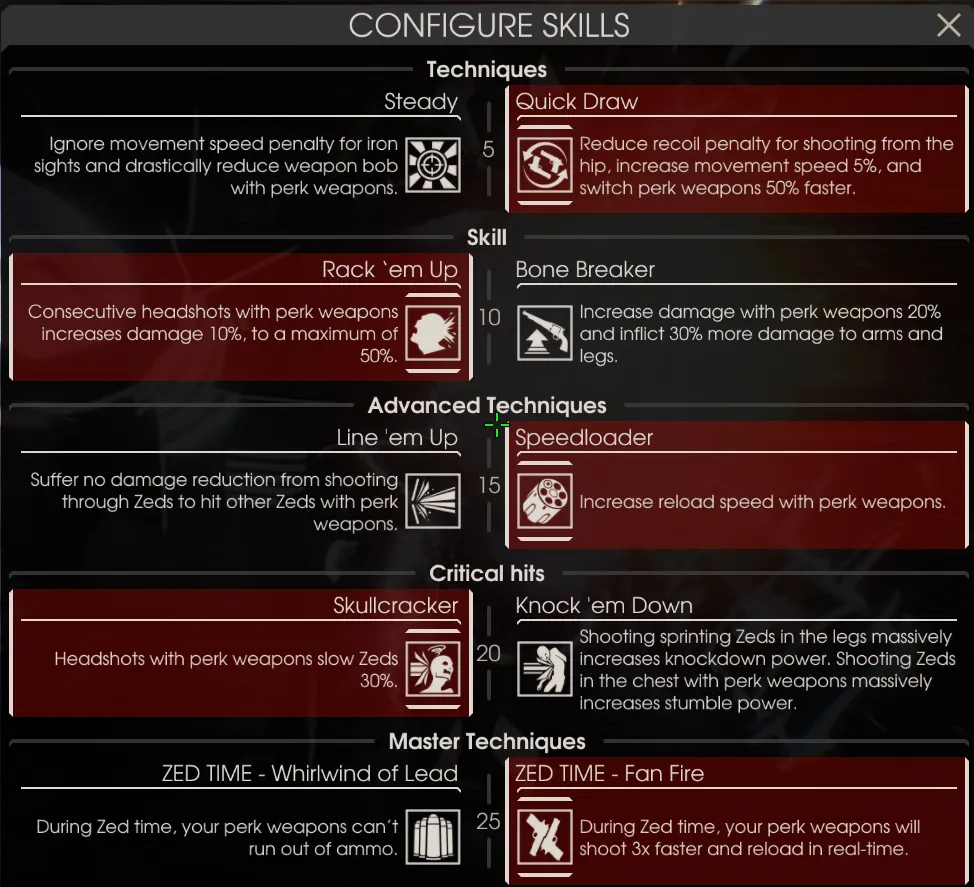 The full recommended skill setup.
Level 5: Steady Aim vs Quick Draw
 Steady Aim or Quick Draw.
This is a long-running argument. Statistically Quick Draw gives more: weapon swap speed and movement speed. Steady Aim greatly reduces bullet spread. The guide quotes Simple Rabbit's analysis:
- Hip-fire has a recoil penalty of 1.75, the Gunslinger passive reduces recoil by 0.75x and Quick Draw by another 0.5x, so hip-firing with Quick Draw ends up at about 0.66x recoil, while ADS is 1x times the passive 0.75x. Ironically ADS can raise recoil relative to hip-fire.
- Quick Draw also doubles swap speed and adds 5 percent movement speed.
- Recoil and bullet spread are independent. Sharpshooter guns have a spread modifier of 0.007; Gunslinger guns are 0.015 for 1911s and revolvers and 0.010 for AF2011 or Deagles. ADS halves random spread and crouching adds another 0.75x.
- So Steady Aim is strictly worse on paper, but it suits players who prefer accuracy above all, especially with revolvers.
Summary: Quick Draw means about 34 percent recoil reduction when hip-firing, double swap speed and 5 percent extra movement. Steady Aim means a 50 percent cut in random spread, 25 percent more while crouching. The author mostly hip-fires and prefers Quick Draw.
Level 10: Rack em Up vs Bone Breaker
 Rack em Up is the core skill.
Rack em Up (ReU) is the core skill that gives the Gunslinger his skill ceiling, and it is almost always better than Bone Breaker. The exception is the boss wave: because boss aggro is not always on you, consistent headshots against Dr. Hans Volter and the Patriarch are hard, so Bone Breaker is smarter there. For King Fleshpound and Abomination keep Rack em Up since their heads are big.
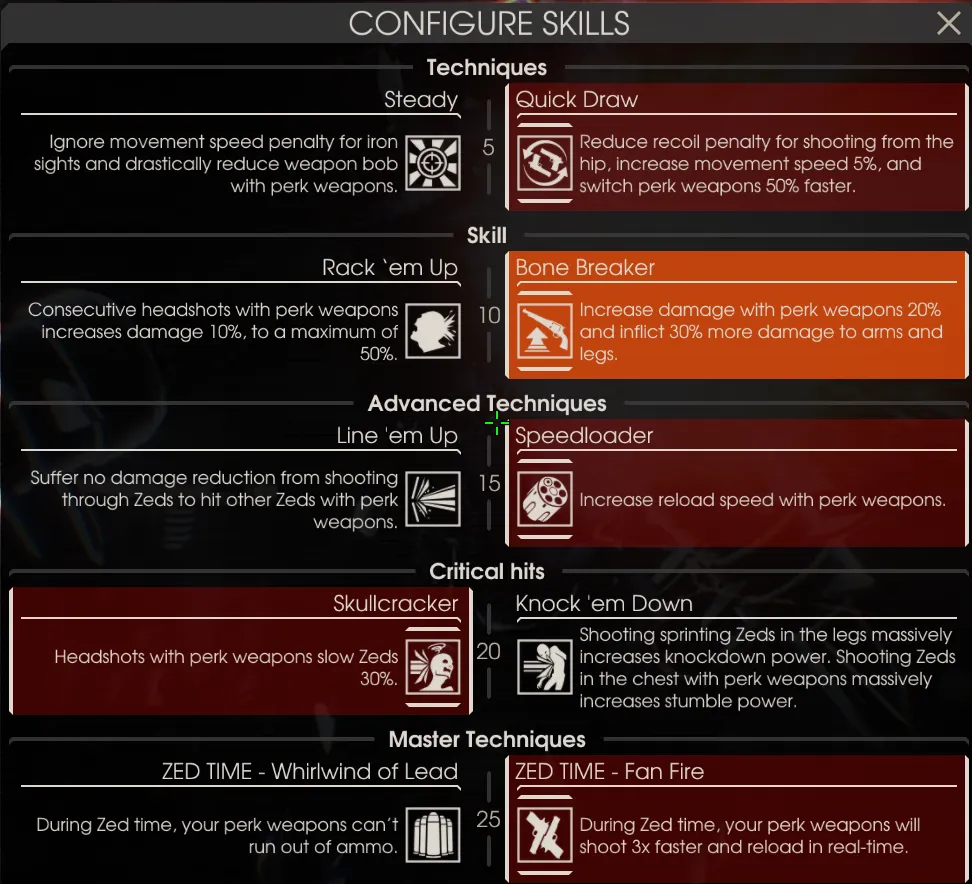 Changing the level 10 skill before the boss wave.
Finding out the boss
The boss is determined before the match starts. In a lobby or solo game open the console (the key to the left of Enter) and type getall KFGameReplicationInfo BossIndex.
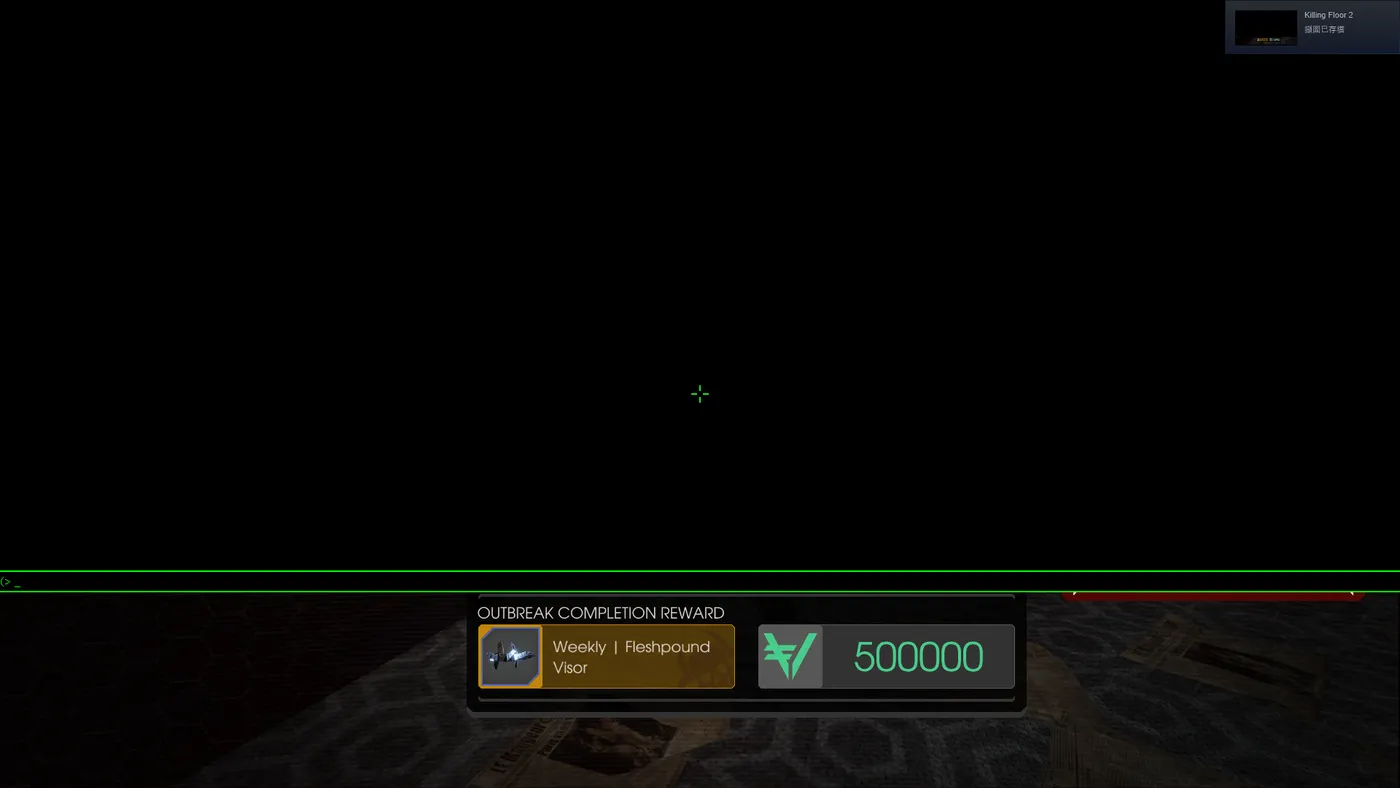 Step 2: open the console.
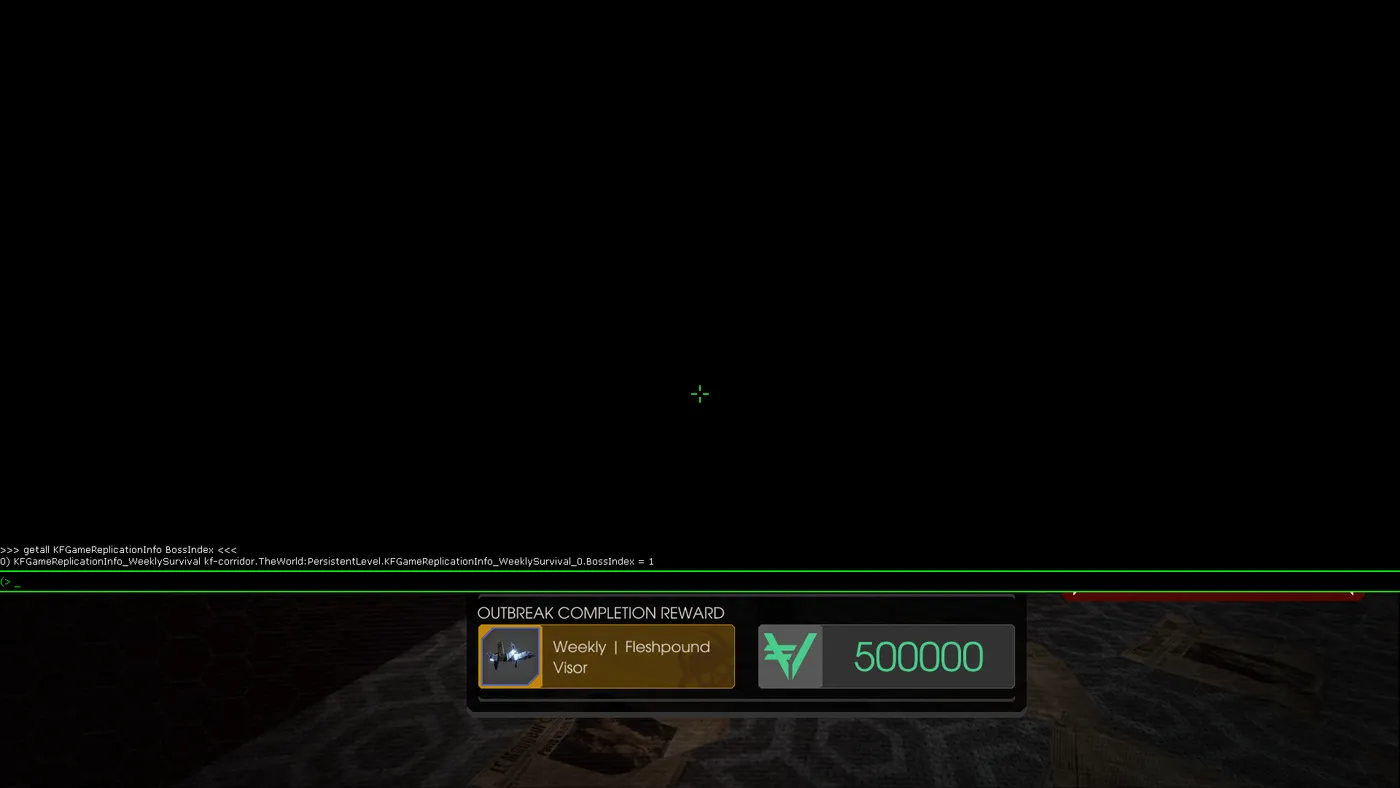 Step 3: type the command and read the index.
| BossIndex | Boss |
|---|---|
| 0 | Dr. Hans Volter |
| 1 | Patriarch |
| 2 | King Fleshpound |
| 3 | Abomination |
| 4 | Matriarch |
Level 15: Line em Up vs Tactical Reload
 Level 15 skills.
Tactical Reload greatly improves the reload speed of Gunslinger weapons and, together with reload cancelling, directly raises DPS. Note that a dry reload with dual M1911s, Desert Eagles and AF-2011s is much faster than reloading with rounds left in the gun.
Level 20: Skull Cracker vs Knock em Down
 Level 20 skills.
Skull Cracker is always preferred: headshots slow zeds down while also building ReU. During big zed takedowns they cannot even reach you, and with 20 or 25 percent movement speed (with Quick Draw) you can outrun even raged ones.
Level 25: Whirlwind of Lead vs Fan Fire
 Fan Fire is the signature skill.
 With Commando Zed Time refreshes the Gunslinger has the highest DPS of any perk and can exterminate any combination of big zeds. Use Whirlwind of Lead only on wave 1 when ammunition is a problem for a new Gunslinger. The author notes you can do a lot during the 18 seconds of Zed Time with Fan Fire active.
Part 3 - Loadouts
Many loadouts work. These three are favoured in a six-player Hell on Earth lobby.
- Dual M1911 (Tier 4) + Dual Desert Eagles (Tier 4) + single AF-2011 (not upgraded). Suggested by Simple Rabbit for the maximum DPS. Upgraded pistols are kept for big zeds, the single AF-2011 handles trash and medium zeds.
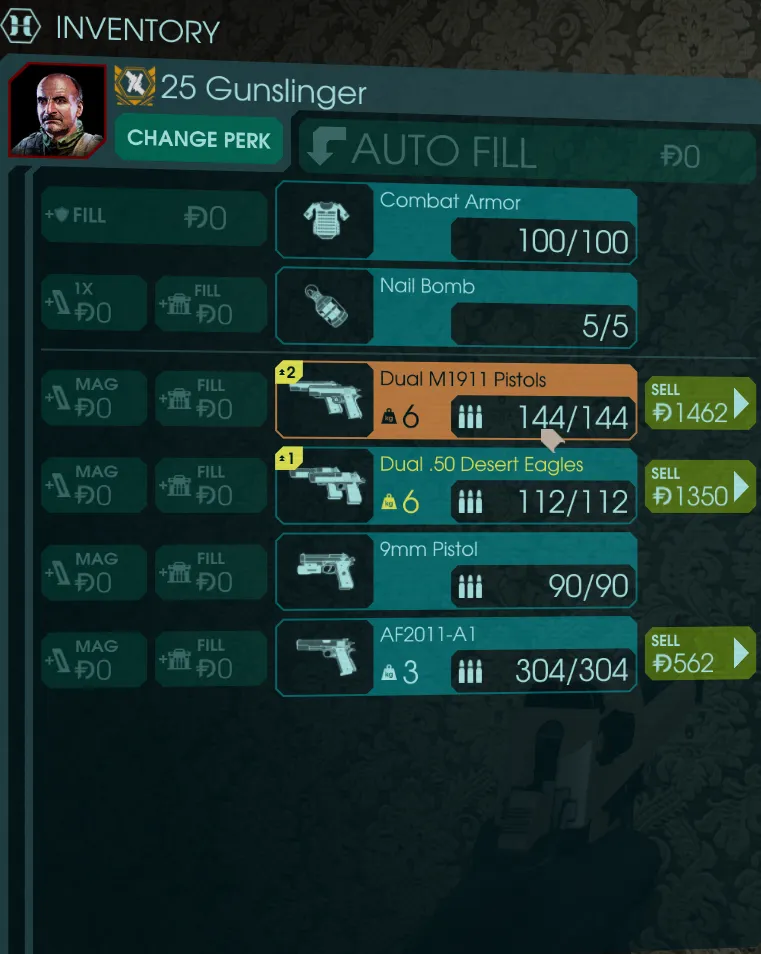 Loadout 1.
- SPX 464 + Dual Magnums + Dual Desert Eagles. Full big-zed specialisation, recommended when laning with a trash specialist like Commando or SWAT. The SPX covers medium to long range, but everything here is overkill for trash; the Deagles run out quickly because they serve as the trash weapon.
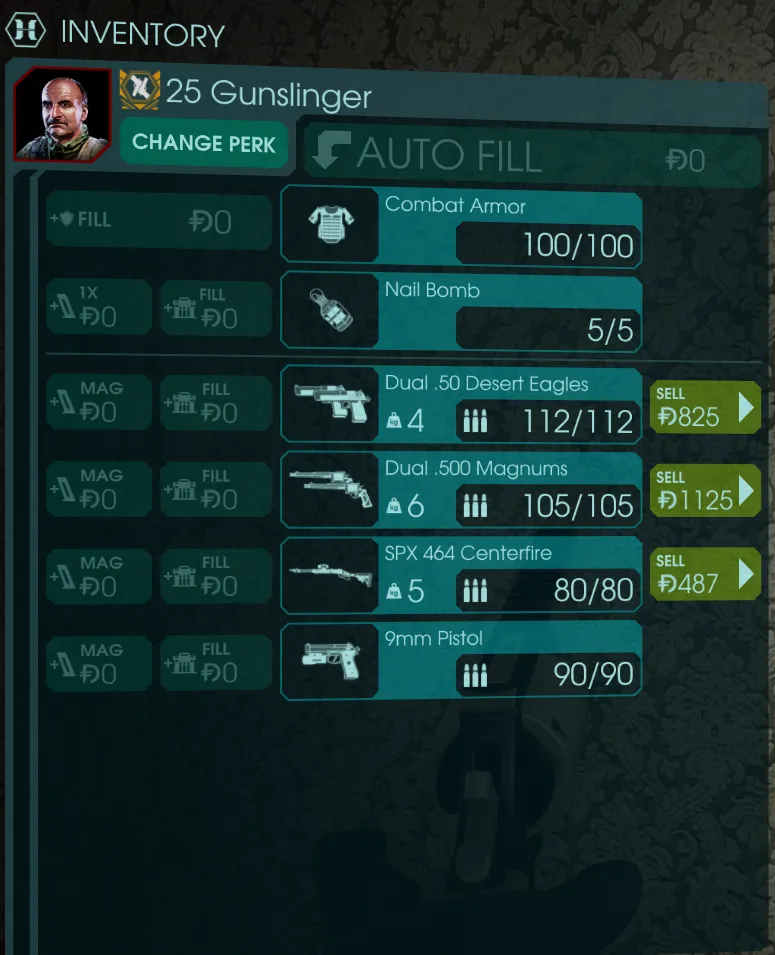 Loadout 2.
- Dual Magnums + Dual Desert Eagles + Dual M1911 + HM-TECH 101. Probably the most complete loadout, enough to solo a lane. Magnums for big zeds, Deagles for medium and big, M1911 and the 101 for trash, and the 101 also heals teammates. Upgrade the 101 and the M1911 once: this adds about 70 and 40 percent damage without more weight.
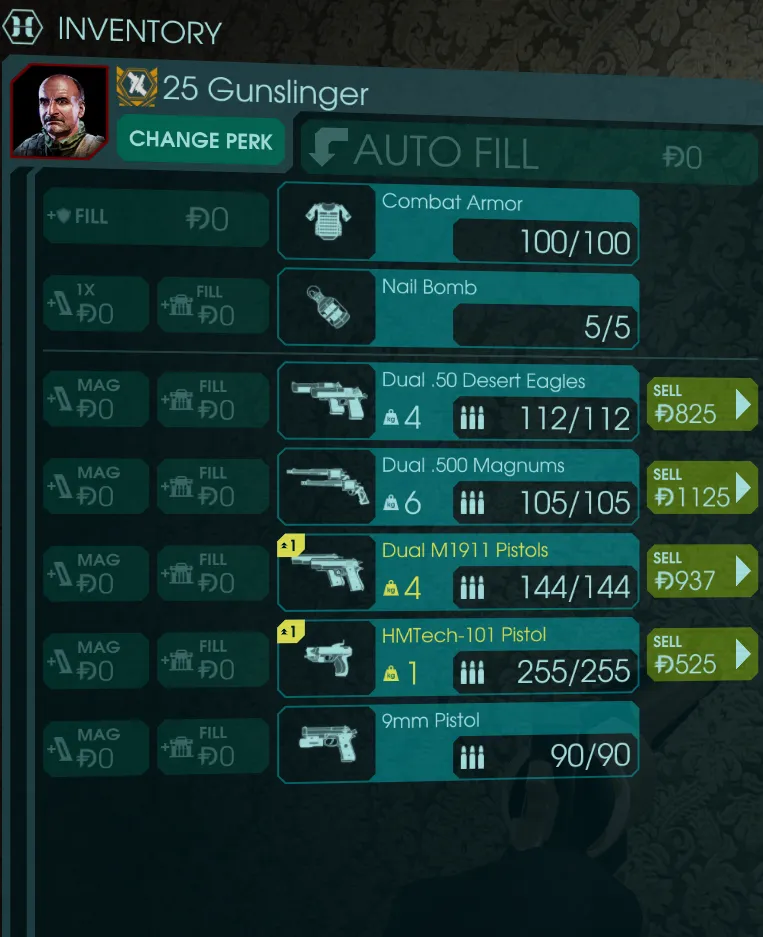 Loadout 3.
Points to note:
- Dual Magnums can be replaced by dual AF-2011s, but only if you can manage their horizontal recoil.
- Dual 1858 revolvers are a good starting weapon and can stay in your loadout later.
- IceBeam suggested extra builds:
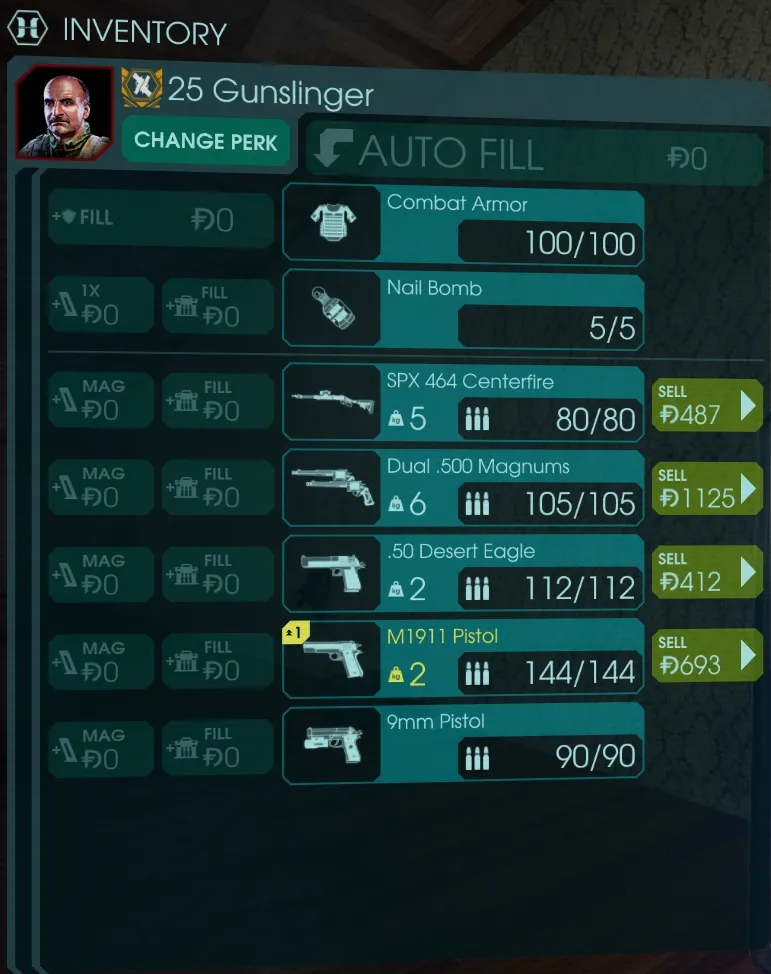 SPX + Dual .500 Magnums / Dual AF-2011s + Desert Eagle + 1911: SPX meta with the richest ammo pool for trash.
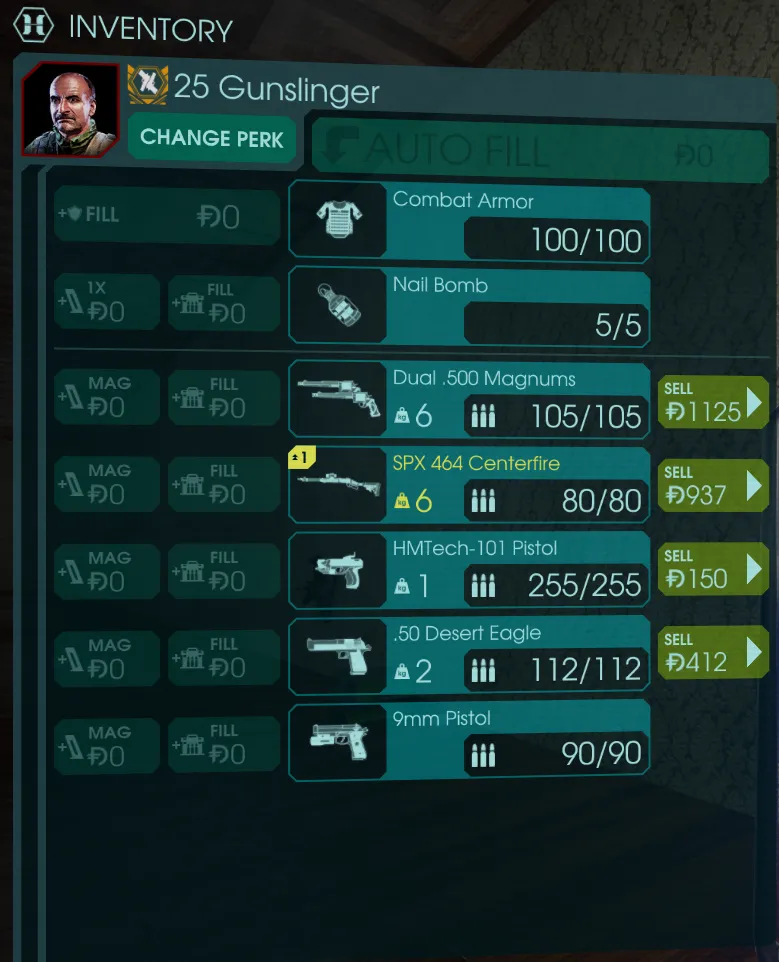 T3 SPX + Dual .500 Magnums / Dual AF-2011s + Desert Eagle + Medic Pistol.
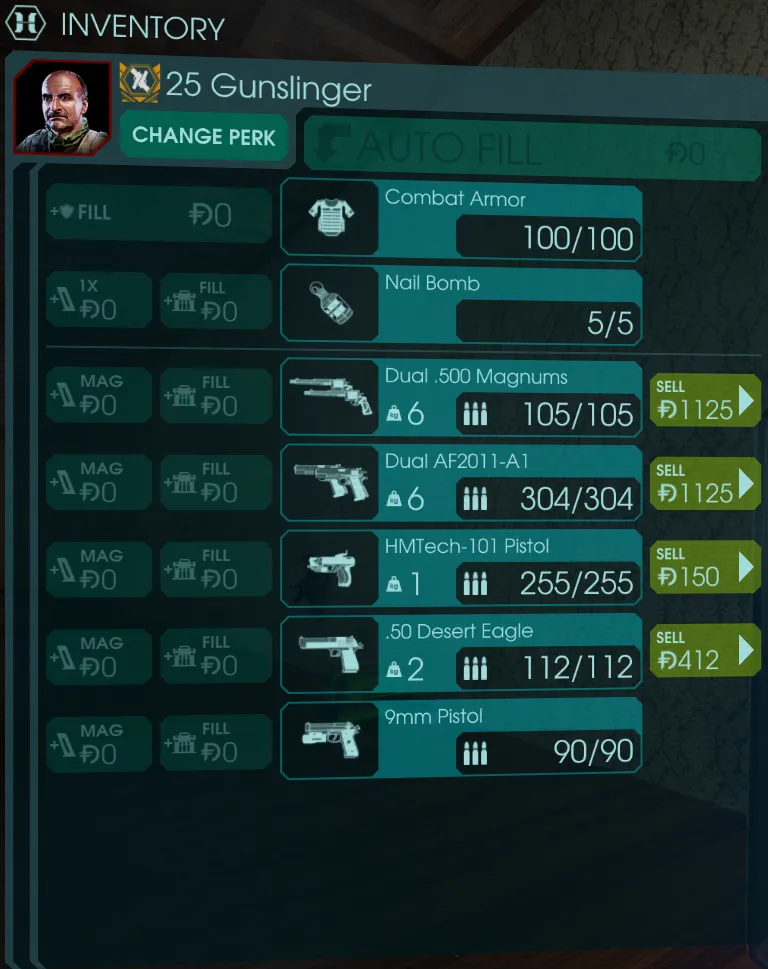 Dual AF2011s + Dual .500 Magnums + Desert Eagle + Medic Pistol: the meta with two tier 4 sets and no weapon upgrades.
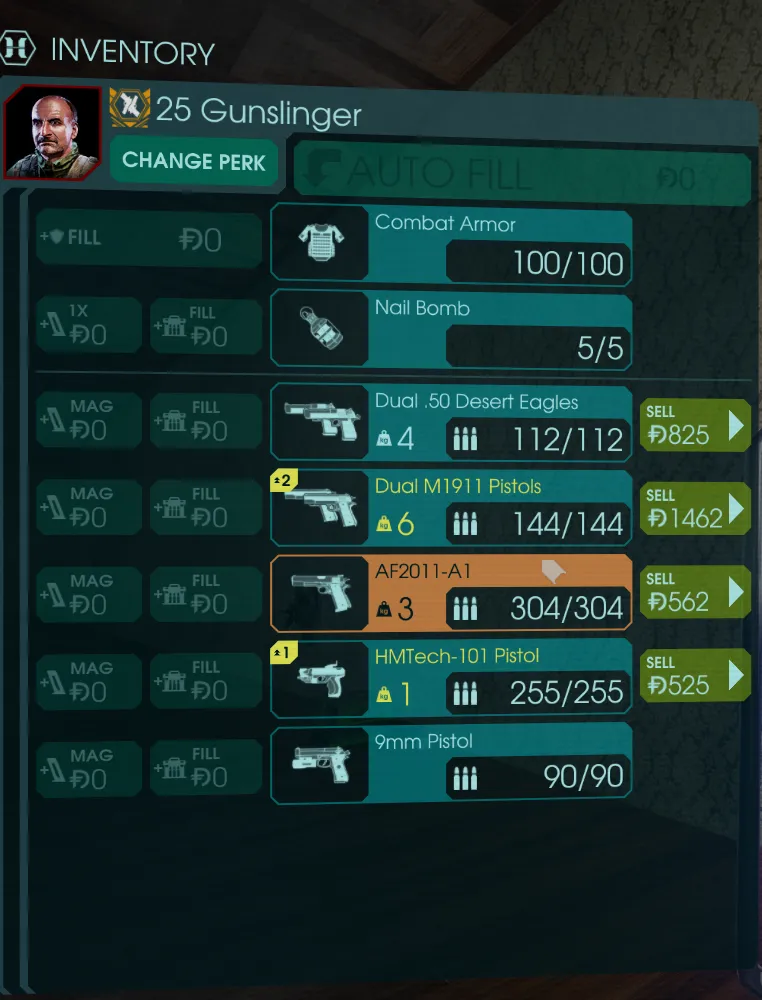 Dual Deagles + T4 Dual 1911s + AF2011 + Medic Pistol: sustained DPS with room for a Medic Pistol.
Part 4 - Shots to kill
HS means headshots, BS means body shots. All kills start from 0 ReU unless stated.
Loadout 1: M1911 T4, Deagle T4 and single AF-2011
| Zed | Dual M1911 T4 | Dual Deagle T4 | Single AF-2011 |
|---|---|---|---|
| Cyst / Alpha Clot / Slasher | N/A | N/A | 1 HS or 1 BS |
| Crawler | N/A | N/A | 1 HS or 1 BS |
| Stalker | N/A | N/A | 1 HS or 1 BS |
| Bloat | N/A | N/A | 3 HS (0 ReU), 2 HS (2+ ReU) |
| Gorefast / Gorefiend / Siren | N/A | N/A | 1 HS |
| Husk | N/A | N/A | 1 shot to fuel tank, 2 HS decap |
| E.D.A.R. | N/A | N/A | 1 shot to chest core |
| Scrake | 10 HS | 13 HS | 12 HS (1+ ReU) |
| Quarter Pound | 9 HS (8 with 1+ ReU) | 11 HS (10 with 1+ ReU) | N/A |
| Fleshpound | 12 HS (11 with 1+ ReU) | 14 HS | N/A |
| Rioter | 1 HS | 1 HS | 1 HS (2+ ReU), 2 HS (0-1 ReU) |
Loadout 2: SPX 464, Dual Magnum and Dual Deagle
| Zed | SPX 464 | Dual .500 Magnum | Dual Deagle |
|---|---|---|---|
| Scrake | 6 HS (0-3 ReU), 5 HS (4+ ReU) | 8 HS (no ReU), 7 HS (1+ ReU) | 12 HS |
| Quarter Pound | 6 HS regardless of ReU | 6 HS regardless of ReU | 10 HS |
| Fleshpound | 8 HS | 9 HS, 8 HS (1+ ReU) | 14 HS with no misses |
Loadout 3: Tier 3 M1911 and Tier 2 HM-TECH 101 (Magnums and Deagles as above)
| Zed | Dual M1911 T3 | HM-TECH 101 T2 |
|---|---|---|
| Cyst / Alpha Clot / Slasher | 1 HS or 2 BS (1 BS with 2+ ReU) | 1 HS |
| Crawler / Stalker | 1 HS or 1 BS | 1 HS |
| Bloat | 3 HS (2 HS with 3+ ReU) | 4-5 HS |
| Gorefast | 1 HS, or 3 BS (2 BS with 2 ReU) | 1 HS decap (clean kill with 1+ ReU) |
| Gorefiend | 2 HS | 3 HS |
| Siren | 2 HS | 3 HS |
| Husk | 1 shot to backpack, 3 HS | 5 HS, or 2 shots to fuel tank |
| E.D.A.R. | 2 shots to chest core (1 with 3 ReU) | 3 shots (0-3 ReU), 2 shots (4 ReU) |
| Rioter | 2 HS (1 HS with 3+ ReU) | 12 HS or 7-8 leg shots |
Part 5 - Big zed takedowns
The author shows recorded takedowns of Scrakes, Fleshpounds and Quarter Pounds for loadouts 1 and 2 (loadout 3 behaves like loadout 2; in extreme cases the Tier 3 M1911s can hunt big zeds). The summary: head tracing is essential, and you need to know the raging and attacking animations of the big zeds.
Part 6 - Advanced skills and notes
Gunslinger buy strategy (Simple Rabbit)
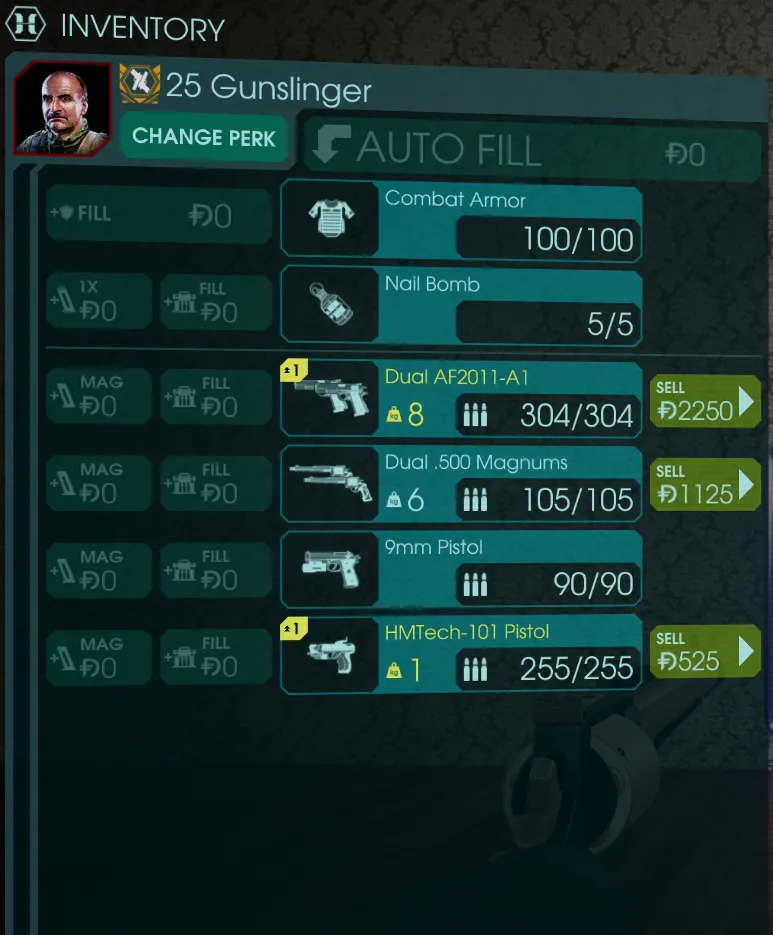 The buy order for the match.
- Wave 1: use the dual 1858 revolvers, save the 9mm for wave 2.
- Before wave 2: sell the 1858s, buy one Desert Eagle and fill the ammo.
- Before wave 3: drop your Deagle on the ground in a safe place (teammates may take it), buy another at the trader, pick the first one up. You have dual Deagles with about 42 bullets for free.
- Before wave 4: buy a single AF-2011.
- Before wave 5: upgrade the dual Deagles or buy another AF-2011 (buy pistols one by one).
- Before wave 6: upgrade the dual Deagles once and refill ammo.
- Before wave 7: buy a single M1911 as a backup, used only when both Deagles and AFs are empty.
- Before wave 8: drop one AF-2011 on the ground, upgrade the M1911 twice, and buy another M1911 (again one by one).
- Waves 9 and 10: fill everything and give dosh to teammates.
- Boss wave: consider two Tier 4 pistols with one upgraded once, and perhaps an upgraded medic pistol.
Other techniques
- Fire 2 or 3 consecutive shots at zeds that block heads, especially Gorefiends and Bloats.
- Reload cancelling greatly raises DPS. Method 1: watch the animation and, when the magazine is about to go in, press the melee key (default V) then fire almost instantly. Method 2: watch the ammo HUD at the bottom right; when the count changes from 0 to 14 (dual Deagles), press melee then fire. Method 1 is riskier but lets you watch the zeds; method 2 is safer but pulls your eyes to the HUD.
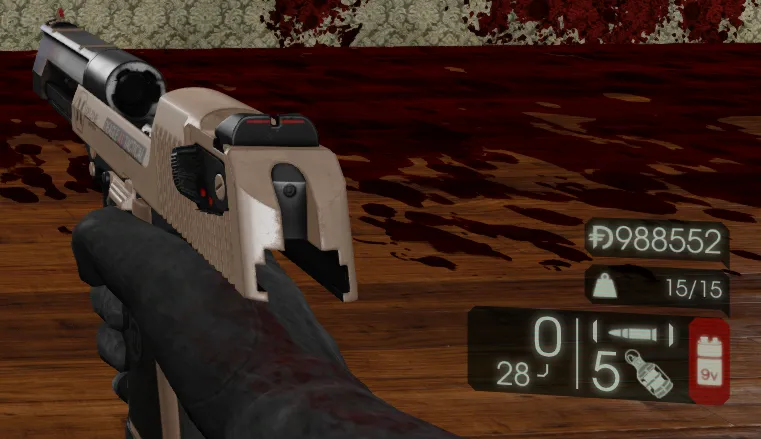 HUD before the reload completes.
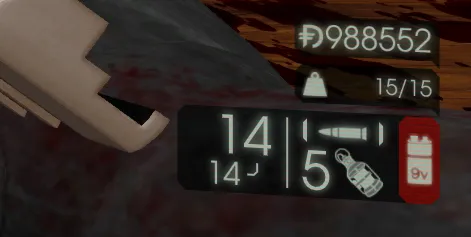 HUD at the moment the count changes: cancel now.
- A dry reload with reload cancelling is notably faster for dual M1911s, Deagles and AF-2011s.
- Reload cancelling does not apply to the Winchester 1894 and SPX 464 because they are tube-fed. Try to leave at least one bullet in them when reloading, since loading the first round takes longer.
- Target prioritisation: kill the trash and medium zeds that disturb a big zed takedown, and do not be afraid to switch targets, especially when you have room to back-pedal.
- Hit and run: speed is your biggest advantage. On a big enough map raged Fleshpounds and even the boss cannot touch you.
- Run around the map during trader time to collect ammo boxes, Tier 1 weapons and armor. On Hell on Earth the trader time is one minute: roughly 30 seconds looking, 15 at the trader and 15 returning.
- Over-capping does not apply to the Gunslinger because none of his skills gives extra ammo.
- If time allows, build ReU (x3 to x5) first with the 9mm or HM-TECH 101 on big zeds to reduce shots needed.
- The hardest part is controlling recoil of the dualies during Zed Time: avoid spamming fire unless a big zed is close, shoot slowly while compensating recoil, or fire 2 to 3 bullets, compensate and repeat.
Final words
The Gunslinger is arguably the all-rounder of KF2, able to deal with every zed type through successive headshots. Together with movement speed and Skull Cracker, zeds cannot even touch him before the dualies wreck them, and a proficient Gunslinger is the DPS powerhouse of the team, especially in Zed Time. Leveling the perk feels like solving a jigsaw puzzle, and once all pieces are in place you see how complete the perk is. Credit goes to Simple Rabbit, IceBeam, the testing map by Fauxy_ and the KF2 wiki.
FAQ
- Is Quick Draw better than Steady Aim for the Gunslinger?
- The guide leans to Quick Draw: it gives 34 percent less recoil when hip-firing, double weapon swap speed and 5 percent extra movement. Steady Aim halves random bullet spread (a further 25 percent when crouching), which is better for ADS accuracy.
- Which Gunslinger skills should I take at level 10 and 25?
- Rack em Up at 10 (swap to Bone Breaker only on Hans Volter or Patriarch waves) and Fan Fire at 25, with Whirlwind of Lead only on wave 1 if ammo is a problem.
- How do I know the boss before the match?
- Open the console and type getall KFGameReplicationInfo BossIndex: 0 Hans Volter, 1 Patriarch, 2 King Fleshpound, 3 Abomination, 4 Matriarch.
