
KF2 Gunslinger Guide: Skills, Weapons, Builds and ZEDs
This page condenses a long Gunslinger guide by a veteran player (last updated for version 1148, December 2023). The Gunslinger is a hit-and-run perk built around fast headshots, mobility and cheap pistol ammo. The author, who mostly plays Support or Demolitionist, found the perk rewarding after leaving it frozen at level 25 for a long time.
The role
Officially the Gunslinger carries plenty of ammo, deals high damage quickly at close range and escapes before ZEDs react. In practice it is a solo-oriented perk, not one for camping with a group. Stay near the team at a key point and take pressure off it. The author notes that the Gunslinger has seen no perk or weapon balance changes in the quarterly updates since June 2021.
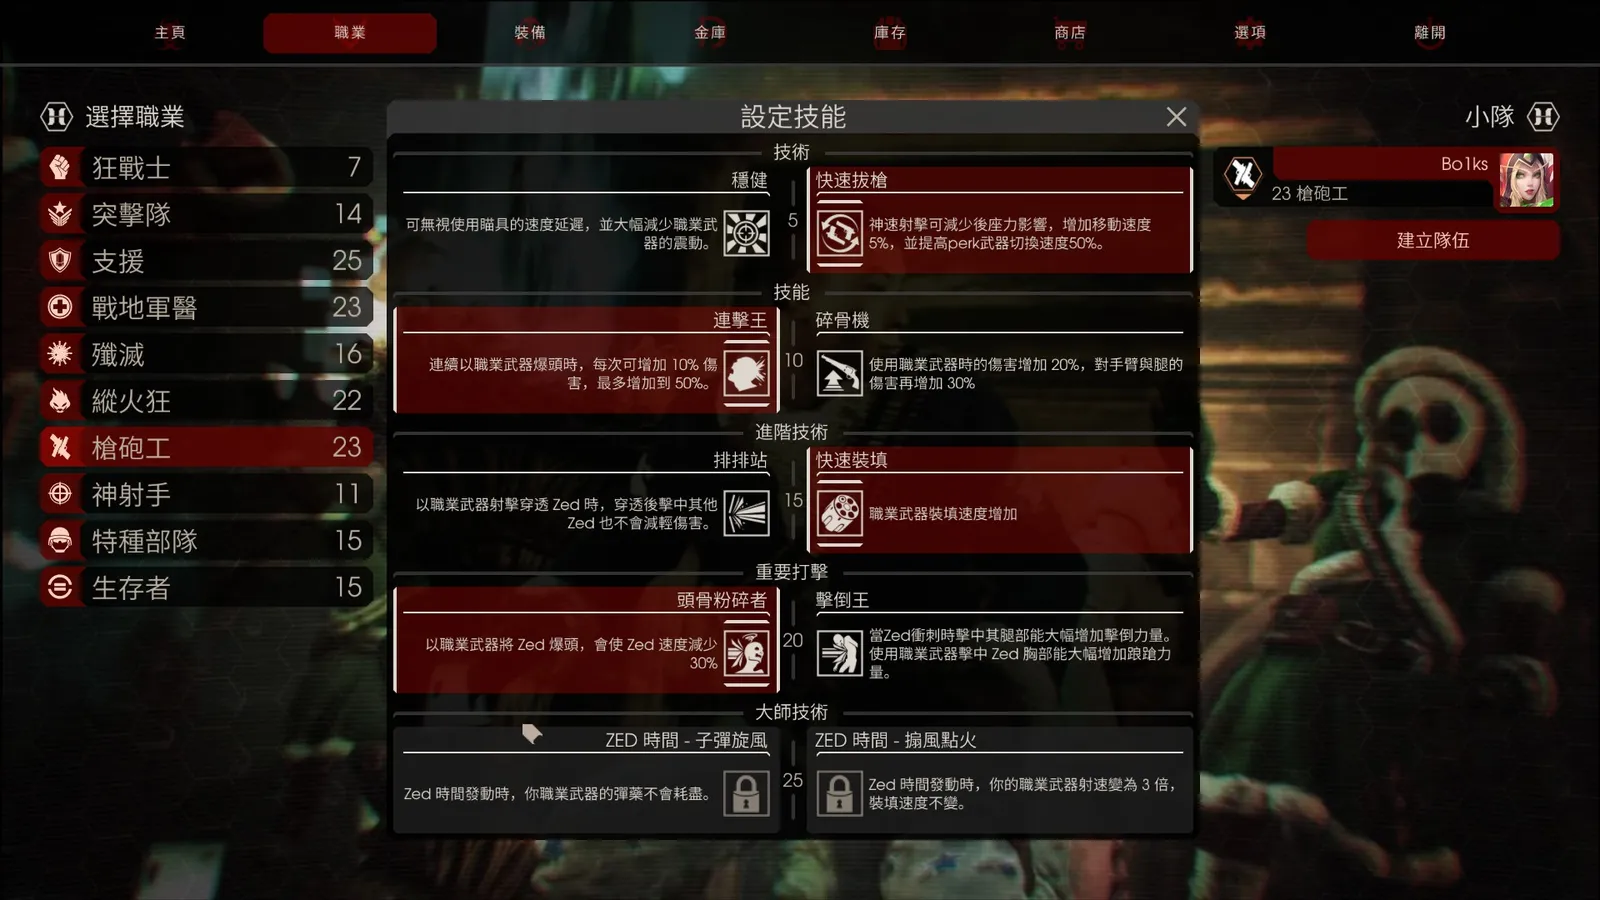
The Gunslinger skill tree.
Skills by level
Level 5
- Steady: ignores the iron-sight delay, greatly reduces perk weapon recoil, +7.5% damage. Not a great fit for the role, but good if you aim after moving, and a near-standard pick for the Clock since it offsets its low damage.
- Quick Draw: less hip-fire recoil, +5% move speed, +50% perk weapon switch speed. This is the first step to the perk's popularity. The fastest ZED on Hard and above, an enraged King Fleshpound, moves at roughly 658-804, while a max-level, full-health, full-weight Gunslinger with Quick Draw runs at 528. Skull Crusher cuts the King's speed by 30% to about 460-562, so you can outrun it.
Level 10
- Rack 'em Up: each consecutive headshot with perk weapons adds 10% damage, up to 50%. It stacks, fades layer by layer, and a miss does not reset it.
- Bone Breaker: +20% damage with perk weapons, +30% more against arms and legs. If a permanent 20% boost for limb shots seems good, the author says to change perk: a Gunslinger who does not hit heads clears slowly, stays poor and burdens the team.
Level 15
- Line Up: perk weapon shots penetrating a ZED keep full damage on the next ones, plus 10 penetration. It was considered useless when everyone used the .500, but the Glock makes it a viable choice with a coordinated team.
- Fast Reload: faster perk weapon reload. The most general choice and the author's usual one.
Level 20
- Skull Crusher: headshots with perk weapons slow the ZED by 30%. It needs no knockdown or stumble build-up and no change of aim.
- Knock Out (Knockdown King in the source): leg hits on sprinting ZEDs greatly increase knockdown; chest hits with perk weapons increase stumble. Less reliable than Skull Crusher.
Level 25
- ZED Time - Bullet Storm: perk weapons do not consume ammo during ZED time. Depends on the team having a strong Commando.
- ZED Time - Fan the Fire (Stoke the Flames in the source): perk weapons fire three times as fast during ZED time, reload speed unchanged. The self-sufficient choice.
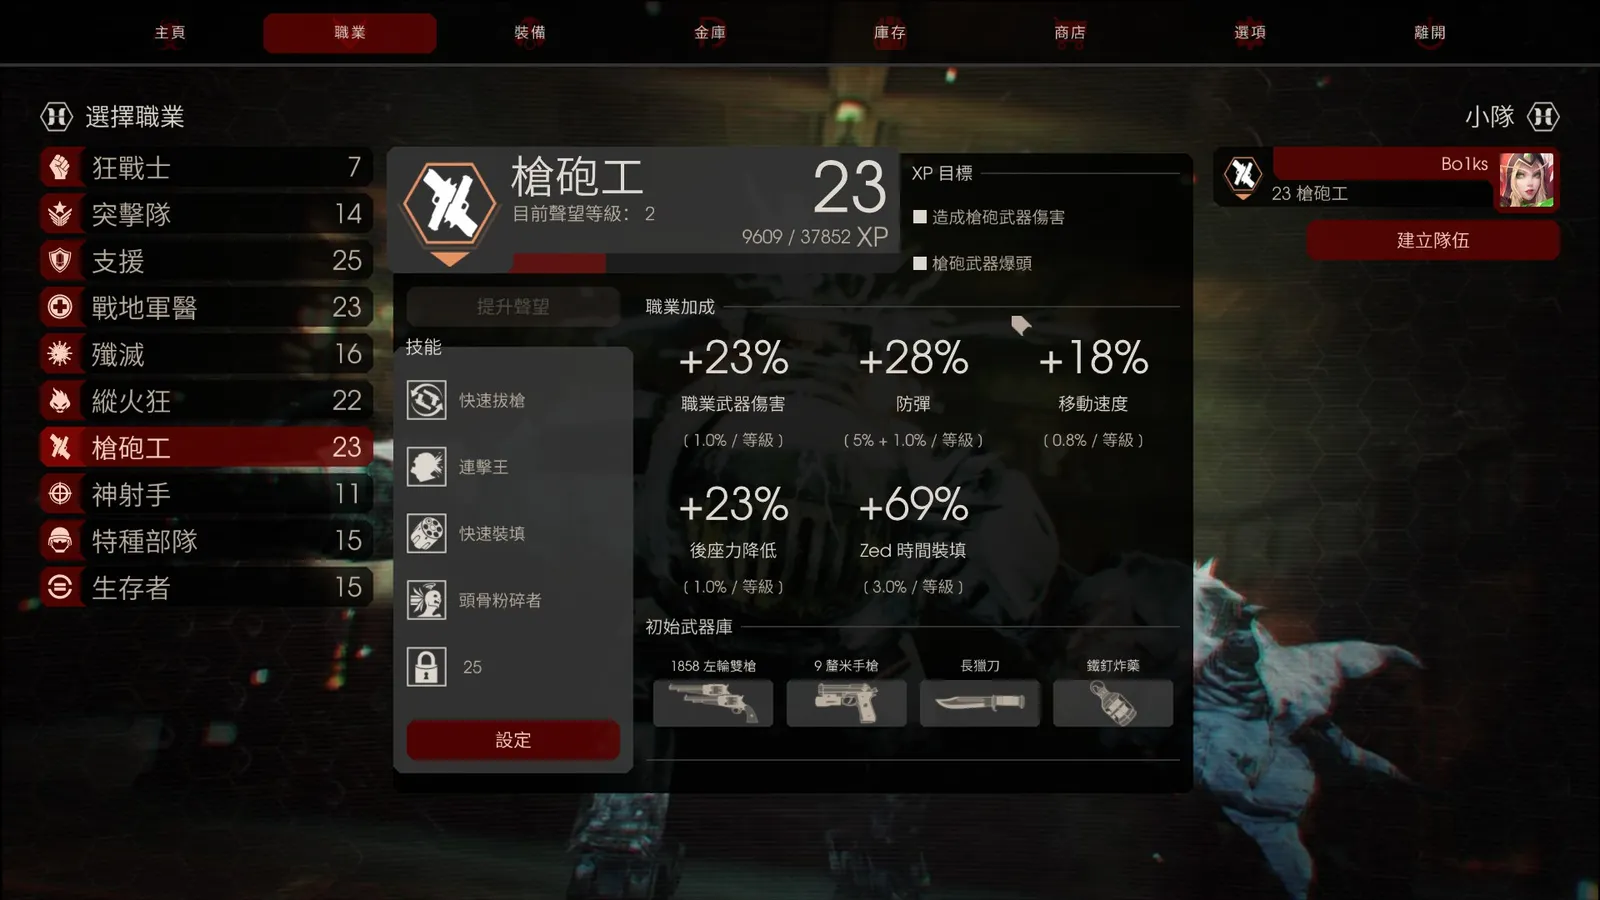
Perk level bonuses.
Per-level bonuses: perk weapon damage +1% per level (max 25%), bullet resistance 5% plus 1% per level, move speed +0.8% per level, recoil reduction 1% per level, ZED time reload +3% per level.
The damage formula
All intermediate results are integers. The overall order is:
(base damage x weapon upgrade multiplier x penetration reduction) x (perk and level multiplier) x (buff multiplier) x (Medic dart multiplier) x (weapon formula multiplier) x (hit zone multiplier) x (damage resistance multiplier) x (ZED block multiplier) x (crippling multiplier).
- Upgrade multipliers do not stack: a 1858 at T3 has a x1.6 multiplier applied to the base 50, not on top of T2's x1.15.
- Penetration: leftover penetration after resistance sets the percentage of damage passed on. Line Up removes that reduction.
- Perk and level multipliers are the biggest part; Commando, Sharpshooter and Gunslinger round up, other perks round to nearest.
- A cripple-causing hit (headshot, limb loss) adds 25% of the ZED's max health to the base damage before the multipliers, rewarding headshots.
- The Medic dart bonus is its own multiplier, so it matters whether the Medic shoots darts at large ZEDs.
- Hit zones range from 0.1 to 3.5. Heads and bodies have very different health, so headshots are the way.
- Resistances are per ammo type and some ZEDs have special ones, such as the Scrake taking a 4x resistance multiplier against RPG-7 impact.
Speed is base speed x health factor x weight factor. Each point of weight costs the Gunslinger about 0.53% speed (15 weight max reduces speed by 8%).
Weapons
The base data below assumes dual-wielding; single-gun players should read the stats and then the loadouts section. Table colors: blue are special, green optional, red main weapons.
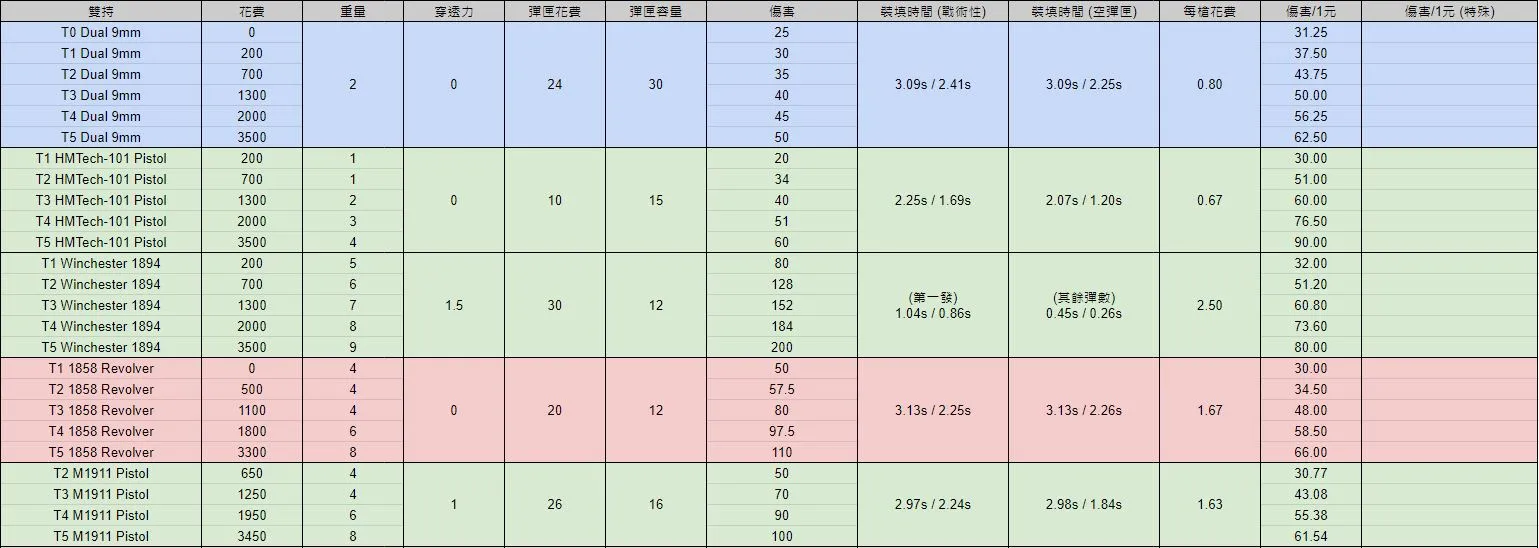
Weapon stats table.
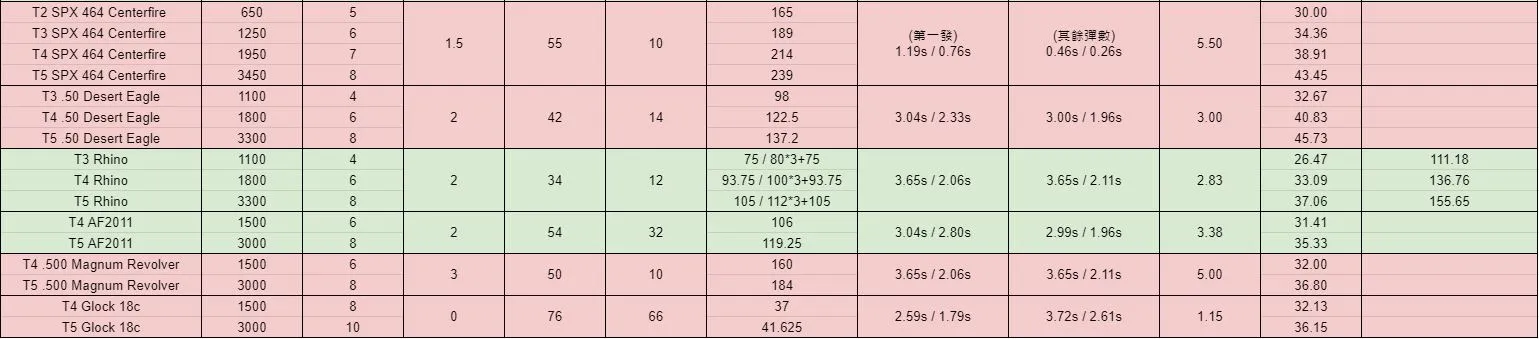
Weapon stats table, continued.
Economics matter. KF2 pays by monster, difficulty, wave length and player count, so choose weapons with the right cost per shot. HX25 ($9 per shot) and the Double Barrel Shotgun ($6.5 per shot) kill reliably but often leave you poorer.
- 9mm pistol: upgrade it to T1 for great value. Upgrades add no weight. It is a shared perk weapon for Gunslinger and Sharpshooter and also gets Commando and SWAT bonuses. With full Rack 'em Up, a T0 9mm acts like an 1858. It does extra damage to Bloats: three or four headshots kill one for about $2.4-3.2. Dual 9mm tactical reload is faster than an empty reload only with Fast Reload.
- HMTech-101 pistol: strong in Gunslinger hands, upgrade to T2 if you find it early. Good through Suicidal, weaker in Hell on Earth, cheap ammo.
- Winchester 1894: great base damage, can pop a Rioter's armor in one hit, the first upgrade is +60%. Reload animations block the view.
- 1858 revolver: 50 base damage handles anything up to wave 4. With Quick Draw, Rack 'em Up and Fast Reload, two magazines can handle a 6-player Hell on Earth Scrake. Three consecutive headshots kill Sirens and Gorefiends. It has a special multiplier against Husks.
- SPX 464 Centerfire: the single-gun king, 165 base damage, one shot is 343, six shots kill a 6-player HoE Fleshpound. Ammo $5.5 per shot, more than the .500. Avoid emptying the magazine because the first reload is slow.
- 1911: a cheap tier-2 step with a very controllable recoil. Great for learning the perk, but players with Fast Reload usually skip to the Deagle.
- Desert Eagle: the main Gunslinger weapon. Moderate ammo cost, strong damage, can kill an E.D.A.R. if you aim well, and the best value among T3+ dual weapons. Buy it around mid-game.
- Rhino: a toy. Random projectiles hit air or body health and anger large ZEDs early. Treat a Rhino Gunslinger like a Firebug.
- AF2011: a toy as well. Each shot uses two bullets, so ammo costs more than the Deagle, and you must hit the exact center of the head for both to land.
- .500 Magnum: king of dual wield, $5 per shot, long reload, best for large ZEDs.
- Glock 18c: ridiculous reload speed (tactical reload is faster than empty), 1200 RPM, and can output 2400+ damage in 3.3 seconds against the .500's 1600. Tradeoffs: zero penetration (take Line Up at level 15 if you want to clear trash), one extra weight, huge spread, and awkward reload behavior. Aim down sights and short bursts, otherwise the .500 or 464 are better.
- Ice dual pistols: skipped for being weak (headshot damage around 30, explosive part hits the body only). HX25 and Flame dual pistols: skipped because explosive damage cannot hurt the head and fire causes monsters to flee.
Upgrading: the damage-to-ammo-cost baseline is about 30 per $1. Buy upgrades mainly to widen your margin for error, not for payback. For example T4 Magnum kills a 6-player HoE Fleshpound head in 8 headshots with 2 misses allowed, T5 in 7 with 3 misses allowed.
Starter weapons from other perks: MP7, AR-15 and the shovel should be sold; the 1894 is worth upgrading once; the 101 saves you $200.
Loadouts
Core rule: any gun can be your main weapon as long as weight allows.
Single gun
- T5 Desert Eagle, $2750: if your headshot rate is above 90% this is enough, with about $4k left after ten waves. Weight 4, only 2.13% speed lost.
- T2 1894 + T5 Desert Eagle, $3450: the 1894 for small ZEDs, the Deagle for large ones.
- T5 SPX 464 + T5 Desert Eagle, $6200: the author's current main set. Buy the Deagle, then the 464 or a T4 Deagle, then T5 464 and optionally T5 Deagle. The Deagle handles small ZEDs (reload cancel in under 1 second), the 464 handles large ones.
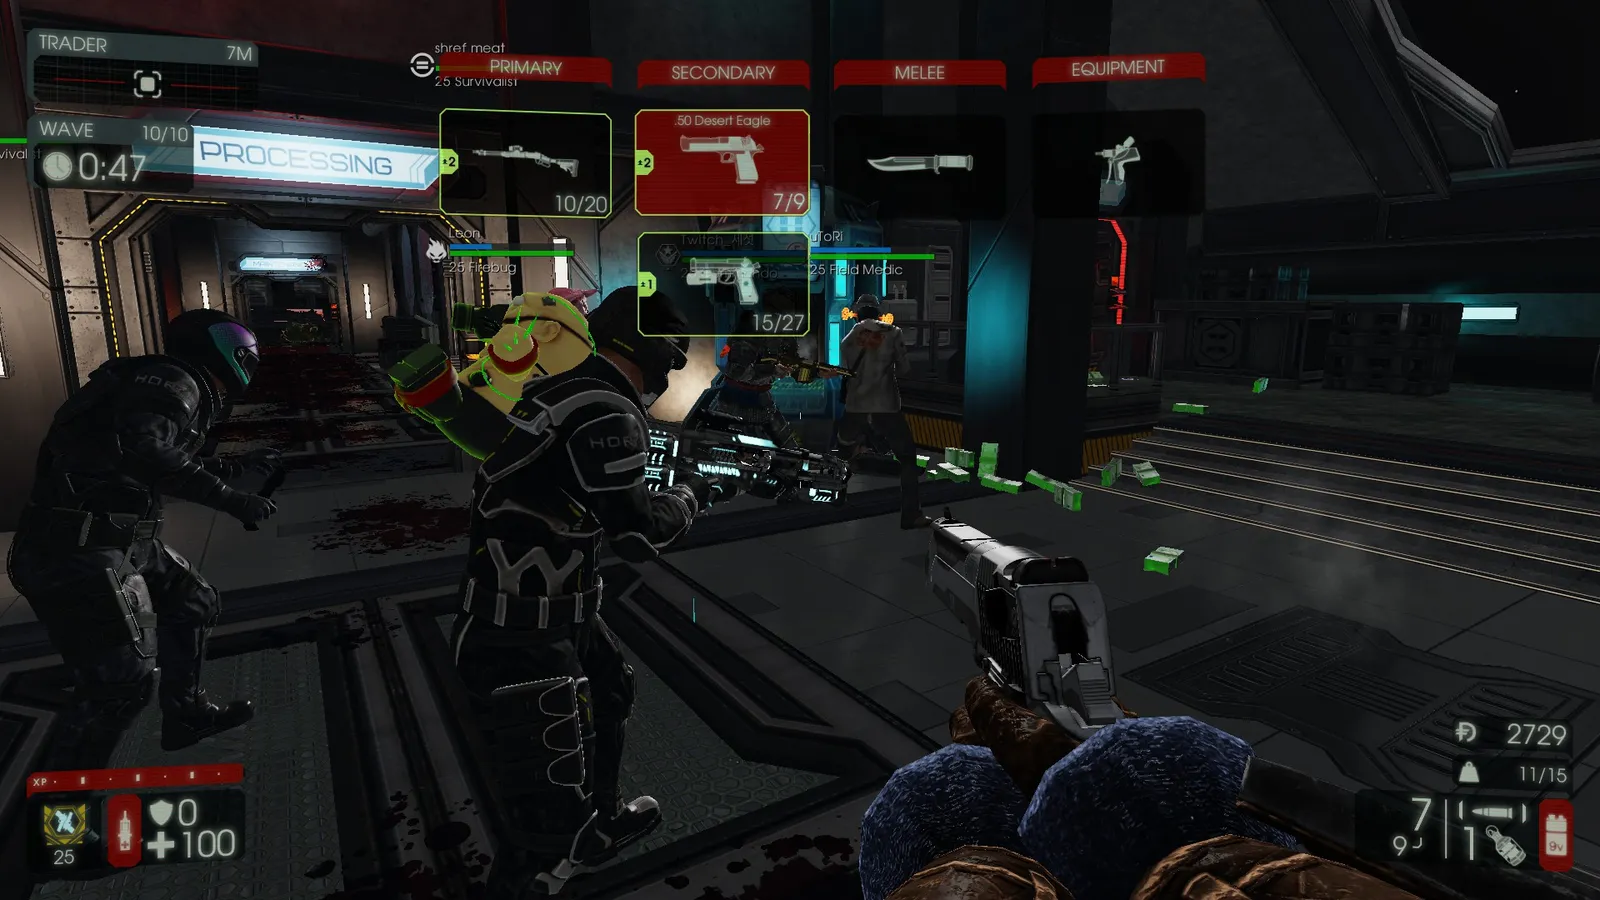
Hell on Earth on Asylum with the single-gun set.
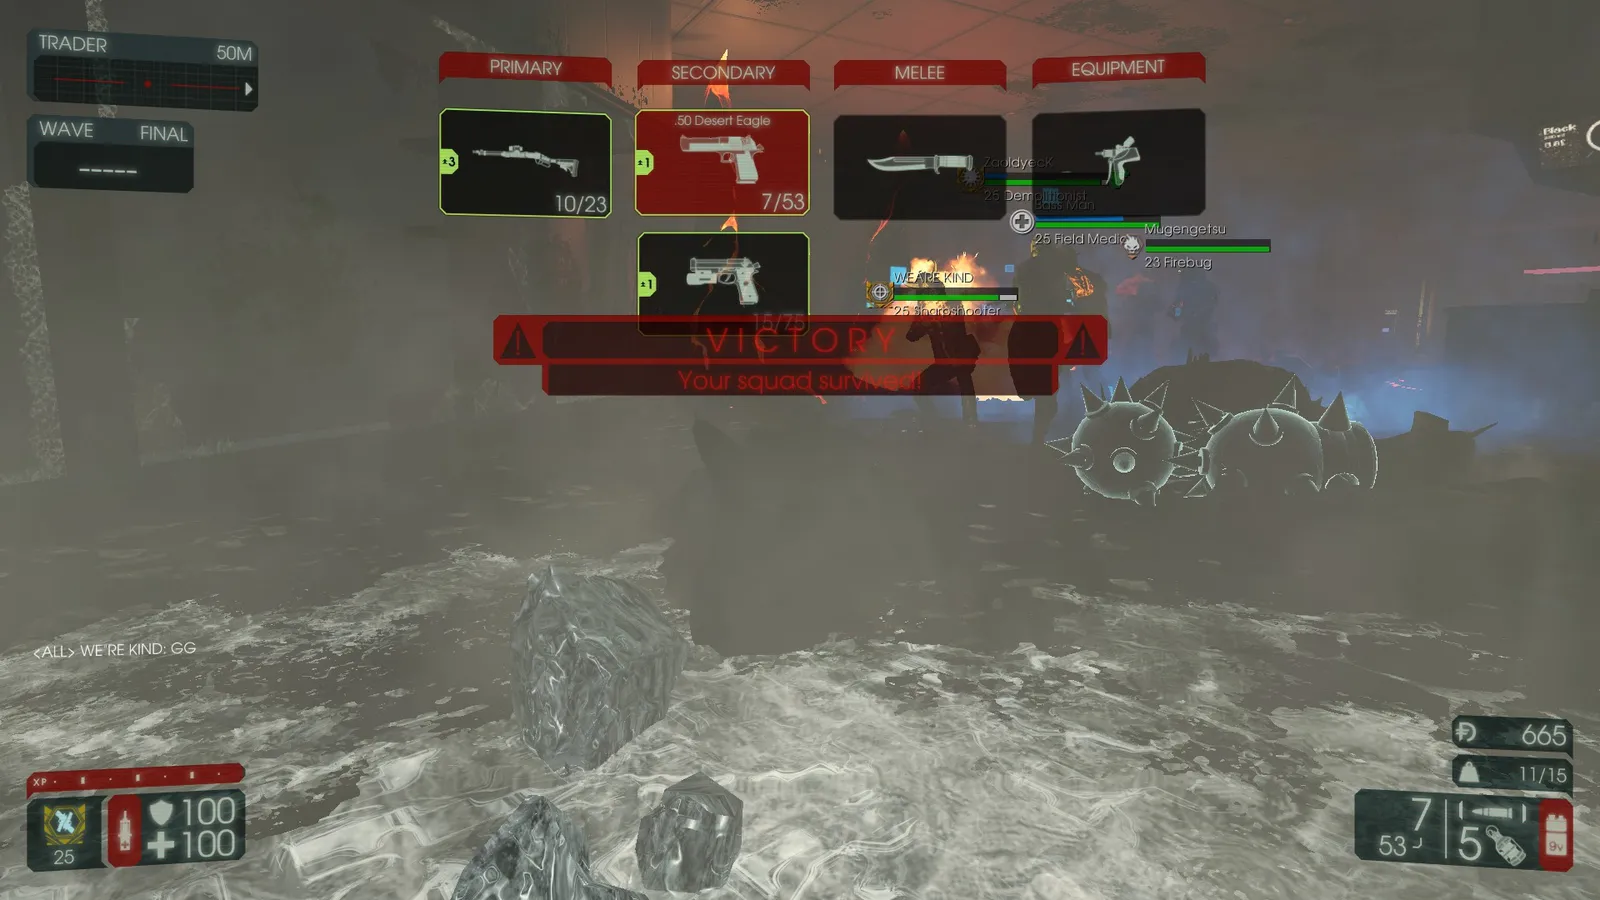
Hell on Earth on Hellmark Station.
Dual wield
- T5 .500 Magnum + T4 Desert Eagle + T1 101, $5000: standard high burst set. Typical order: Deagle, T4 Deagle or dual, dual Magnum, T5 Magnum.
- T5 G18c + T3 Deagle + T1 101, $4300: looks cheaper, but high ammo costs; not for hip-fire players.
- T3 Deagle + T4 1911 + T1 101, $3250: no main or secondary, low spread of costs, magazine-fed and fast to reload; very beginner friendly.
Once your accuracy is high, even a 6-player HoE Fleshpound drops in one burst and dual guns just add weight and cost.
ZEDs
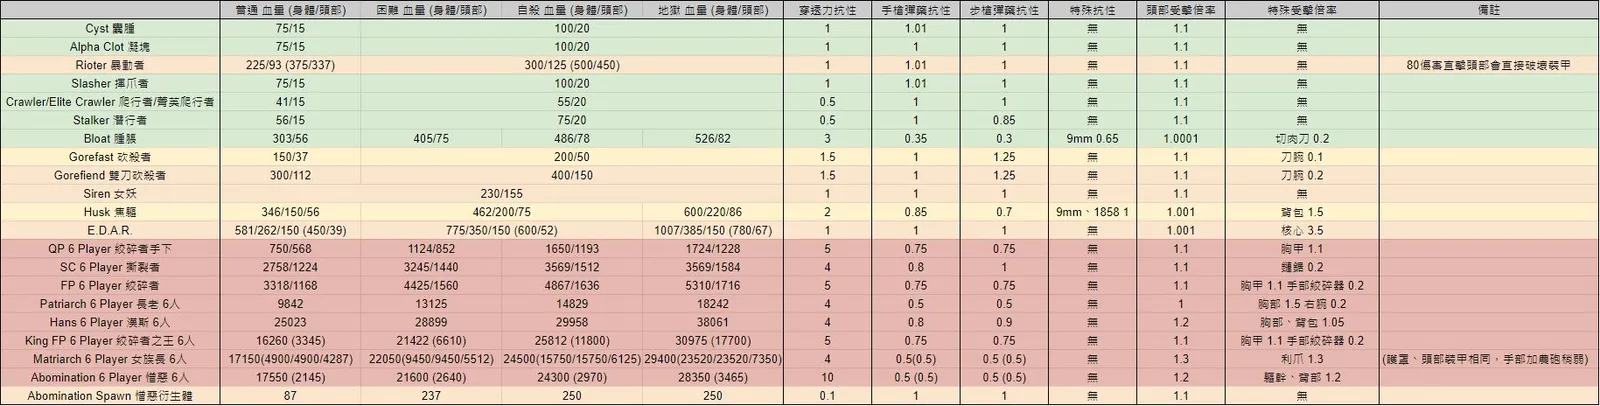
ZED health and color-coded recommendation table.
Table colors: green means use the 9mm, yellow the 1858 or 1911, orange the Deagle, Rhino or 1894, red the AF2011, .500 or 464.
- Cyst, Alpha Clot, Slasher, Crawler/Elite Crawler, Stalker: one headshot with a 9mm is enough. Alpha Clots rush; Slashers hunch and sway; Crawlers drop the headshot line; Elite Crawlers release gas if not headshot; Stalkers may go invisible and sway the head when attacking.
- Rioter: armored on body and head. Anything with base damage above 80 (1894, 464, Deagle, Magnum) breaks head armor in one hit; the 464 and .500 can kill outright.
- Bloat: high body health and pistol resistance, but the 9mm has a special modifier. Kill it early with headshots.
- Gorefast: one 1858 headshot, or a T1 9mm with three Rack 'em Up stacks. Gorefiend: 3 shots 1858, 2 Deagle, 1 .500. Watch out for blocking.
- Siren: same health on every difficulty; treat like a Gorefiend, no block.
- Husk: aim at the fuel tank with an 1858; two cannon poses place the tank at the body's left or head's left.
- E.D.A.R.: hit the red core, 5-6 9mm shots are enough.
- HVTs (Quarterpound, Scrake, Fleshpound): stack five Rack 'em Up layers on the head with the 9mm, then switch to a big gun. Normal difficulty is really "Hard" in health multipliers: trash is 0.75x on Normal and 1x above. A 6-player HoE Fleshpound dies to roughly ten .500 shots. A Scrake has the highest head multiplier among HVTs, and the Fleshpound has far more body health than the Quarterpound.
- Bosses: Patriarch is a target with Skull Crusher; Hans has a thickening shield (shoot while it drains players, then pop it with headshots); King Fleshpound's chest laser requires crouching; Matriarch, with armor on three parts, summons E.D.A.R.s which should be killed first; Abomination is easiest by total health but resistant to pistol ammo; its Spawn can be one-shot with a headshot with the Magnum when Rack 'em Up is full.
Teammates
Short version: stay away from bad Demolitionists, Firebugs and poison-talent Medics.
- Sharpshooter: easy to pair with; check whether they land headshots (their level bonus applies to headshot damage).
- Commando: good to have for ZED time. Stay away from random ones.
- Support: good ones can cover large and small ZEDs. Watch out for those who spam the Double Barrel Shotgun and waste team money.
- Survivalist: jack of all trades; may take Medic or Demolitionist roles. Cover them if they fill the team's gap.
- Berserker: protect them from Bloats, Sirens and Husks and let them farm trash; they can parry and absorb HVTs.
- SWAT: let them take what they cannot handle; HVTs resist SMG ammo.
- Gunslinger: each guard one exit, flee through the other. Otherwise you only compete for dosh.
- Field Medic: look for dart use on large ZEDs; avoid the poison talent because HVTs resist poison (about 0.2-0.3).
- Demolitionist: send them after trash; HX25 costs $9 per shot. Firebug: strong at clearing trash but hard to pair with because of mixed damage types.
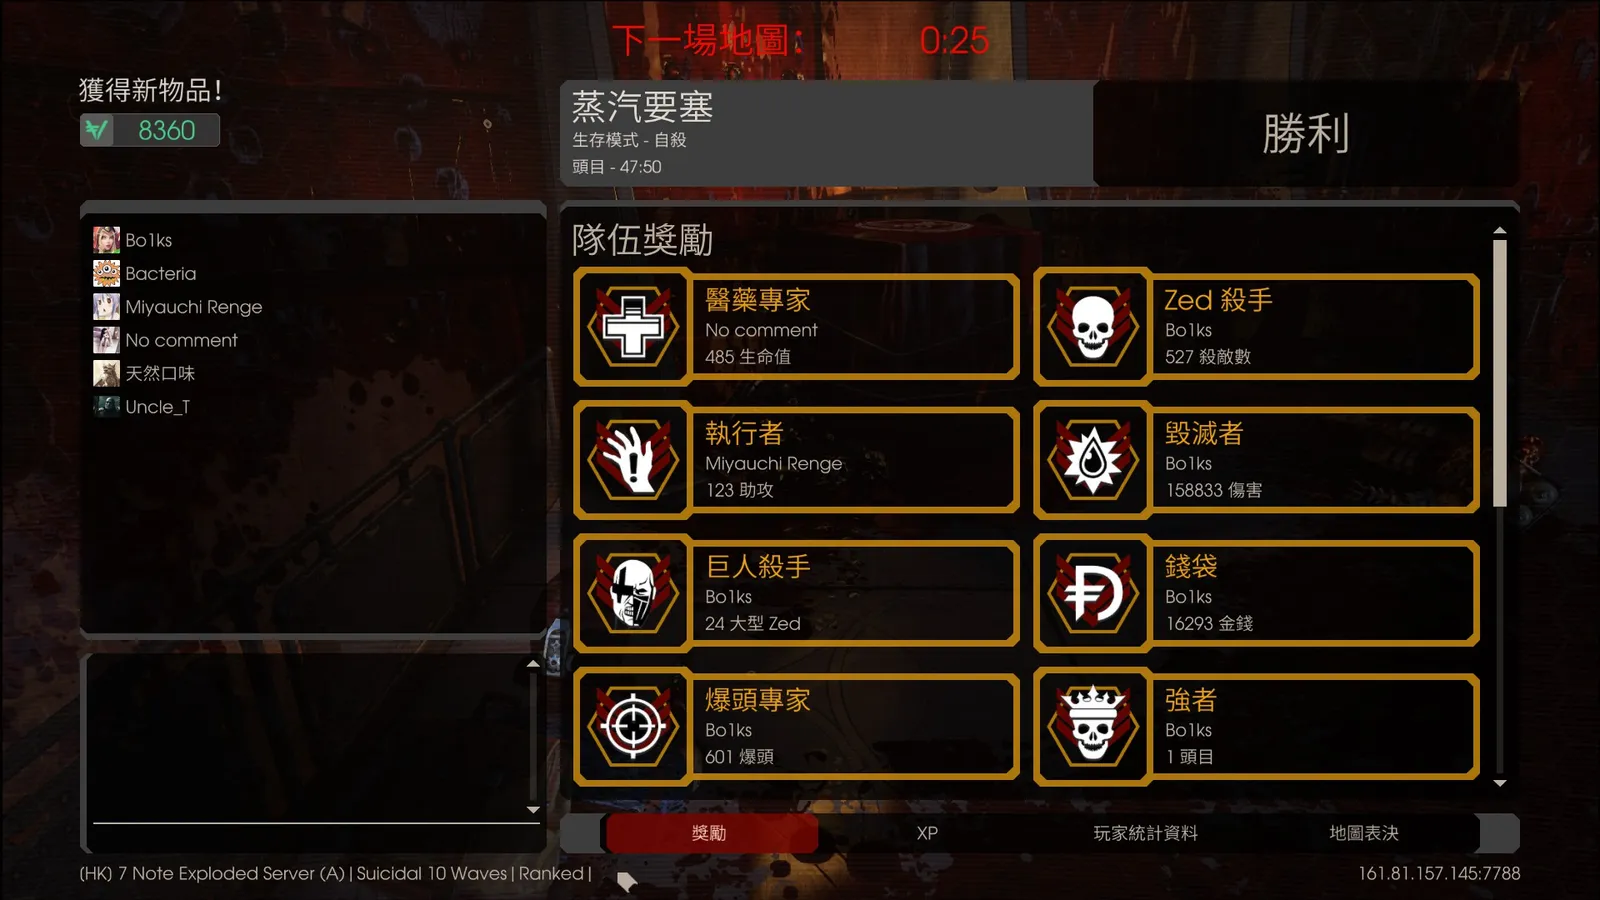
End-of-match awards used as performance indicators.
Performance indicators
- Kill count is less important than position and teammate deaths: with 300+ kills plus assists in a 10-wave Hard match you did fine.
- Headshot expert is the best measure for a Gunslinger: aim for headshots at least equal to kills.
- Large ZED kills: you should clear more than half of the top player's count.
- Destroyer and the dosh award are easy to inflate and say little by themselves.
FAQ highlights
- Data comes from the official wiki.
- Upgrades are worth it mainly for margin for error; many players switch guns instead of reloading.
- Why play Hard or Suicidal at max level: there are too many unprepared players and a Gunslinger with little ammo has less margin for error. Solo videos can be misleading because damage taken in solo is about half of a 6-player room.
- Buy order: check the match state first; with a good team pick Medic to keep the 101, otherwise Sharpshooter for the 1894, then switch to Gunslinger in game.
For a related build overview see KF2 perk and skills build guide.
FAQ
- Which Gunslinger skill gives the most speed?
- Quick Draw at level 5 adds 5% move speed. A max-level, full-health, full-weight Gunslinger with it runs at 528, and Skull Crusher at level 20 slows hit ZEDs by 30%, which lets you outrun most of them.
- What is the best single-gun loadout?
- A T5 Desert Eagle alone (2750 dosh) works for accurate players. The main loadout of the author is a T5 SPX 464 plus a T5 Desert Eagle (6200 dosh): the Deagle for small ZEDs and the 464 for large ones.
- Is the Rhino or AF2011 worth using?
- The guide calls both toy weapons. The Rhino's random projectiles hit body health or air and enrage large ZEDs early; the AF2011 costs more per shot than a Deagle and needs a perfectly centered headshot to land both bullets.
- How is damage calculated in KF2?
- Base damage times upgrade multiplier and penetration reduction, then perk and level multipliers, buffs, Medic dart bonus, weapon formula, hit zone, resistance, block and a final crippling bonus.
