
KF2 Solo Field Medic on Hell on Earth: RRRRR Build Guide
The author considers the Field Medic the best perk in the game by firepower to survivability ratio: other perks may hit harder but survive worse, or the reverse. This guide is for solo play on Hell on Earth (or for a lobby where you realize the team is hopeless but it is too late to leave). It also notes that an RRRRR Medic is the most hated build in multiplayer, so keep it to solo games. Compare with Field Medic solo and support builds.
Skills
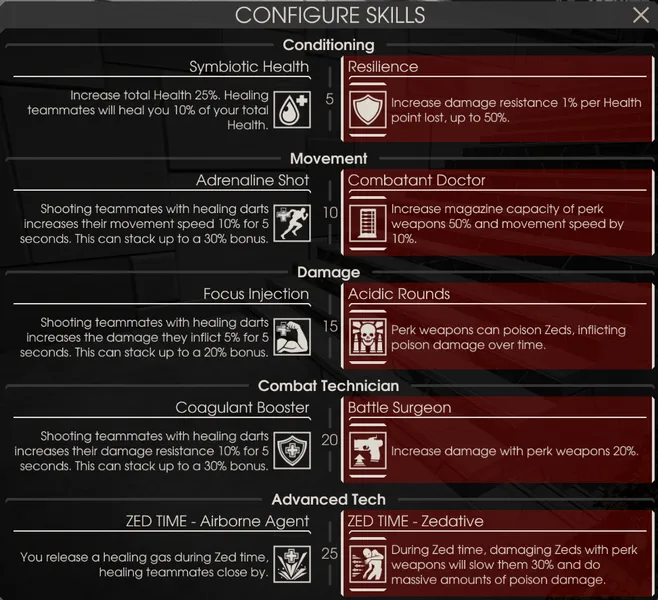 The RRRRR Field Medic spec.
Pick the right option at every tier. The left skills at levels 10, 15 and 20 (medic grenade, 501's grenade, Hemoclobber heavy attack) can matter, but constant bonuses are better and the right tree is stronger anyway.
- Level 5: a huge defensive boost at low health, maxed at 50% resistance when you are at 50 HP, so all incoming damage is halved. With your armor you can tank several Fleshpounds for a few seconds on HoE. Get used to staying at 50 to 60 HP and do not heal yourself.
- Level 10: bigger clip size and +10% movement speed, which is extremely good.
- Level 15: perk weapons poison zeds. The damage over time is small and depends on weapon damage, but it kills the weakest zeds without further attention. It shows its power with the sniper rifle.
- Level 20: plain +20% damage with perk weapons.
- Level 25: the right option looks great on paper (slows zeds, strong poison) but you barely notice it without a Commando. The left option does not heal, yet AoE healing poisons zeds and distracts crawlers and stalkers that like to sneak behind you. Your choice.
Weapons
In waves 1 and 2 the starting pistol is enough to headshot most zeds; kite when needed and do not even buy armor, save the money for a shotgun.
On HoE, especially if your aim is poor, you can start the map as Berserker for waves 1 and 2 using the starting shovel, kiting and buying nothing for him. Use this spec:
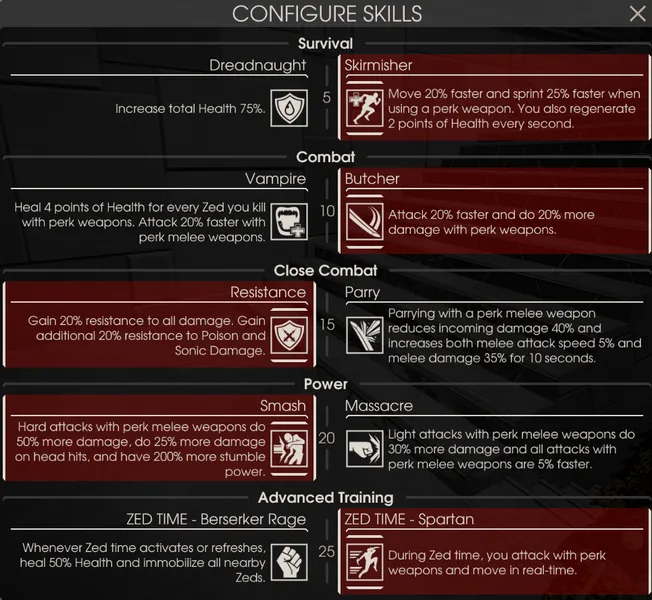 A Berserker spec for the opening waves.
At wave 3 switch to Medic, sell the shovel and/or medic pistol and buy a shotgun. Buy the sniper rifle before the final (boss) wave and upgrade it before the boss wave. The setup before the boss wave:
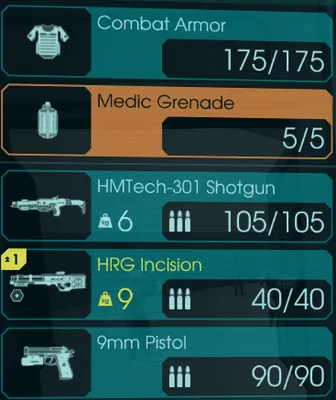 Loadout before the boss wave.
The shotgun gives great firepower, penetration, fire rate and reload. The sniper rifle is the answer for fat zeds and bosses, and its alt-fire healing dart can stun or even kill. Anything else risks cornering you or sending you running for an ammo box.
Tactics
Always know what lies behind you: being cornered and surrounded is the worst place on HoE. In "oh no" moments remember your healing grenades also poison zeds, and poisoned (green) zeds lose their focus on you for a second.
- Regular zeds: one-shot with headshots or any body part, and remember the poison.
- Siren: headshot with the shotgun. Husks: body shot with the shotgun at medium range. Riot zeds: shoot the legs. Bloats: one or two headshots, do not waste ammo on body shots.
- Use the Incision liberally. One sniper round on a distant riot zed or Siren before they buff allies is better than chaotically spraying shotgun ammo later with a shaking red screen.
- Scrake and Fleshpound: pull out the sniper rifle. It deals about 600 direct damage plus three ticks of 200 to 250 over two seconds (from the level 15 passive), and a one second electrocute that keeps zeds calm longer. On HoE a Scrake needs one hit anywhere with an upgraded Incision (without the upgrade: one Incision hit and one from any weapon, even the 9mm). A Fleshpound always needs two Incision hits anywhere; body shot first, and the second can even be your fists. Quarterpounds need one hit, and a perfect line can kill two or three.
- Most dangerous non-bosses: EDARs. They are robots and immune to poison (1 damage per tick), and even Incision cannot easily one-shot them on HoE. Bombers are the worst; kill them first or kite behind corners.
Bosses
Before the boss wave find fairly open space where you can kite, with objects that block line of sight to the nastiest attacks. Use the Incision mostly from the hip: there is no need to snipe. You usually kite while backing away; the Medic is fast enough, and sometimes it is smart to turn and sprint.
- Patriarch: one of the easiest. He often dies from damage over time while running away, even before his first heal. Avoid his rockets.
- Hans Volter: similar, but sometimes uses an energy shield which is almost immune to poison. Keep shooting him with the Incision.
- Abomination: fat and slow; kite and snipe.
- King Fleshpound: like the Abomination but he can hit you once or twice. Back away and shoot; avoid his beam behind corners or just crouch.
- Matriarch: the hardest, mostly because of the EDAR minions she summons. Do not get overwhelmed and kill them first. She herself is nothing special: back away and shoot at her head.
To learn the boss in advance type getall kfgamereplicationinfo bossindex in the console after the map starts (even in the lobby). It returns 0 Hans, 1 Patriarch, 2 King Fleshpound, 3 Abomination or 4 Matriarch.
Conclusion
With enough skill any perk can clear HoE solo, but the author finds Medic the easiest, almost boring. His latest example was Desolation: Survival, solo, 4 waves, HoE, with waves 1 and 2 played as Berserker and waves 3 and 4 as Medic, facing Hans Volter.
FAQ
- Which Field Medic skills does the guide use?
- The RRRRR spec, the right option at every skill tier. Constant bonuses beat the left side items, and the right tree is stronger overall.
- What should I buy before the boss wave?
- A shotgun and an upgraded sniper rifle (the HRG Incision, with its healing dart alt-fire that can stun or even kill).
- How do I find out which boss is coming?
- Type getall kfgamereplicationinfo bossindex in the console after the map starts: 0 Hans, 1 Patriarch, 2 King Fleshpound, 3 Abomination, 4 Matriarch.
