
KF2 Solo Hell on Earth Guide: Techniques and Perk Builds
A Japanese Steam guide to playing Killing Floor 2 solo on Hell on Earth, translated and condensed. Assumptions: level 25 perk, Long game (10 waves), official maps, the same perk for the whole run. For beginners the author suggests Suicidal or a 7-wave game first. The author argues solo play ("the marathon") trains aim, positioning and awareness that also help in co-op when a camp collapses. Version-specific notes refer to patch 1056 and may have changed. Compare with the Berserker solo Hell on Earth guide.
General techniques
- Reload cancel. Three versions exist: cancel the reload recovery with a bash the moment the magazine is loaded; cancel it by switching weapons; or hold fire during the reload and tap bash when the magazine fills, which cancels the bash and fires, giving the fastest first shot. Option 3 works with almost every gun and is essential for continuous fire.
- Hit weak points. Usually the head; Husks have the tank, the Patriarch the right arm. Each ZED has separate durability per body part (a Gorefast's arm reduces damage) and separate head and body health. Visible parts still count as weak points even while a ZED guards, so a head hit on a charging Fleshpound with crossed arms still gets the headshot multiplier. Aim at the jaw against double-blade Gorefast guards.
- Quick shot. Pop into aim-down-sights and fire, then drop back to hip fire to keep a wide view. Beginners from other games tend to ADS while enemies are in their face, a classic KF mistake. Mix hip fire, walking, running, ADS, and crouching depending on accuracy.
- Breaking through. Learn how to push through a blocked corridor (bash, knockback).
- Stomping. Jumping onto small ZEDs stuns them: useful to crush Crawler heads and when dropping off ledges. Jump into a knockback attack to fly far and escape, for example when a Husk fires behind you or a Fleshpound chases you.
- Bash. Bash a lot, so bind it to a comfortable key. It one-shots small ZED heads for free; with some perks it hits harder than a 9mm bullet. Rifles have a slightly offset hitbox, so aim a bit to the right. Practice on Crawler heads, which also prevents Elite Crawler gas, and it can strip a Bloat's guard. In the current version it can interrupt a double-blade Gorefast's swing.
Marathon basics
At the start of the author's solo career, wave 1 on Hell on Earth was nearly impossible; the current version is far more casual. First memorize the map and your escape routes, preferring routes where you can see ahead and open areas, with ledges you can jump from:
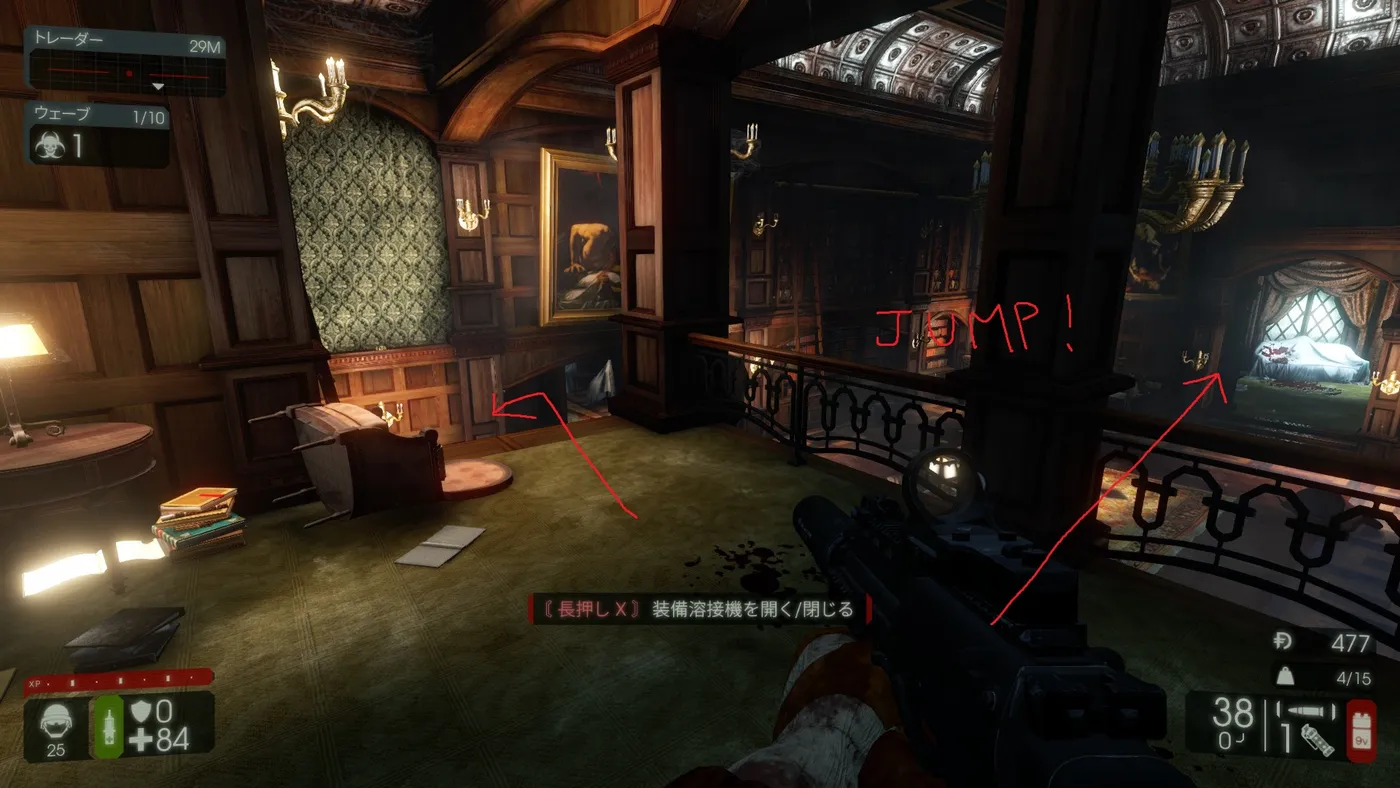 Example of a ledge route: jump from the right and ZEDs go around; jump from the left and they follow you down.
The most dangerous moments are going through doors and narrow passages, so always reload before them and throw a preemptive grenade into spots that scare you (grenades are plentiful in solo). Understand the rules: ZEDs spawn in the next room after you kill, teleport in if you get far away, and some come out of holes. Use headphones to hear large ZEDs and Stalkers. Finally find flat spots to turn and shoot, especially for shooter perks, who repeat run, turn and shoot to thin the crowd. On bosses, corridors may even be good shooting spots.
Official maps
Biotics Lab, Burning Paris, Outpost, Volter Manor, Catacombs, Evacuation Point, Black Forest, Farmhouse, Prison, Containment Station, Hostile Grounds, Infernal Realm, Zed Landing, The Descent, Nuked and The Tragic Kingdom. Easy maps have flat ground, good light, stairs or ledges to jump, open areas and wide passages; Paris and Outpost are good introductions. The Descent is terrain-wise the worst.
Boss notes
- Buy one or two high-damage boss weapons in advance and keep them on your route; ammo spawns during boss fights.
- Boss minions: when the boss heals, more ZEDs spawn; the second and third heals add medium ZEDs. Kill Husks immediately and plan for Bloats blocking your path.
- Hans: the easier boss; in solo you cannot hit his back, so aim at the head. High-DPS perks should break the shield.
- Patriarch: the worse draw, very slow to kill. Aim for the soft right arm. Minigun, rockets and tackle all hurt; use obstacles. To kill him before healing, use the secondary weapon to reduce health and finish with your main weapon just before he escapes. He cloaks, so use headphones to track his direction.
- King Fleshpound: probably the weakest boss now, just a tough Fleshpound; aim at the head or chest core, and unlike the Fleshpound, explosions are no longer a weakness. Crouch to avoid the beam when you are on flat ground; use cover on slopes.
Perks
 Berserker.
Berserker is probably the easiest in any situation. Very fast, tough and heals as it kills, no ammo management and Zed Time clears a room.
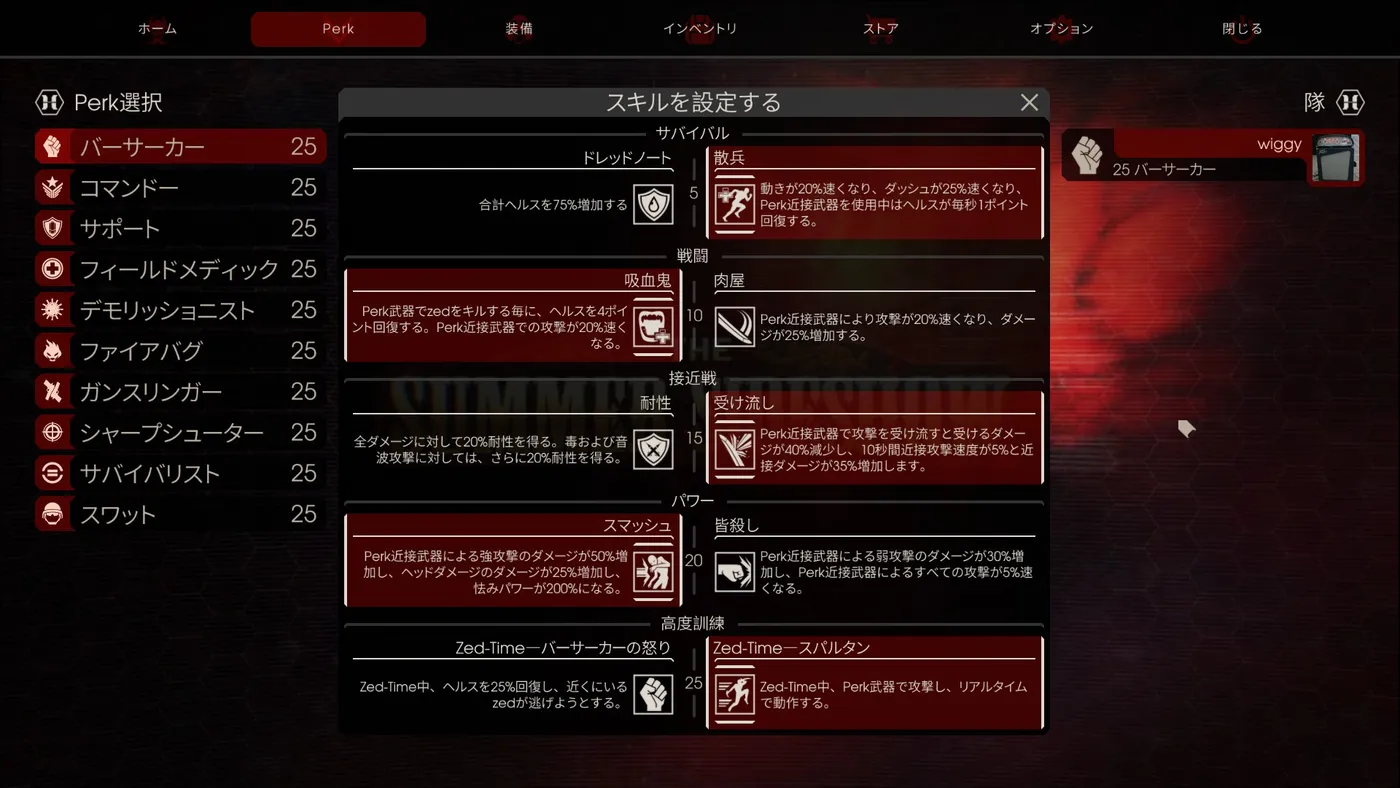 Recommended Berserker skills.
- Skills: right-hand level 5 skill is the fastest of any perk, easily outrunning enraged large ZEDs on flat ground; choose the left one in narrow areas such as The Descent. Level 20 can be right until you buy the Eviscerator.
- Play: always parry for the buff, and the Katana can cancel parry recovery with reload. Wave 1: avoid Bloats without the buff, use the 9mm. Waves 2-3: buy the Katana; use EMP on Husks. Wave 4+: sell the early weapons and buy the Eviscerator, switch level 20 to the left, throw it through rows of ZEDs (aim at legs against metal-parts Sirens and Gorefasts, heads against Husks and Bloats; one Eviscerator shot kills a Scrake and two a Fleshpound). Buy the Katana back when you have money, since it clears trash faster.
 Commando.
Commando has low breakthrough but quickly kills distant medium ZEDs; seeing Stalkers is a great help and extended Zed Time matters. Ammo is easy, but guarded Gorefast groups and Fleshpounds are unpleasant.
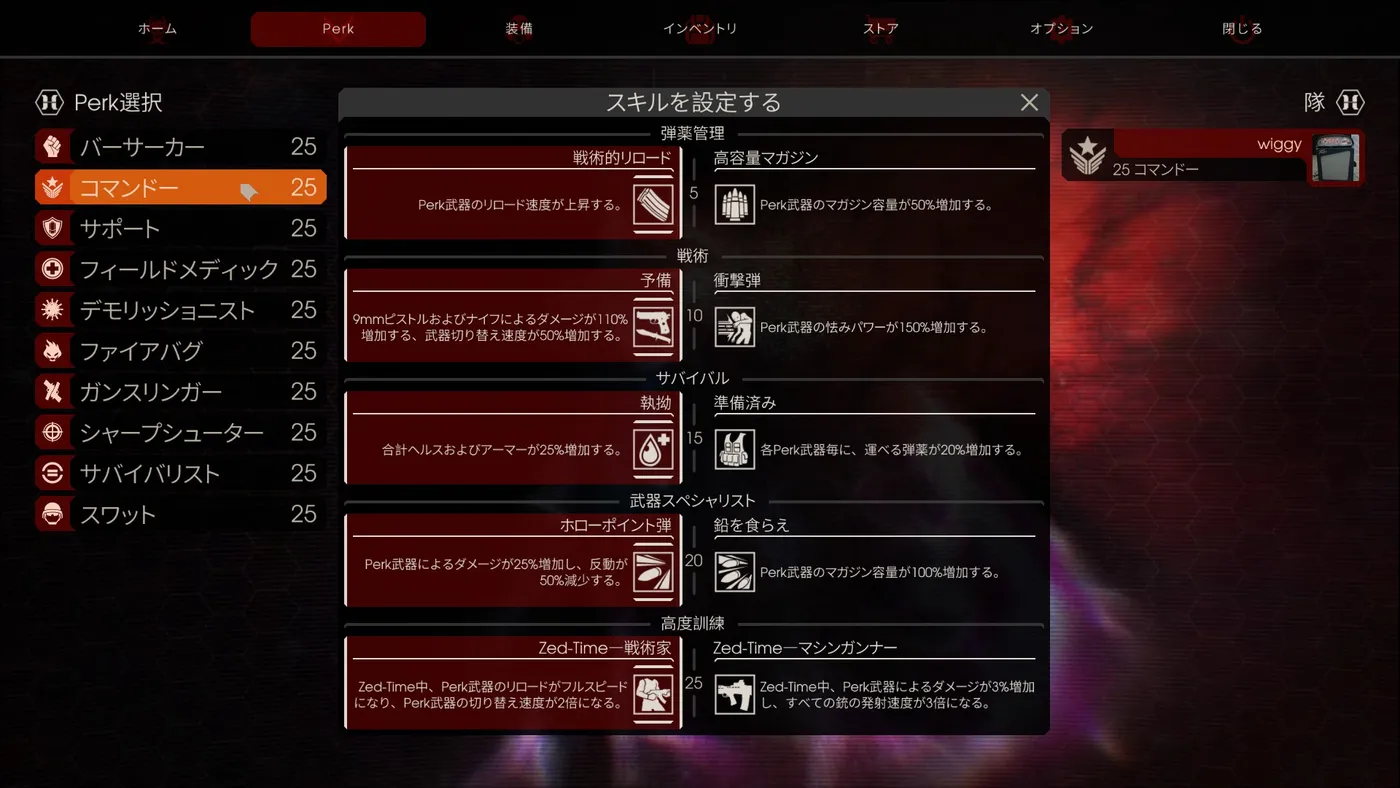 Recommended Commando skills.
- Wave 1: Varmint semi-auto (burst against double Gorefasts and Bloats). Wave 2: add the Bullpup. Wave 3: sell everything, buy the AK and some ammo; use short bursts and burst mode against Gorefasts. Wave 4+: the Stoner LMG as main is the author's favorite (needs reload cancels and recoil control) with the AK as a sidearm; the SCAR's 20-round magazine is too small. The medic assault rifle after version 1056 is very usable with its stagger and almost no recoil.
- Fleshpounds: throw 2 to 3 HE grenades; they are particularly effective and the gun finishes it. Check for Sirens before engaging.
 Support.
Support is slow but has very high breakthrough, loose aiming and no Gorefast stress. Ammo management is hard early, and it is weak against Bloats and Husks until the AA-12 arrives and against the Patriarch.
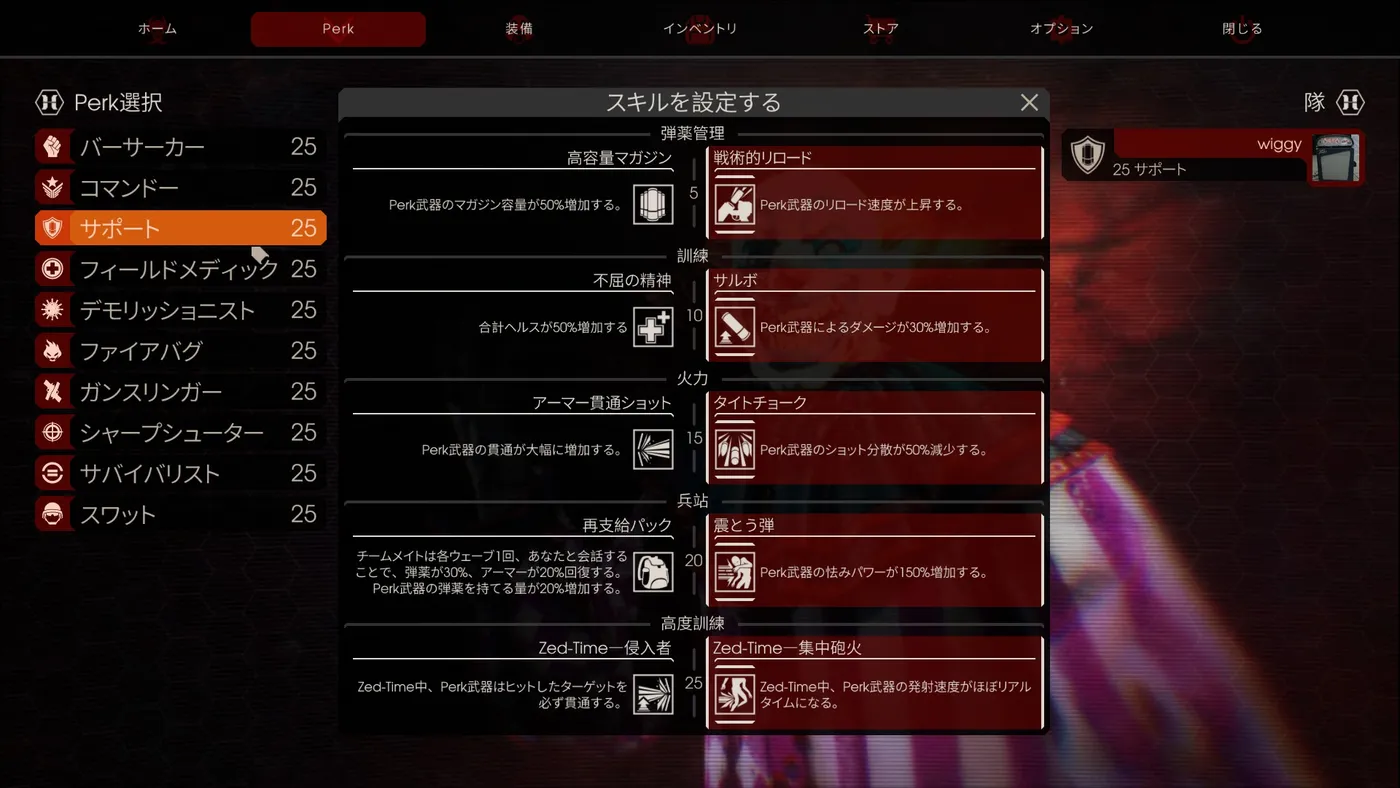 Recommended Support skills.
- Wave 1: the starting shotgun with penetration, heads on Gorefasts, 9mm on Bloats. Wave 2: buy the Boomstick and use its alternate fire on medium ZEDs. Waves 3-4: a stopgap (the author uses the M4). Later: sell everything for the AA-12, then add the Boomstick; two weapons are enough. Use Boomstick alternate fire to the head to one-shot a Scrake or Fleshpound (aim at the charge or the attack motion). Jumping and firing it lets you rocket-jump. Against the Patriarch you may take the level 10 left skill for 50 extra health.
 Field Medic.
Field Medic is fast and very tough, with great breakthrough but terrible attack power and heavy recoil: by far the most annoying shooter in solo.
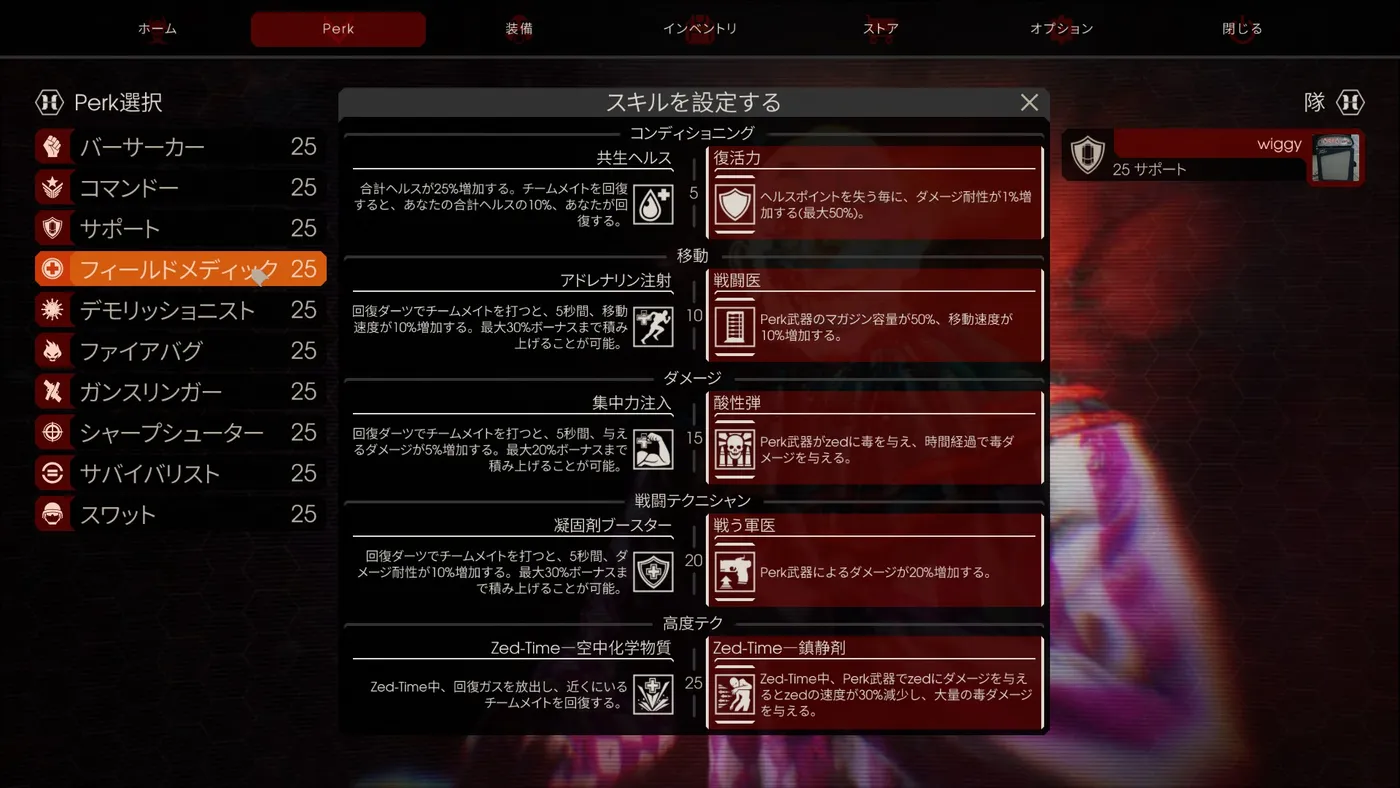 Recommended Field Medic skills.
- Acidic Rounds do little damage but make small ZEDs panic, easing breakthroughs. Do not take this build to co-op.
- Wave 1: knife also applies acid; save pistol ammo. Wave 2: buy the SMG. Wave 3: swap for a shotgun. Wave 4+: assault rifle, but add a shotgun for large ZEDs. Against a raged Fleshpound, throw a grenade in your path and fight inside the smoke. The Hemoclobber (version 1056) is weak in co-op but strong in solo for large ZEDs, and the assault rifle buff removed the perk's weakness. An old alternative: use a Berserker hammer with the AR for parries (a Fleshpound dies in three hits).
 Gunslinger.
Gunslinger is fast, good for beginners at shooter perks thanks to accurate hip fire, with fast large ZED kills (Scrake in three shots) and a nice synergy with the Centerfire, but hates Stalkers.
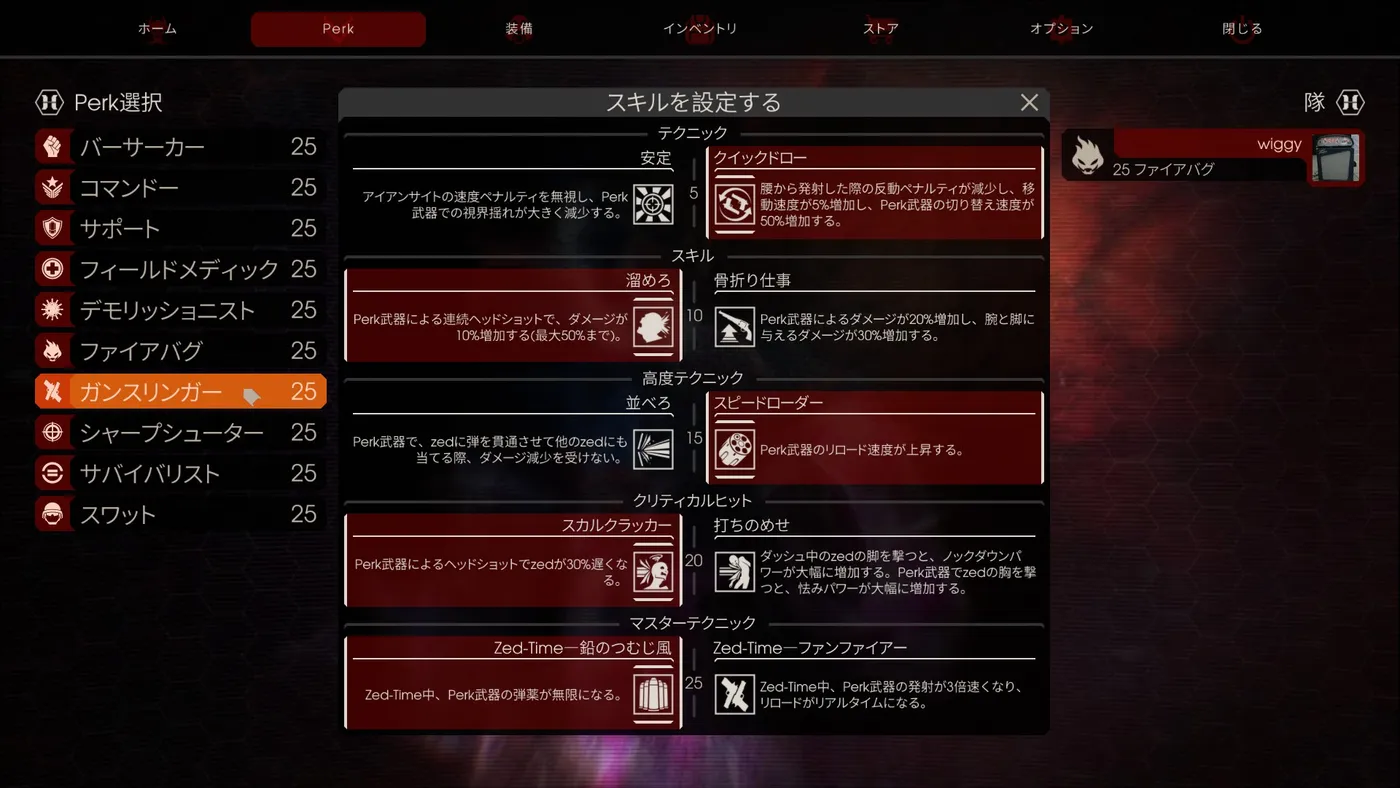 Recommended Gunslinger skills.
- Dual weapons tip: buy one, drop it, buy another and pick the first up to double starting ammo (not possible in co-op). Wave 1: punches and 9mm, revolver on Bloats and double Gorefasts. Wave 2: Centerfire. Wave 3: sell the starting revolver, add 1911s. Wave 4: dual Desert Eagles. Wave 5+: Magnums; by wave 10 Centerfire plus dual Magnums is enough. Keep Stalkers off your back.
 Demolitionist.
Demolitionist has demanding early ammo management and a unique rhythm, soft because there are no general resistance skills, but its explosion resistance lets it survive bosses. Punch heavily in waves 1 to 10.
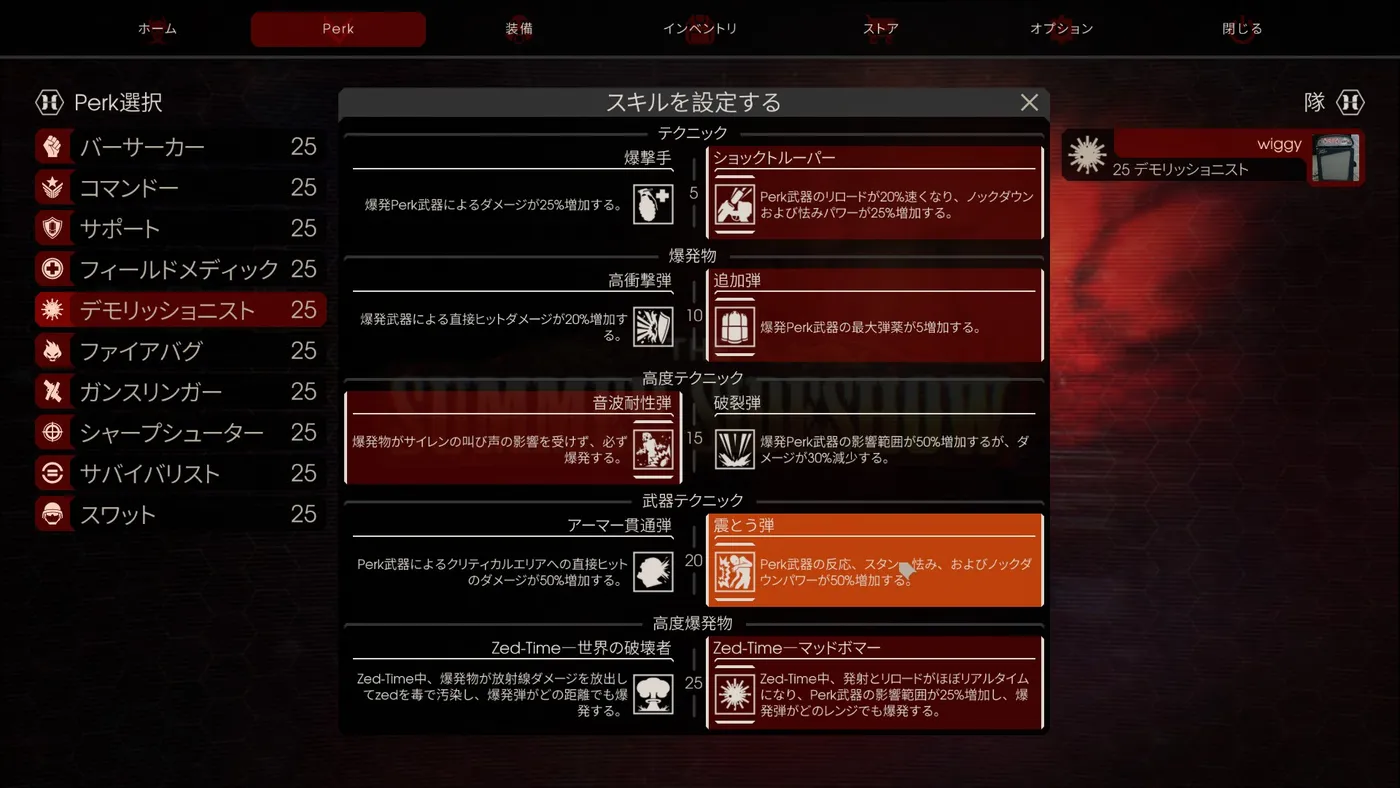 Recommended Demolitionist skills.
- Wave 1: punch, 9mm on Bloats, grenade pistol on groups. Wave 2-3: buy the M79 if you have 12 grenades left for the pistol; fire from a distance because of self-damage. Wave 4-6: RPG, then keep the grenade pistol topped up. Wave 7-10: fire the RPG constantly; self-damage is minor. Dynamite stuns Fleshpounds (not enraged ones, but use it for damage) and can break blocking Gorefast groups. An RPG direct hit kills a Scrake instantly. Welding doors is tolerated in solo and can set up an RPG blast on Fleshpounds. Against bosses use RPG with reload cancels; the Patriarch is stable if you mind the minigun; C4 is risky but possible.
 Firebug.
Firebug breaks through easily since burning ZEDs lose their contact hitbox and needs no aim; the Caulk n' Burn is overly generous with ammo.
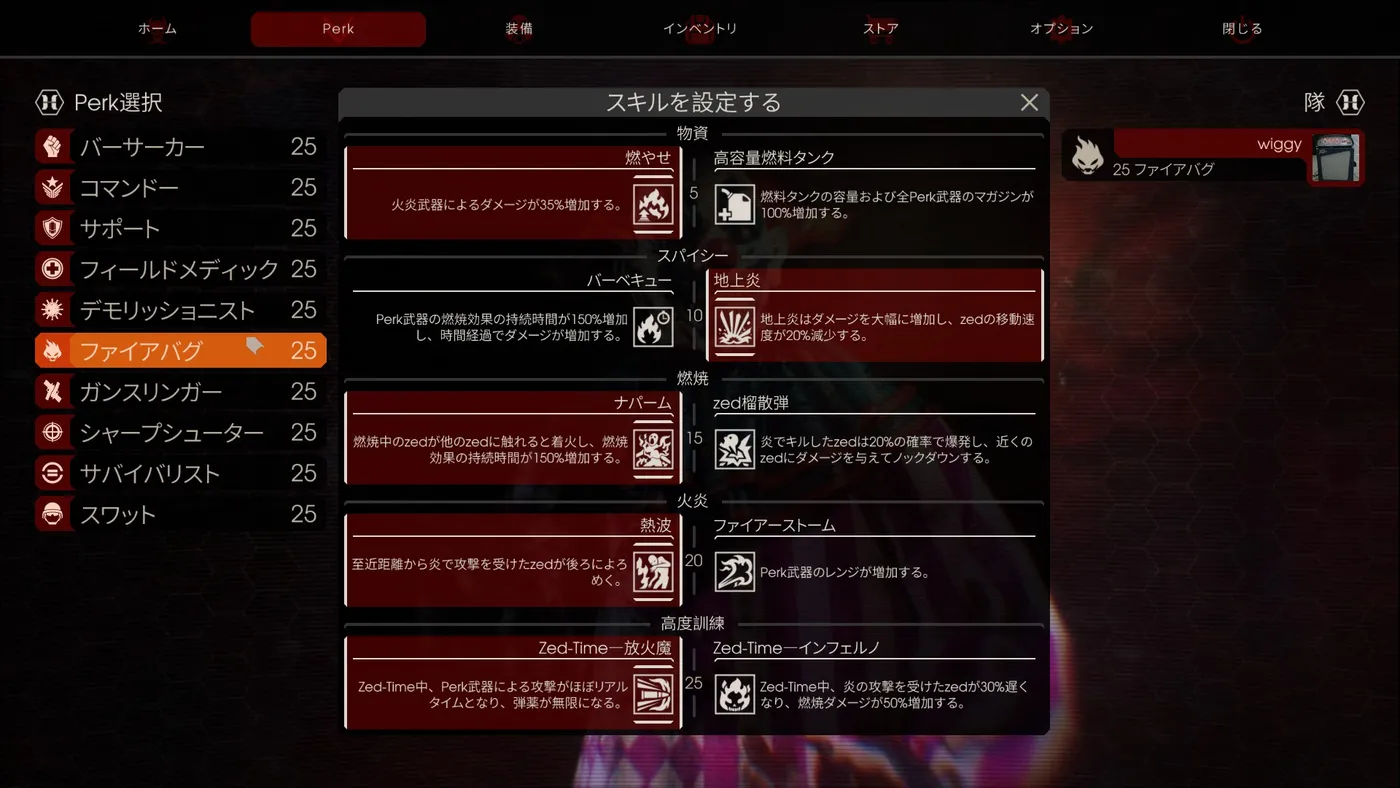 Fixed Firebug skills.
- Wave 1: burn everything. Wave 2: a trench gun against Husks. Wave 3+: buy the Microwave Gun when affordable. Everything except Fleshpounds, Husks and bosses dies to the Caulk n' Burn, even Scrakes; shoot the ground and leave blue flames to save fuel. The Patriarch is the problem boss because Firebug is slow, has no extra health or resistance and the Microwave Gun is not a projectile; fight while running and use ground and Molotov fire. Hans is trivial.
 Sharpshooter.
Sharpshooter has middling breakthrough but is fast and top class at killing large ZEDs; ammo is hard and Stalkers are hated.
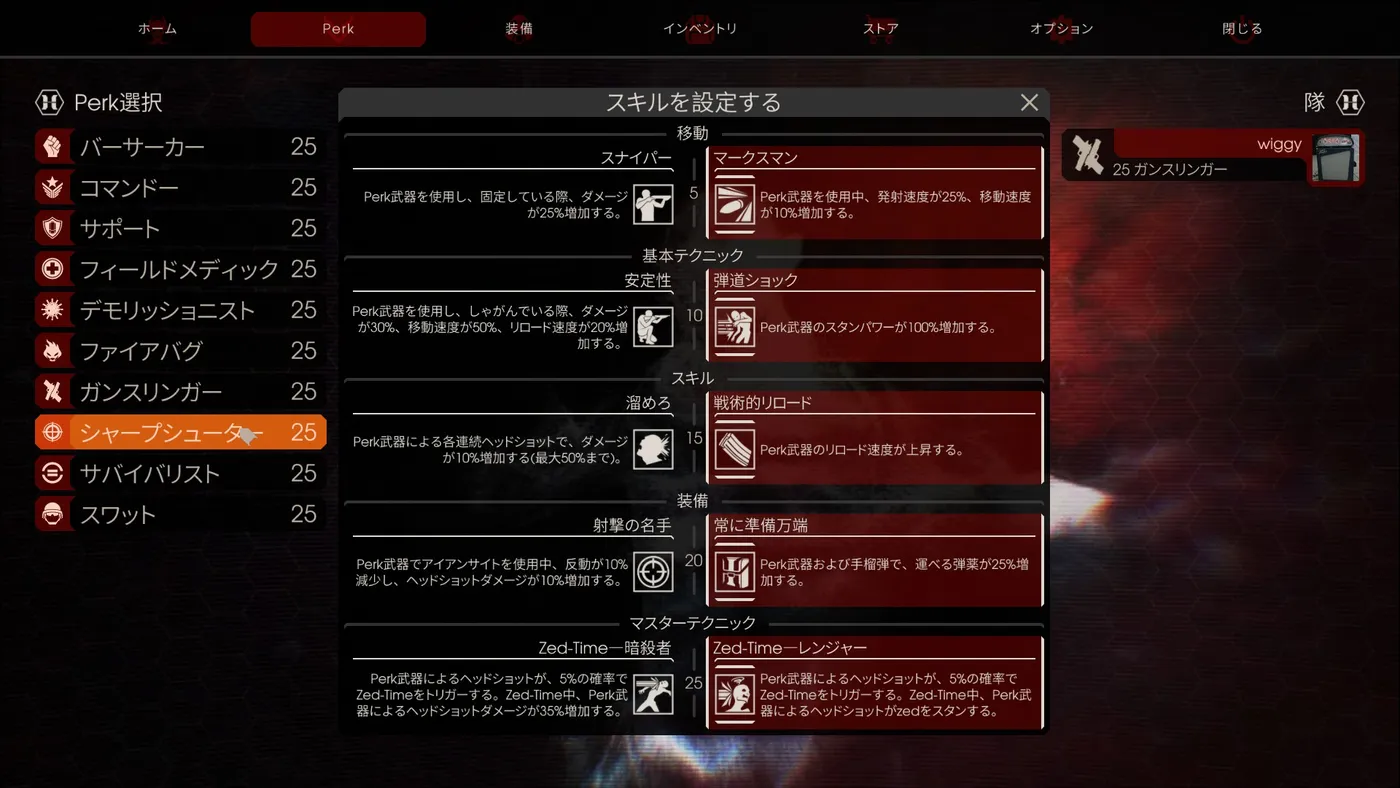 Recommended Sharpshooter skills.
- Take Marksman and Tactical Reload in solo. Wave 1: 9mm headshots one-shot small ZEDs. Wave 2: Centerfire. Wave 3-4: crossbow or the EBR. Wave 5+: sell them for the Railgun and always buy Centerfire ammo first. Practice putting the Railgun on a charging Fleshpound's head; a Scrake dies in two body shots. The freeze grenade is a reliable last resort when surrounded.
 Survivalist.
Survivalist feels half-baked in both modes and shows how strong the specialist perks are. The easiest way to play it is as a weaker Berserker, with good resistances and heavy armor. Only the level 10 skill matters; it makes you the fastest perk while holding melee. The author warns about the trader's auto-upgrade trap, which can sell and replace weapons without ammo.
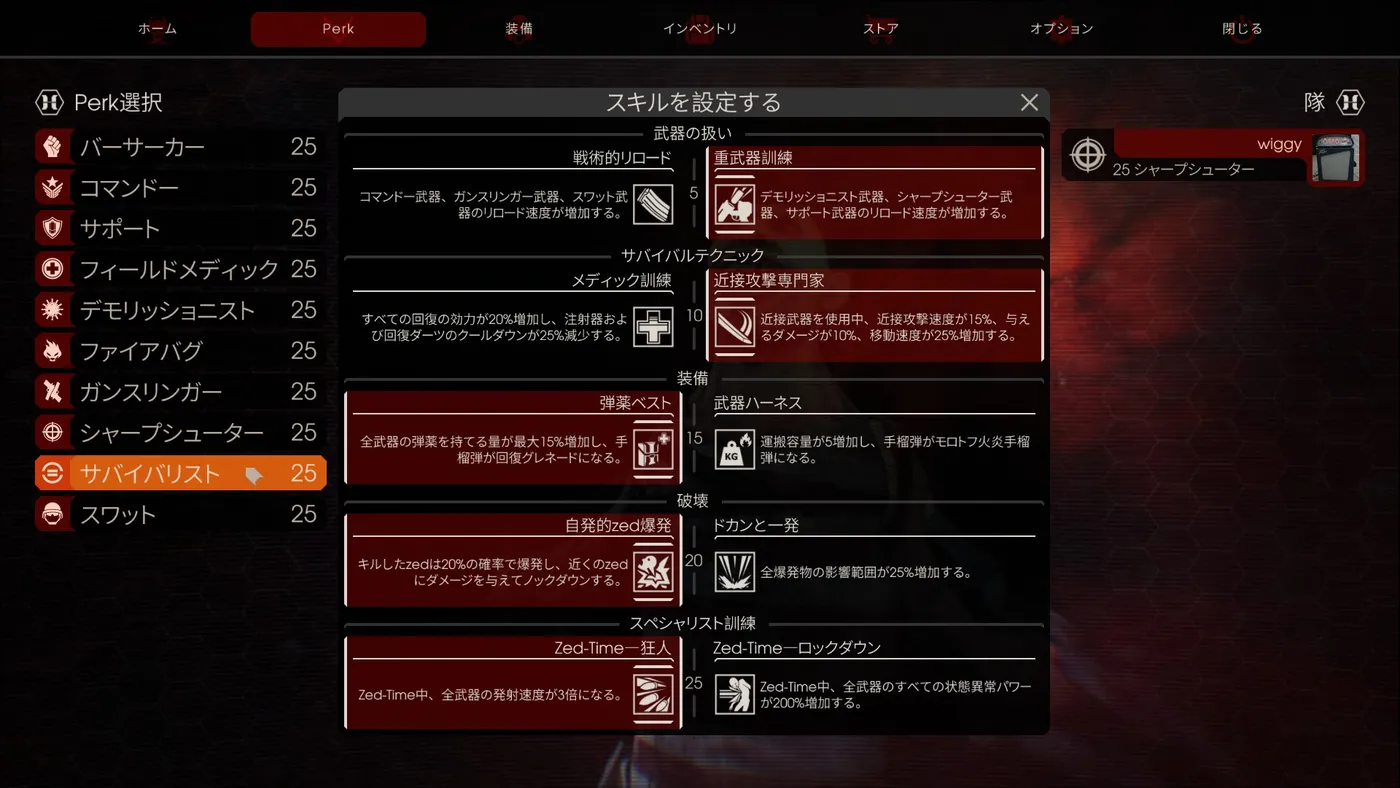 Survivalist skills.
- Waves 2-3: buy a long-range tool for medium ZEDs (Centerfire or a recyclable crossbow). Wave 4: the Eviscerator, then play like a Berserker.
 SWAT.
SWAT relies on flashbangs in solo (no self-damage, fast, small radius, can clear Clots, Stalkers and Crawlers, and stuns everything but raged Fleshpounds and bosses), and has a lot of rate of fire and magazine. It is easy though slow.
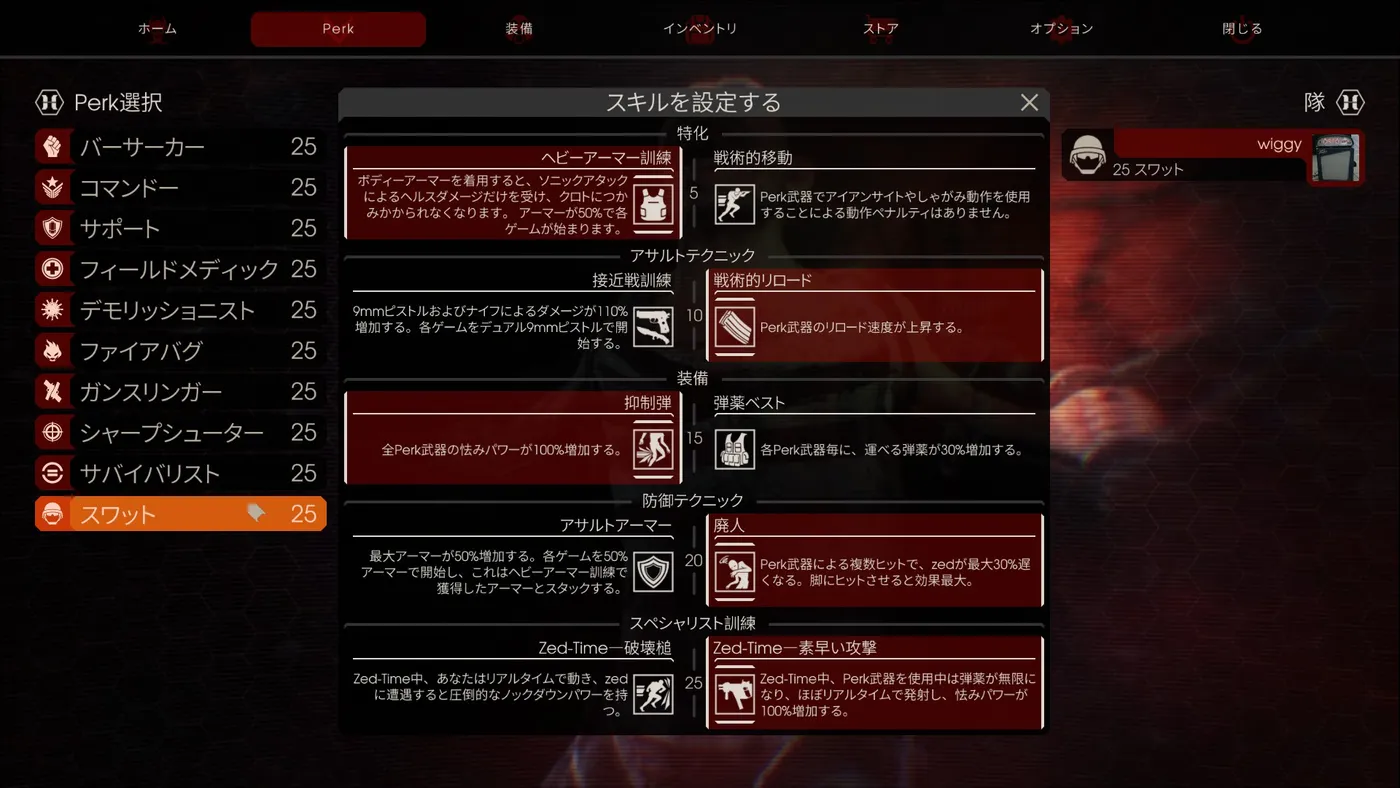 Recommended SWAT skills.
- Wave 1: dual 9mm or knife. Wave 2: MP5. Wave 3: sell both for the P90 and buy the Kriss with the money from the 9mm. Wave 4+: Kriss, then the P90 as a second gun; keep the Kriss on full auto for Fleshpounds. Armor reduces how often the skills trigger. Against a Fleshpound hit with a flashbang and follow with the Kriss, repeating one at a time. Stun has a cooldown per ZED, so spend your five flashbangs wisely.
