
KF2 ZED Guide: Health Rules, Resistances, Bosses (Japanese)
A very detailed Japanese Steam guide, "an enemy introduction by a beginner for beginners", translated and condensed. It explains how ZED health, damage resistances and status effects work, then covers every small, elite, medium, large and boss ZED with weaknesses and counters. It is the most mechanical ZED reference in this batch. Compare with the shorter ZED resistances page and the ZED types overview. Multipliers come from the game version of the guide (around 2023) and may have changed.
ZED basics
ZED is the common name for the enemies, mostly bioweapons produced by cloning. They fall into four size classes: small (swarms, also spawning from vents and manholes), medium (one to several at once, each tough or with special abilities), large (heavy tanks that appear from mid waves and in groups late in the game) and bosses (one at the end, killing it wins the match). On higher difficulty ZEDs have more health, waves are larger, attack and movement speeds rise, small and medium ZEDs run more often, and elite variants replace base ZEDs more often. More players means more ZEDs, more large ZED health and more large ZEDs at once.
Health structure
Most ZEDs have two health gauges, head and body, and emptying either kills them. When you destroy the head, the body takes heavy damage that depends on the weapon; if that does not kill it, the ZED survives for a while headless. Headless ZEDs do not run and do not grab, but still strike you if close, and they somehow know where you are. They die after a short time and can be shot in the body. Headless states are more common with high health (Bloats and Husks), on high difficulty and when a low-power weapon kills by headshot only.
Some ZEDs have extra gauges, for example the Husk's backpack tank and the E.D.A.R's chest core. Metal parts and held weapons count as flesh for the game but reduce damage a lot. Some armor has its own health and must be destroyed before the body takes damage; the SWAT G36C has a special armor-piercing effect against these (EDAR chest armor, Rioter head and body armor, and the Matriarch's arm cannon).
Guard and dodge
ZEDs with weapons can guard: after being hit they raise the weapon in front of the head, cutting damage by about 10 to 20 percent and status buildup by 80 percent for just over a second, and cannot be stunned or knocked down meanwhile. Guard chance rises with difficulty, and some ZEDs do not guard on low difficulty. Agile ZEDs dodge by jumping or rolling after being hit, even by damage from another enemy; this makes an Elite Crawler's gas cloud scatter the ZEDs behind it. Dodging has no cooldown. The AI also triggers guards and dodges in other situations, such as being aimed at with a sniper scope, shotgun or arrow fire, being lit by a flashlight, ground fire or ice nearby, or standing in a Husk's line of fire. Only Hans Volter both guards and dodges.
Damage and status resistance
Each ZED has resistances per damage type (the same on every body part), for example the Cyst resists almost nothing but takes 75 percent less from Microwave damage and 1.5x from SMGs and assault rifles. Separately, body parts can have their own damage multipliers (a Gorefast takes 1.1x to the head but only 0.2x on the arm blade). These do not change with difficulty or player count. Every ZED lacks resistance to freeze, bleed, shell impact (direct grenade hits) and EMP damage.
Status effects work with a buildup bar that triggers at 100 and drains at 20 per second, so you must apply it quickly. The resistance can vary per body part (a Siren takes 2x stun on the head and 0.5x elsewhere). EMP disrupts special actions at 25, bleed triggers at 65, and EMP panic needs 100. After a status triggers, the ZED briefly cannot be afflicted with it again.
Jumping and stomping
ZEDs jump over ledges and can land on you, dealing damage by weight: small Crawlers and Cysts little, but a Bloat, large ZED or boss is a death-level stomp. Avoid fighting under drop-offs or next to ledges. Seasonal events change ZED looks, and on Santa's Workshop they are always in winter dress.
Small ZEDs
All small ZEDs (except the Gorefast) can spawn from vents and manholes and have poor status resistance.
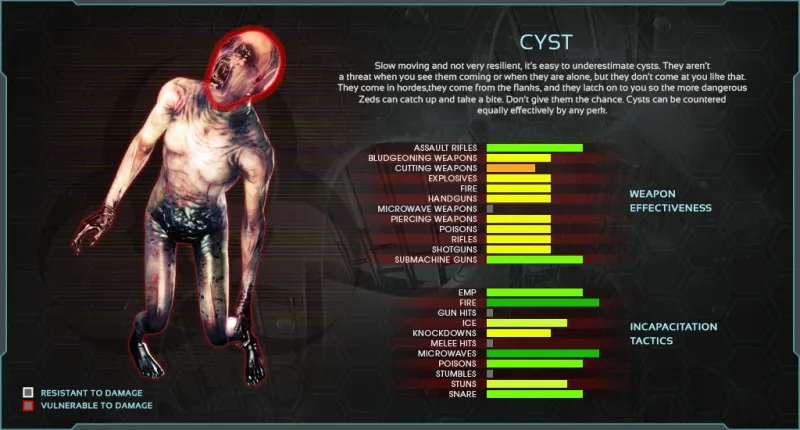 Cyst, the weakest Clot.
- Cyst: slow, weakest small ZED, but sneaks in through vents and grabs players. Weak to SMGs and assault rifles; avoid Microwave weapons, which it resists strongly.
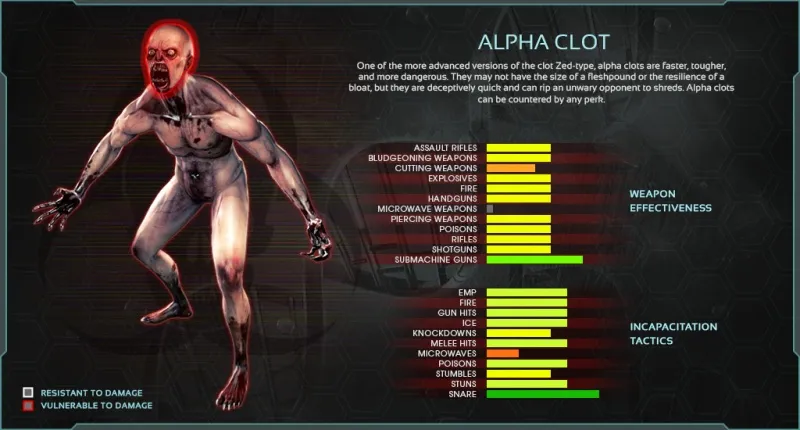 Alpha Clot.
- Alpha Clot: more normal walking speed, same behavior. Weak to SMGs. On Suicidal and above it may be replaced by the dangerous Rioter.
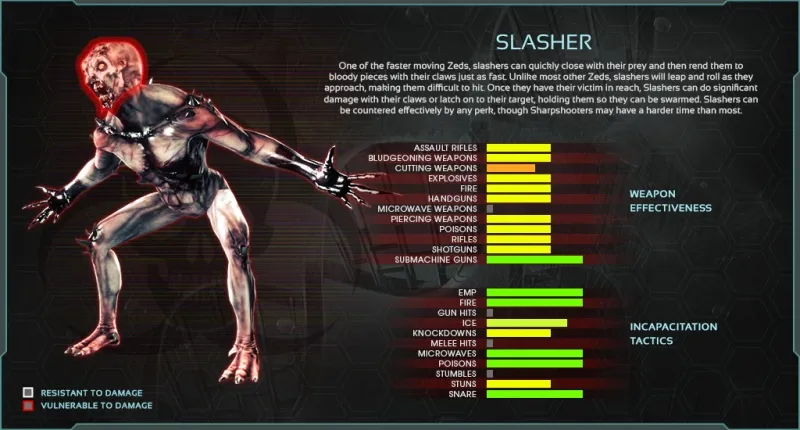 Slasher.
- Slasher: fast and aggressive, often running, and can roll or leap aside to dodge. Kill early with anything but Microwave.
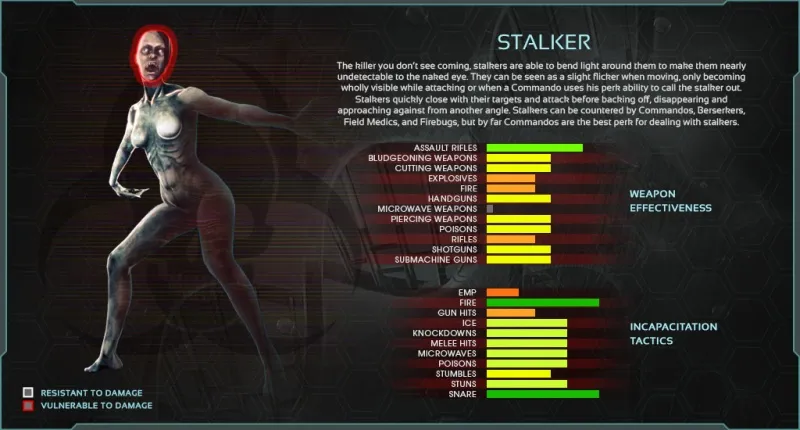 Stalker.
- Stalker: cloaks fully (with a faint shimmer), low health, very fast, and acrobatic attacks. The player voice lines warn you of nearby cloaked ZEDs; a Commando near them makes them glow red; EMP removes the cloak; fire also reveals them. Weak to assault rifles. Does not appear in the first wave.
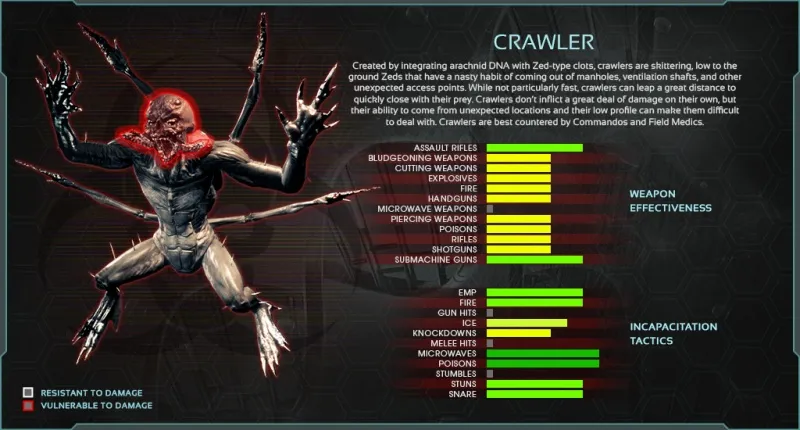 Crawler.
- Crawler: tiny spider-like ZED with the lowest health of all, dark and fast. Easily stomped by jumping (some weeklies use this; other ZEDs can be stomped too with stairs or ledges). Often spawns in big groups and dodges with side hops. Weak to SMGs and assault rifles. From Hard it may become an Elite Crawler.
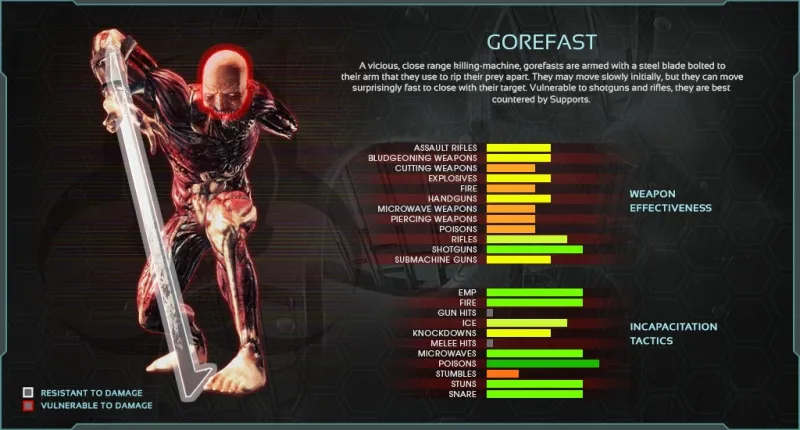 Gorefast.
- Gorefast: one arm is a metal blade. The toughest small ZED, with strong chain attacks. It runs when close or hit, and raises the blade to guard the head, cutting damage by 80 percent. Because it does not run while guarding, body shots work. It does not spawn from vents. Weak to shotguns (1.6x), assault rifles and rifles (about 1.2x). Support starting weapon is aimed at it in early waves.
Elite small ZEDs
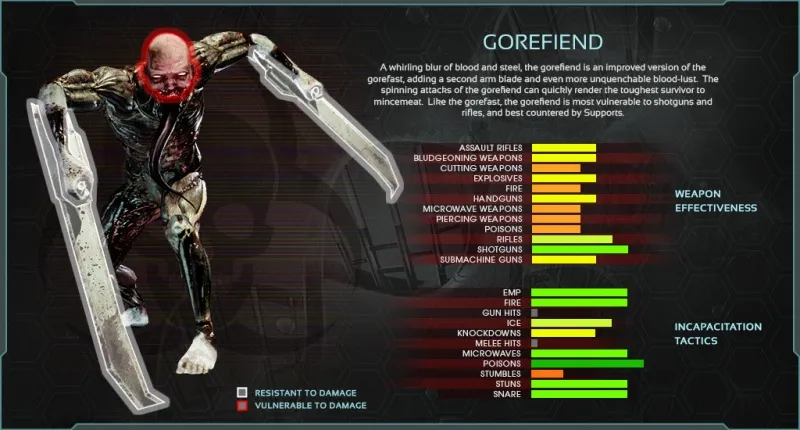 Gorefiend.
- Gorefiend: replaces Gorefast; black skin and two blades, body health 2x and head 3x. Guards with both blades crossed and still cuts blade damage by 80 percent. Same weaknesses; Support should blast it first. From Normal.
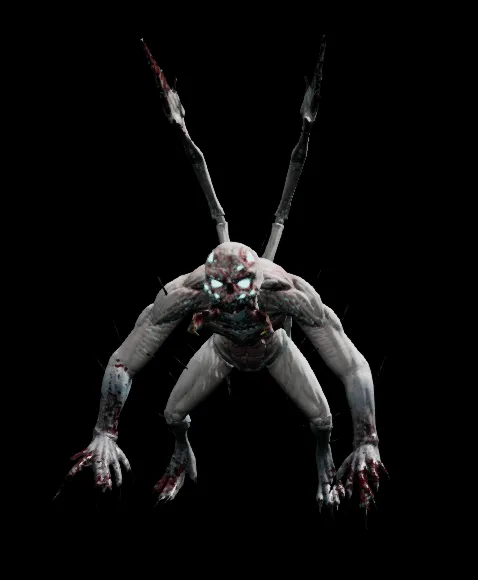 Elite Crawler.
- Elite Crawler: white-skinned Crawler with the same stats; if killed by body shots it leaves a lingering poison cloud that damages and obscures vision, and makes other ZEDs scatter. Head kills avoid the cloud. From Hard (only 1 percent chance on Hard); in Endless from Normal.
 Rioter.
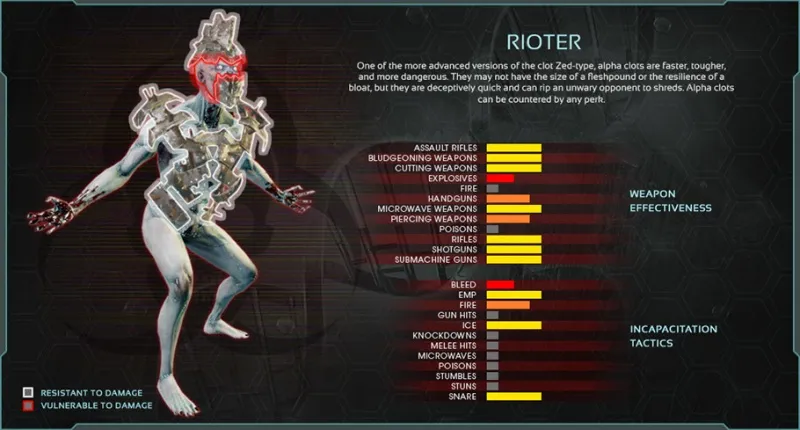
- Rioter: replaces Alpha Clot with head and chest armor; body health 3x and head 6x or more plus separate armor gauges. When the armor breaks it starts running. While armored, only limbs and back can be hurt effectively, although a one-shot head kill can bypass the helmet. The SWAT G36C is built for this. It buffs nearby ZEDs (eyes glow, attack up at least 20 percent, run) and itself (attack x2.5). Very weak to fire (3x, also against armor) and the Arc Generator (3.5x). Appears only on Suicidal and above.
Medium ZEDs
 Bloat.
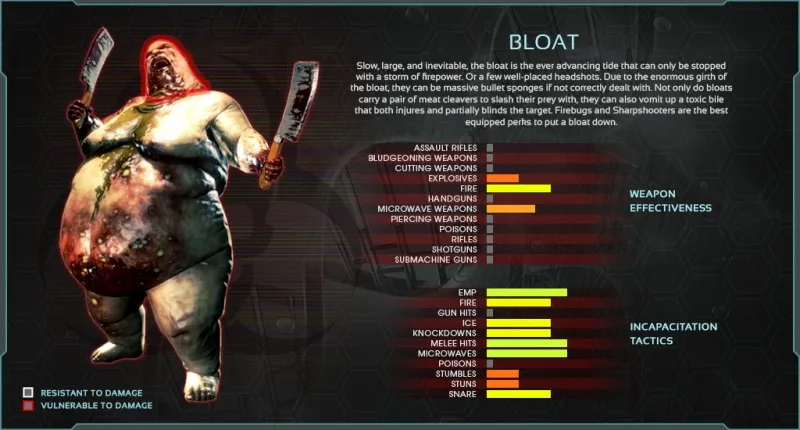
- Bloat: obese ZED with very high body health and strong resistances that shields other ZEDs. Guards with its cleavers (80 percent cut), has low head health and explodes into poison with a poison mine when killed by body damage, so kill the head. Vomit does damage over time, blurs vision and cannot be guarded; short range. Strongly resists poison, 3 to 5 tenths of melee, bullets and explosives. Weak (no resistance) to fire, and it does not explode if burned to death (burns by Spitfire or Dragon's Breath direct hits are not fire). The only medium ZED present in the first wave.
 Siren.
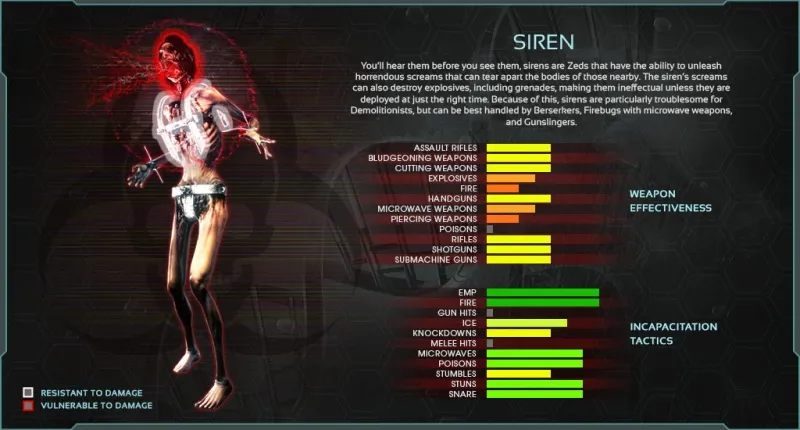
- Siren: thin woman with a metal harness. Her scream ignores armor, distorts vision and fizzles explosives; damage rises the closer you are. It is a special action, so EMP temporarily stops it. A nightmare for Berserkers (answer with EMP grenades) and Demolitionists (the sonic-resistant rounds skill fixes it). Resists penetration, poison and fire; the harness halves damage, so shotgun users find it hard at mid range. Slashing, blunt and bullets are fine on unharnessed parts.
 Husk.
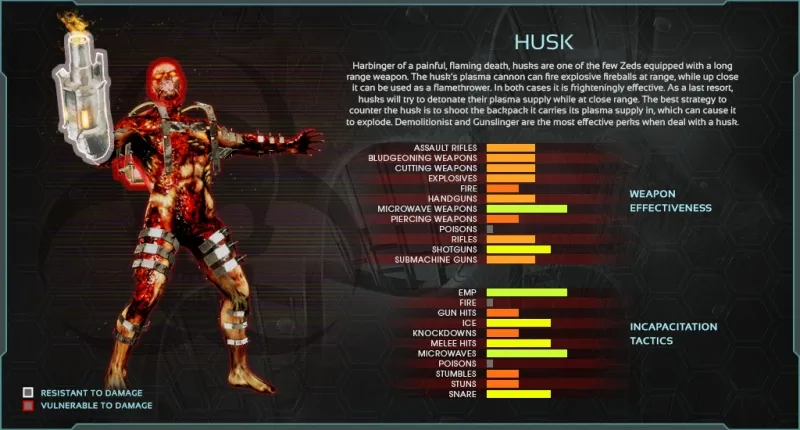
- Husk: fuel tank on its back and a flame cannon arm. The best sniper among ZEDs, firing exploding fireballs that also set you ablaze and knock you back; projectiles can hit other ZEDs. At low health it dashes in and self-destructs, and on Suicidal and above it also uses a heavy flamethrower. Body health like a Bloat, head like a Siren body, and the cannon halves damage. The tank has its own low health and takes 1.5x; destroying it causes an explosion that damages ZEDs but not players. Weak to Microwave (1.15x) and shotguns; strongly resists penetration, poison and fire. EMP blocks its flame attacks. Aim for the head or tank quickly, or break line of sight and wait for it to come close.
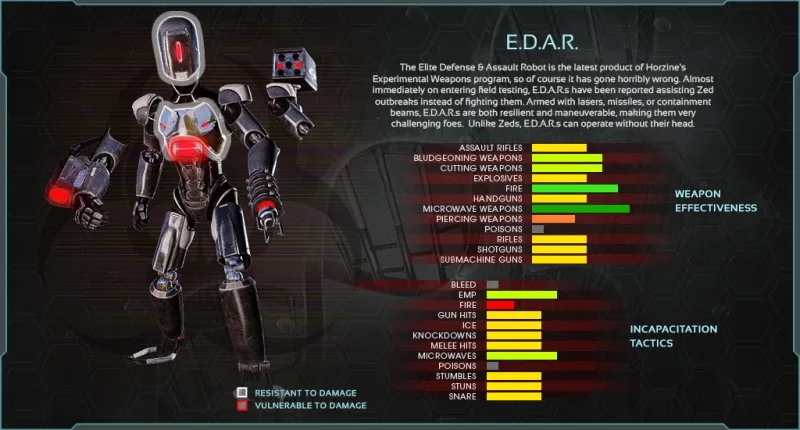 E.D.A.R.
- E.D.A.R. (Elite Defense and Assault Robot): a rampaging security robot counted as a ZED. Killing the head does not kill it; the chest core is the weak point (3.5x damage, so even a 9mm can break it) and its EMP burst hurts only enemies. Armored head and chest have separate health; breaking the chest armor stops its dashes and dodges. Replaces Husks or Stalkers at random. Weak to explosives (2.5x), Microwave (3.25x), Healing Flame (1.2x), Hemogoblin bleed on armor (5x) and Arc Generator on the body (3.5x, alt fire 2x); poison does almost nothing. Three types: Blaster (rapid lasers), Bomber (three unguided rockets) and Trapper (a capture beam). Their shots can hit other ZEDs, so you can use ZEDs as cover.
Large ZEDs
They appear from mid waves and have very high health, attack and resistances. Their health grows with player count and they can enter a rage; multiple can spawn late. Players voice a warning when one approaches. They also use "unparryable" attacks (weapon flashing red). They have some EMP status resistance but EMP's special-action block still applies easily.
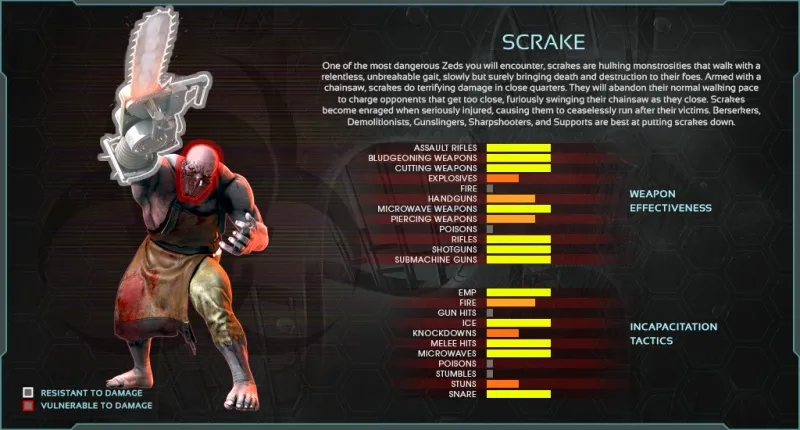 Scrake.
- Scrake: enrages when its health falls under a threshold that depends on difficulty (50 percent Normal, 75 percent Hard and Suicidal, 90 percent Hell on Earth) and never calms down again, running constantly with triple slashes and unparryable chainsaw attacks. Normally it walks, with two-hit slashes and lunging steps that are hard to sidestep. The chainsaw guard cuts damage by 80 percent. Strong resistances to penetration, poison, fire, explosives; individual resistances to the Tesla Launcher and Hemogoblin. Status effects mostly fail except head stun and slowdown; freeze grenades and flashbangs work even when it is enraged. Weak to Microwave (1.15x), RPG direct hits (4x) and medic missile direct hits (3x). Standard method: stop it with a freeze grenade or flashbang and focus the head. Clear the nearby ZEDs and reload first, since freeze or stun lasts under 2 seconds.
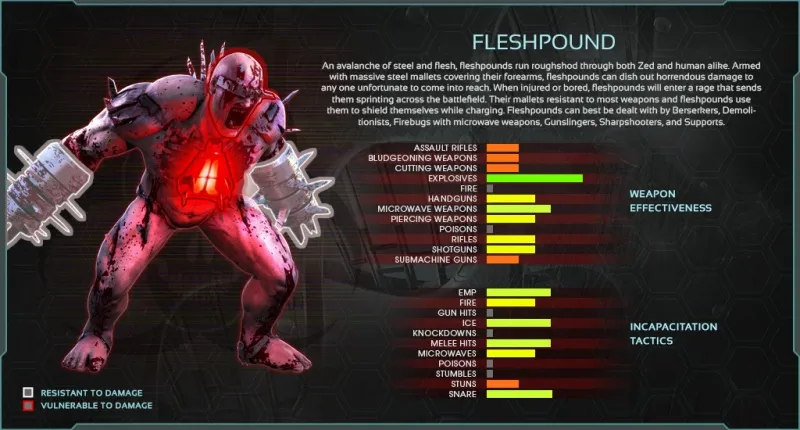 Fleshpound.
- Fleshpound: the highest health besides bosses, with arm grinders that cut damage by 80 percent. It rages in two ways: it sees a player for 10 to 14 seconds (switching targets resets the timer) or it takes 276 total damage. On Suicidal and up it may spawn already enraged. Raged, it charges and cannot be easily stunned (75 percent status cut) and any hit returns it to normal; there is no cooldown before it can rage again. In its normal state the chest panel is yellow; enraged, red. Resists slashing, poison, fire, SMGs, assault rifles and the Tesla Launcher, and most other attacks do 0.6 to 0.75x. Weak to explosives (1.5x), Microwave (1x) and the Helios Rifle (0.8x). Head and chest panel take 1.1x. Use freeze grenades or flashbangs when it is calm, never while enraged.
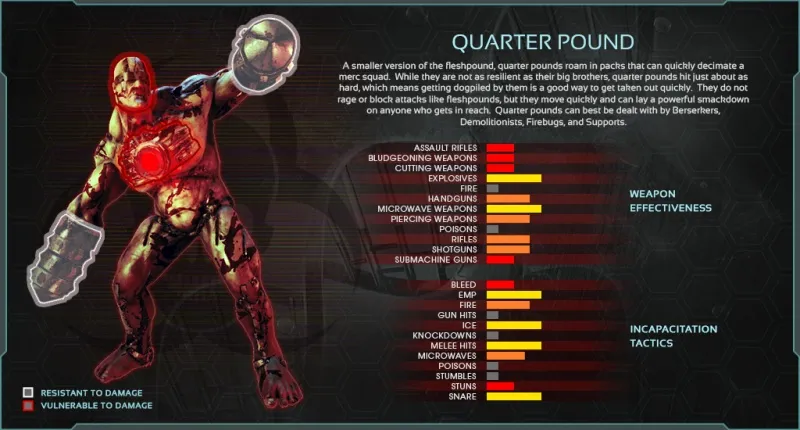 Quarter Pound.
- Quarter Pound: a cheaper mass-produced Fleshpound with less attack and health, faster movement, always several at once, appearing in early waves. Resistances are about the same and the explosive weakness is gone (still 1x). It is announced as a Fleshpound by the warning voice.
Bosses
One boss appears at the end of Survival (or every fifth wave in Endless), randomly chosen from five. They have shared head and body health, so no instant kills. They carry ranged attacks, unparryable melee, durability tricks and summons; the match ends when the boss dies.
 Dr. Hans Volter.
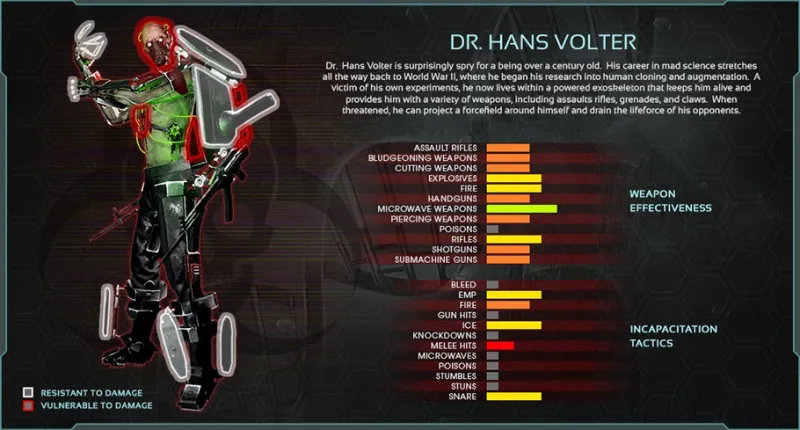
- Dr. Hans Volter: a bio-modified researcher over a century old. When his health falls to thresholds he raises a shield (shown as a blue bar) and enters a hunt phase: he throws smoke grenades, runs at a player and drains health for 5 seconds, then releases them. Destroying the shield makes him fall and cancels the drain. There are three hunt phases per fight; later shields are stronger but he recovers less health. He summons ZEDs for 30 seconds before each hunt phase begins. His attacks: Mkb 42 rifle fire, poison and HE grenades (red markers show where they land), melee, and later a grenade barrage that can kill instantly. Weak to the Mine Reconstructor (1.2x), fire (1.1x), RPG (1.2x) and Arc Generator (1.5x, alt 2x), and he takes normal damage from slashing, blunt, Microwave and explosives; he is the only enemy for which both fire and Microwave work. The head and core take extra damage.
 Patriarch.
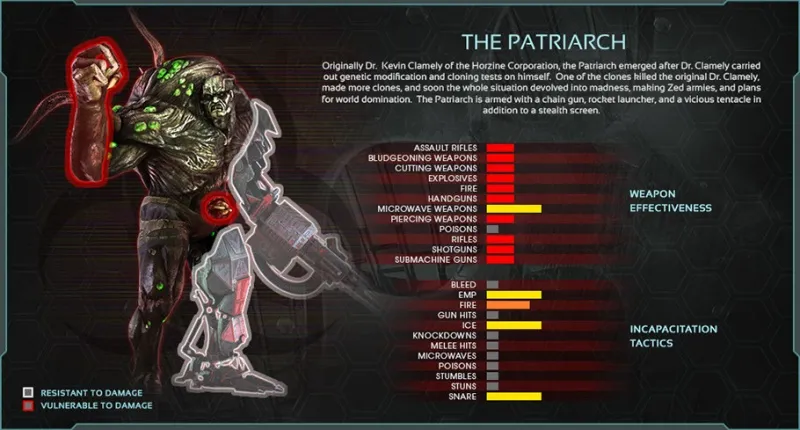
- Patriarch (Kevin Clamely): founder and former CEO of Horzine Biotech, who made the ZEDs. He cloaks often, uses minigun, rockets, mortars and tentacle pulls, and can heal himself three times with a syringe (less each time). He summons ZEDs when his health drops under a threshold, for 30 seconds or until he heals. His minigun, rockets (three at once) and mortars (up to six shells later) can be avoided by hiding, though mortars hit over cover. He prefers isolated players and the player farthest away. Resistant to most damage types; slashing and blunt work at 1x, Arc Generator 1.5x. Hit his right arm and tentacles.
 King Fleshpound.
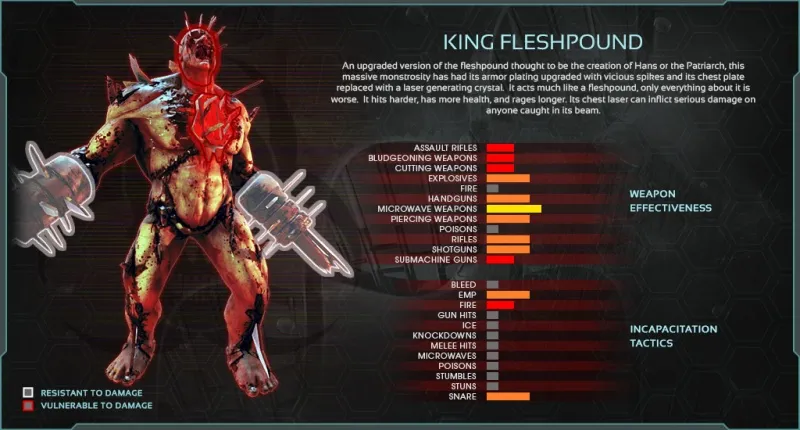
- King Fleshpound: a bigger Fleshpound with the same rage rules but, as a boss, it enrages very often. At 30 percent health it raises a shield. It summons Quarter Pounds at the start and at 75, 60 and 30 percent health (a number depending on player count), and these must be cleared. New attacks: a double lariat spin and the King Beam from the chest panel, which can be dodged by crouching (but not while it is shrunk by a shrink ray, which you should never use on it). It overcame its explosive weakness and is weak to the Arc Generator. Avoid the grinders, which cut damage to 0.2x.
 Abomination.
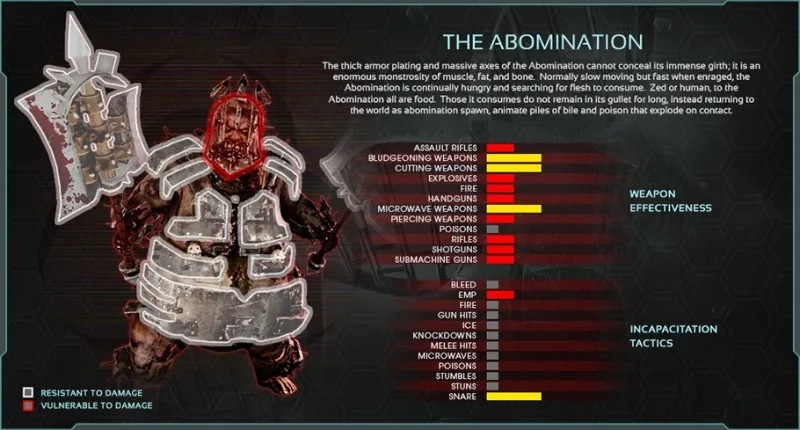
- Abomination: a bigger Bloat with a battle axe. Enrages every 20 percent of lost health for 9 seconds. Additional armor on head, front and back with separate health; the SWAT G36C helps. It summons Cysts, Slashers and Alpha Clots and sometimes eats them to produce Abomination Spawn. Attacks: axe, flatulence (poison cloud and spawn), vomit with poison mines, and a suction bite. Very resistant to poison (0.05x) and many damage types; slashing and blunt work at 1x. Abomination Spawn are self-propelled "vomit mines" that explode and hurt the boss's armor (25x against armor).
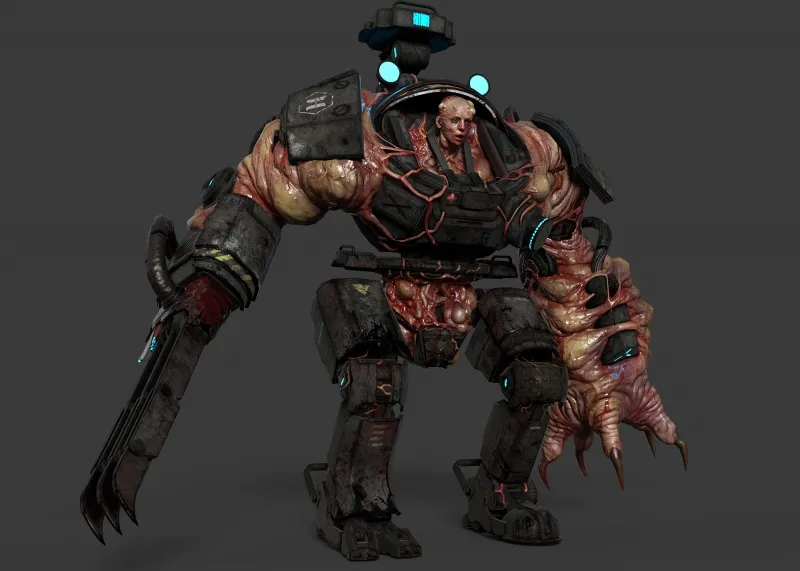 Matriarch.
- Matriarch (Rachel Clamely): the Patriarch's daughter, a self-modified flesh-and-machine monster, the last boss added. Spawns with a shield that must be broken first (it takes the weapon's flat damage without perk bonuses), then a head armor plate and an arm cannon with their own health, both of which break on their own at 50 percent boss health. Summons only E.D.A.R.s (Blaster, Bomber, then both, with Trappers at top difficulty) at several health thresholds and gets faster each time; she cloaks after the third. Attacks: melee including unparryable and a full-body spin, Tesla Blast (an unavoidable chain lightning once fired, so break line of sight), Plasma Cannon, Scorpion Whip (a tentacle pull) after the cannon is destroyed, Lightning Storm (area), and Warning Siren (a boosted scream). Mostly the same resistances as her father; targets the player doing the most damage. Weak points: head (1.3x), the right shoulder and right half, claws after the cannon breaks.
