
Killing Floor 2 Early Tips: Zed Priorities and Class Tactics
This is a translation of an early Russian-language Killing Floor 2 guide written during the game's early updates. Many numbers (perk skills, prices, patch behaviour) reflect that time and have changed, so read it for the thinking, not as current statistics. Its author plays public servers and wrote down the advice that the newbies he saw kept missing. For current material on the same perks see perk Berserker, perk Support, perk Commando and perk Medic.
General tips
- Shoot the head, only the head. It is the weak spot of every Zed.
- Think about the team. For example, many players open fire on a Scrake as soon as they see it. After a certain amount of damage it turns aggressive and charges, and the target may be someone else. Before you shoot a Scrake or Fleshpound, make sure the team is ready to help you finish it quickly.
- Divide duties. When the big Zeds come, everyone usually abandons their positions to hit them. But small Zeds, especially Sirens and Bloats, are the bigger danger in the confusion. If the big ones are already handled, cover the rear.
- Set priorities (see below).
- Build a balanced team. There must be a Medic. If nobody has taken it, become one.
- Plan spending. On the first four waves of a 10-wave game (the first ten in a Long game) do not buy armor. Spend the early waves picking up drops and ammo from spawn points, kill with starter weapons, sell spare drops, and buy powerful guns by wave 4. This is for low difficulties; on high ones it depends on the team.
- Late-wave pressure (at the time of the update): the last four Zeds are always aggressive. They sprint, Scrakes rage regardless of health and Fleshpounds never calm down, so do not leave big Zeds for the end of the wave.
- Study the official Zed pages on the Killing Floor 2 site for current weaknesses and resistances.
Zed priority list
- Fleshpound and Quarter Pound. Big area damage can wipe half a weak team. Use your strongest guns and explosives. Quarter Pounds come in groups of three or more, with a slightly different roar, hit hard and are less fat. Besides the head, they are vulnerable at the chest light.
- Scrake. While calm it walks slowly and can be kited. Once enraged it is as dangerous as a Fleshpound.
- Gorefiend. Huge HP for a small Zed, blocks, spins and hits hard. Kill it while it is far away.
- Husk. Shoot the fuel tank on its back to blow it up with those around it (the explosion does not hurt players). The shot and the burning DoT hurt, and on higher difficulties he has a close-range flamethrower. At low HP he may suicide-explode next to you.
- Siren. Dangerous close up; her scream also destroys grenades thrown at her or near her. Two or three Sirens next to a team are hard without a Medic. Kill them early from a distance.
- Bloat. Dangerous at close range, durable even without a head, and the acid damages armor and obscures vision. Shoot the head only. On high difficulties they leave acid bubbles that burst over a decent area. The game often shuffles a small Siren right behind a Bloat.
- Alpha Clot and acid Crawlers. Alphas buff other Zeds; acid Crawlers, if not killed with a headshot, leave an acid puddle that eats armor.
- Everything else: Gorefast, Stalkers, Crawlers, Slashers, Clots and Cysts. Stalkers are hard to see without a Commando.
Berserker
The Berserker is one of the most important classes. After updates it has 25 percent damage resistance, Medic-like speed, night vision by default and immunity to Clot grabs. Its job is killing Zeds and tanking big ones like Fleshpounds and Scrakes by parrying. It also earns bonus XP for each kill within 2 metres of teammates: 6, 8, 10 and 14 XP on Normal, Hard, Suicidal and Hell on Earth.
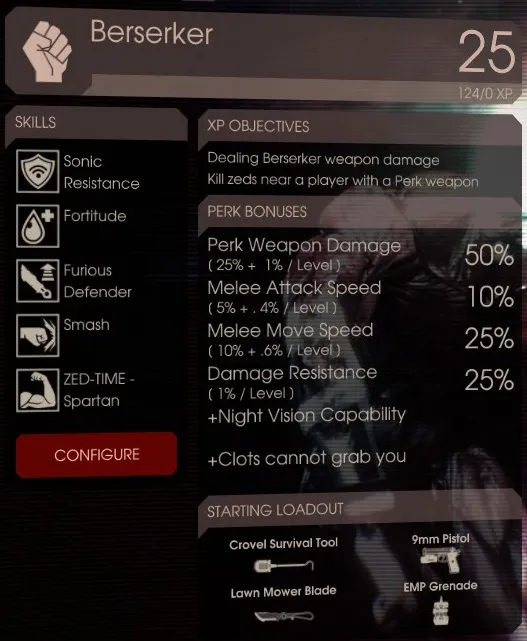 The Berserker perk menu.
Weapons
- Crovel: starter melee, fine for the first waves. Replace it with a Pulverizer or Eviscerator once you can.
- VLAD-1000 Nailgun: fires 7 nails per shot (single nails in alt fire) that ricochet. Good knockdown and penetration, stuns Sirens and Husks. Great for narrow corridors. Low damage and ammo hungry in main fire.
- Zweihander: first DLC weapon, more power and range than the hammer or crowbar, slower and without knockdown. Good for backstabs.
- Pulverizer: the author's main melee weapon. Its alt fire swings and then fires a mini-shotgun blast with strong knockdown. Great against Fleshpounds, which are weak to explosions, and for Sirens and Husks.
- Eviscerator: a disc crossbow, strong at both ranges. Discs ricochet and can be picked up. After the update it got a laser sight and can parry and block. The alt fire is a circular saw using fuel. It is heavy, so the author prefers pure melee.
- EMP grenade: an electrical field that shocks, slows and disorients all Zeds. During the shock they cannot use special attacks, an angry Scrake stops running and a Fleshpound calms down. Three together stall both for a moment. Very useful control, low damage.
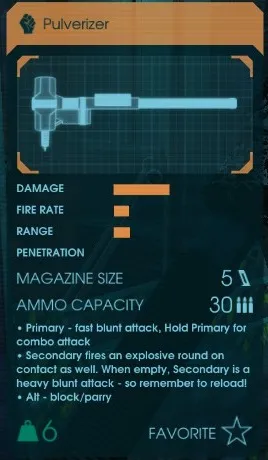 The Pulverizer, a hammer with a shotgun.
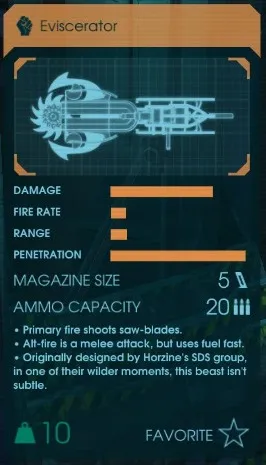 The Eviscerator disc launcher.
Parrying and backstabs
Press block at the exact moment of an enemy attack and the attack is cancelled and the enemy is disoriented for a few seconds. Any damage in that window breaks the stun. A hammer parry costs 2 armor and 1 health, which is almost nothing. A Scrake is hard to parry because of its complex animations and, with human reaction and ping, the author says a normal player parries no more than half. It is simpler to run, dodge and attack between swings. A Fleshpound is much easier to parry, and the hammer's explosive damage helps kill it.
The backstab was added to all weapons: a push attack (a stab for swords and knives) on the bash button. It shoves a Zed, combos with the tier 4 perk, and on a headshot knocks big Zeds down (hammer and sword). The sword's stab is fast and removes heads.
Skill choices
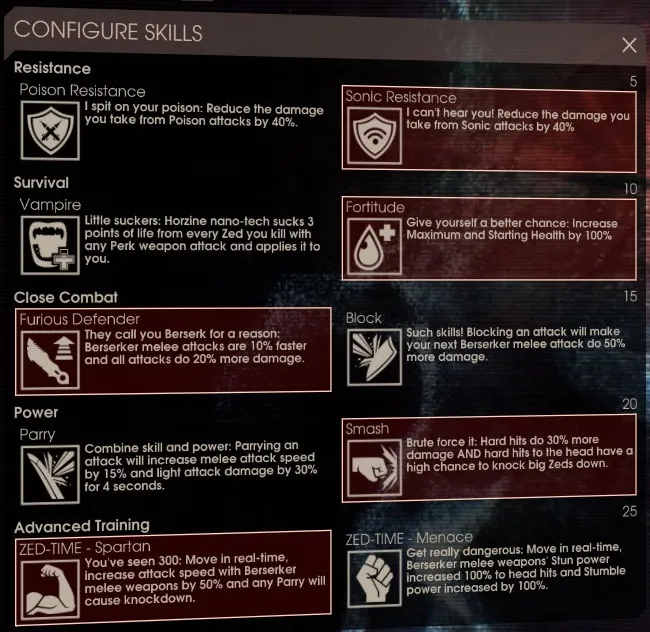 The Berserker skill tiers.
- Tier 1: Poison Resistance (40 percent against Bloat bile and Hans's gas) or Sonic Resistance (40 percent against Sirens). Poison on the first two or three waves, Sonic until the boss, and Poison again for the boss. Alone, Sonic is far better, especially on high difficulties.
- Tier 2: Vampire (3 HP per kill with Berserker weapons) or Fortitude (+100 HP, so 200 total). Fortitude wins. Vampire only works early with no Medic.
- Tier 3: Furious Defender (+10 percent attack speed and +20 percent melee damage) or Block (+50 percent damage on the next attack after a parry). The author prefers Furious Defender; Block is for good parriers and the Hans wave.
- Tier 4: Parry (+15 percent attack speed and +30 percent light-attack damage for 4 seconds after a parry) or Smash (+30 percent heavy attack damage and a high chance to knock big Zeds down on head hits). Smash is recommended.
- Tier 5 (Zed Time): Spartan (+50 percent attack speed, parries knock enemies down) or Menace (100 percent chance to stun big Zeds on a head hit). Spartan for waves 1-4, Menace from wave 5.
Support
Support is the main striking force. Your tasks are shooting big Zeds and large groups of small ones, and welding and unwelding doors. It is comfortable for beginners, since it needs less precise aiming: shotguns spray penetrating pellets (penetration grows with level). The author calls the double-barrel and AA-12 the strongest tools of this stage.
The beginner's main problem is ammo, caused by firing too early. Wait for a few Zeds to come out so the shot is maximally effective, and still aim at the head: a starter shotgun head shot can pass through at least three Zeds in a line. Aim at neck level. Save big ammo for big Zeds and use the pistol on lone Clots. Support also earns bonus XP for door welding, every 510 HP welded (a door has 1500): 6, 8, 10 and 14 XP by difficulty.
Weapons
- SG 500 Pump-Action: starter shotgun, decent damage and tight spread, slow tube reload. Reload in lulls and do not drop to zero.
- Double-barrel Boomstick: huge damage and spread with a fast reload, cheap at 650, so you can buy it on wave 2. Alt fire shoots both barrels, with strong recoil used for the jump shot: fire both barrels at your feet while jumping to fly higher or backward and escape a Fleshpound or Scrake.
- M4 Combat Shotgun: accurate semi-auto, but very expensive and heavy, long reload. The author does not recommend it.
- AA-12: the best Support weapon: 20-round magazine, high fire rate and damage. Save it for big Zeds. It got 200 more expensive in the update.
- Frag grenade: shreds small Zeds, use in crowds and on big Zeds.
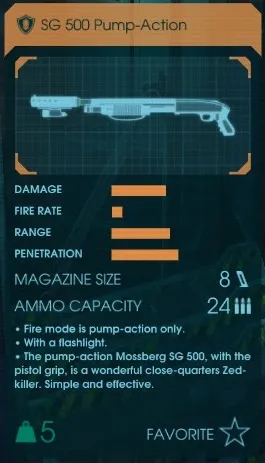 The SG 500 pump-action.
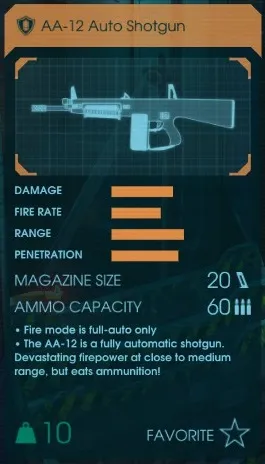 The AA-12 auto shotgun.
Skill choices
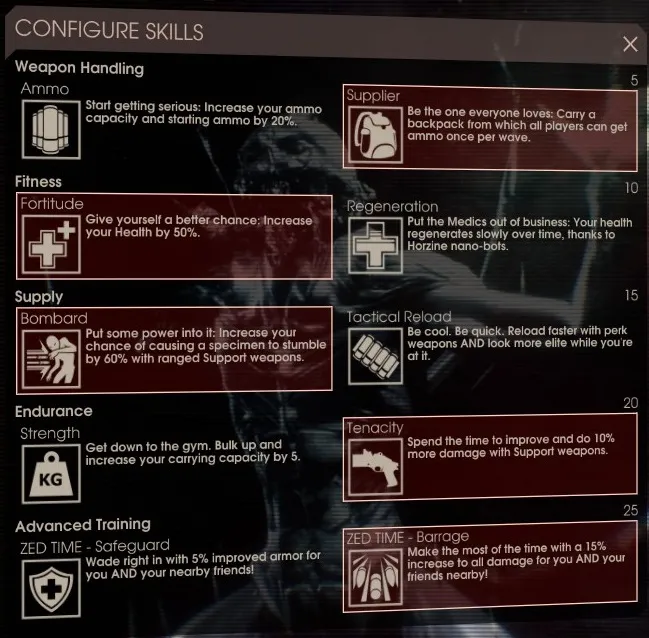 The Support skill tiers.
- Tier 1: Ammo (+20 percent ammo) or Supplier (a backpack teammates take ammo from once per wave, equal to 5 ammo boxes). Supplier is better, and more so with more Supports.
- Tier 2: Fortitude (+50 HP) or Regeneration (4 HP per 5 seconds). Take Fortitude.
- Tier 3: Bombard (+60 percent chance to stun) from wave 3 to 10, and Tactical Reload for the boss, or skip Bombard if reload speed matters more.
- Tier 4: Strength (+5 kg carry, three shotguns) or Tenacity (+10 percent damage). About equal; the author takes Tenacity.
- Tier 5: Safeguard (+5 armor per Zed Time for you and nearby teammates) or Barrage (+15 percent damage for you and nearby allies in Zed Time). Barrage; skills do not stack, so with several Supports pick different ones.
Commando
Commando is a favourite. It is more valuable to the team than to itself: it is the only class that sees Zed health, which gives confidence, and the only one that can stretch Zed Time up to 6 seconds, activating the last skills of every class for their maximum time. After updates the flashlight was replaced with night vision and Kalashnikov and SCAR ammo was trimmed.
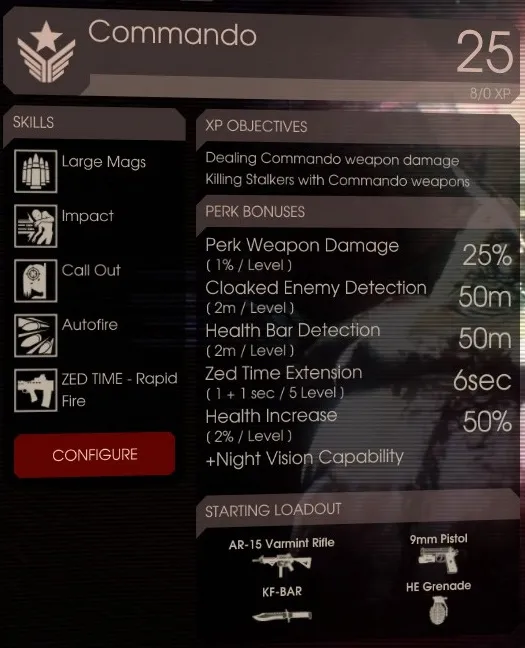 Commando as seen in the perk menu.
Your task is killing weak Zeds, especially Husks, Bloats, Sirens and Stalkers, and keeping Zed Time going. A common mistake is a wrong target priority: first the Husk, then Sirens and Bloats as they approach, then the rest. In a good team do not spend ammo on Fleshpounds and Scrakes, since your damage is strong only on headshots, and recoil and movement make that hard. Help on big Zeds only once your main job is done.
A trick against Scrakes with a Berserker: after the Berserker's EMP grenade the Scrake moves slowly and straight, so empty a SCAR magazine into its head. Commando is not suited to Hans. A gaming mouse button with double or triple click, in single-fire mode, gives good damage with minimal recoil.
Bonus XP for Stalker kills with Commando weapons: 3, 5, 6 and 9 extra XP (11, 15, 16, 19 total) by difficulty.
Weapons
- AR-15 Varmint Rifle: the starter, in the author's view the worst starter of all classes; the 3-round burst is awkward and ammo hungry.
- SA80 L85A2 Bullpup: cheap and accurate, highest fire rate, and very good in single-shot mode.
- Kalashnikov AK-12: powerful, slower than the bullpup, no single fire. The author prefers it to the bullpup.
- SCAR-H: the best Commando weapon: powerful, accurate and fast, small magazine, with burst and single modes. A must buy for stronger Zeds.
- HE grenade: large explosive damage; use against crowds and Fleshpounds.
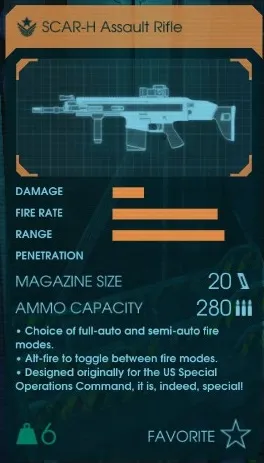 The SCAR-H.
Skill choices
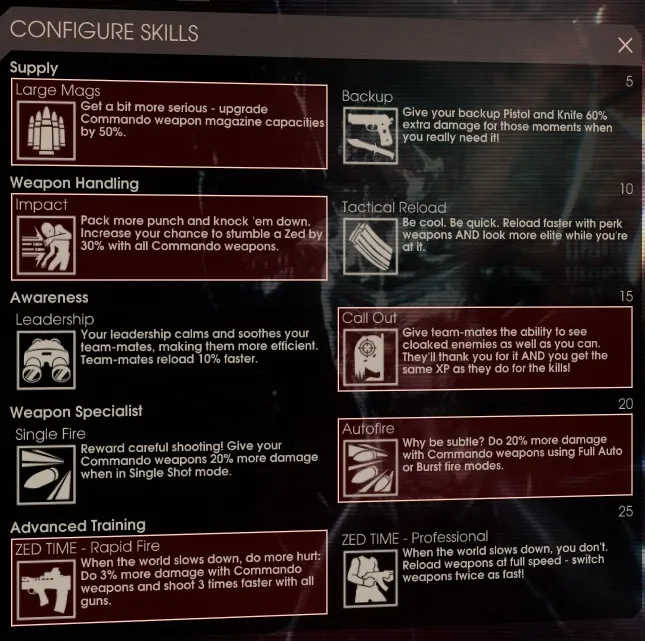 The Commando skill tiers.
- Tier 1: Large Mags (+50 percent magazine size) or Backup.
- Tier 2: Impact (+30 percent stun chance, best on weak Zeds like Sirens and Husks) or Tactical Reload.
- Tier 3: Leadership (+10 percent reload speed for teammates) or Call Out (teammates see Stalkers and earn more XP for killing them).
- Tier 4: Single Fire (+20 percent damage in single fire, not for the Kalashnikov) or Autofire.
- Tier 5 (Zed Time): Rapid Fire (+3 percent damage and 3x fire rate, pairs with Autofire) or Professional.
Zed Time mechanics
Zed Time happens when Zeds or players die and slows the game to 20 percent of normal speed. The timer starts at 3 seconds and cannot exceed 3.0000 on its own. Killing any Zed resets it. The minimum gap between two Zed Times is 10 seconds.
Base chances: player kills a Zed within 300 units: 2.5 percent; beyond 300 units: 5 percent; a Zed kills a player or another Zed: 3 percent; a Commando resetting the timer at the right level: 100 percent; boss death: 100 percent (6 seconds).
Extra chances (not added to the base): 4 or more Zeds killed by one explosion: 5 percent; 2-3 by explosion: 3 percent; a headshot kill closer than 50 units: 5 percent; farther: 3 percent.
Time since last Zed Time: under 10 s: none; 10-30 s: normal; 30-60 s: x2; over 60 s: x4. So after 30-60 seconds a headshot has a 10 percent chance. Under the hood, each kill rolls FRand() against the chance.
Medic
The Medic is one of the most needed classes. The goal is to heal the dying and shoot weak and medium Zeds. A common mistake is chasing XP and forgetting to heal. You can also create free armor: jump from a ledge, fall damage takes HP but not armor, then heal yourself and the armor remains, and in the update any dart restored armor even at full health. At level 25 with the right skills a Medic is a decent tank (120 HP and 175 armor), able to shield teammates from a Fleshpound or Scrake and throw a heal grenade at its feet. Medics earn bonus XP for every 20 HP healed: 2, 2, 3 and 4 XP by difficulty.
Weapons
- HMTech-101 Pistol: starter, decent damage, only two shots with a full dart charge, light so other classes carry it too.
- HMTech-201 SMG: 40-round magazine, high fire rate, modest damage. The author usually skips it.
- HMTech-301 Shotgun: 10 shells, tight spread, close range against crowds.
- HMTech-401 Assault Rifle: the best medic weapon: 30 rounds, medium fire rate, high damage; perfect for Sirens, Husks and Bloats.
- Medic grenade: a blue healing cloud that heals allies and damages and applies a DoT to enemies, killing small Zeds quickly.
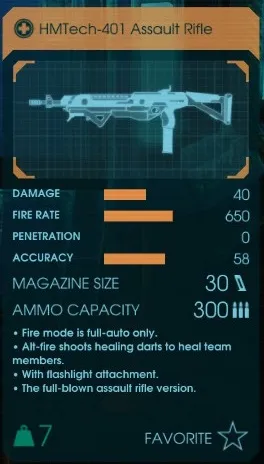 The HMTech-401 assault rifle.
Skill choices
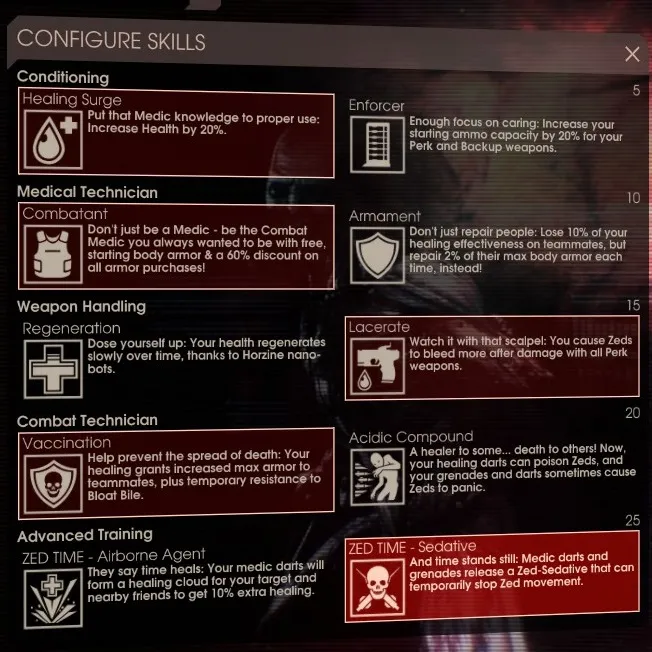 The Medic skill tiers.
- Tier 1: Healing Surge (+20 HP) or Enforcer (+20 percent ammo).
- Tier 2: Combatant (full armor at start and -60 percent armor cost, useful when Dosh is tight) or Armament. The 10 percent heal bonus turned out to be heal amount, not speed, so Armament or alternating is preferred.
- Tier 3: Regeneration (2 HP periodically) or Lacerate (a 15-second bleed with tiny damage). The weakest tier.
- Tier 4: Vaccination (6 percent armor per dart or grenade tick and temporary Bloat bile resistance) or Acidic Compound.
- Tier 5 (Zed Time): Airborne Agent (a cloud that heals nearby allies by 10 percent of the heal) or Sedative.
Tactics against big Zeds
Stop being afraid of them. Many beginners freeze, run or fire at everything. The author supplied a practice map with a spawn menu for training and parry practice (the link was posted on a file host).
Scrake
Two states: calm and enraged. It starts calm, walking slowly, and enrages after a certain amount of damage. In the calm state, the first attack is always the same, so you can anticipate it. Kill it with several players, ideally at least three, so it dies fast and without losses.
- Berserker: with right skills it can kill without taking damage, dodging and hitting.
- Demolitionist: an RPG shot to the head kills quickly, with the right skill for accuracy.
- Shooters plus control: Sharpshooter freeze, SWAT stun grenade, Demolitionist dynamite and, as a last resort, the Berserker grenade. Once the Scrake is controlled, all shoot the head.
- Firebug with a microwave: the alt fire pushes the Scrake away during its attack, and two in a row knock it down.
Fleshpound and Quarter Pound
The Demolitionist can kill them solo: the RPG, dynamite and the Fleshpound's double damage from explosions. After that comes a Berserker with a hammer, who should tank it and save others. Tips:
- A Fleshpound calms after landing a hit, so do not fire at it when you are trying to escape.
- Do not stand next to it; its attacks are fast and strong. If a teammate is about to die, step in front with a melee weapon and armor.
- You can always outrun a Fleshpound; even if it hits you, it turns calm and gives you time.
Hans Volter
He has two phases, attack and healing. At the start the heart is green and he prefers firing his guns, so take cover and chip away. At roughly 20-30 percent HP he releases white smoke and a shield, entering a healing phase. There are three healing phases, with the heart color going green, yellow, red, and then a final attack phase.
- A player caught by Hans cannot die; he drains them to about 20 HP. The real risk is small Zeds right after healing ends.
- Hans never attacks the player he drained right after the healing phase (though he may release gas if more than one player is near him).
- A Berserker should not get caught, or the next attack phase will go to someone else; stand closer to help instead.
- His "heart" is the weakest spot, but hard to hit since standing in front is dangerous. If you can stun Hans in Zed Time, even better.
He becomes easy if you choose well who goes into his arms and deal damage together.
FAQ
- Which Zeds should I kill first?
- The guide ranks them: Fleshpound (and Quarter Pound) first, an enraged Scrake next, then Gorefiend, Husk, Sirens, Bloats, Alpha Clots and Crawlers, with the weakest Zeds last.
- How long is the base Zed Time?
- Zed Time slows the game to 20 percent of normal speed and starts at 3 seconds. The minimum gap between two Zed Times is 10 seconds.
- Should I buy armor on early waves?
- No. On the first four waves of a 10-wave game (the first ten in Long) the guide suggests saving Dosh for strong weapons instead of wasting armor on weak Zeds.
- What do I do against a Fleshpound?
- Use explosives (Demolitionist with RPG and dynamite) or a Berserker with the Pulverizer. The Fleshpound calms down after a hit, so running away is easier if you stop shooting.
