
KF2 Hell on Earth Guide (2015): EMP Magdump, Pulverizer and Class Roles
This guide was written in August 2015, during the early access days of Killing Floor 2, when there were only four perks (Berserker, Commando, Support and Field Medic) and the Hell on Earth success rate in public servers was poor. Most of it assumes level 25 perks. Many values have changed since (Pulverizer, stumble rules and skills especially), so treat it as a record of an influential early strategy: the author's changelog credits videos from q3.railgun and others. For modern coverage see large ZED takedowns practice guide and Hell on Earth camping spots by map.
How to read it
The author suggests this order: About the guide, About HoE, Scrake tactics for the team (EMP + Magdump), your class section (or all of them if you adapt to the team), Fleshpound tactics for the team (Pulverizer Pounding), notes on special ZEDs, weapon intricacies, then common mistakes. The author wishes these tactics would become standard so they would not need explaining on every HoE public server.
About Hell on Earth
HoE comes down to three things:
- How fast can your team kill a Scrake or Fleshpound? Remove them and only lesser ZEDs remain. Ask yourself: does your team watch where a Scrake may come from? If the spot you hold has a single funnel (like the Burning Paris hotel hallway), is the team grouped and ready for the EMP when the Scrake turns the corner? With two funnels (like the Outpost trucks), do you have mics or at least Request Help to call the visual? When someone calls a Scrake, does the formation shift and group up when the EMP drops? The game can spawn Scrakes back to back (the author has seen 6 in a row), so killing them immediately is the best solution.
- If you cannot handle a 2 Fleshpound / 1 Scrake spawn, how fast does the team recognize it and kite? When in doubt, run. A player who does not see how bad it is may be left behind and die.
- How good is your team? The author played HoE pubs for three weeks before finishing a map, and only managed it after renting a private server with a password: about two weeks, a week of it on Volter Manor. The joke among friends was that HoE was "pay to win". It needs teamwork, chemistry and time.
Common mistakes
- Berserkers refusing to carry a Medic AR or SCAR. They spectate while the EMP freezes a Scrake when they could add DPS, and a Medic AR also lets them heal.
- Shooting a Scrake before the EMP detonates. If a shot lands at the same time the EMP goes off, the Scrake panics and ruins everyone's aim, usually ending with a raging Scrake.
- Refusing to carry a Pulverizer. Fleshpounds resist non-explosive, non-piercing damage by 50 percent and take 50 percent extra from explosives. It also stumbles Scrakes if circle strafing gets patched.
- Backpedaling from Sirens. Wait until she finishes screaming, then tank her: her melee is slow and weak and gives easy headshots.
- Constantly shooting Fleshpounds so they never calm down. It skips its rage animation and stays raging (effectively a raging Scrake). After it hits a player, let it calm so the next rage plays the animation (easier headshots) and the Berserker can parry.
- Medics throwing grenades carelessly near a Scrake. One Medic grenade can rage a Scrake. When kiting, throw grenades ahead of your path, not behind, and be careful when you cannot see what is ahead.
- Supports firing shotguns at ZEDs in front of a Scrake. Shotgun penetration damages the Scrake and rages it.
Berserker
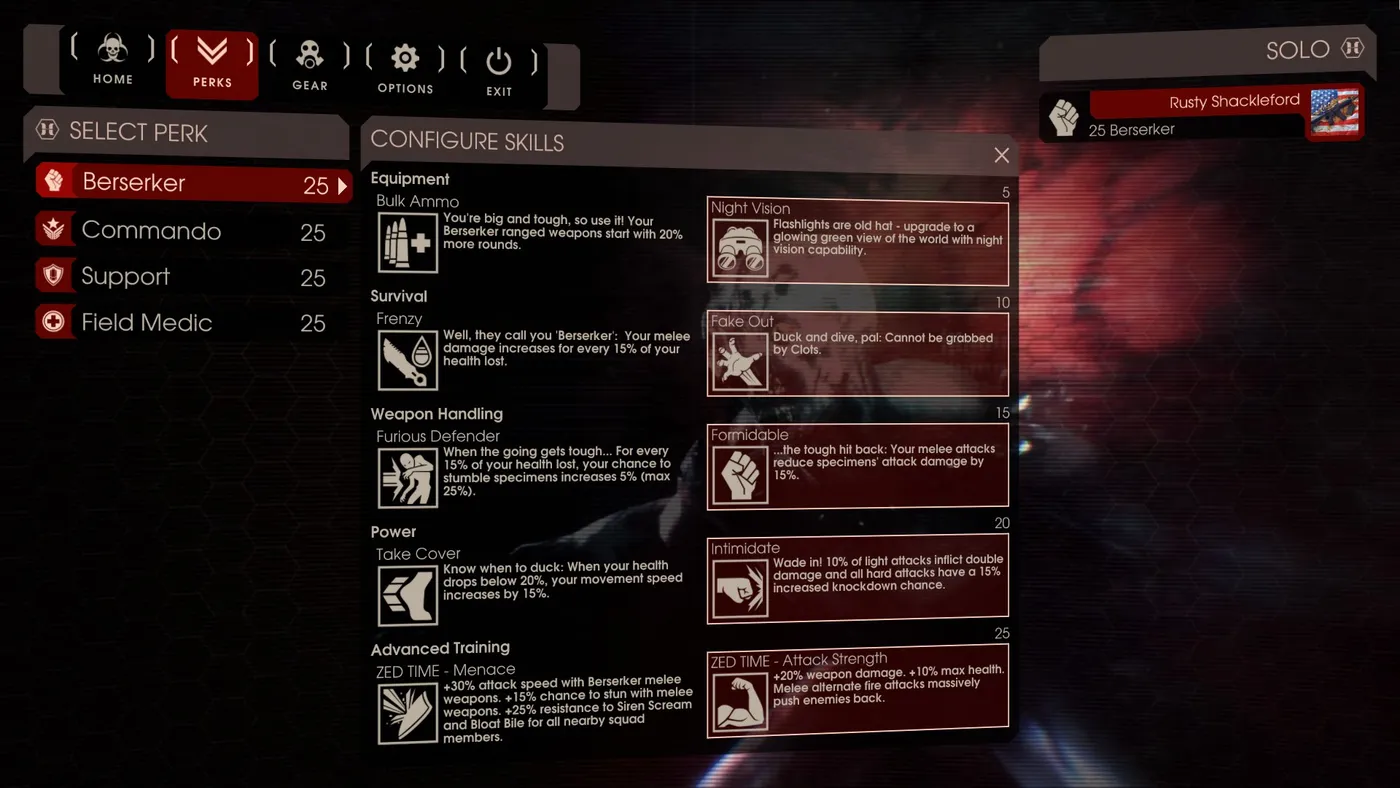 The Berserker skill screen with the author's picks highlighted (early 2015 skill set).
Role: tank a door or tight corridor, sometimes cover the team's weak side, and learn to parry (mostly Fleshpounds, sometimes Scrakes). You are the most money-efficient player and should share dosh so the others ramp up.
Loadout: Pulverizer and HMTech-401 Assault Rifle (Medic AR). Use the Pulverizer on everything except Husks and Scrakes; against a Scrake only if EMP + Magdump did not finish it: alt-fire to stumble it, then parry, or alt-fire, back away, wait for the lunge, run past and alt-fire again (stumbling a Scrake has a 3-second cooldown). The Medic AR (30 rounds, 40 damage, 1200 total damage) is for Scrakes after an EMP, for healing, and for retaking ground.
Ramping up (7 waves):
- Waves 1-4: stick with the Crovel, pick up weapons (keep them for Husks unless it is a Katana) and give money to teammates. Do not buy EMPs until wave 6 at least. By the end of wave 4 you can buy the Pulverizer (needed for Fleshpounds only).
- Wave 5: buy the Medic AR. Scrakes appear more often, so ask for money if you need it.
Tactics: vertical slashes for lined-up ZEDs, horizontal for side-by-side (press the direction once and keep slashing). The Crovel decapitates well and often triggers Zed Time; the Pulverizer is inaccurate. Use the Pulverizer alt-fire on Sirens ASAP; use a forward light slash on Bloats, repeating until decapitated; Husks are risky: one alt-fire kills a damaged Husk, otherwise two. For Fleshpounds, lure them behind your frontline when the team cannot kill them quickly, or let a Fleshpound spawned in front of you plug the door against other ZEDs while your Medic heals. Be careful with double Fleshpounds side by side.
Commando
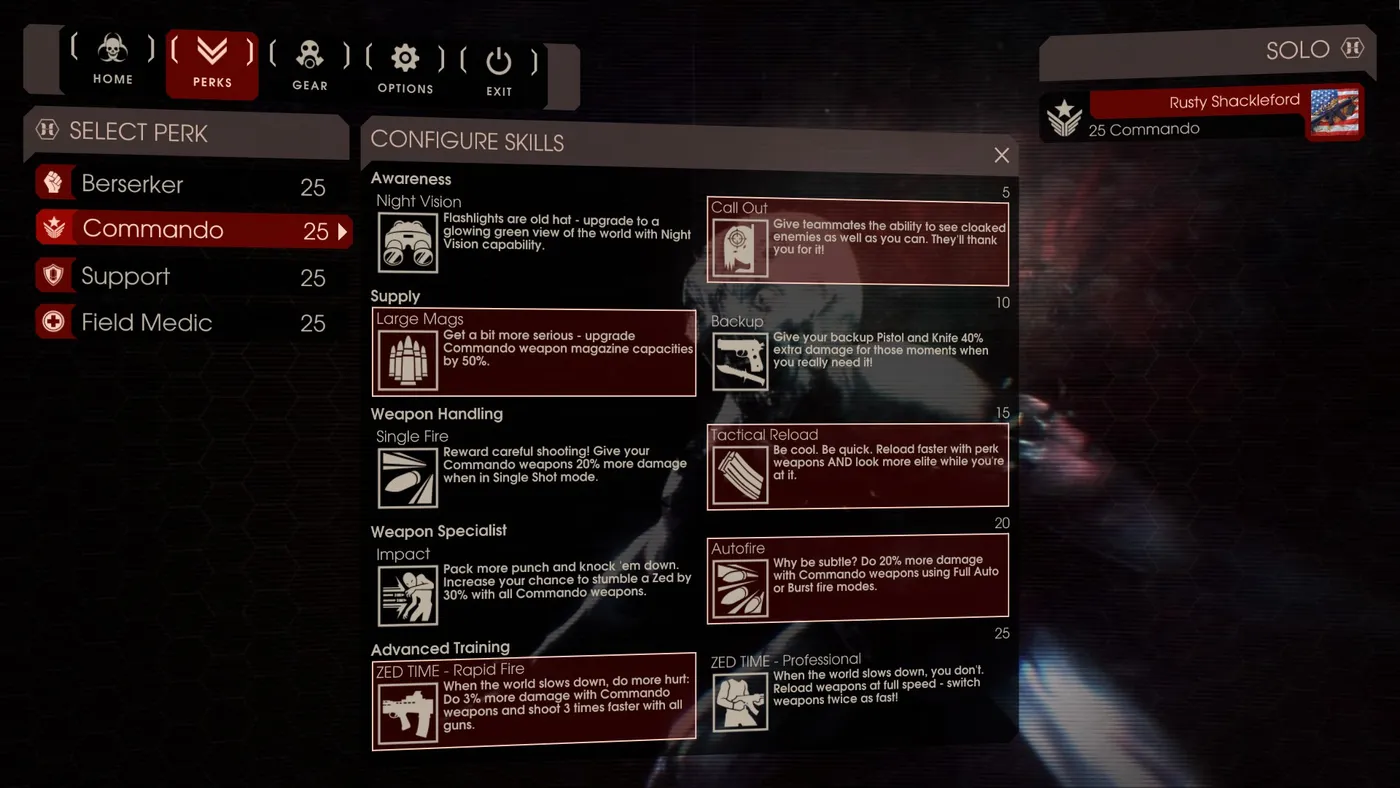 The Commando skill screen with the author's picks.
Role: hold a long corridor so ZEDs come in a straight line. One Commando can hold it, leaving the rest of the team for multi-direction spots, and the solo long path helps trigger Zed Time extensions. With big ZEDs around, either supply damage or do trash control and extend Zed Time (hopefully your Medic lands Zedative).
Loadout: HMTech-201 SMG (to conserve SCAR ammo, trash only; great in Zed Time with Rapid Fire), Pulverizer (for Fleshpounds and stumbling a raging Scrake, since nobody takes Impact) and the SCAR-H (25 bullets on a 6-player HoE Scrake; fire bursts at range). The AK-12 in burst mode is also good.
Ramping up: waves 1-3 use the AR-15 (use its melee bash on single ZEDs to decapitate; throw grenades at mobs; keep only the SG 500 and sell other drops; at least 5 ammo boxes for grenades). End of wave 3: SCAR. Wave 4: AR-15 to start the wave, grenade and SCAR for mobs; finish with the SCAR to not split kill dosh; end: Medic SMG. Waves 5-6: Pulverizer, without buying ammo.
Tactics: headless bodies extend Zed Time (tag them if you have time); throw a grenade to clear trash around a Scrake (50% explosive resistance, so it will not easily rage) or a Fleshpound (which takes 50% extra); grenade a blindside choke point or behind a Scrake for a bit of time.
Support (Pulverizer loadout)
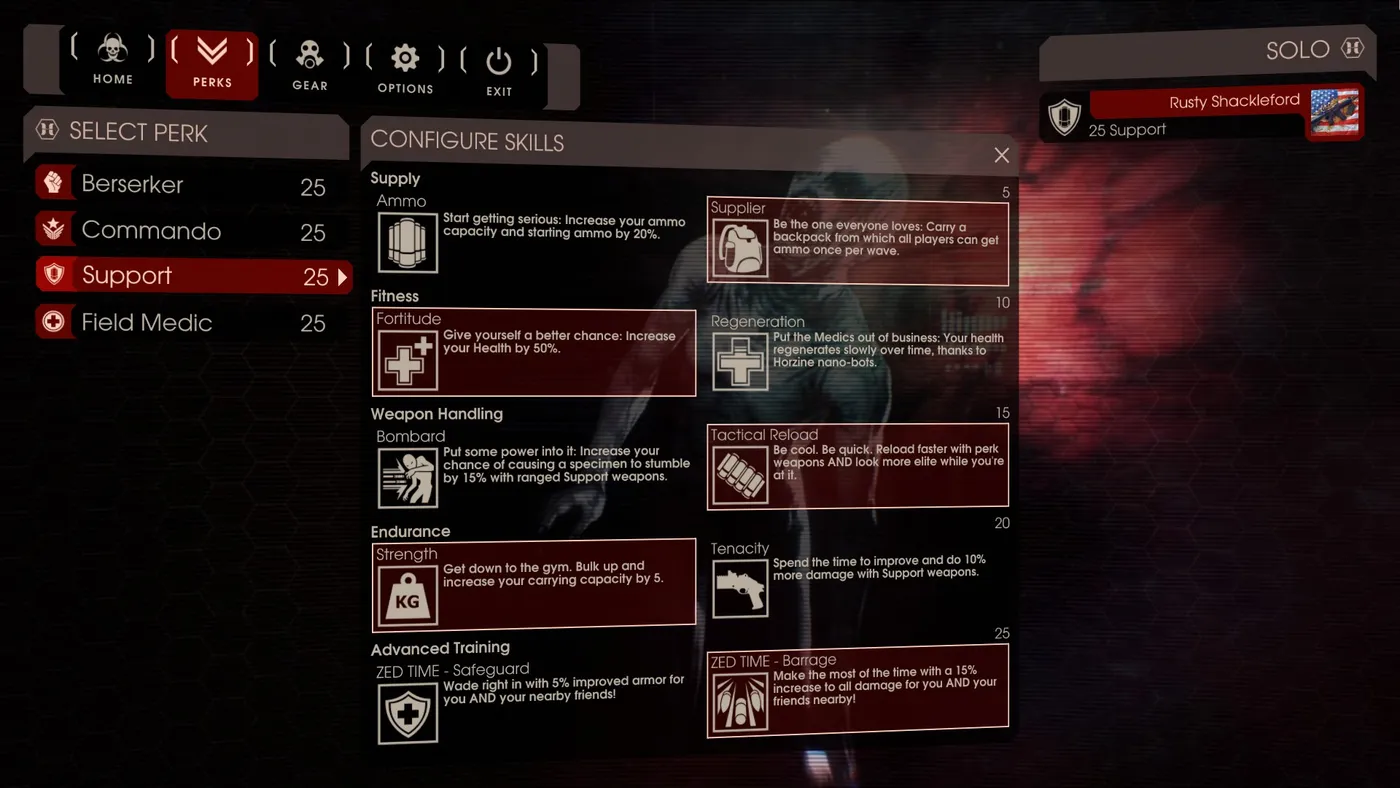 The Support skill screen with the author's picks.
Role: versatile: short corridors where you mow down trash with the double barrel, medium corridors with SG 500 plus double barrel, doorways with double barrel plus AA12, or supporting several spots. With big ZEDs you provide the damage.
Loadout: Double Barrel Shotgun (trash and Husks, Bloats, Sirens; three well-placed headshots down a 6p HoE Scrake), Pulverizer (Fleshpounds, stumbling a raging Scrake) and AA12 (EMP + Magdump on Scrakes, kiting; finish with the double barrel alt-fire if needed).
Ramping up: waves 1-3: use the weapon melee bash on singles, remind everyone that you are the Supplier, pick up weapons and keep the AR-15; buy the AA12 at the end of wave 3. Wave 4: sell the others and buy the double barrel. Waves 6-7: the Pulverizer.
Tactics: the SG 500 refills with only 6 ammo boxes and the AA12 with 4, so do not buy ammo except for the double barrel. Except for the AA12, Support weapons punish misses; a grenade is often better against distant mobs. The SG 500 has a narrow spread: use it from far away on lined-up ZEDs. Use the double barrel to regain ground and against Sirens, Bloats and Husks (rush Sirens before they scream or just as they finish; for Husks use alt-fire after the attack). The AA12 is for when everything hits the fan. With Supplier, run up to teammates mid-wave and let them take ammo. Throw grenades to clear trash around Scrakes; throw a few at Fleshpounds before the first Pulverizer alt-fire and the parry lock. Practice parrying a Fleshpound.
Support (SCAR loadout)
This variant replaces the Pulverizer with the SCAR-H. The SCAR is used on Scrakes so you can headshot from a safe distance (almost impossible to ruin EMP + Magdump), and the AA12 is for "Parry Lock + AA12 Dump" on Fleshpounds. Pros: reliable EMP + Magdump, fast Fleshpound kills. Cons: expensive (the Pulverizer is 400 cheaper), slightly ammo inefficient (about a full AA12 clip per Fleshpound).
Field Medic
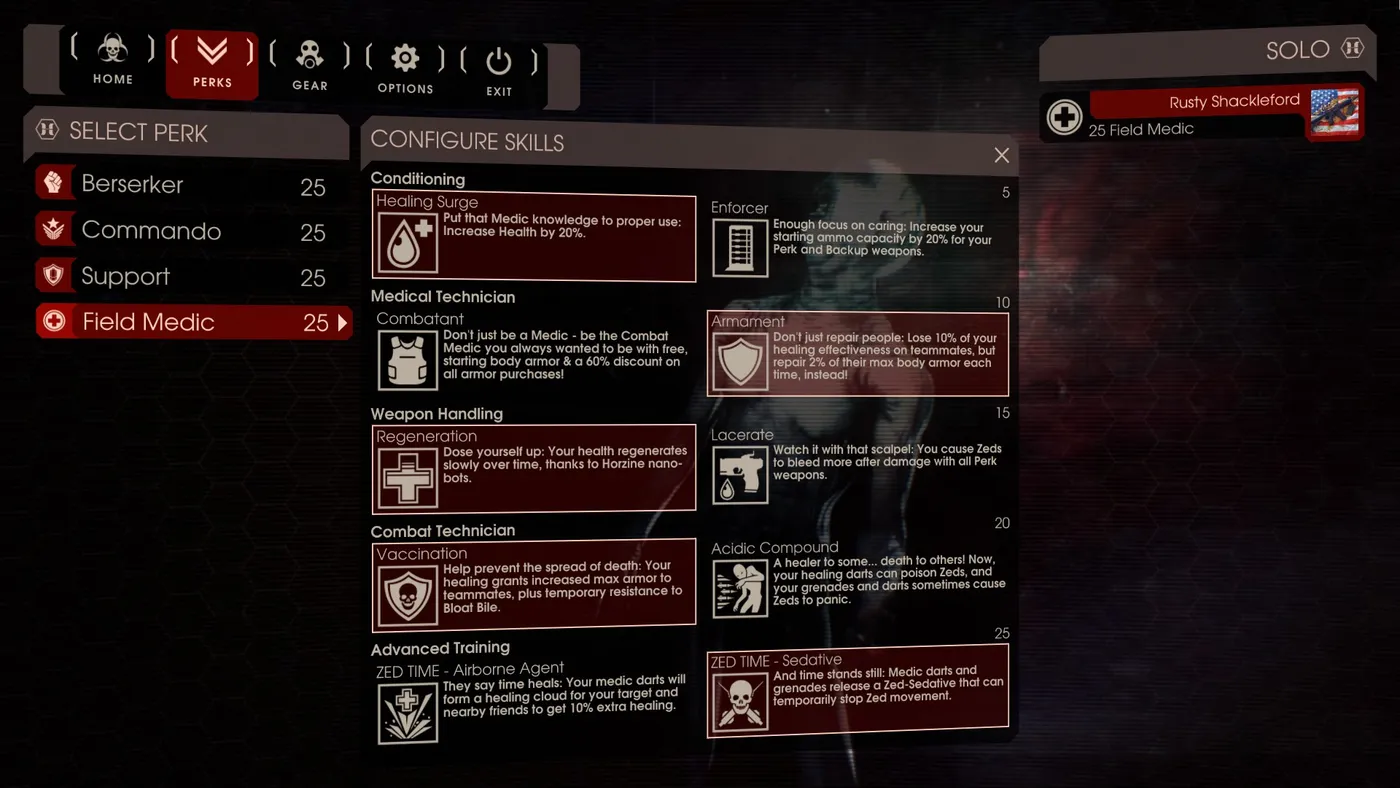 The Field Medic skill screen with the author's picks.
Role: healing first. When the team is in control, kill only Bloats, Husks, Sirens and Crawlers, but help if the team is overwhelmed. Scrakes and Fleshpounds are where the Medic matters most.
Loadout: HMTech-101 Pistol (swap to it for 2 darts in the time the Medic AR regenerates 1), Pulverizer (Fleshpounds in wave 7, especially if you throw yourself a heal grenade; stumbles raging Scrakes) and HMTech-401 (330 total ammo, lasts waves 6-7 if used carefully).
Ramping up: wave 1 use the knife until mobs appear, then the pistol; ask for money for the Medic AR. Waves 2-3: buy the Medic SMG (an upgrade over the pistol and it saves the pistol's heal recharge); offer free armor via fall damage (do not kill a Siren at the end of a wave to speed that up); by wave 3 buy the Medic AR. Waves 4-5: SMG to start, AR when hectic; the Berserker tanks the first Fleshpound wave; buy the Pulverizer only if everyone has the optimal loadout. Wave 6: spam the pistol, use the AR when needed; 20 rounds are enough for the Pulverizer.
Tactics: pumping darts fast restores HP slower than waiting 1 second between darts: shoot fast for armor, a bit slower to save someone (especially from a Siren). Keep dropped weapons until you have the Medic AR (an SG 500 or AR-15 beats the pistol in early waves). Throw a med grenade at the door if a Berserker is being overwhelmed, at your feet to heal under pressure, at the team for them to tank in, behind a Scrake to kill trash (and at both entries if trash comes from two sides), and when a Fleshpound arrives, once the Berserker is in place.
Scrake tactics: team
You will meet these on public servers, so recognize which one your team uses. The author's preference: EMP + Sedative + Magdump.
EMP + Magdump (second favorite). 1) Spot the Scrake and announce it (mic or Request Help) so Supports and Commandos get in place. 2) With the team grouped so the Scrake comes in a straight line, the Berserker drops the EMP. 3) When it goes off, everyone shoots the head; the Scrake should die before the EMP wears off. Pros: fastest, efficient. Cons: not yet the meta, so someone may not understand; a player may circle strafe, the player the Scrake follows may not run to the group, someone may shoot it right as the EMP detonates (panic), a Support may stand too close and cause a lunge. It needs an EMP grenade, and late waves have 5+ Scrakes, so a Supplier is needed to refill EMPs; the author recommends 2 Berserkers.
Sedative + Magdump. Requires a level 25 Medic with Sedative and some RNG (a Commando on a long corridor helps trigger Zed Time). Call out the Scrake, group up, heal everyone so autolock does not pick a hurt teammate; the Medic clears trash (keeps clips full, triggers Zed Time) and keeps teammates out of the dart's line of sight; when Zed Time procs, the Medic darts the Scrake and everyone goes point blank for 2-3 seconds of clean headshots. Pros: fast, efficient, cleanest headshots, procs all Zed Time perks (Support's Barrage gives everyone 15% extra damage). Cons: pure RNG, teammates may be out of position or low on ammo, the autolock may hit the wrong target.
EMP + SCAR. Needs a very skilled Commando (Large Mags, Autofire, SCAR in full auto) landing 24 headshots out of a possible 30, plus a Berserker's EMP. Only two players, but difficult; recoil may cost headshots.
Circle strafe. The current meta though inefficient and risky, and going to be patched. Approach, avoid the lunge by moving to the right of the Scrake, then circle counter-clockwise behind it while everyone shoots. Pros: safe, easy, no resources. Cons: time consuming, risky with multiple Scrakes or Fleshpounds, inefficient, the circling player may be killed by a chainsaw to the gut if too fast, and needs protection from other ZEDs; it will be patched.
Scrake tactics: individual
- Berserker: Pulverizer Parry Lock. Alt-fire to stumble, hug the Scrake, normal swing to cut the stumble short, parry at once, repeat. A Medic should heal you; teammates shooting force you to skip the swing. Very risky, inefficient, relies on parry working.
- Commando: SCAR Impact (needs the level 20 Impact perk). Shoot the head from afar in full auto; melee bash when it arrives, retreat and reload; shoot, bash, retreat; unload the rest. Ammo efficient (a bit over a clip) and a good last-man-standing tactic, but you must give up Autofire and have room to back up.
- Support: Double Barrel Dance. Alt-fire the head from the Scrake's right side, turn, alt-fire again, retreat and reload; alt-fire as it lunges. Fast and ammo efficient but very risky.
- Support: Double Barrel Bombard (level 15 Bombard, competing with Tactical Reload). Melee bash, wait about 1.5 s, shoot its head then the legs while backing away, reload, bash as it sprints; repeat three more times. Easy to learn, a full double barrel can kill up to 5 six-player HoE Scrakes.
- Medic: Kite. Only when just Scrakes remain: use a long corridor with doors or a balcony the Scrake cannot jump from, rage it from afar, kite, close doors, shoot again. Safe but time consuming, 47 headshots from the Medic AR per Scrake.
Fleshpound tactics: team
Pulverizer Pounding. With at least 4 players carrying a Pulverizer in a 6-player HoE game (the author keeps a spreadsheet of required swing breakpoints). 1) Spot it, announce it, do not get near (a Siren may be behind). 2) Supports, Medics and Commandos each throw 2 grenades to rage it. 3) Supports, Commandos and the Berserker switch to Pulverizers and alt-fire. 4) Medics heal and clear trash while looking for Zed Time, then dart the Fleshpound to sedate it. 5) Each non-Medic keeps alt-firing until it dies. Perfect grenade hits mean 2 alt-fire hits per player; for the last two Fleshpounds throw 3 grenades each. Pros: fastest, ammo efficient, no shooting so no permanent rage, easy to parry. Cons: lots of coordination, expensive, Sirens can eat the grenades.
Parry Lock + AA12 Dump. Easy to get a team to buy into: needs a Support with an AA12 and someone to parry (the Pulverizer has the widest parry window and can rage a Fleshpound with one alt-fire). The rest of the team does not shoot. Rage it, the Berserker hugs it and parries, alt-fires to rage it, and during the rage animation the Support dumps the AA12 into the head at point-blank: 17 headshots kill a 6p HoE Fleshpound if all pellets land. Easiest when the head is up; when it is down, aim diagonally left, right, left, right. If it does not die, stop shooting, wait for the parry and repeat. Cons: not ammo efficient (about a clip per Fleshpound), needs the +5 kg perk for Support, double Fleshpounds need two parriers and two Supports.
Brute force. Everyone dumps mags while the Medic heals; worst method: ammo hungry, slow, risk of permanent rage.
Fleshpound tactics: by class
- Berserker: Pulverizer + Parry Lock. Wait for rage, hug, parry with the Pulverizer, alt-fire, alt-fire again during its rage animation, repeat; on the last shell parry, back away and reload. Easy to learn but long, and a missed parry hurts; do not let the Pulverizer run empty.
- Commando: SCAR + KF-BAR parry. Shoot from distance; when it rages switch to the knife, hug and parry, retreat and reload. Not ammo efficient: 51 SCAR headshots with Full Auto.
- Support: AA12 + Machete parry (same steps) and AA12 Bombard (level 15): fire single bursts until it rages, learn the head movement, dump the AA12 into the head during rage, melee bash before the rage ends, back off and reload. Very risky: you die if it is not dead after its second rage (stumble cooldown 15 s).
- Medic: Kite (rage it, close doors; 102 Medic AR headshots per 6p Fleshpound) or Medic AR + Scalpel parry; throw a med grenade first for extra damage.
Hans Volter
The author calls this a rough draft. Fight Hans where there are obstacles to kite around (not too big, not too short). Supports beat Commandos here; buy extra AA12s and put them near the fight; everyone should carry and use a Medic Pistol. Never shoot Hans while he is healing or looking to heal; always get grabbed immediately when he looks to heal.
- Method A: the Zerker parry-locks with the Pulverizer (90% damage reduction if parried, 50% if blocked) plus Formidable, with 2-3 Medics healing and Supports dumping AA12 mags: the safest non-exploit way. Do not bunch up; more than two players near Hans makes him throw a gas grenade at his feet.
- Method B: all Medics with AA12, Med SMG and Med Pistol, using speed and corners.
- Method C: Supports on a second-floor balcony, Medics circling an obstacle downstairs and drawing his aggro.
- Method D: with no balcony, whoever is not targeted dumps a magazine while the target runs around cover: a game of tag.
- Method E: circle strafe, a cheesy exploit but by far the easiest and safest.
Notes on special ZEDs
- Sirens: do not backpedal. Wait for the scream to end, draw aggro, hug her and do not move; shoot the head freely. Do not back away or melee bash her until she dies. Berserkers on Siren duty alt-fire the Pulverizer; Medics can flinch-lock her with the Medic AR.
- Bloats: if you cannot avoid bile, melee bash and keep moving. A Bloat decapitated with a slash dies instantly instead of walking around. Berserker: use a forward slash; the Pulverizer alt-fire is usually a waste.
- Husks: Berserkers avoid them unless damaged and in cooldown; Medics stumble lock them with the Medic AR; Supports use a point blank double barrel shot to the head during cooldown (one shell if half the pellets land).
- Scrakes: take 50% less damage from explosives and slashing. Kiting means dealing with Husks, Bloats and sometimes Fleshpounds that could rage the Scrake.
- Fleshpounds: take 50% extra from explosives and piercing and resist everything else by 50%. Shooting after a hit skips its rage animation and gives you a never-calming Fleshpound.
Weapon intricacies
- HMTech-401: can flinch-lock Husks and Sirens; do not spam the alt-fire to pump out darts continuously.
- Double Barrel Shotgun: alt-fire pushes you back, useful to dodge a Fleshpound lunge, to run from mobs or to jump over a Scrake or Fleshpound (aim down, jump, alt-fire).
- Melee bash: can stumble an unraged Scrake, but each chunk of damage raises stumble resistance, so do not bash a raging Scrake unless you have Impact, Bombard or Furious Defender; there is a 3-second cooldown. To decapitate trash with a bash, look straight ahead then aim slightly up (straight or slightly below for Slashers and Stalkers). Shotguns, the nail gun and Eviscerator bash for 20 or more damage, enough to decapitate trash; Commando weapons only 15 (21 with Back Up).
- EMP grenade: one fewer EMP is needed to panic a ZED if it is shot at the moment of detonation, which you do not want on Scrakes.
- Flamethrower: the author recommends learning it before the Firebug was released.
FAQ
Why Rapid Fire over Professional for level 25 Commando? Rapid Fire makes extending Zed Time much easier (5 extensions), forgives misses, can extend on Sirens and Husks and gives incredible DPS during EMP + Magdump. Professional avoids being caught in reloads or weapon swaps. Both have merits.
Melee bashing a Scrake did not work: is a perk needed? No, but after the Scrake takes some damage it can no longer be stumbled by a bash unless you have Impact, Bombard or Furious Defender, and it has a 3 second stumble cooldown. Do not bash a raging Scrake.
Resources
The author recommends the KF2 spreadsheet (inner workings) and the YouTube channels of q3.railgun, Dev D., (KFM) Blockyz and Kinx, and credits them along with SimpleCat.
FAQ
- What is the EMP + Magdump tactic?
- The team groups up, the Berserker drops an EMP grenade on a Scrake, and everyone shoots its head until it dies before the EMP wears off. Nobody should shoot before the EMP detonates, or the Scrake panics.
- What is Pulverizer Pounding for Fleshpounds?
- Supports, Medics and Commandos throw 2 grenades to rage the Fleshpound, then Supports, Commandos and the Berserker switch to the Pulverizer and alt-fire it, while Medics heal and handle trash.
- Why should you stop shooting a Fleshpound after it hits someone?
- If you keep shooting, it skips its rage animation and stays in rage, effectively becoming a raging Scrake. Letting it calm down gives easier headshots and lets the Berserker parry.
