
KF2 S.W.A.T. In-Depth Guide: Skills, Loadouts, Shots to Kill
This is a condensed version of an English-language community guide to the S.W.A.T. perk of Killing Floor 2 (assumed setting: 6 players on Hell on Earth). The S.W.A.T. is a niche pick that specializes in clearing trash ZEDs, so the guide explains the role, which skills to take on which waves, which SMGs to buy, and how to deal with big ZEDs. For a different take see the SWAT guide translated from Spanish.
Part 1: The role of the S.W.A.T.
A trash ZED specialist
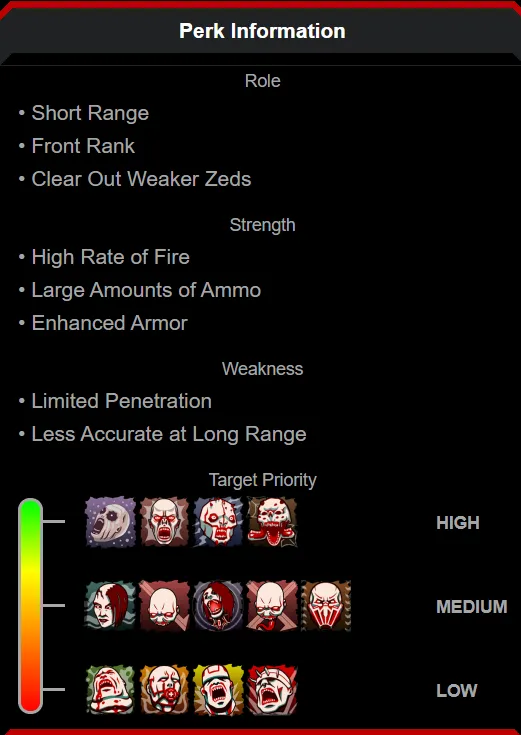 Official perk information: high rate of fire, large ammo, enhanced armor; limited penetration and accuracy at range.
The S.W.A.T. excels against Cysts, Clots, Slashers and Rioters (spawning from wave 1) and Crawlers (from wave 2). Stalkers are a special case: your starting MP7 cannot kill a Stalker with a single headshot, and it takes five body shots while they dodge around. Stalkers come in groups, up to 5-6 at once on Suicidal and Hell on Earth, so buy a better weapon. Any Tier 2 SMG (MP5, Tommy Gun, HM-TECH 201) kills a Stalker with one headshot.
An acceptable medium ZED slayer
The word "acceptable" is deliberate: the S.W.A.T. cannot get a clean kill on Gorefasts and Gorefiends, since the body keeps moving after the decapitation.
An occasional big ZED hunter
Because the perk is meant for trash, lane with a designated big ZED hunter such as a Sharpshooter, Gunslinger or Demolitionist. Avoid standing together with a Commando, who needs trash kills to refresh Zed Time; split lanes instead. You may still take down big ZEDs when:
- You follow up on a teammate's failed takedown.
- You cooperate with teammates to bring them down.
- You have enough back-pedaling room or flashbangs (the perk grenade).
Part 2: Skill choice
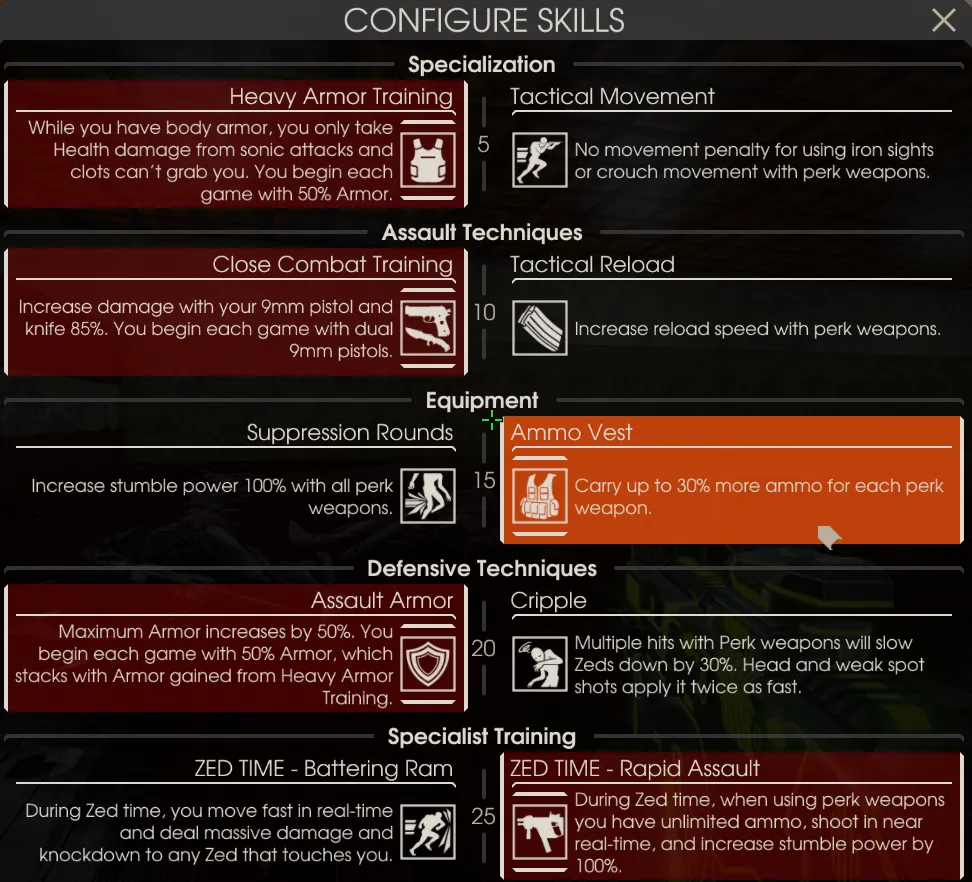 Suggested skills on wave 1.
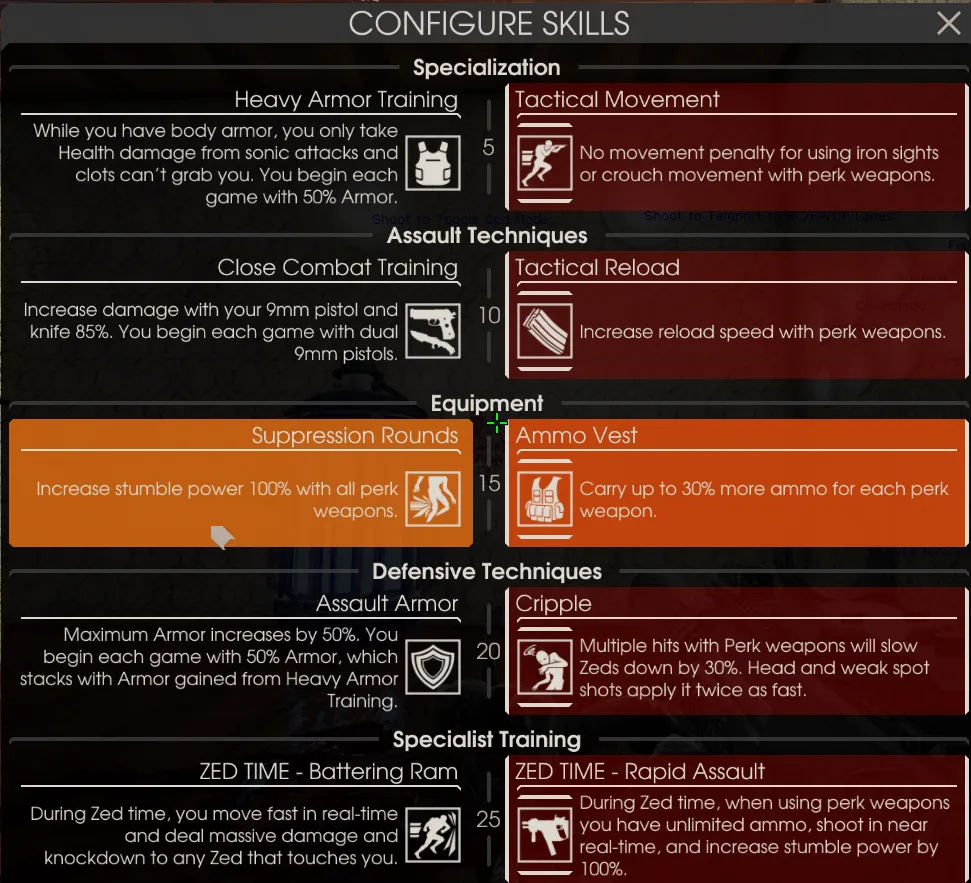 Suggested skills on waves 2-10.
- Level 5, Heavy Armor Training vs Tactical Movement. Heavy Armor Training is popular with new players for its tankiness, but Tactical Movement lets the S.W.A.T. solo big ZEDs without a flashbang.
- Level 10, Close Combat Training vs Tactical Reload. Take Close Combat Training on wave 1: it lets you kill a Bloat or Gorefiend with 3 headshots, and you can sell the extra 9mm for 75 dosh, which buys several SMG magazines. Tactical Reload benefits all SMGs and the 9mm, so consider it from wave 2.
- Level 15, Suppression Rounds vs Ammo Vest. Suppression Rounds add stumble power so you can solo big ZEDs. Avoid it when you cooperate with teammates, because premature stumbling means missed shots for everyone. Ammo Vest gives up to 30% more ammo and makes the S.W.A.T. a bullet hose. If a Support is present on wave 1, take ammo from him.
- Level 20, Assault Armor vs Cripple. Assault Armor gives 100 armor on wave 1 and up to 150 maximum. Cripple (slows ZEDs by 30%, similar to the Gunslinger's Skull Cracker) is more useful for soloing big ZEDs: consistent headshots on Scrakes, Quarter Pounds and Fleshpounds may keep them from hitting you at all.
- Level 25 (Zed Time), Battering Ram vs Rapid Assault. Rapid Assault is far superior: unlimited ammo in Zed Time and killing nearly everything you see. With Zed Time refreshes from a Commando you can eliminate several big ZEDs in one Zed Time.
Over-capping trick
You can enjoy both Suppression Rounds and Ammo Vest:
- After the wave ends, go to the trader and buy the guns you want (skip if your loadout is complete).
- Open the menu with Esc and switch Suppression Rounds to Ammo Vest.
- Buy ammo and armor.
- Throw them on the ground (in a corner near the trader, away from teammates who might steal and sell them).
- Switch Ammo Vest back to Suppression Rounds.
- Pick up your SMGs.
Do not take ammo from a Support or pick up ammo boxes after this, or all the extra ammo is lost.
Part 3: Loadouts
The Kriss Vector is a must-have, with 1200 RPM and an ammo pool of 66+644=710 when Ammo Vest is selected.
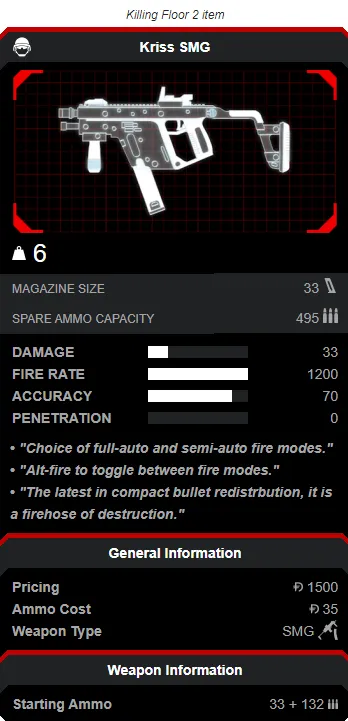 Kriss SMG: 1200 rounds per minute.
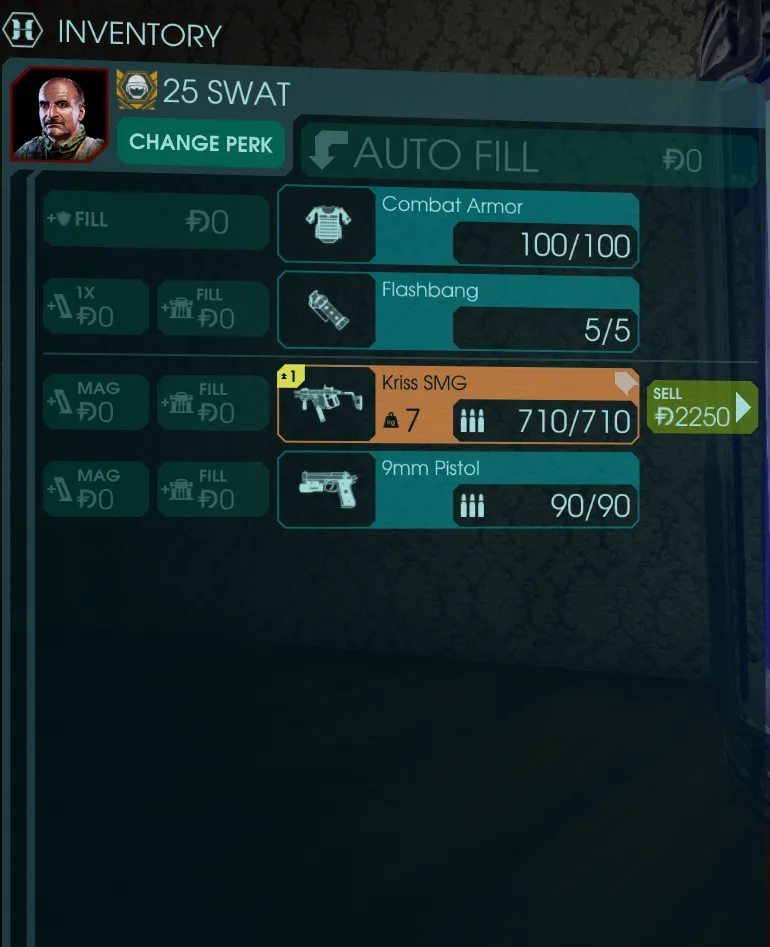 Ammo pool of the Kriss with Ammo Vest.
1. Spray and pray. Tier 4 Kriss with a Tier 3 SMG (P90, UMP, HRG Nailgun) or a Tier 2 SMG. This gives plenty of bullets and suits players who are not confident at headshots.
2. Weapon upgrade mastery. Tier 5 Kriss plus a Tier 5 Nailgun, P90, UMP or MP5, plus the HM-TECH 101 for healing.
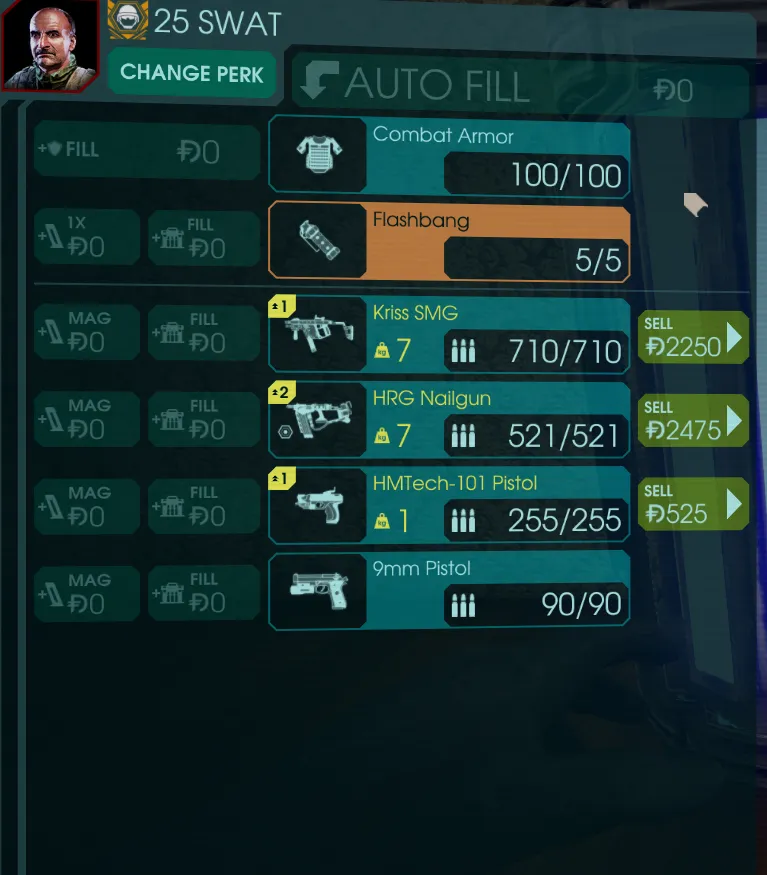 The author's favourite loadout.
The upgraded Kriss shreds everything below a Fleshpound, while the HRG Nailgun's piercing damage lets the S.W.A.T. take down Fleshpounds and Quarter Pounds (like the FN FAL for the Commando) and serves as a backup when the Kriss runs dry.
Part 4: Shots to kill (6 players, Hell on Earth)
HS means headshots and BS body shots. Wave 1 with the MP7 and dual 9mm, using Close Combat Training:
| ZED | MP7 | Dual 9mm |
|---|---|---|
| Cyst / Clot / Slasher | 1 HS or 4 BS | 1 HS or 3 BS |
| Rioter | 10 leg shots | 7 leg shots |
| Gorefast | 3 HS (body remains) | 1 HS (body remains) |
| Gorefiend | 7 HS (body remains) | 3 HS (body remains) |
| Bloat | 12 HS | 3 HS |
The S.W.A.T. is precision-based: headshots are far more effective than body shots.
Tier 2 SMGs (wave 2):
| MP5-RAS | Tommy Gun | HM-TECH 201 | |
|---|---|---|---|
| Ammo pool (Ammo Vest) | 80+416=496 | 100+325=425 | 80+624=704 |
| Ammo cost | 28 dosh / 40 bullets | 50 dosh / 50 bullets | 21 dosh / 40 bullets |
| Damage | 25 | 30 | 20 |
| Fire rate | 896 | 720 | 800 |
The MP5 has the highest rate of fire, the Tommy Gun the best per-bullet damage, and the HM-TECH 201 heals and has the cheapest ammo (buy it when the team has no Medic).
| ZED | MP5-RAS | Tommy Gun | HM-TECH 201 |
|---|---|---|---|
| Cyst / Slasher / Clot | 1 HS / 3 BS | 1 HS / 2 BS | 1 HS / 3 BS |
| Rioter | 7 leg shots | 6 | 9 |
| Crawler | 1 HS / 2 BS | 1 HS / 1 BS | 1 HS / 2 BS |
| Stalker | 1 HS / 3 BS | 1 HS / 3 BS | 1 HS / 3 BS |
| Gorefast | 2 HS | 2 HS (clean kill) | 2 HS |
| Gorefiend | 5 HS | 4 HS | 7 HS |
| Siren | 5 HS | 4 HS | 6 HS |
| Bloat | 8 HS | 6 HS | 10 HS |
| Husk | 9 HS or 4 shots to the fuel tank | 8 HS or 3 | 10 HS or 4 |
| E.D.A.R. | 6-8 shots to the core | 6-8 | 6-8 |
Tier 3 SMGs (waves 3-4):
| P90 | UMP | HRG Nailgun | |
|---|---|---|---|
| Ammo pool (Ammo Vest) | 100+455=555 | 60+377=437 | 84+437=521 |
| Ammo cost | 40 dosh / 50 bullets | 36 dosh / 30 bullets | 45 dosh / 42 bullets |
| Damage | 30 | 45 | 40 (piercing) |
| Fire rate | 857 | 600 | 857 |
The P90 has the biggest magazine, the UMP the highest per-bullet damage, and the Nailgun's piercing damage hurts Fleshpounds and Quarter Pounds, so buy it when you have no big ZED hunter or need to solo a lane.
| ZED | P90 | UMP | HRG Nailgun |
|---|---|---|---|
| Cyst / Slasher / Clot | 1 HS / 2 BS | 1 HS / 2 BS | 1 HS / 2 BS |
| Rioter | 6 leg shots | 4 | 6 |
| Crawler | 1 HS / 1 BS | 1 HS / 1 BS | 1 HS / 2 BS |
| Stalker | 1 HS / 3 BS | 1 HS / 2 BS | 1 HS / 2 BS |
| Gorefast | 2 HS (clean kill) | 1 HS (clean kill) | 2 HS |
| Gorefiend | 4 HS | 3 HS (clean kill) | 4 HS |
| Siren | 4 HS | 3 HS | 6 HS |
| Bloat | 6 HS | 4 HS | 7 HS |
| Husk | 8 HS or 3 to the tank | 5 HS or 2 | 9-10 HS or 4 |
Waves 5-6 and later, the Kriss Vector:
| ZED | Kriss Tier 4 | Kriss Tier 5 |
|---|---|---|
| Cyst / Slasher / Clot | 1 HS / 2 BS | 1 HS / 2 BS |
| Rioter | 5 leg shots | 5 |
| Crawler | 1 HS / 1 BS | 1 HS / 1 BS |
| Stalker | 1 HS / 3 BS | 1 HS / 2 BS |
| Gorefast | 2 HS (clean kill) | 1 HS |
| Gorefiend | 4 HS | 3 HS |
| Siren | 4 HS | 4 HS |
| Bloat | 6 HS | 5 HS |
| Husk | 7 HS or 3 to the tank | 6 HS or 3 |
| Scrake | 33 HS | 32 HS |
| Quarter Pound | 47 HS | 40 HS |
| Fleshpound | 78 HS | 69 HS |
Do not use the Kriss on Fleshpounds. Fleshpounds resist SMG damage but not piercing, so use the Nailgun:
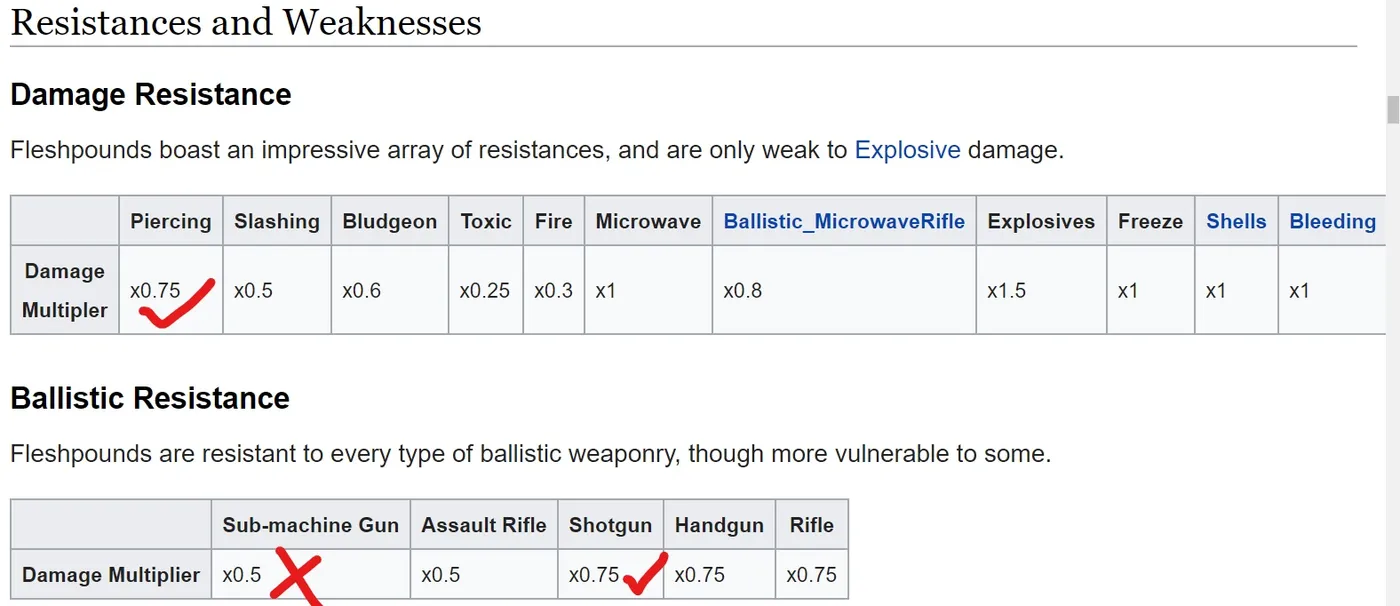 Fleshpound resistances: SMG damage is poor, piercing is better.
| ZED | Nailgun T3 | T4 | T5 |
|---|---|---|---|
| Quarter Pound | 30 HS | 27 HS | 24 HS |
| Fleshpound | 42 HS | 37 HS | 33 HS |
Part 5: Big ZED takedowns
With a flashbang you can take down Scrakes even with Tier 2-3 SMGs, and it is easier with the Kriss. You carry at most 5 flashbangs, so save them for emergencies: a breached defense line, several big ZEDs at once, or being cornered.
To kill big ZEDs without a flashbang, use Tactical Movement, Suppression Rounds and Cripple:
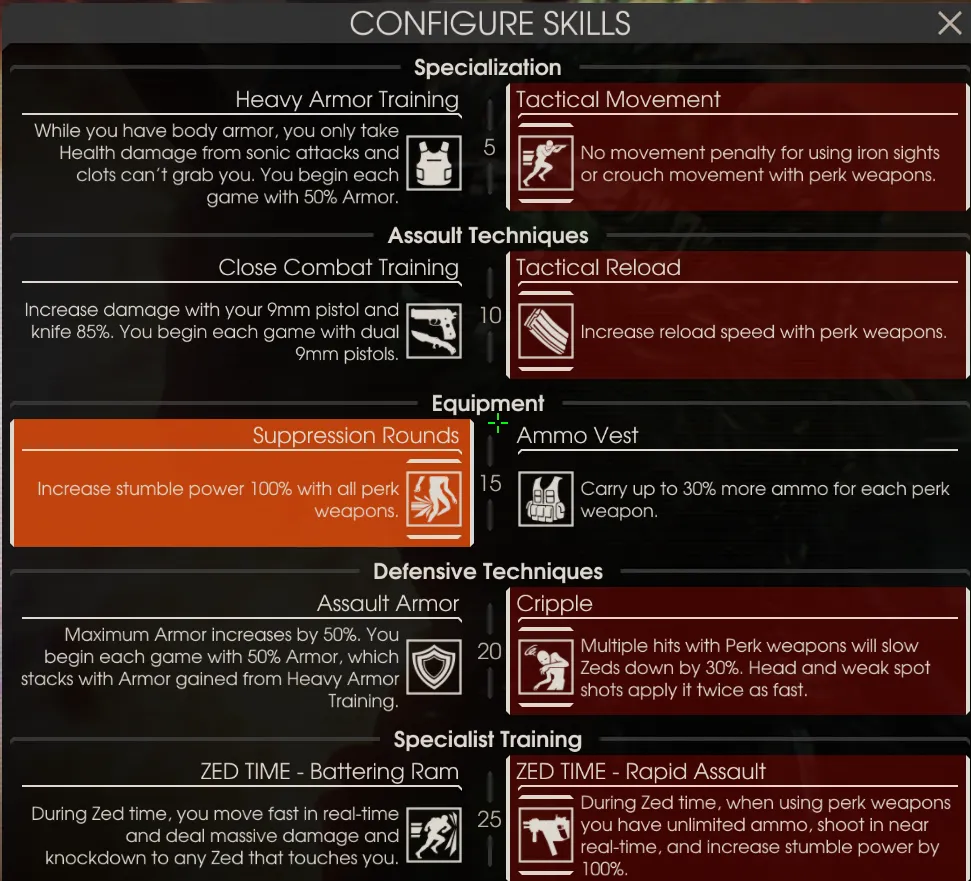 Skill combination for handling big ZEDs without a flashbang.
Fleshpounds can be killed without a flashbang too, though the Kriss needs more than a magazine per Fleshpound, so the Nailgun is the preferred choice. Notes:
- A Tier 3 Nailgun can stumble a calm Fleshpound before it rages; Tier 4 and 5 cannot.
- A Quarter Pound, calm or raged, can be stumbled with the Nailgun.
- Head tracing is the key to a successful takedown; practice helps.
- If several are spawn-raged, ask for help, since soloing multiple big ZEDs is extremely tricky for a S.W.A.T.
Part 6: Advanced notes
- The HM-TECH 201 can spam healing darts infinitely during Zed Time.
- Playing S.W.A.T. on wave 1 saves money: free 100 armor plus an extra 9mm, a total of 300+75=375 dosh thanks to Heavy Armor Training and Assault Armor.
- Do not run S.W.A.T. on the boss wave. Its damage is underwhelming next to a Gunslinger or a Sharpshooter with the railgun; switch to Commando to keep clearing trash.
- A good match will earn you the "Head Popper" MVP award.
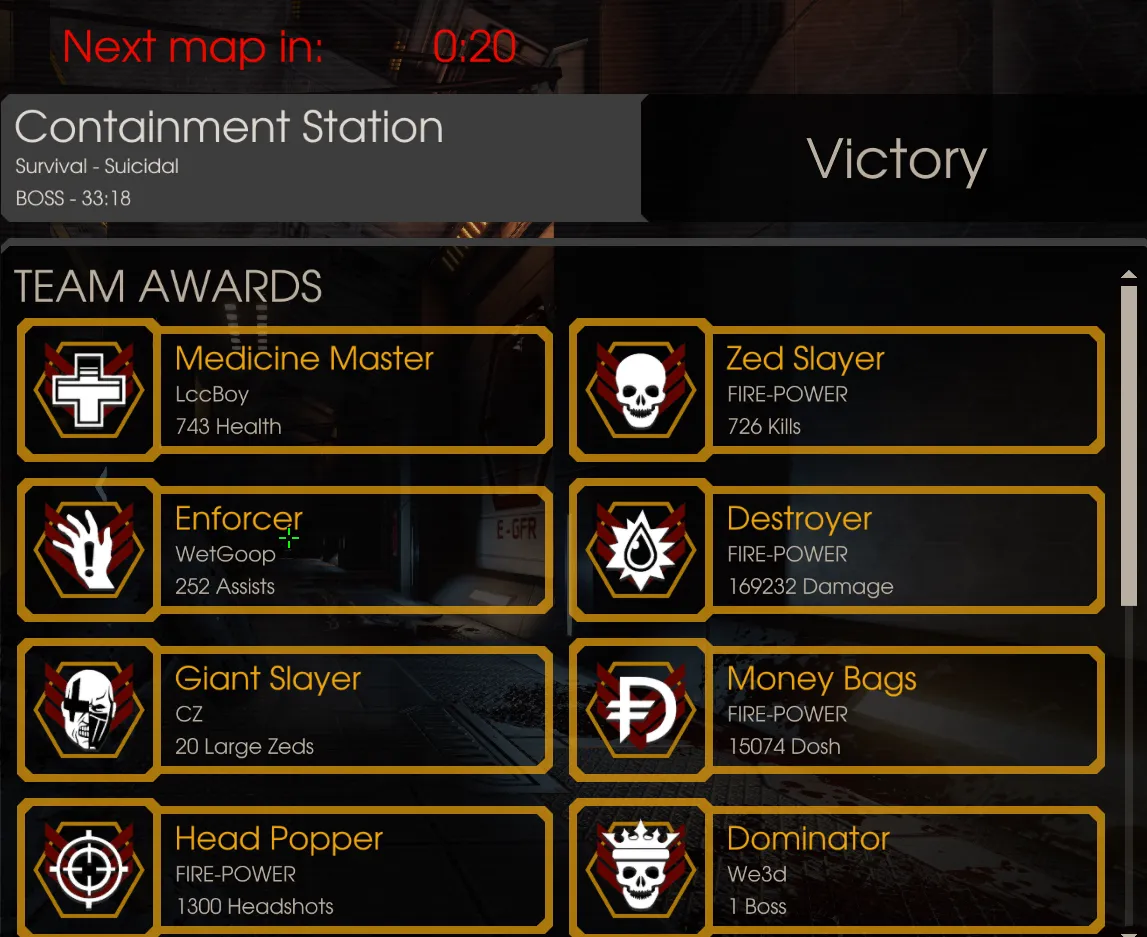 Team awards after a victory, including Head Popper.
- If a Support is present on wave 1, choose Ammo Vest and take ammo from him.
Final words
The S.W.A.T. is niche, since it specializes in trash clearance. Mediums can be awkward because Gorefasts and Gorefiends keep moving after decapitation, and in time to kill and ammo use big ZEDs are hard for it. If you love SMGs and their wild rate of fire, at least try it on wave 1. Credits: KF-TestingMapRedux by Fauxy_ and the Killing Floor 2 wiki. Source: Steam community guide "An in-depth guide for the S.W.A.T." by Mike Tyson.
FAQ
- What is the S.W.A.T. best at?
- Clearing trash ZEDs (Cysts, Clots, Slashers, Rioters, Crawlers, Stalkers) and crowd control, thanks to a high rate of fire, large ammo pools and extra armor.
- Which weapons should a S.W.A.T. run?
- The Kriss Vector is called a must-have for its 1200 RPM and huge ammo pool. Pair it with a Tier 2-3 SMG, or upgrade the HRG Nailgun to handle Fleshpounds and Quarter Pounds through its piercing damage.
- Should I play S.W.A.T. on the boss wave?
- The author advises against it: SWAT damage is underwhelming compared with the Gunslinger or the Sharpshooter with the railgun. Switch to Commando if you want to keep killing trash.
