
KF2 Killing Large ZEDs: Builds and Combos for Every Perk
This guide (marked outdated by its author, written for 6-player Hell on Earth and still useful on lower difficulties) lists the loadouts, skills and combos each perk can use to kill Scrakes and Fleshpounds. Mandatory skills and weapons were outlined in yellow in the original screenshots. It requires level 25 for the full combos, though some work lower. See also large ZED takedowns practice guide and shots to kill and damage formulas.
Introduction and teamwork
Primary large-ZED killers are Demolitionist and Sharpshooter; secondary are Gunslinger, Support and Berserker. Swat, Commando, Medic and Firebug are not supposed to kill them, but their emergency options are listed too. The author recorded the videos on a test map without horde pressure, so real games are harder.
The key is teamwork. If you are not playing a large-ZED killer, it is not your job to kill them. Do not even shoot them, because large ZEDs rage after a small amount of damage and enraging several at once can wipe the team. For XP, one 9mm shot is enough to get full XP when it dies. Your job is to give the killer room by killing the horde. Do not fire an RPG at Clots or dump a SCAR magazine into a Fleshpound.
Large ZED mechanics
- Raged large ZEDs gain speed and damage, so kill them quickly. Enraging several without a plan means a wipe.
- Scrakes rage at 75% health on Suicidal and 90% on Hell on Earth, and a raged Scrake will not stop until it dies.
- Fleshpounds rage after 276 damage, or 10-14 seconds after having line of sight with a player; getting out of sight does not reset the timer.
- Fleshpounds calm down after hitting a player once, so they are less dangerous than raged Scrakes.
- Danger ranking: raged Scrake > raged Fleshpound > calm Fleshpound > calm Scrake.
- If a hit is unavoidable, pull out the knife, jump and parry. The parry mitigates damage, the jump knocks you away, and tanking a hit calms a Fleshpound.
Demolitionist
Pros: blows up the horde as well, handles multiple or raged large ZEDs. Cons: explosions can enrage other large ZEDs; frequent reloads leave no room for error. It is the best large-ZED killer after the latest update (Fleshpounds now often spawn raged), which favors Demolitionist over Sharpshooter.
Scrakes. They resist explosions but are weak to RPG headshot impact: with all left-side skills an RPG headshot deals nearly 8 times damage. Dynamite stuns any ZED. Explosives fired from closer than 3 meters do not blow up (to prevent suicide), but impact damage still applies; sometimes it is better to explode so the horde takes damage, sometimes safer to fire at close range if several large ZEDs are together.
- Build 1 (author's main). RPG-7, C4 and .500 Magnum with Bombardier, High Impact Rounds, Sonic Resistant Rounds and Armor Piercing Rounds. One Magnum bullet then one RPG headshot kills.
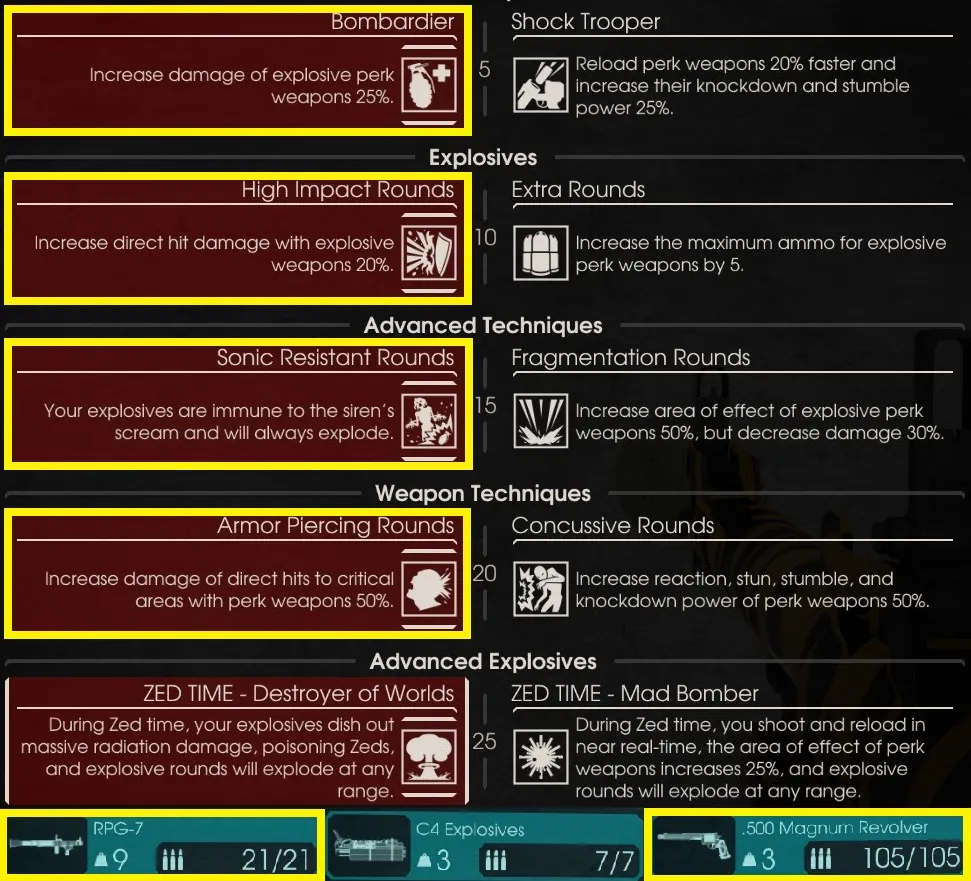 Build 1: Bombardier, High Impact, Sonic Resistant, Armor Piercing; RPG-7, C4, .500 Magnum.
- Build 2. For people who prefer M79 or M203 over C4: 1 RPG plus 1 M79/M203 headshot. With Concussive instead of Armor Piercing it takes 2 missiles per Scrake, a waste of ammo.
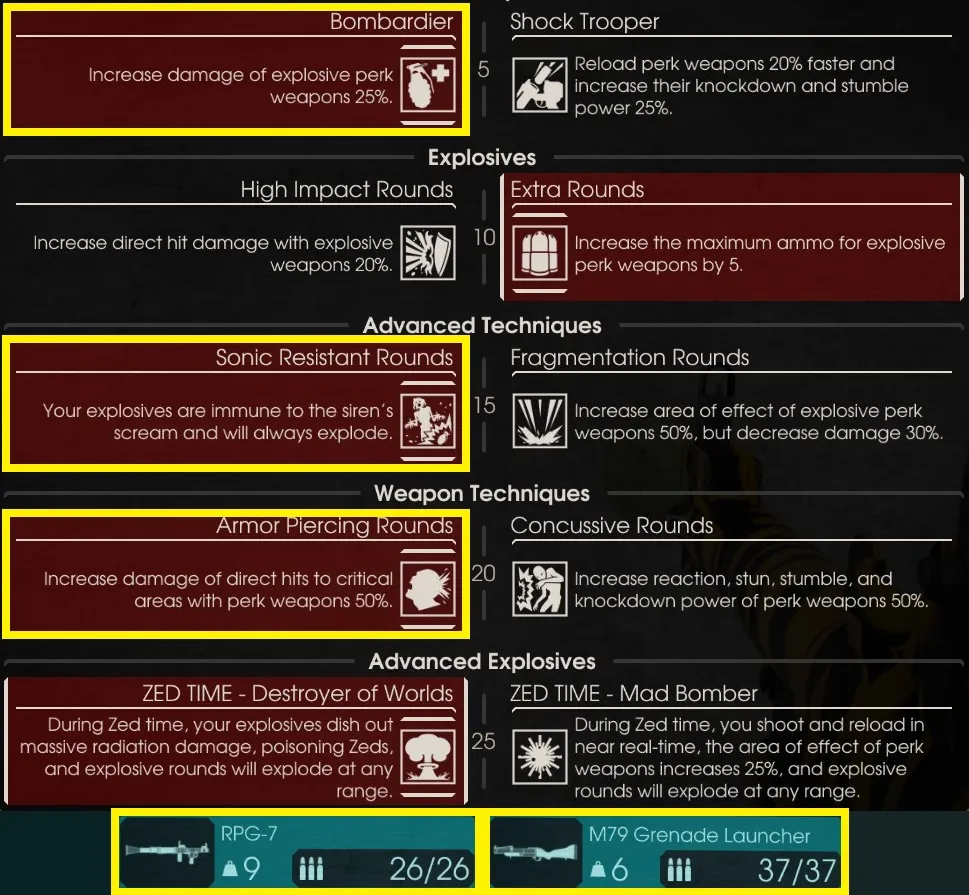 Build 2 for M79/M203 users.
Fleshpounds. Demolitionist is the main Fleshpound killer, since they are weak to explosions. You need Bombardier for extra damage and Siren resistance; RPG plus C4 is recommended, because RPG alone is not enough.
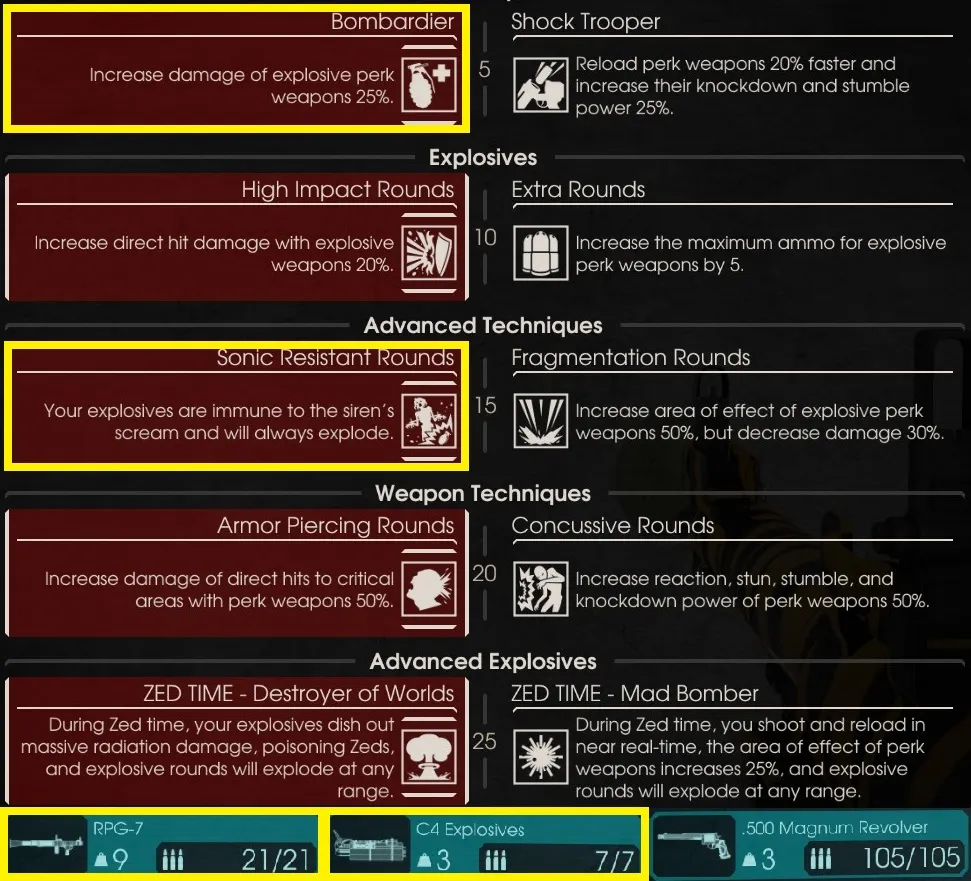 Fleshpound build skills and weapons.
- Option 1 (favorite): aim for the leg for a knockdown.
- Option 2 (no C4): 3 missiles to kill.
- Option 3 (no RPG): M79 plus C4 plus M203; good against hordes but useless against Scrakes. Never play Demolitionist without the RPG.
Multiple Fleshpounds. Weld a door after planting C4 inside, damage them through it, then finish with the RPG when they break through. Without a door, use chokepoints: double Fleshpounds need to be close together; for triples, improvise and go overkill. C4 has a 3-second damage cooldown, so a second blast within that window deals half damage; chain at most two (3 or more gives 50%, 25% and 12.5%). The mechanic exists to prevent killing the boss instantly.
Sharpshooter
Pros: fastest large-ZED kills, from a distance. Cons: worst self-defense against the horde, trouble with raged large ZEDs. The Railgun defaults to auto-aim; switch to manual, because auto-aim deals half damage and breaks these combos.
Scrakes.
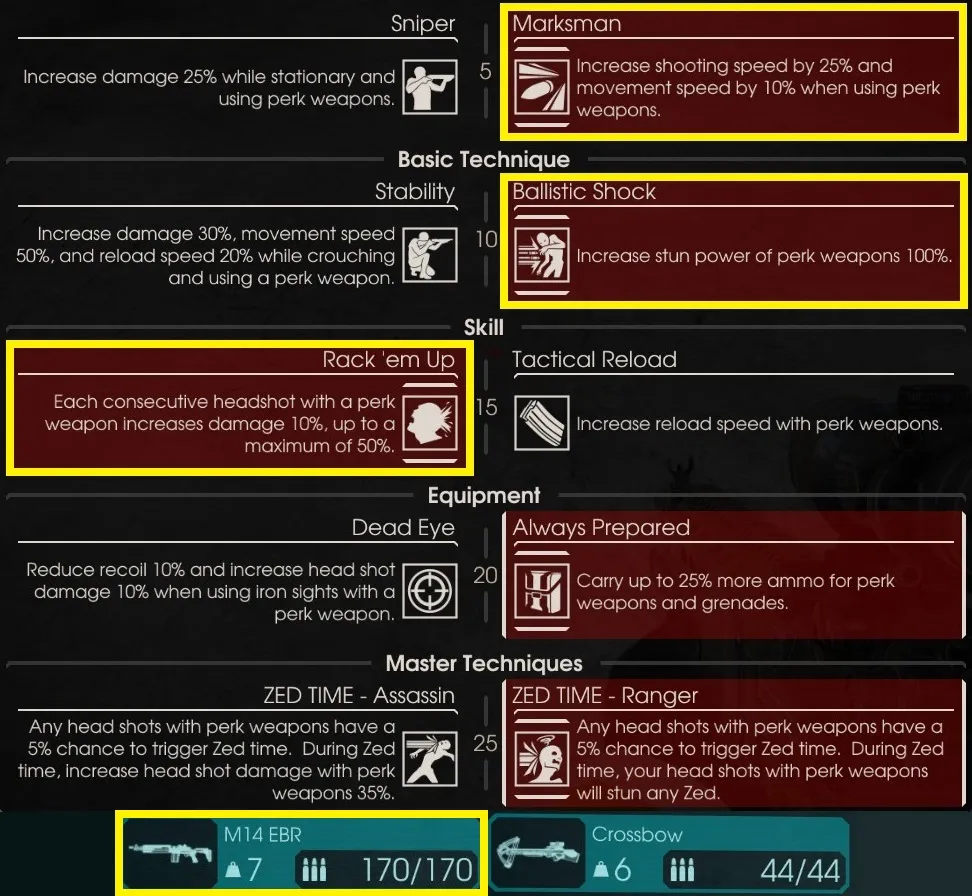
- Build 1: all left-side skills for a one-shot kill. Crouch, stand still and aim for the head. Weakest against hordes. SPX Centerfire can replace the Magnum (slightly stronger but heavier and slower).
- Build 2: slower against big ZEDs but better against everything else (also playable as SPX + Crossbow + Magnum). Option 1: stun with the Crossbow first (hit the body for a guaranteed stun; headshots are inconsistent), then kill with the M14 or SPX. Option 2: just use the M14, which stuns halfway, then kills.
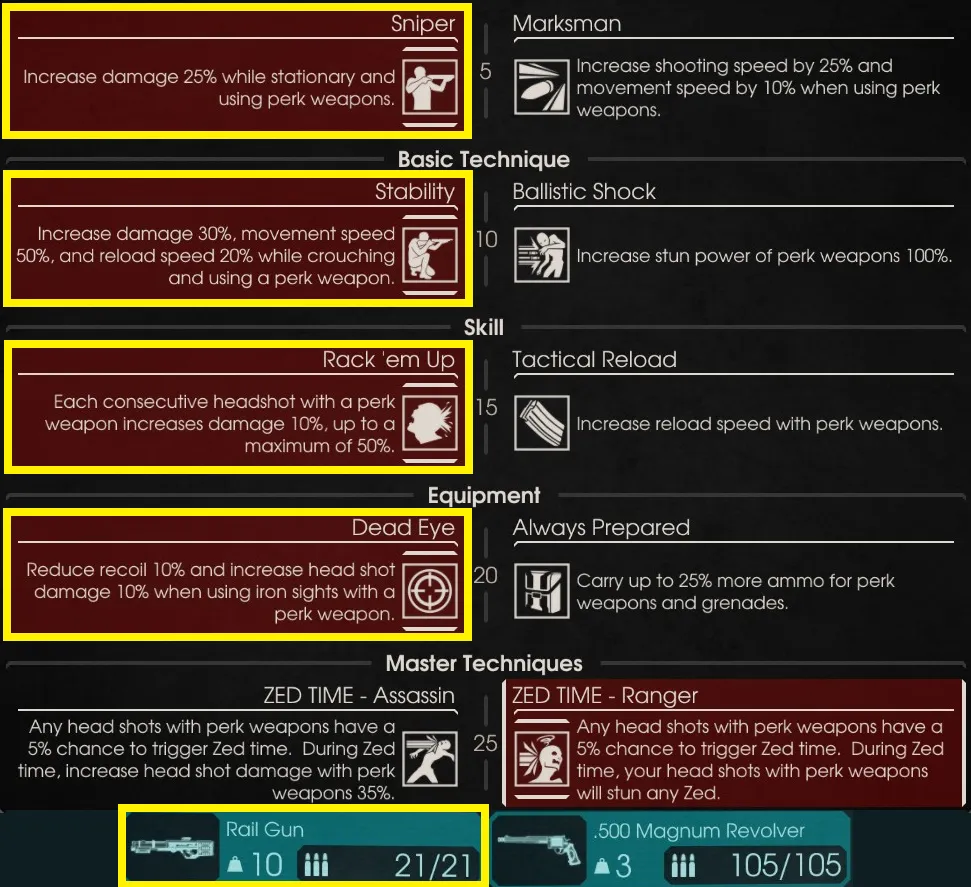 Sharpshooter Build 1 skills.
 Sharpshooter Build 2 skills.
Fleshpounds.
- Build 1: one Railgun shot is not enough. Option 1 (safest): 2 Railgun shots, waiting for the rage animation to end for a guaranteed headshot. Option 2 (ammo efficient): 2 Magnum or SPX headshots first, then wait for the rage animation to end for a headshot.
- Build 2: the Crossbow is essential. Option 1: headshot with the Crossbow to stun, then kill with the M14 or SPX. Option 2: 4 Crossbow headshots kill quickly. Do not let the Rack 'Em Up counter decay or you need an additional shot.
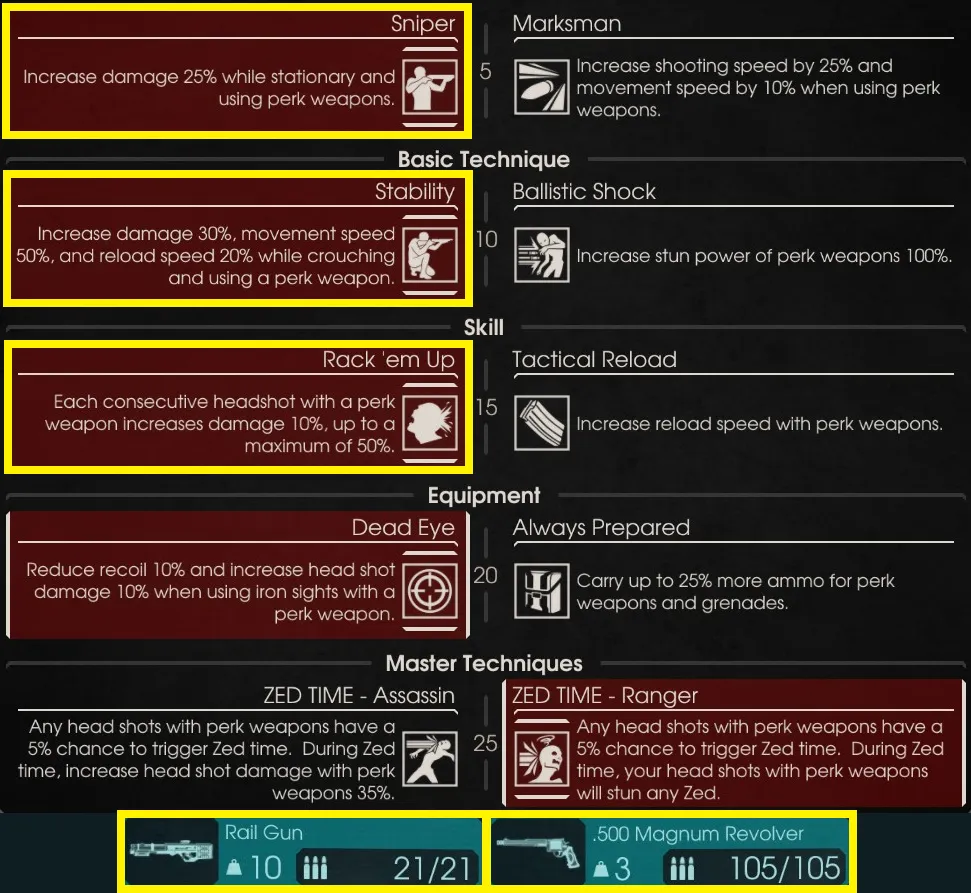 Fleshpound build 1.
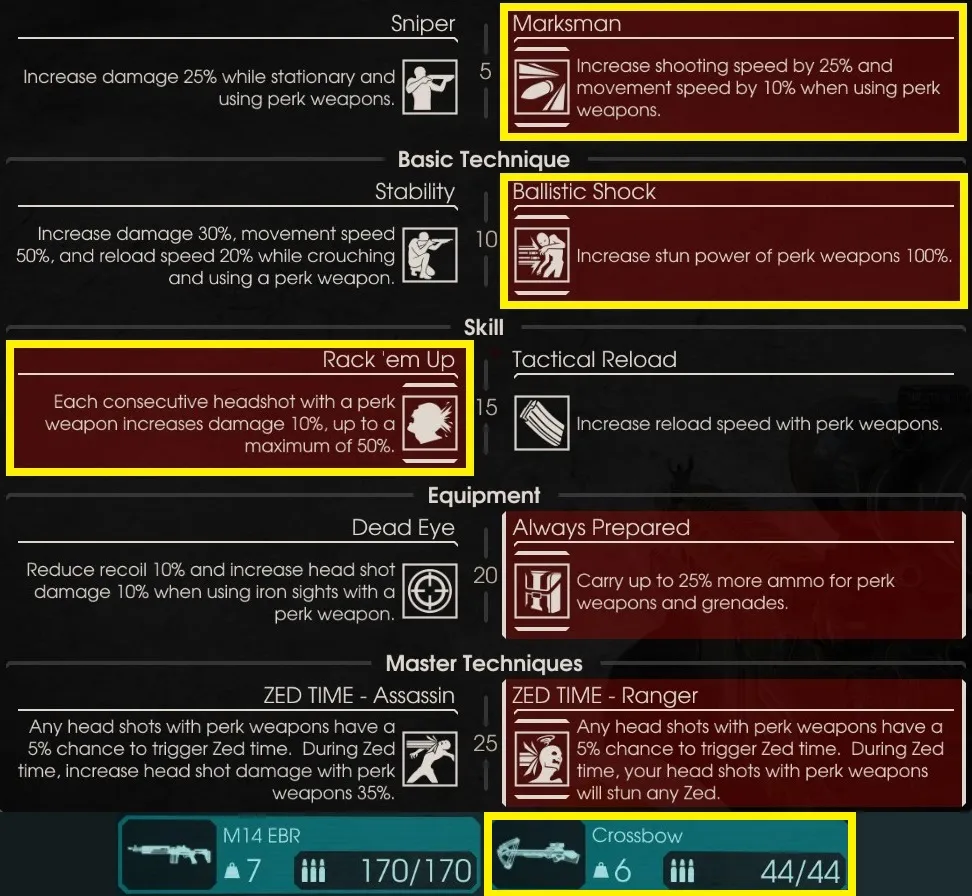 Fleshpound build 2.
Multiple Fleshpounds. With Build 1 and a Freeze Grenade you can handle double Fleshpounds (crouch and stand still, 2 Magnum or SPX headshots each, then finish with the Railgun), but triples are hard. With Rack 'Em Up at 2 or higher, 1 SPX headshot plus 1 Railgun headshot kills a Fleshpound.
Gunslinger
Pros: the most flexible perk, fast, can dodge melee. Cons: struggles with multiple large ZEDs, high ammo use. It is hard to master, but controlling recoil is the main challenge. The only important skill is Rack 'Em Up.
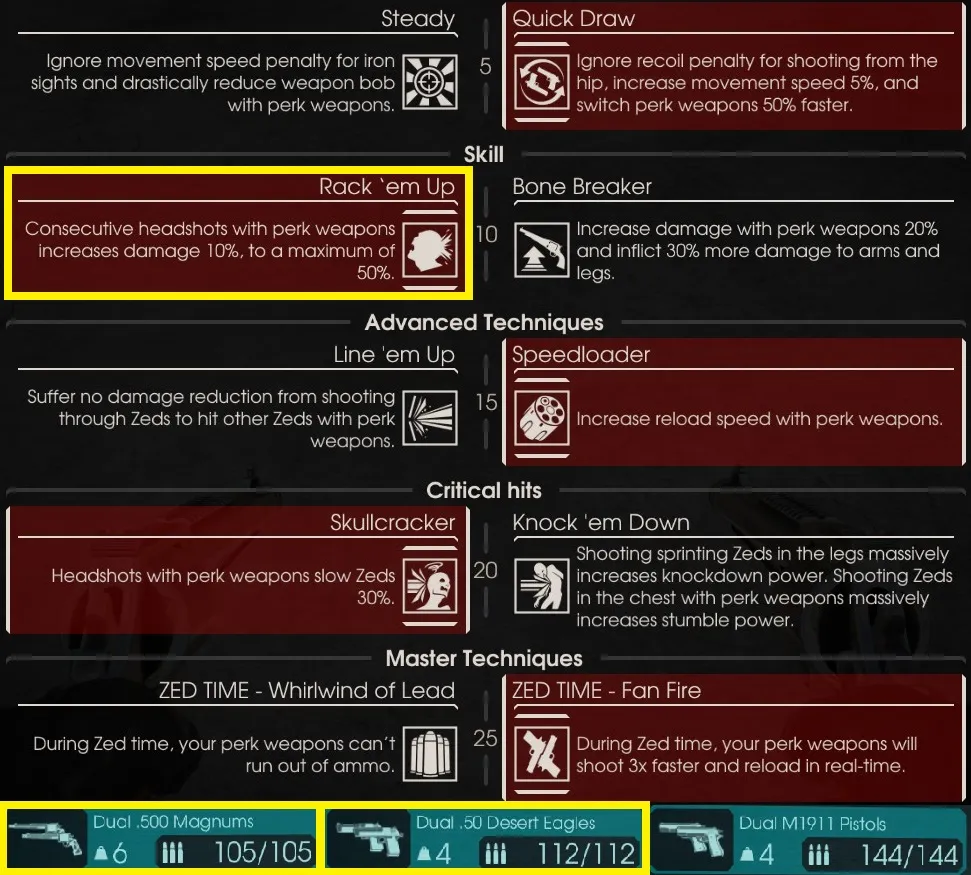 Gunslinger skill choices.
- Scrakes: Deagles are enough if you keep the aim steady.
- Fleshpounds: trace the head movement during the rage animation; Deagles alone are not enough, so carry both pairs of pistols.
Support
Pros: handles raged large ZEDs, very fast, ammo efficient. Cons: penetration may enrage several; you must be very close. Support has the cheapest large-ZED weapon: the Double-barrel Boomstick, tier 2 at 650 dosh, buyable on wave 2 and killing like a tier 4. AA12 and Boomstick are the key weapons, and Salvo and Tight Choke are highly recommended.
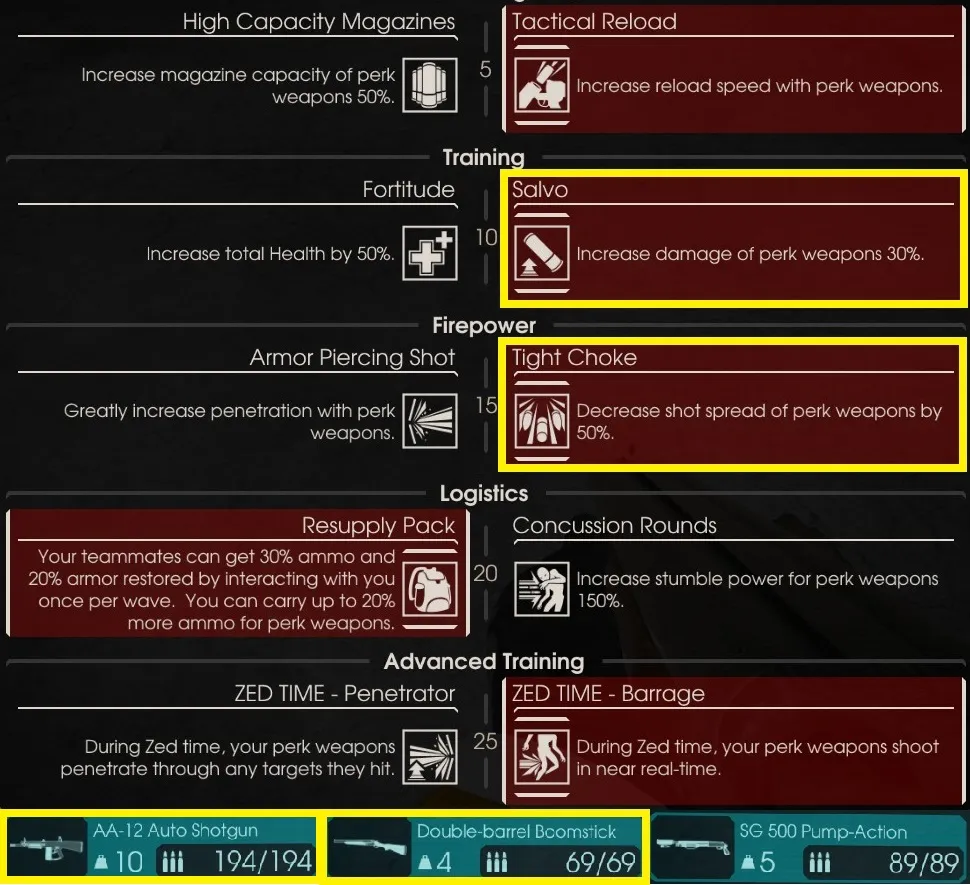 Support skills.
- Scrakes: 2 double shots to the head; do not miss pellets. The Boomstick has insane stumble power.
- Fleshpounds: Option 1: 3 well placed Boomstick double shots. Option 2: 8 AA12 headshots until it starts running, then one Boomstick double shot.
Faster advanced Support combos by RykerZzZ were linked in the original.
Berserker
Pros: can tank and parry, runs fast. Cons: has to get close, needs frequent healing. Killing Scrakes with 4 or 5 head hits from the Pulverizer or Zweihander is possible but headshots with melee are hard; the Zweihander is not effective against large ZEDs. The Eviscerator is among the best Scrake killers: you only need the Smash skill. A Deagle is a good off-perk weapon to blow up Husks at range.
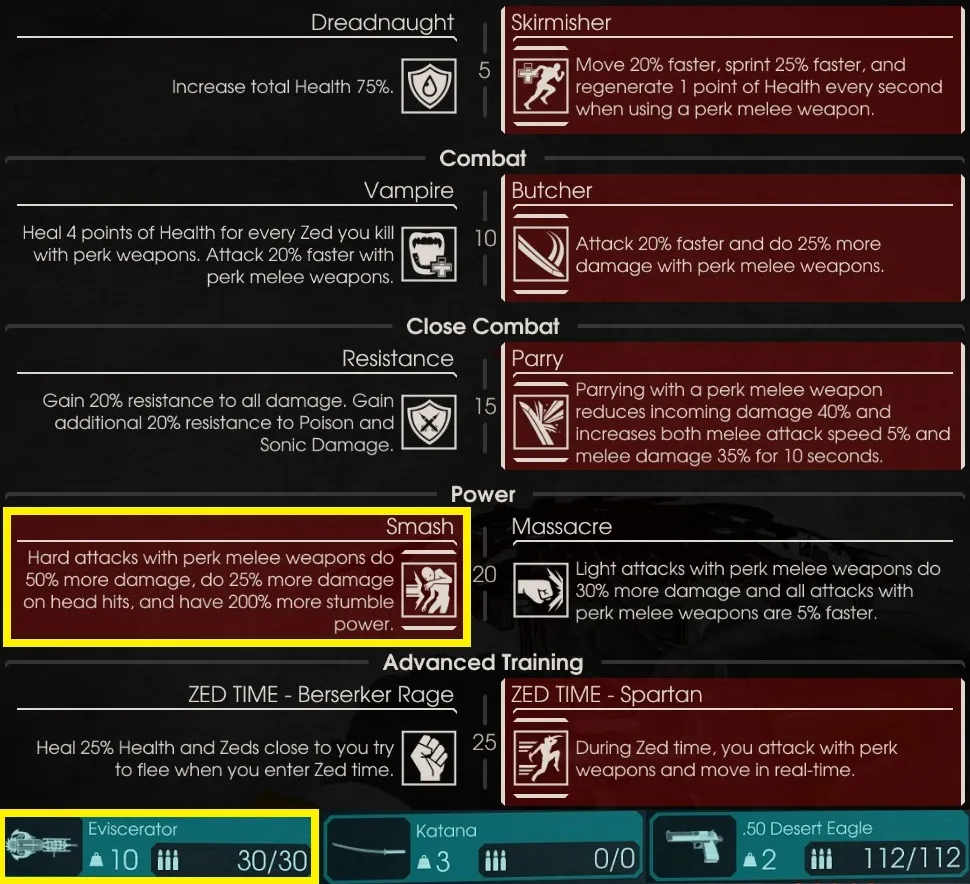 Berserker Scrake build.
- Scrakes: 2 Eviscerator headshots.
- Fleshpounds (Build 1): 2 Deagle headshots lower the head health enough for 3 boosted Eviscerator blades; "boosted" means after a parry with the Parry skill you get a 35% damage boost.
- Fleshpounds (Build 2): fully explosive: after an RPG shot, 4 Pulverizer explosions.
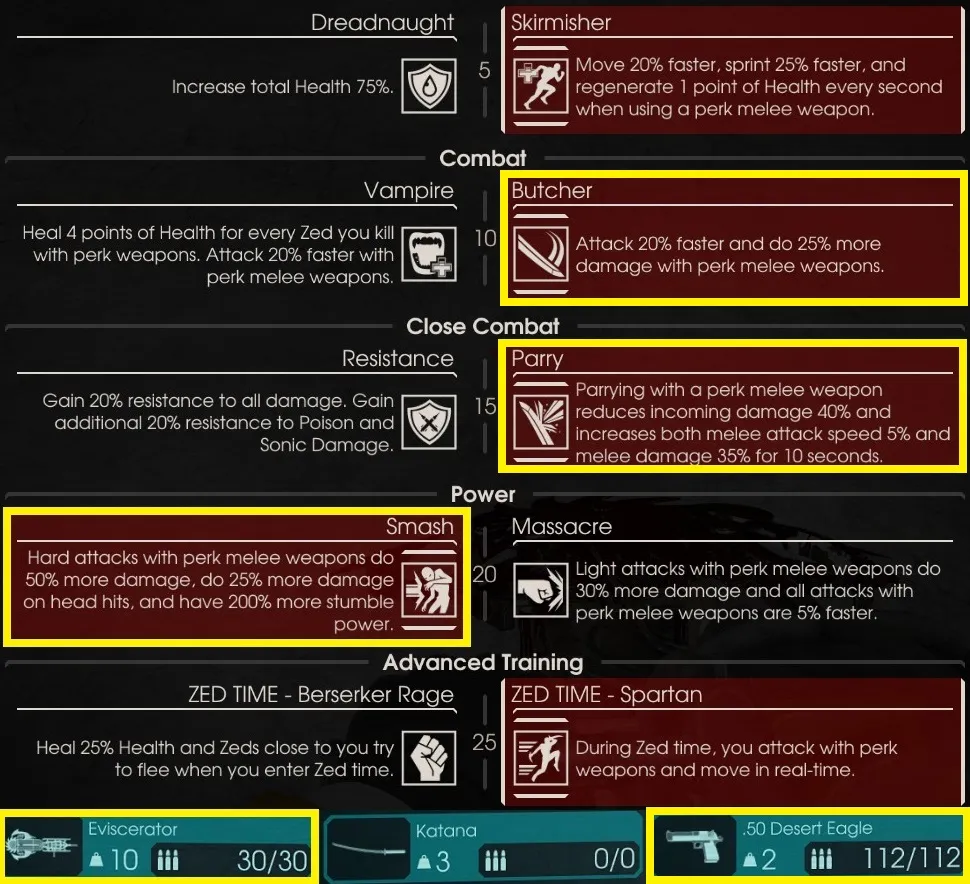 Fleshpound build 1.
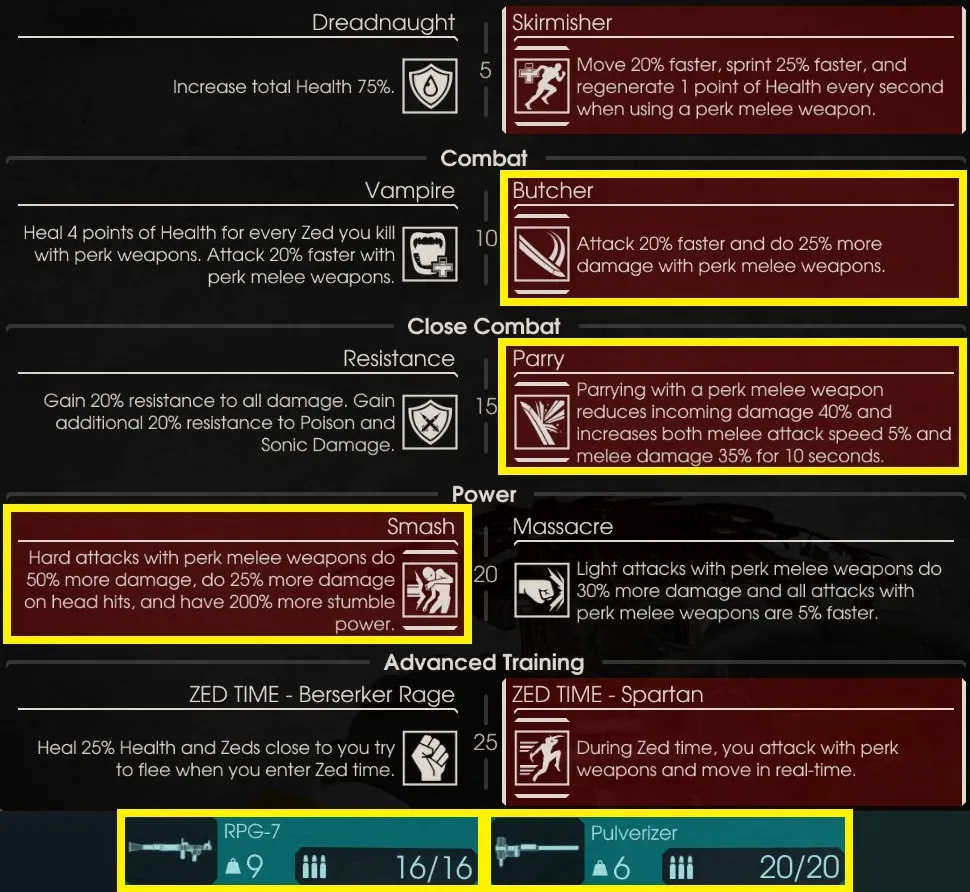 Fleshpound build 2.
Mace and Shield is good, but there is no effective large-ZED combo: just parry when needed. It is the best choice for the boss wave since it can block ranged attacks.
Swat
You need no skills to kill a Scrake, only the 25 percent passive damage bonus. A flashbang stuns a Scrake long enough to empty a Kriss magazine. Swat cannot efficiently kill Fleshpounds: the flashbang stuns them, but one magazine is not enough. Kill the horde instead.
Commando
You need all the capacity and damage skills.
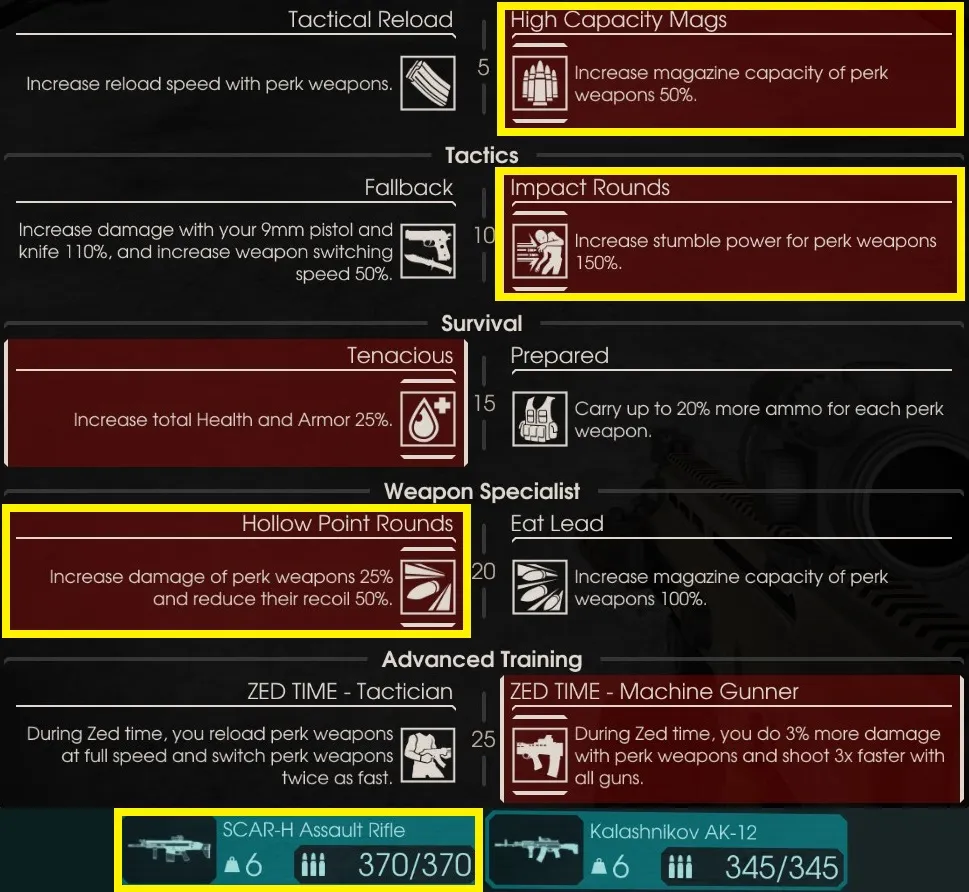 Commando skills.
Thanks to Impact Rounds a Scrake will stumble before reaching you. A Fleshpound cannot be killed efficiently; kill the horde and help a Demolitionist with grenades.
Medic
A Medic should never face a large ZED alone. In an emergency it is possible to kill a Scrake with the Medic Rifle if you do not miss; combining both guns guarantees it. Acidic Rounds make the Scrake panic. Recoil control matters because medic weapons recoil the most. Fleshpounds cannot be killed efficiently, so focus on healing. The author does not recommend Combat Medic skills unless the team accepts less healing.
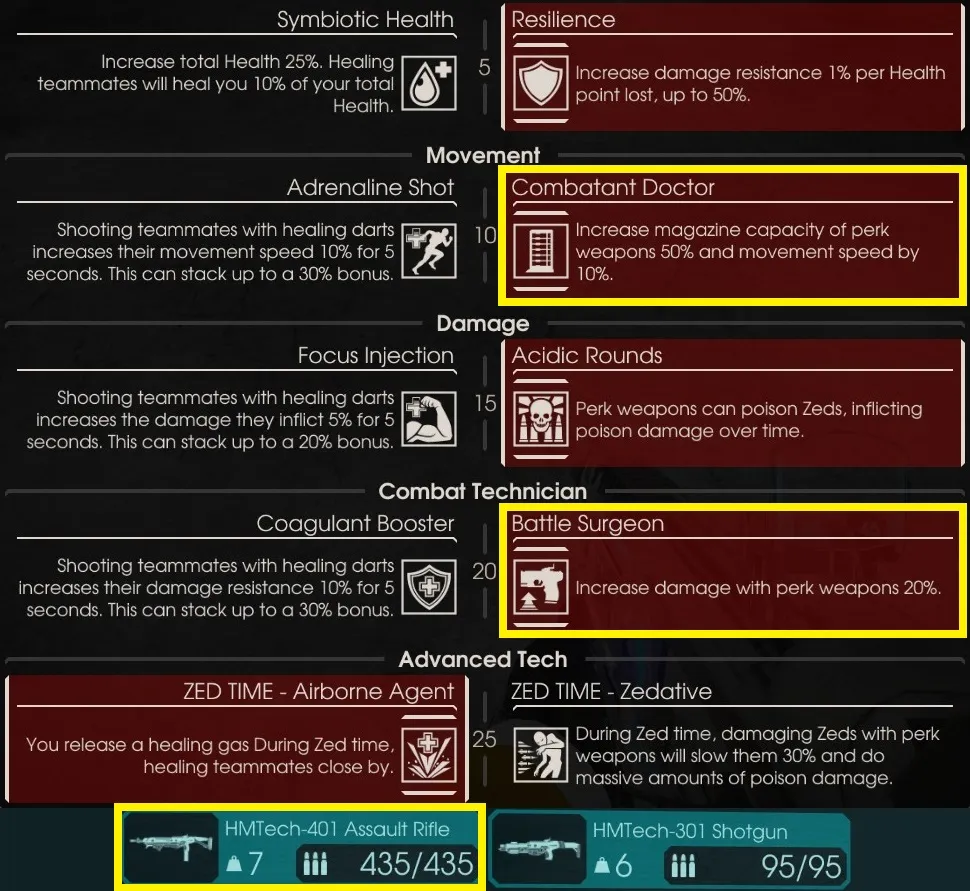 Medic skills.
Firebug and Survivalist
Even after the buff, Firebug is poor against large ZEDs according to the author; it is the best horde cleaner, so stay away from them and do not enrage them. The Survivalist section was a joke entry.
FAQ
- Which perks are the main Large ZED killers?
- Demolitionist and Sharpshooter are primary; Gunslinger, Support and Berserker are secondary. Swat, Commando, Medic and Firebug are not meant to kill large ZEDs.
- How do Scrakes and Fleshpounds rage?
- A Scrake rages below 75 percent health on Suicidal and 90 percent on Hell on Earth. A Fleshpound rages after 276 damage or 10-14 seconds after seeing a player; breaking line of sight does not reset the timer.
- How do I survive an unavoidable large ZED hit?
- Pull out the knife, jump and parry it. The parry mitigates damage and the jump knocks you away. Tanking one hit also calms a Fleshpound.
