
KF2 Map Defense Positions: Best Spots on Every Map
A varied map pool makes the game bigger, but it also means memorising defensive positions on every map. This Russian community guide (written for high difficulties such as Hell on Earth) shows the most successful positions with screenshots and says which classes suit them. Alternative positions numbered 2, 3 and so on are harder to execute. The map list runs up to Ashwood Asylum. For a broader look at roles see team composition and roles.
Notes from the authors
- A position does not guarantee that all six players gather there and survive without losses.
- The goal is to give players on Suicidal and Hell on Earth an alternative way to reach the boss.
- Positions numbered 2, 3 and higher are alternatives and are harder to pull off.
- The guide does not discuss public matches or random players.
- If you cannot hold a position, do not die on it with the whole team: retreat and regroup if you can.
- Holdout positions are complex and need coordinated teamwork.
- Endless positions are only for standard or light waves (Clots, Crawlers, Stalkers). Standing on a position during Scrake, Fleshpound or Husk waves is suicide.
- Class picks are the authors' vision; skill and preference matter most. If there is no good Berserker, a Firebug or Support can substitute in many cases, but without a decent Medic you are in trouble.
Map types
- Standard: a normal map, fully available at once.
- Holdout: after each wave players move to another location; Endless cannot be enabled on these maps.
- Endless: a map only for Endless mode.
- Objectives: seasonal event maps, plus some maps added after the Back and Kicking Brass event, with extra tasks.
Burning Paris
 Burning Paris
Modes: Standard, Endless. Seine embankment with a cinema, several cafes, a riverside street and even a metro station.
Position 1: The standard and most universal spot. All traders are roughly equidistant except the subway one, so navigation and buying trips are quick. Zeds come from two sides and occasionally drop through a vent; in an emergency you can bail out through the broken windows.
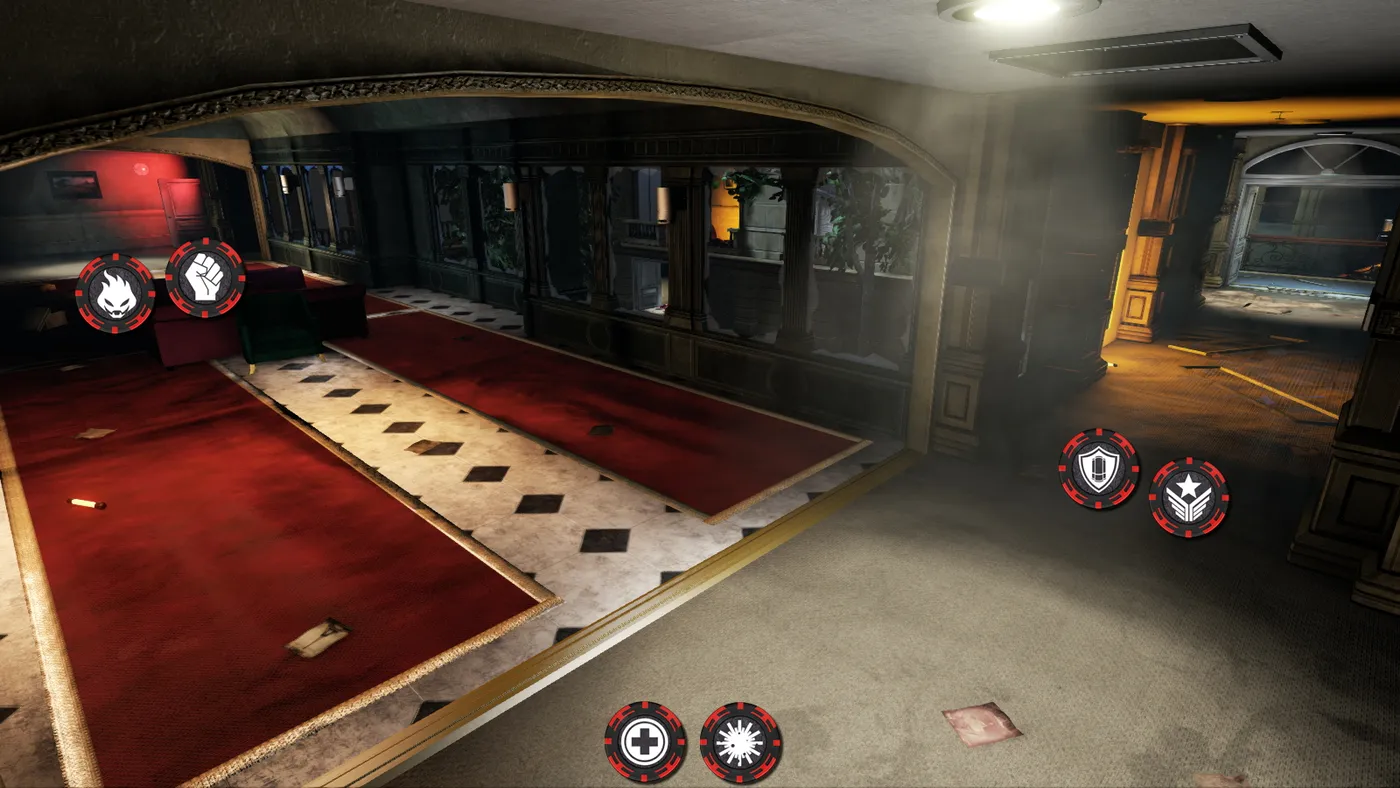 Burning Paris, position 1
Position 2: The bar counter works only for skilled players who can quickly kill Husks, Sirens and Bloats. A variant for those who want something new.
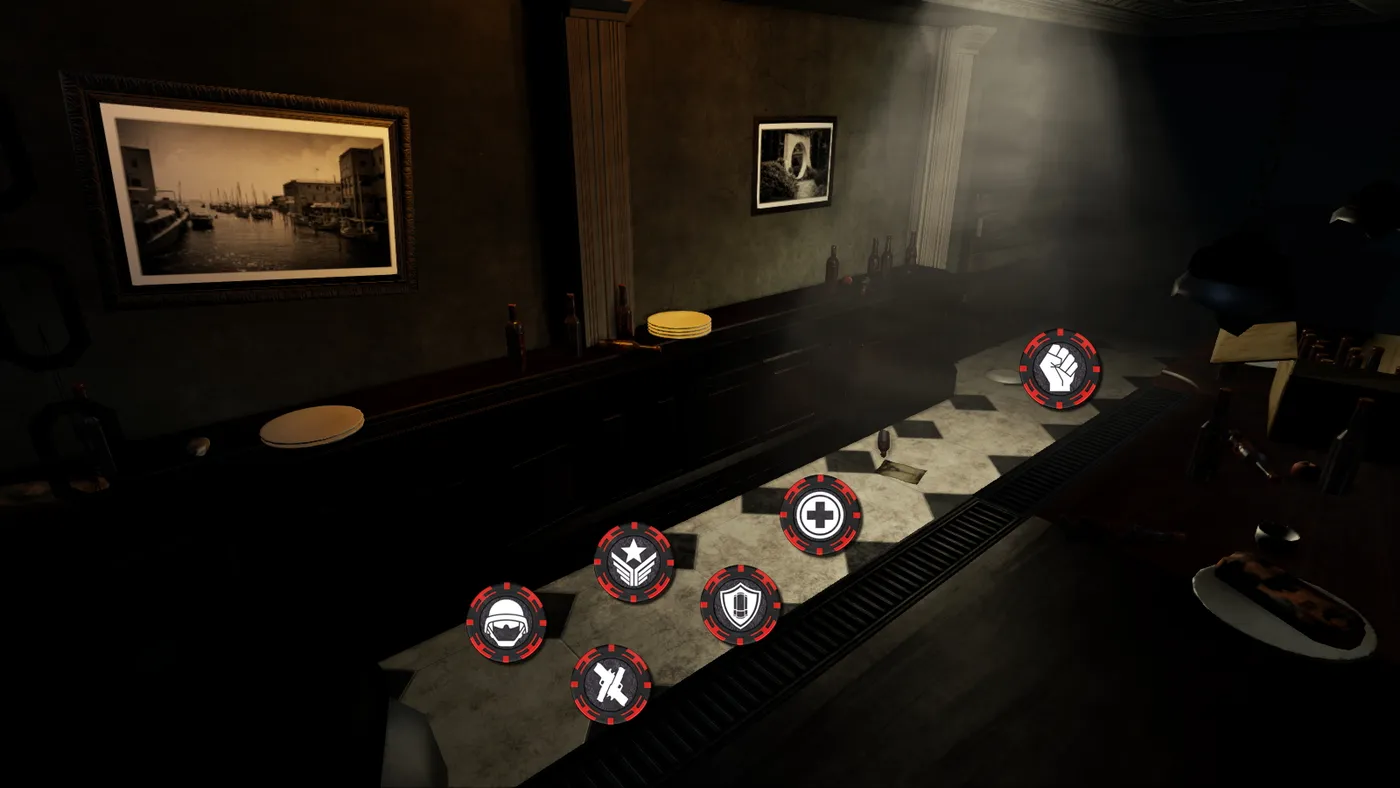 Burning Paris, position 2
Biotics Lab
 Biotics Lab
Modes: Standard, Endless. A secret underground Horzine lab: several high-tech halls connected by narrow corridors.
Position 1: The only reasonably good place. A Demolitionist on the operating-room dome and a Medic on the railing can cover both flanks, so they should stand so they do not block each other.
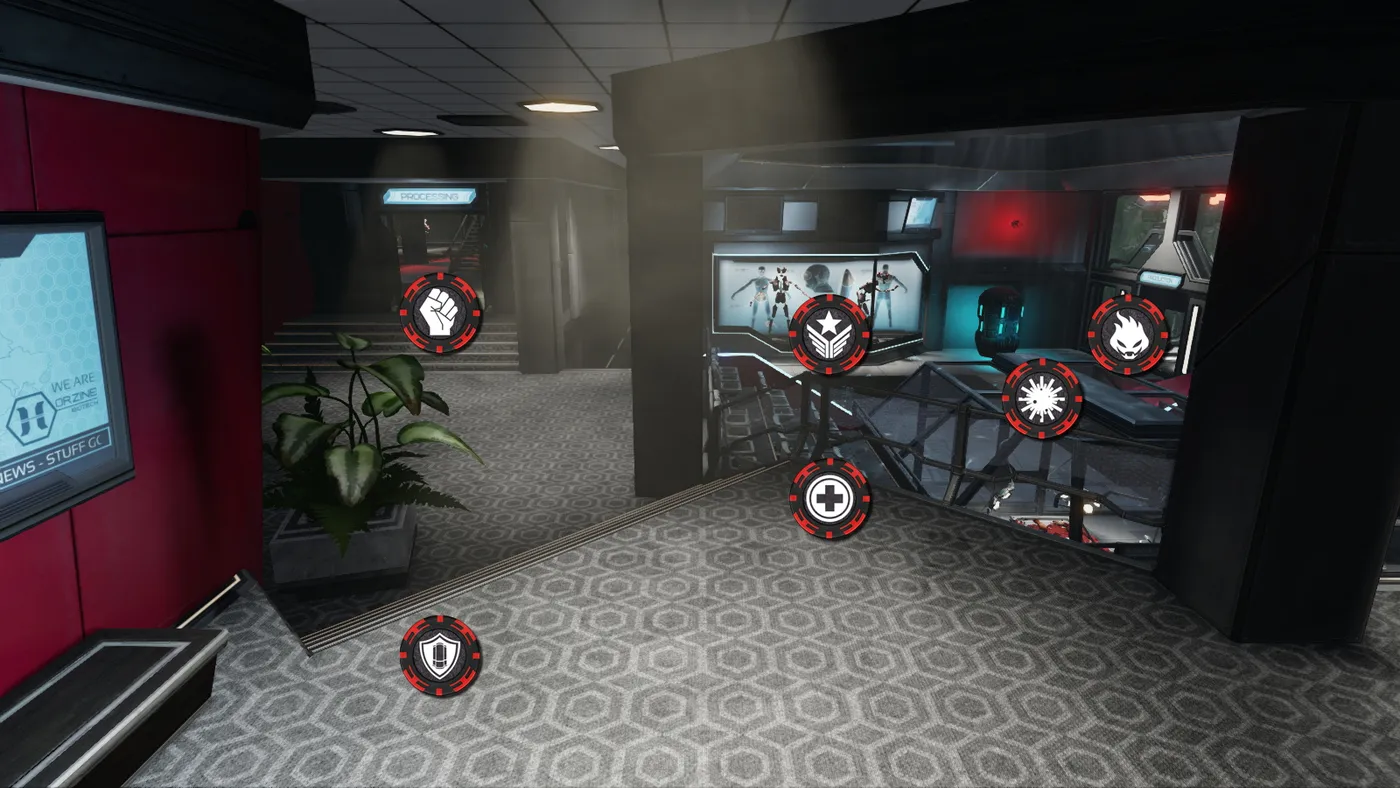 Biotics Lab, position 1
Outpost
 Outpost
Modes: Standard, Endless, Objectives. A Horzine base beyond the Arctic Circle. Players can use the yard, the side path and some interior rooms.
Position 1: The classic spot where players stood back in the beta. The one nuisance is that zeds sometimes climb in from the mountains (up to Husks and E.D.A.R.), so the team has to stay attentive.
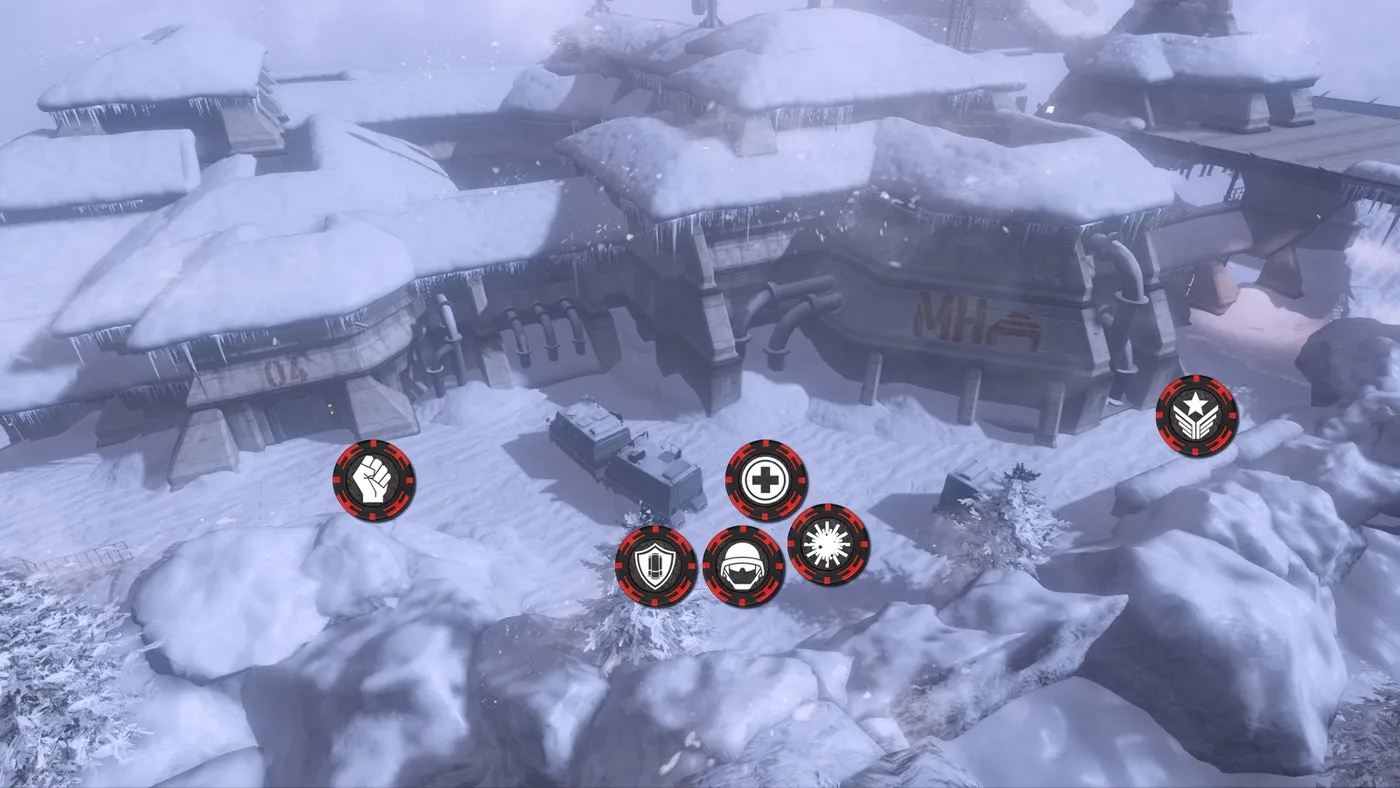 Outpost, position 1
Position 2: For those who do not want to stand outside and keep watching the mountains. With competent, coordinated play nobody can smoke you out.
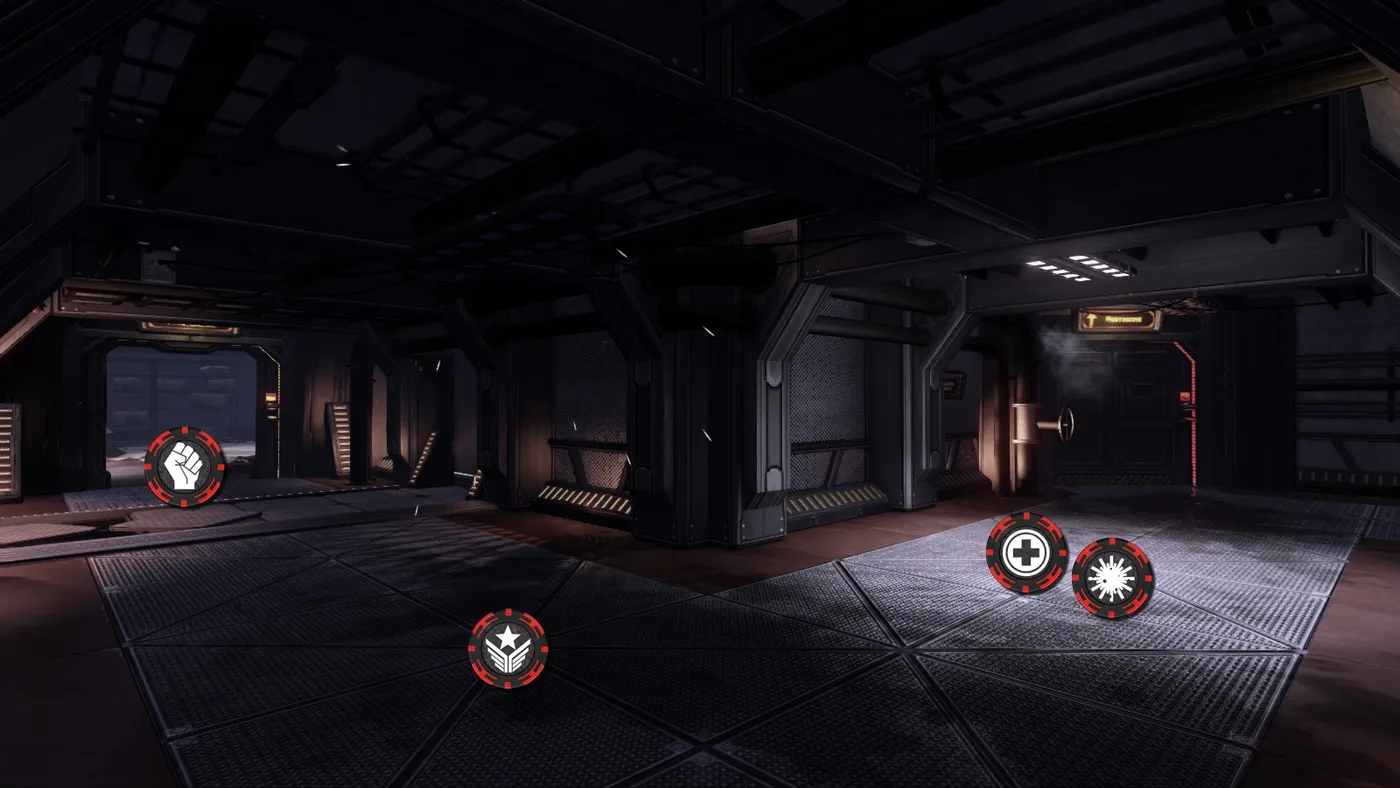
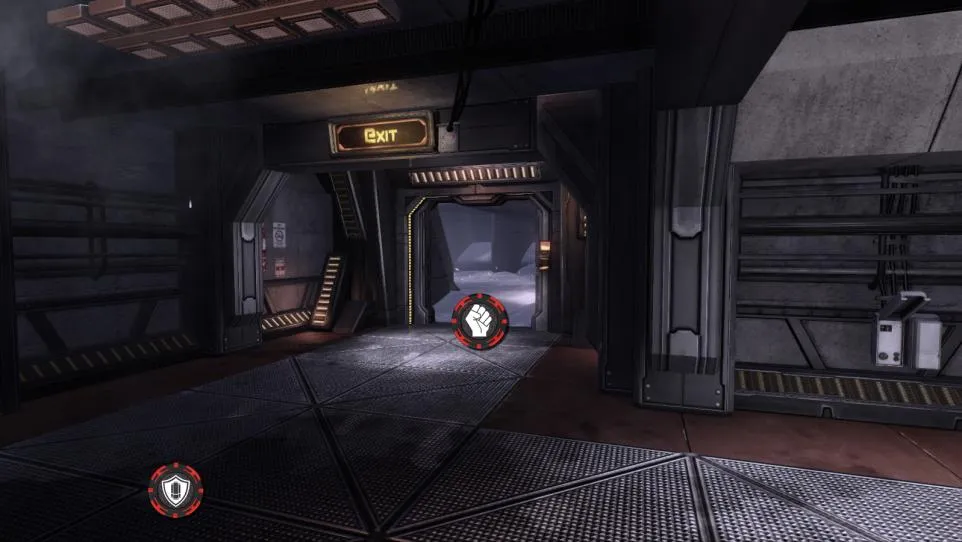 Outpost, position 2
Position 3: An alternative to position 2.
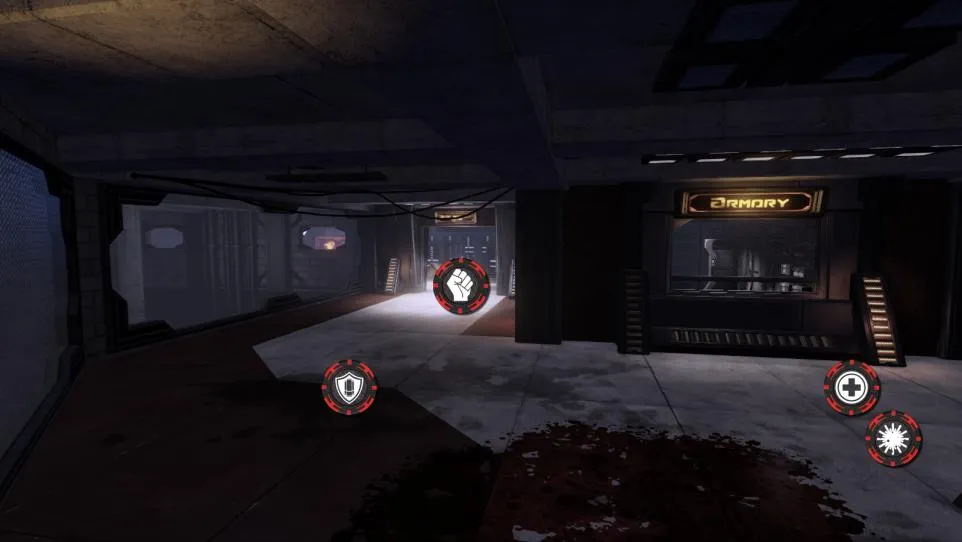
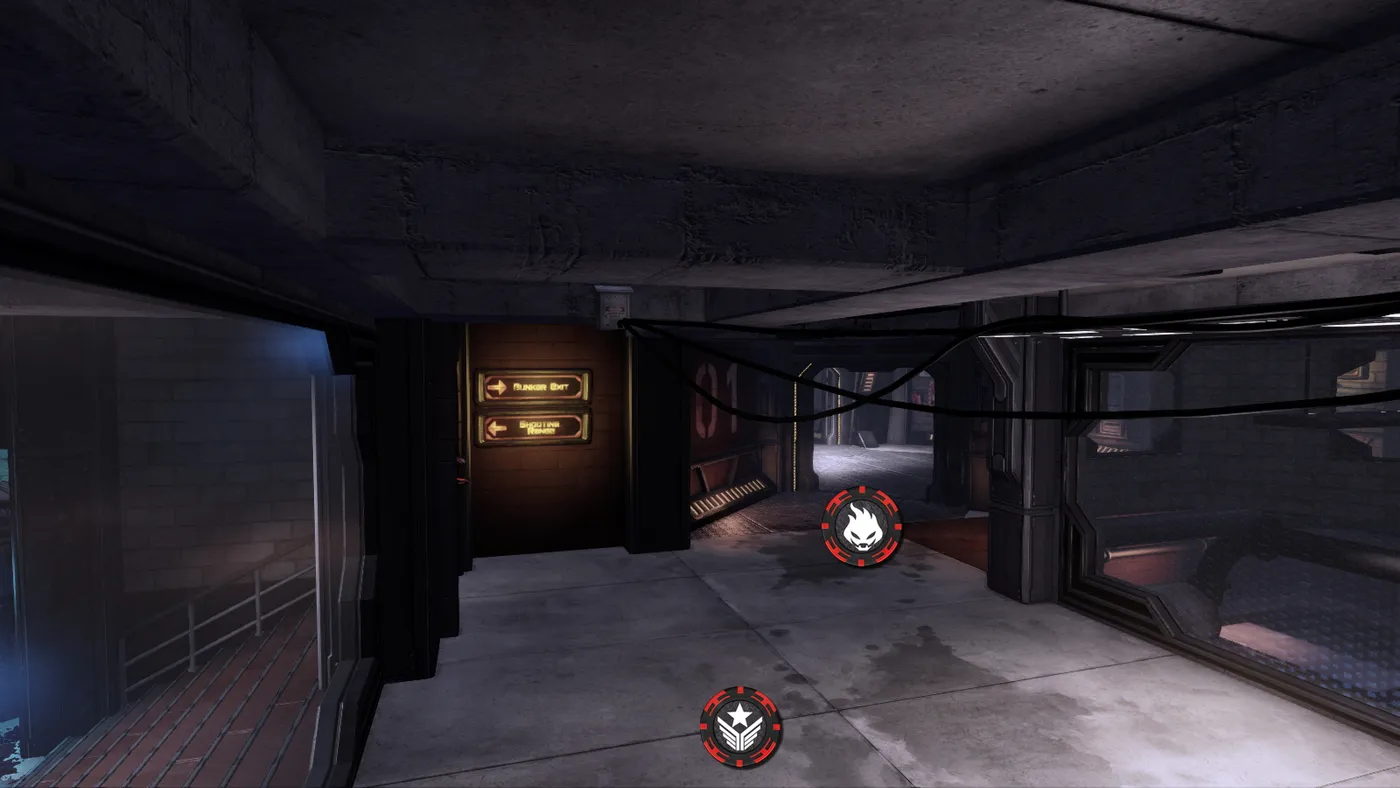 Outpost, position 3
Volter Manor
 Volter Manor
Modes: Standard, Endless. Hans Volter's family estate and one of his labs: the manor, garden, wine cellar and the upper floor of his secret room.
Position 1: The classic spot. Zeds come from two sides and occasionally through a floor hatch. The open layout lets you see them all, but if Zed Time coincides with a lightning flash you will briefly see nothing. An emergency exit exists.
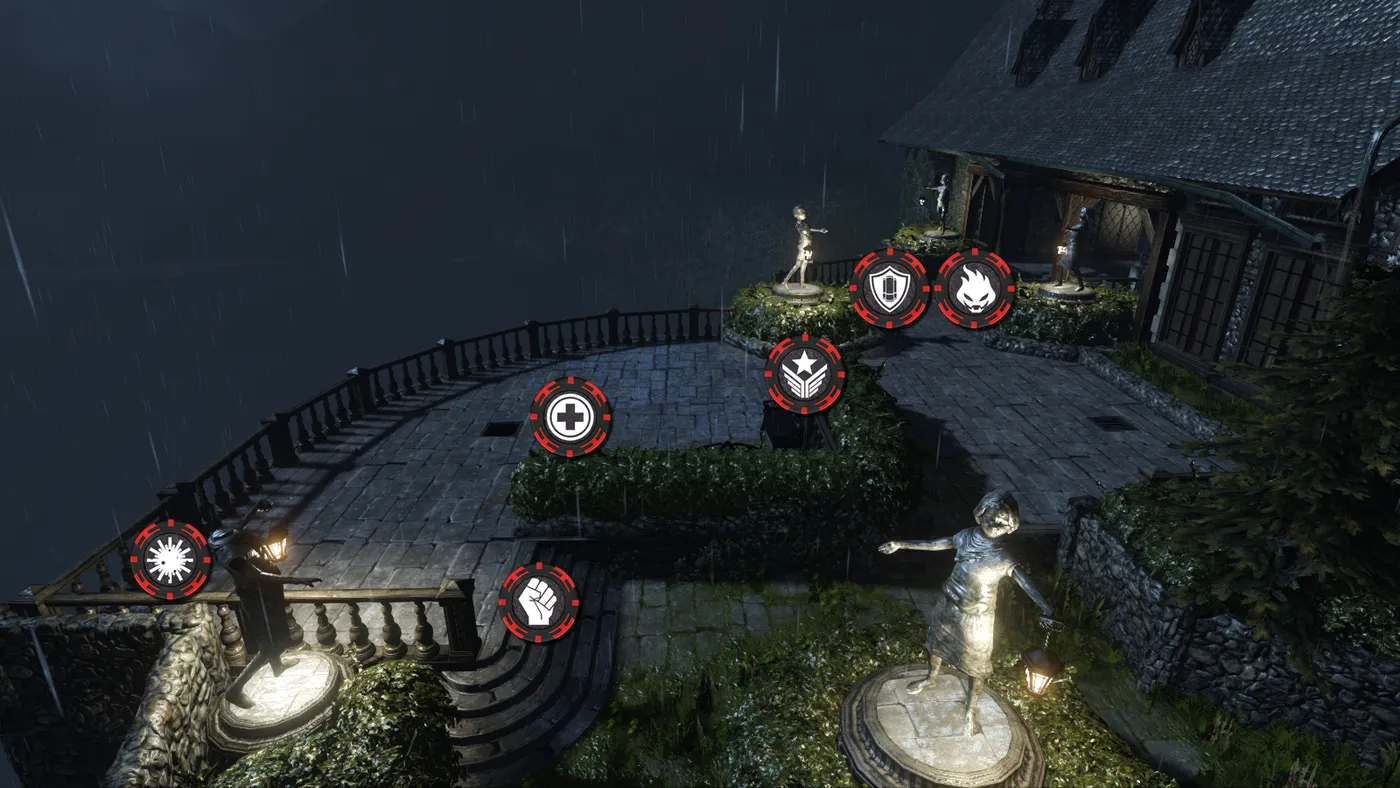 Volter Manor, position 1
Position 2: Nearly identical to position 1, but in a poorly lit part of the manor, so zeds that dropped from the ceiling may go unnoticed in the dark.
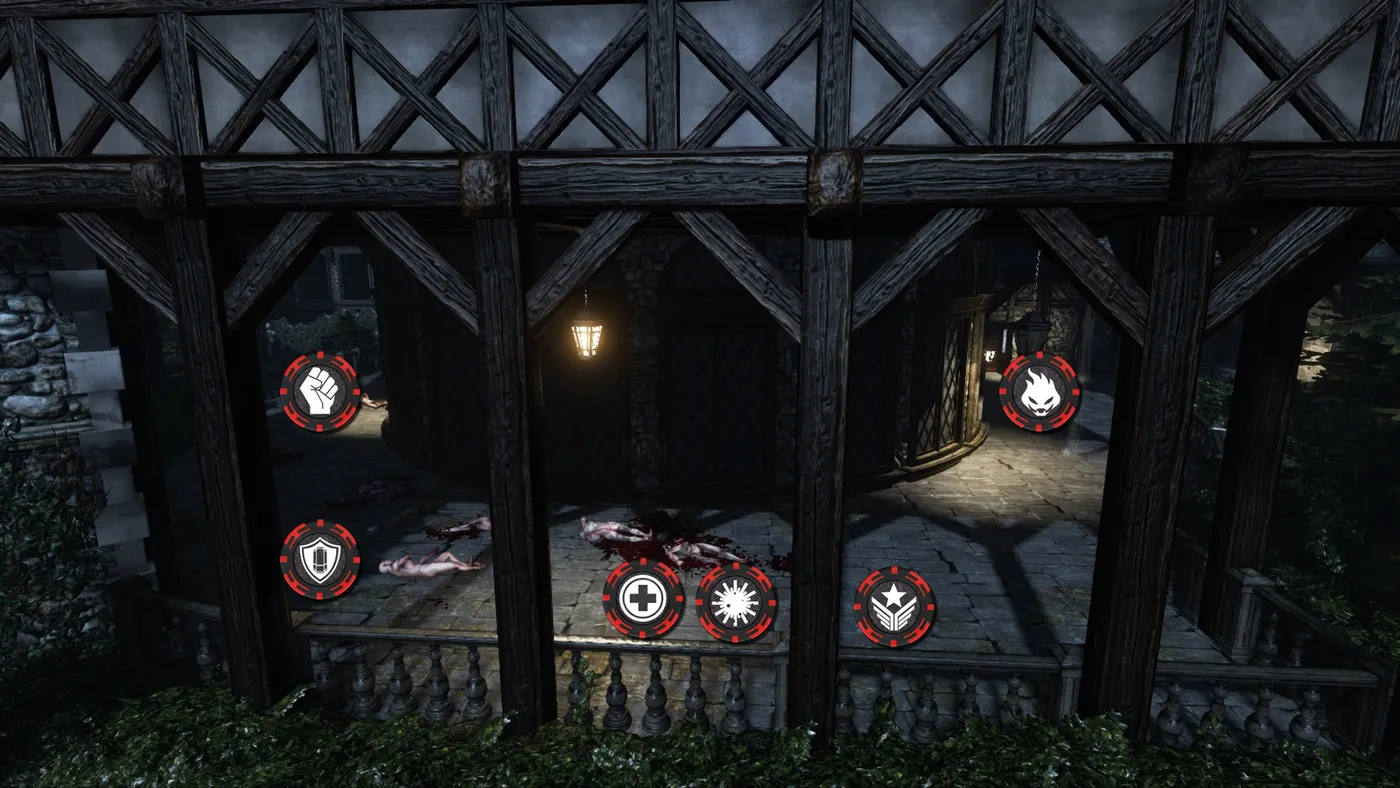 Volter Manor, position 2
Catacombs
 Catacombs
Modes: Standard, Endless. Catacombs under Rome: a sinister setting with no room to manoeuvre and crowds of zeds.
Position 1: The only comfortable defensive spot; two narrow passages are paradise for Berserkers and Firebugs. Be careful: a badly thrown grenade can break a lamp and plunge the area into darkness. There is nowhere to retreat if the line breaks, but that is true of the whole map.
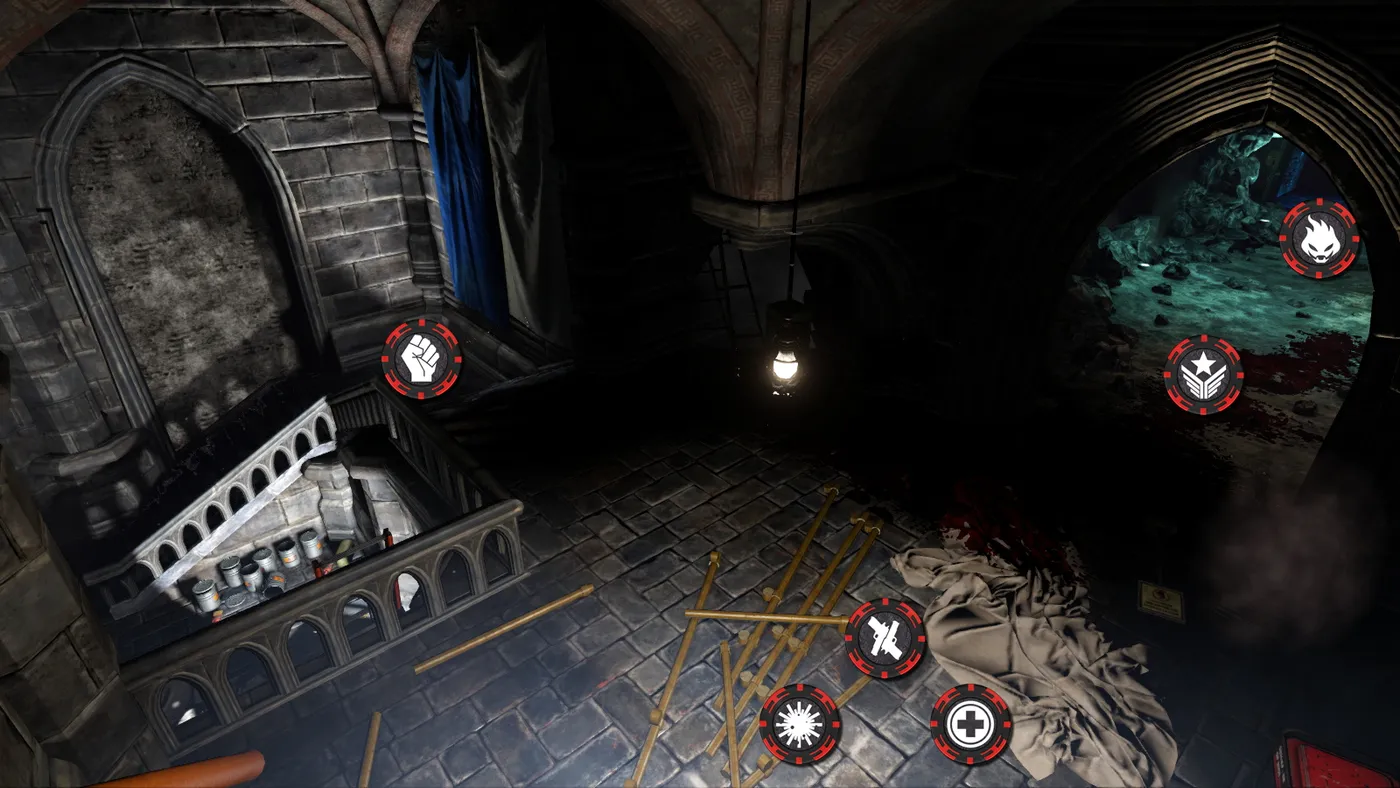 Catacombs, position 1
Evacuation Point
 Evacuation Point
Modes: Standard, Endless. A port in Helsingor, Denmark: the terminal, a ferry and a nearby building.
Position 1: The standard and probably best spot, equally good for all classes. It is equidistant from all traders, so buying trips are short.
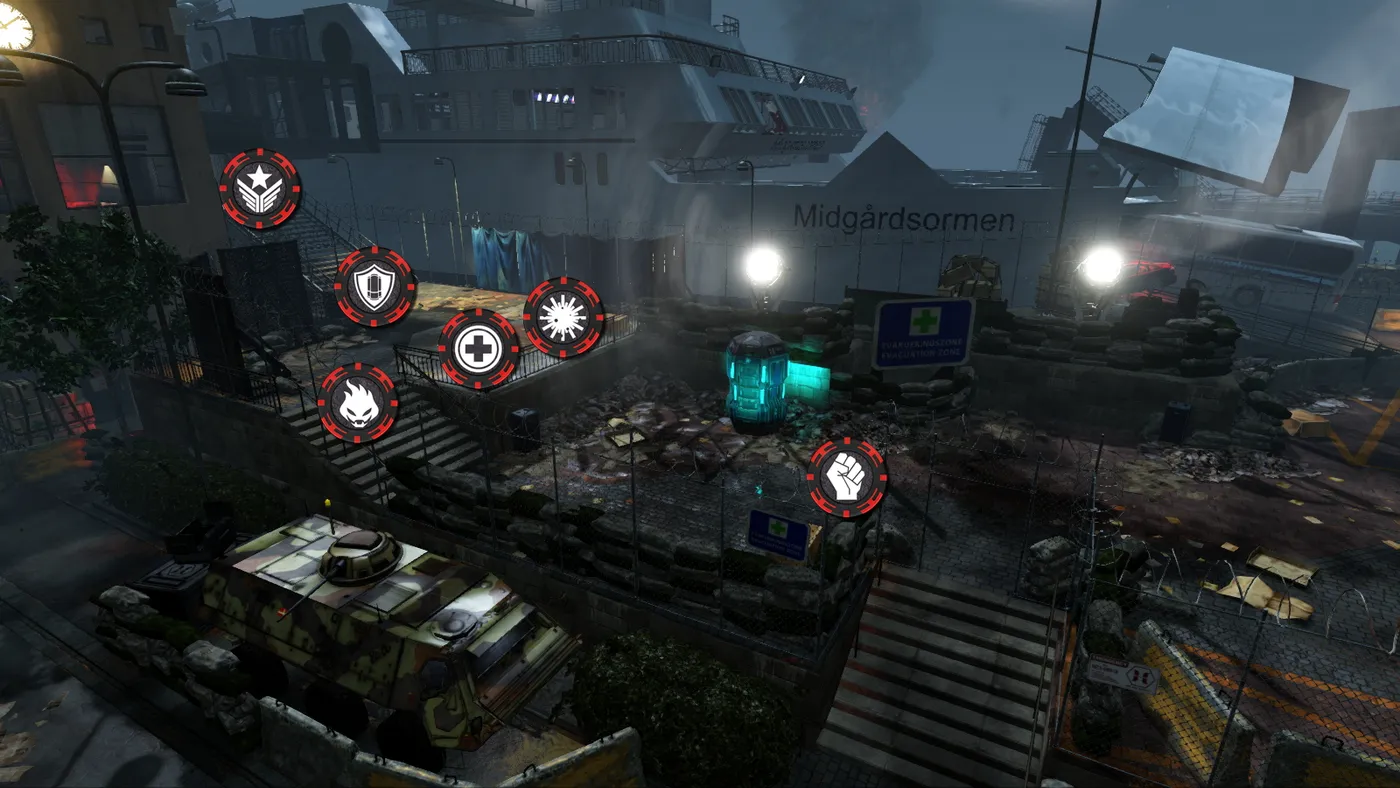 Evacuation Point, position 1
Position 2: An alternative that is also comfortable for the final fight against bosses (except Abomination and King Fleshpound).
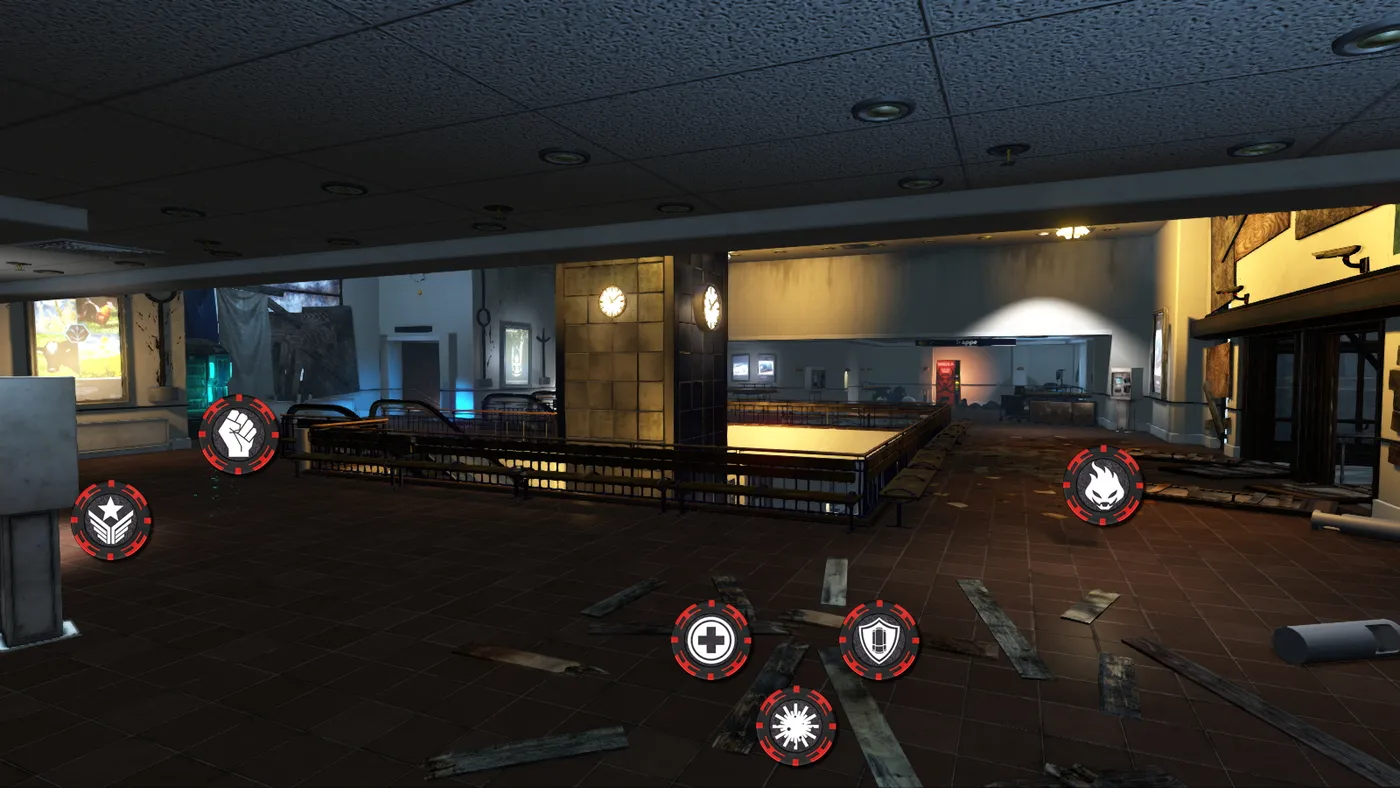 Evacuation Point, position 2
Position 3: A spot that levels a Berserker well but needs a good Medic and coordinated play. There are two similar spots on the map; pick the one you prefer.
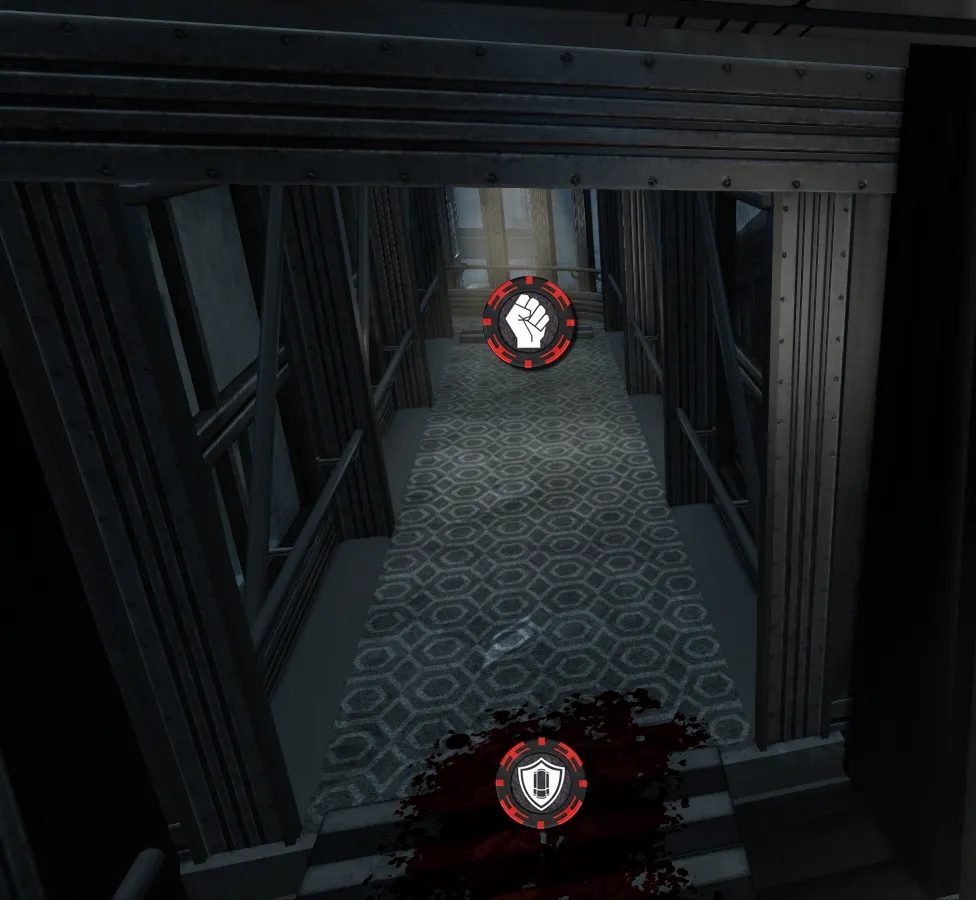
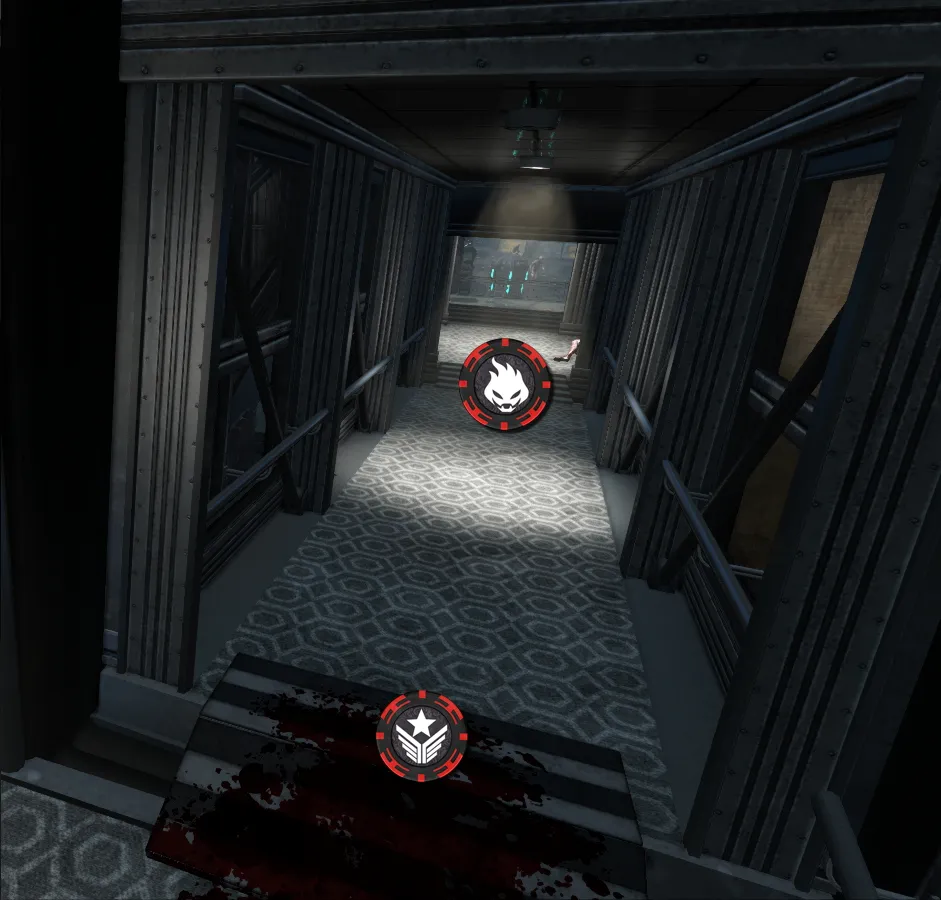
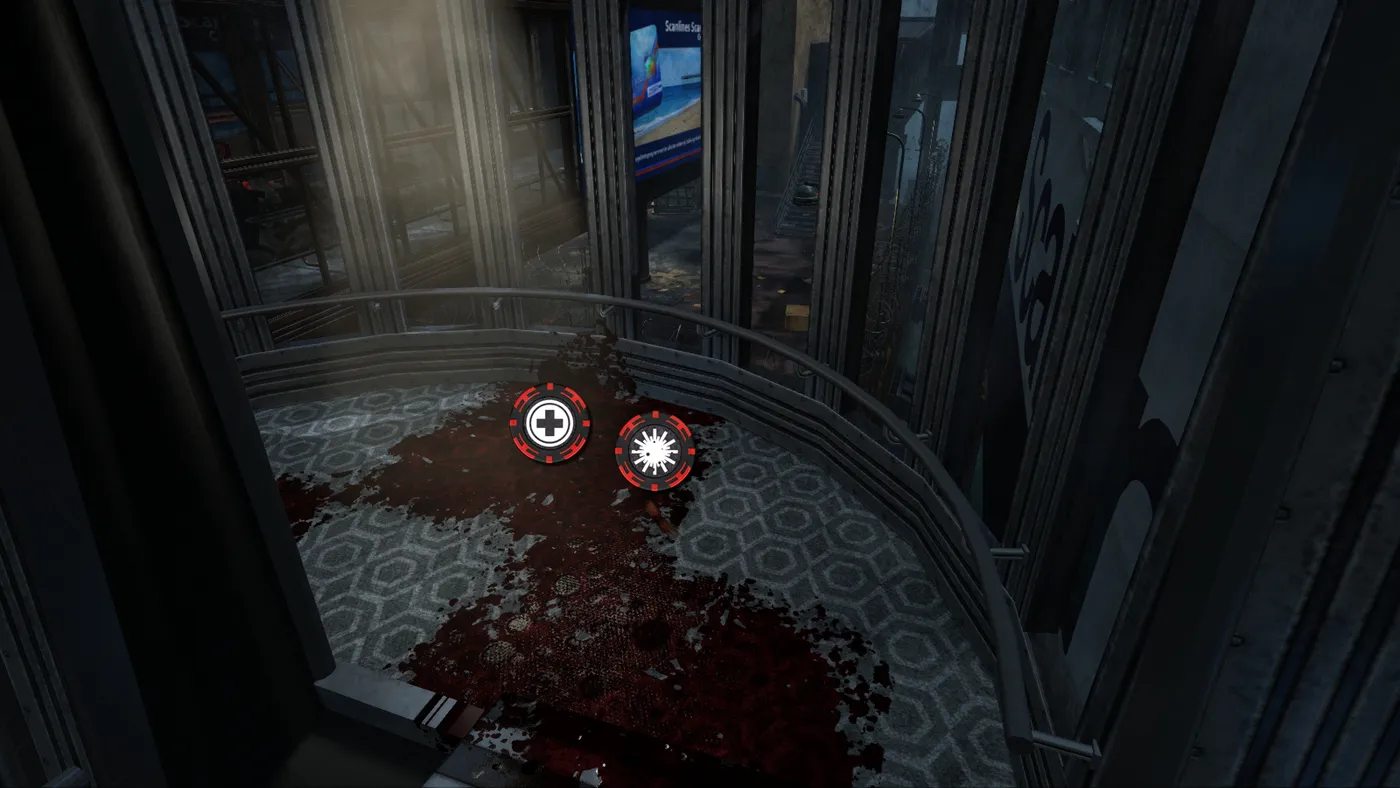 Evacuation Point, position 3
Farmhouse
 Farmhouse
Modes: Standard, Endless. A lost farm with a huge house and a decent barn; the map has the fewest traders, just two.
Position 1: A standard place that is good both for defence and for killing zeds outside. Trouble comes only from E.D.A.R. spawning on the roof and Husks firing from the street towards the broken railing.
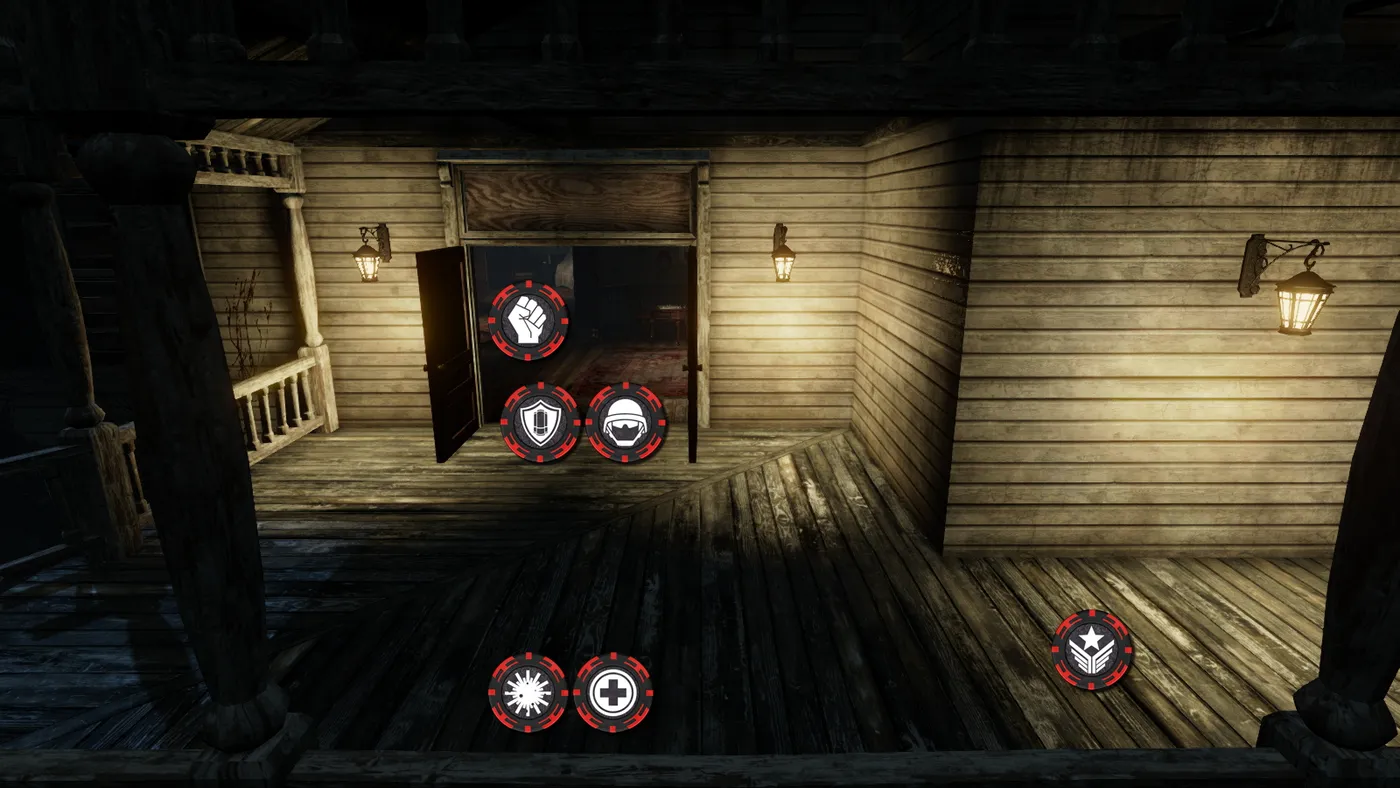 Farmhouse, position 1
Position 2: Defending in the barn also works, but zeds often fall from above (including elite Crawlers), which distracts from the main group.
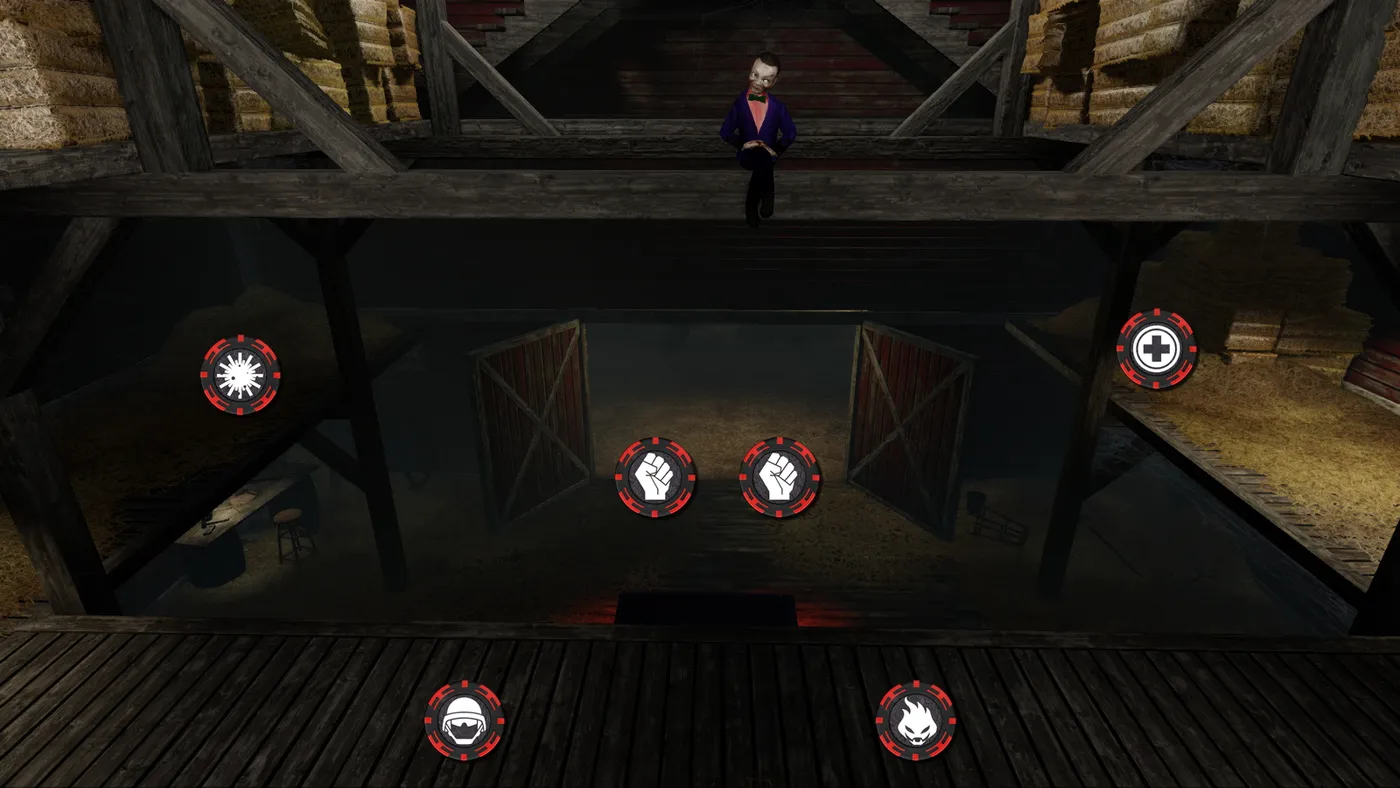 Farmhouse, position 2
Black Forest
 Black Forest
Modes: Standard, Endless. A stretch of forest where a Horzine zed transport crashed; hilly terrain that is hard to learn.
Position 1: A narrow pass where their numbers do not matter. Watch the right side: Husks can and will shoot from there.
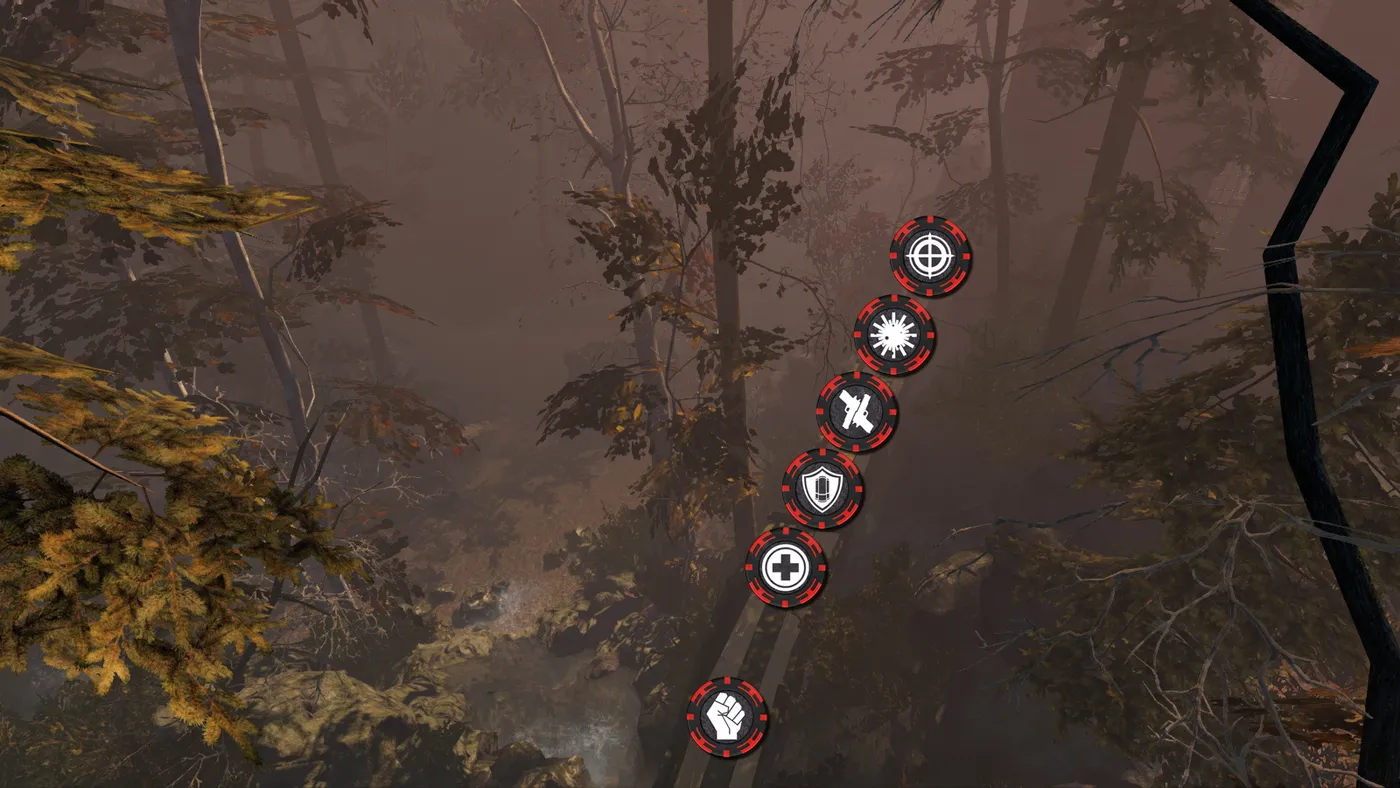 Black Forest, position 1
Position 2: This hill gives a view over half the map, which suits Sharpshooters and snipers. The pass is wide, so zeds can slip through and ignore the Berserker.
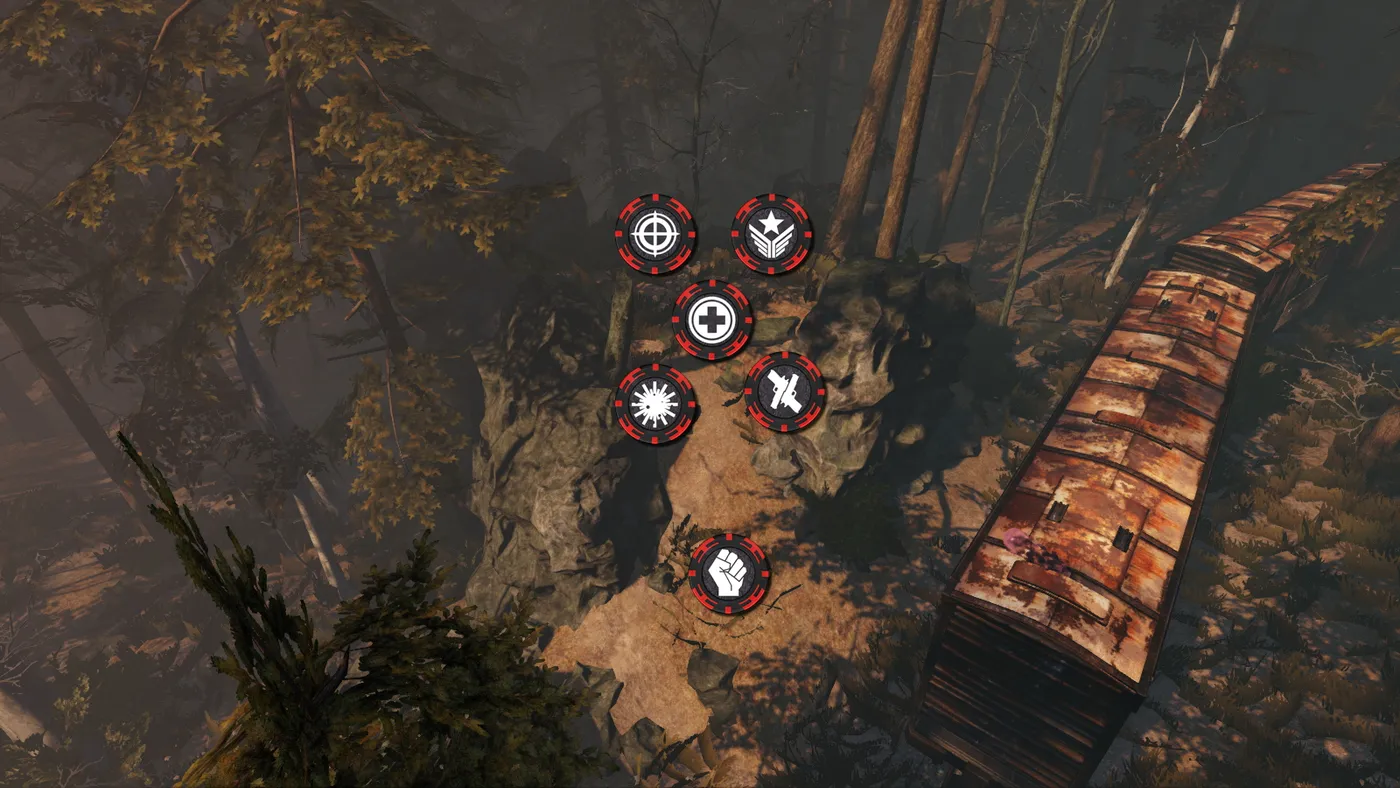 Black Forest, position 2
Prison
 Prison
Modes: Standard, Endless. Welcome to Mother Russia; do not drop the soap.
Position 1: The classic spot for levelling perks legitimately: a single passage and a convenient tower for shooter classes. It needs an experienced Berserker and Medic. Beware Husks that shoot across the map and knock down players on the tower, or sneak close to a Berserker among regular zeds to burn or suicide on him, and E.D.A.R. whose rockets or lasers can kill a Berserker in seconds.
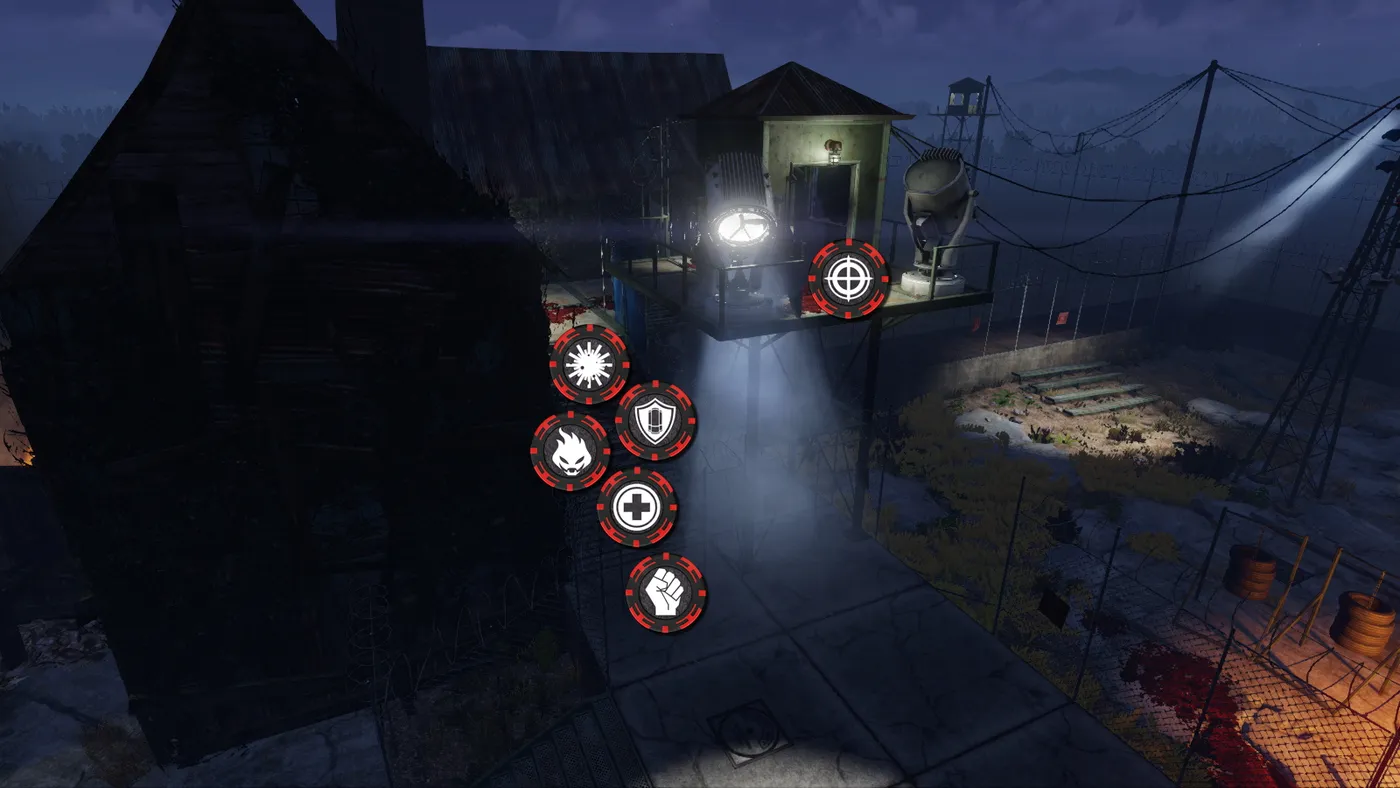 Prison, position 1
Position 2: A non-standard option for an inexperienced Berserker: less load on him, more on everyone else.
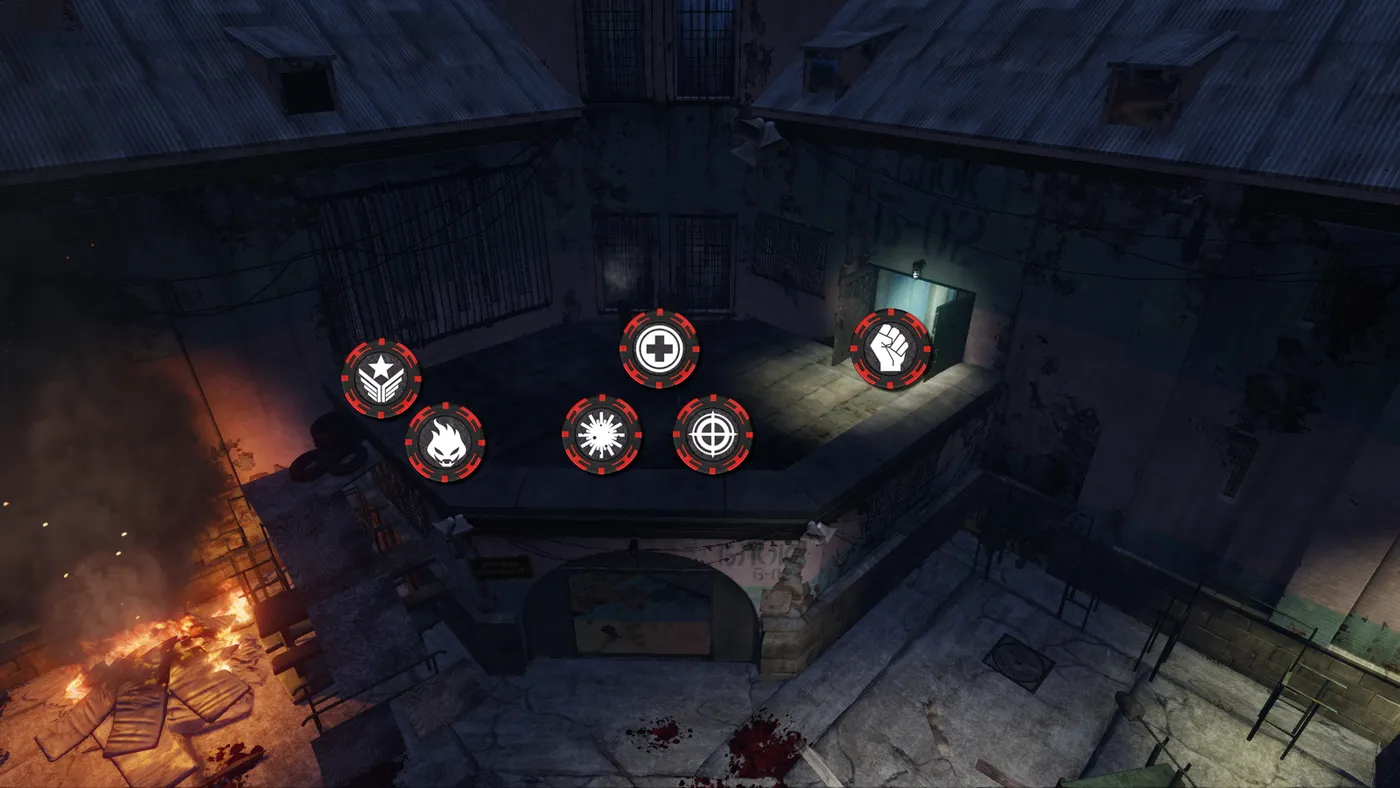 Prison, position 2
Containment Station
 Containment Station
Modes: Standard, Endless. A Horzine research space station that has been infected and must be retaken before it falls to Earth.
Position 1: Easy to defend with a good Medic and comfortable for every shooter class, including Sharpshooter. Also a good place for the final against bosses (except Abomination).
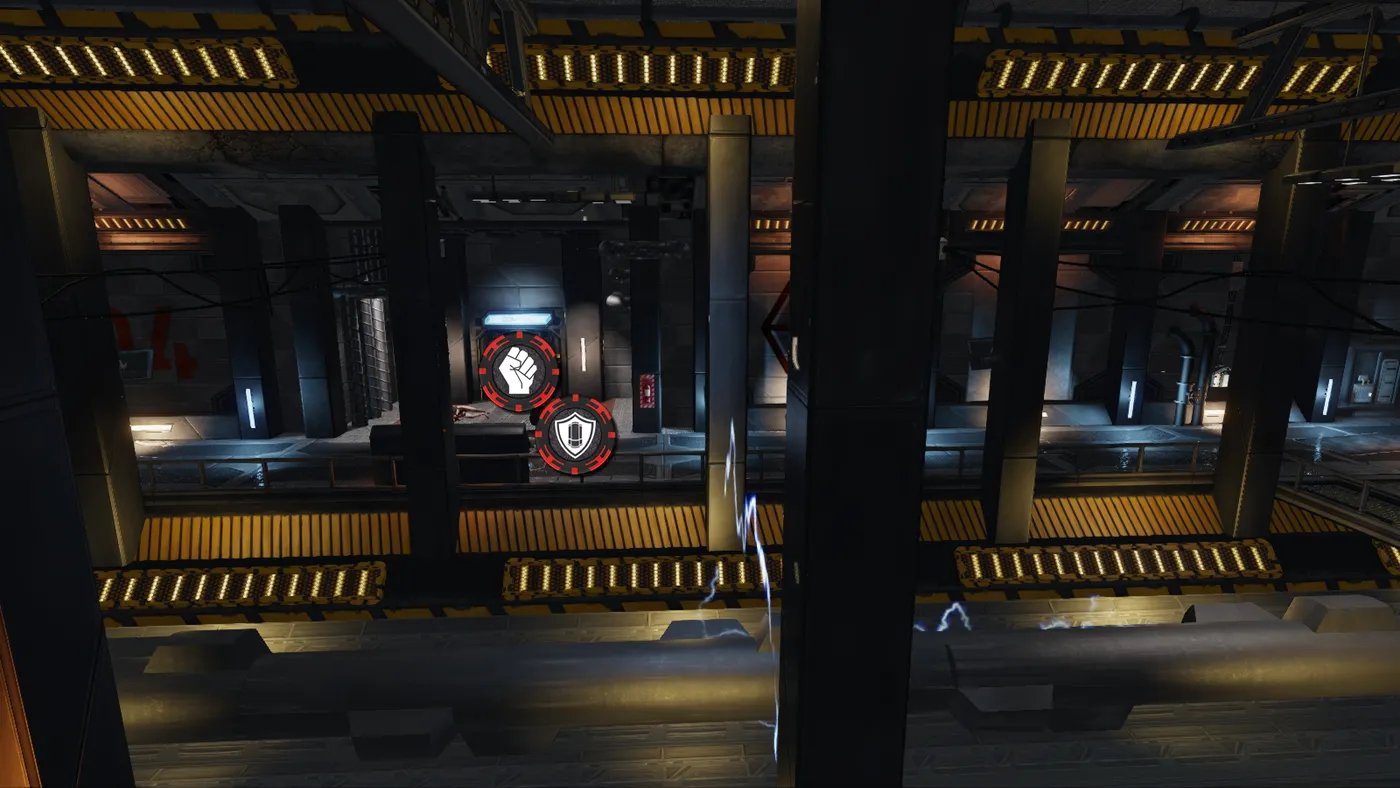
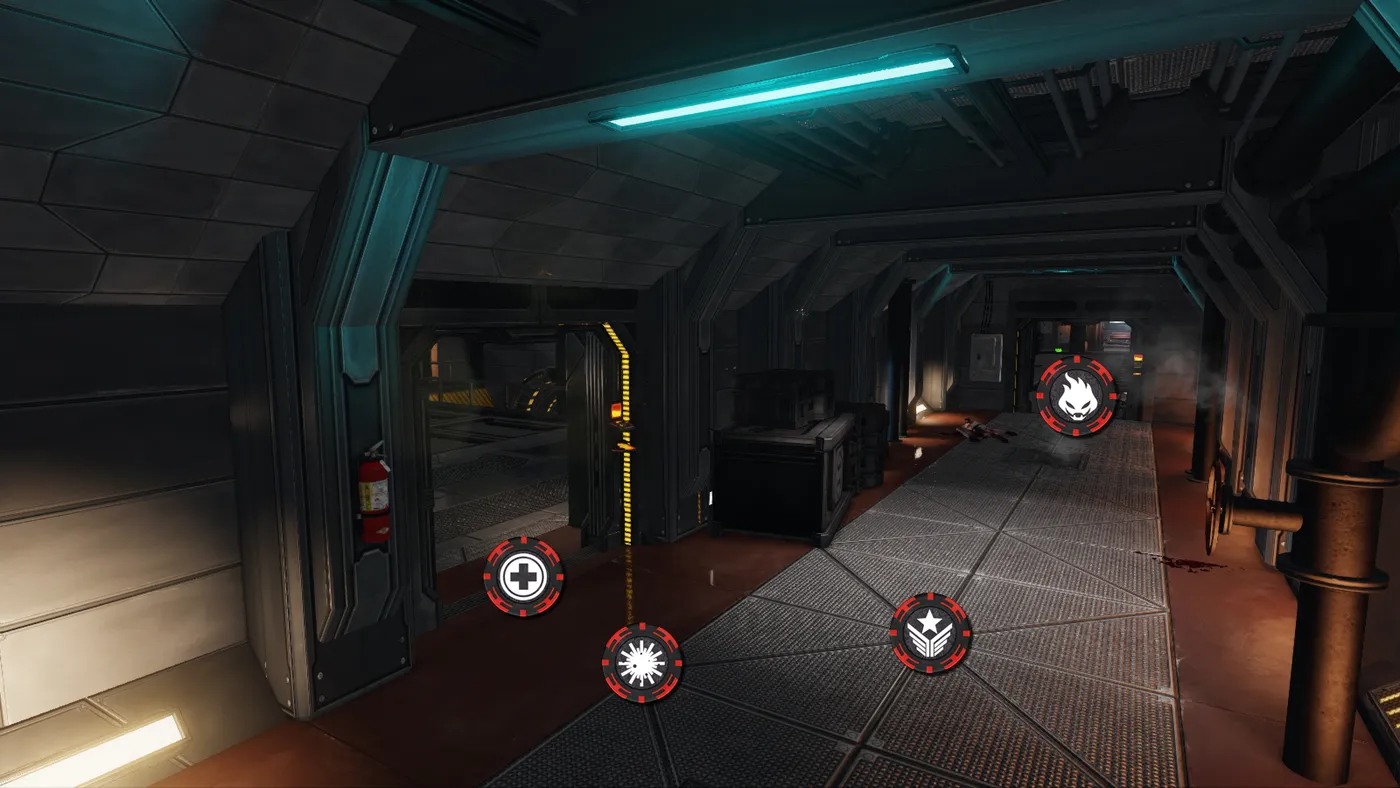 Containment Station, position 1
Position 2: Another position that needs somewhat better teamwork.
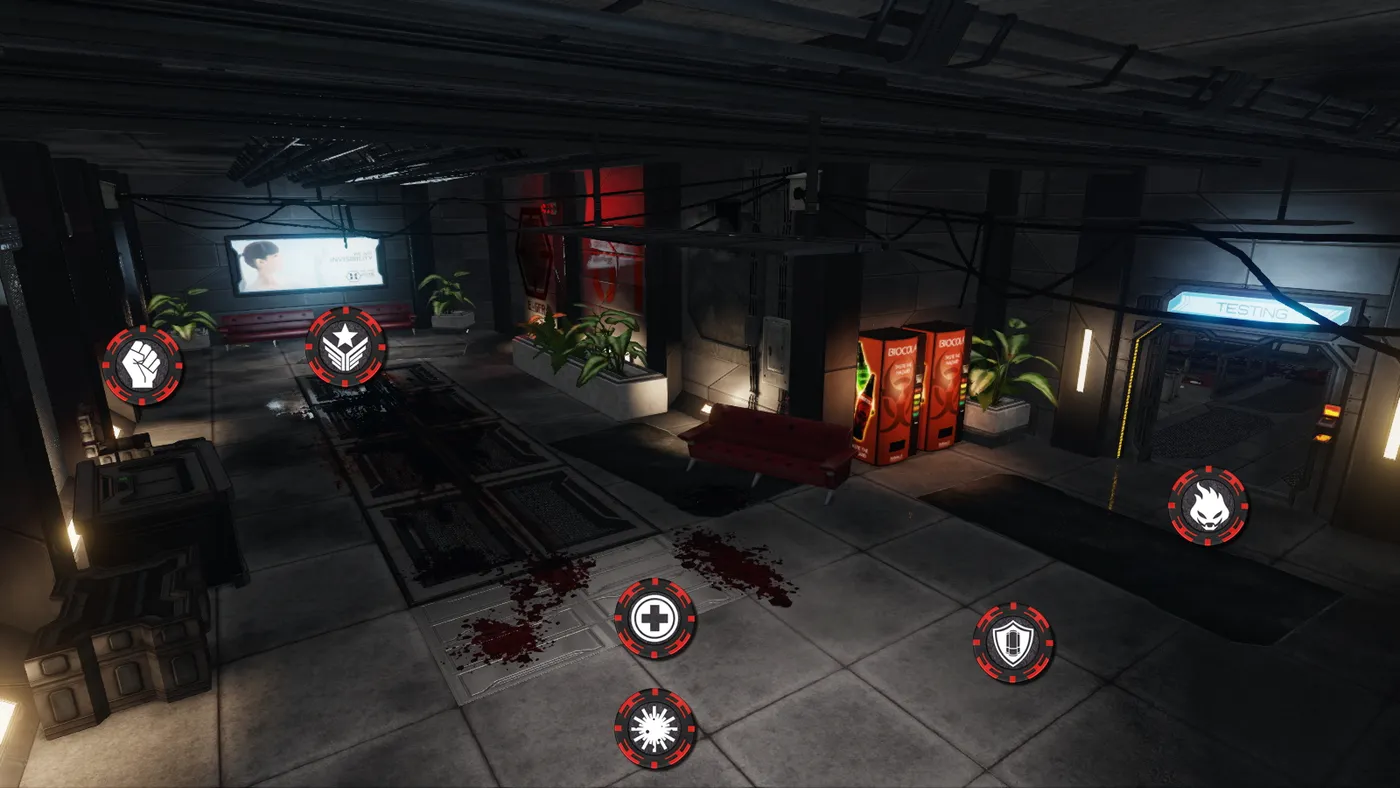 Containment Station, position 2
Hostile Grounds
 Hostile Grounds
Modes: Standard, Endless. London remains a battlefield between survivors and zeds, above and below ground.
Position 1: The usual place where most games are played.
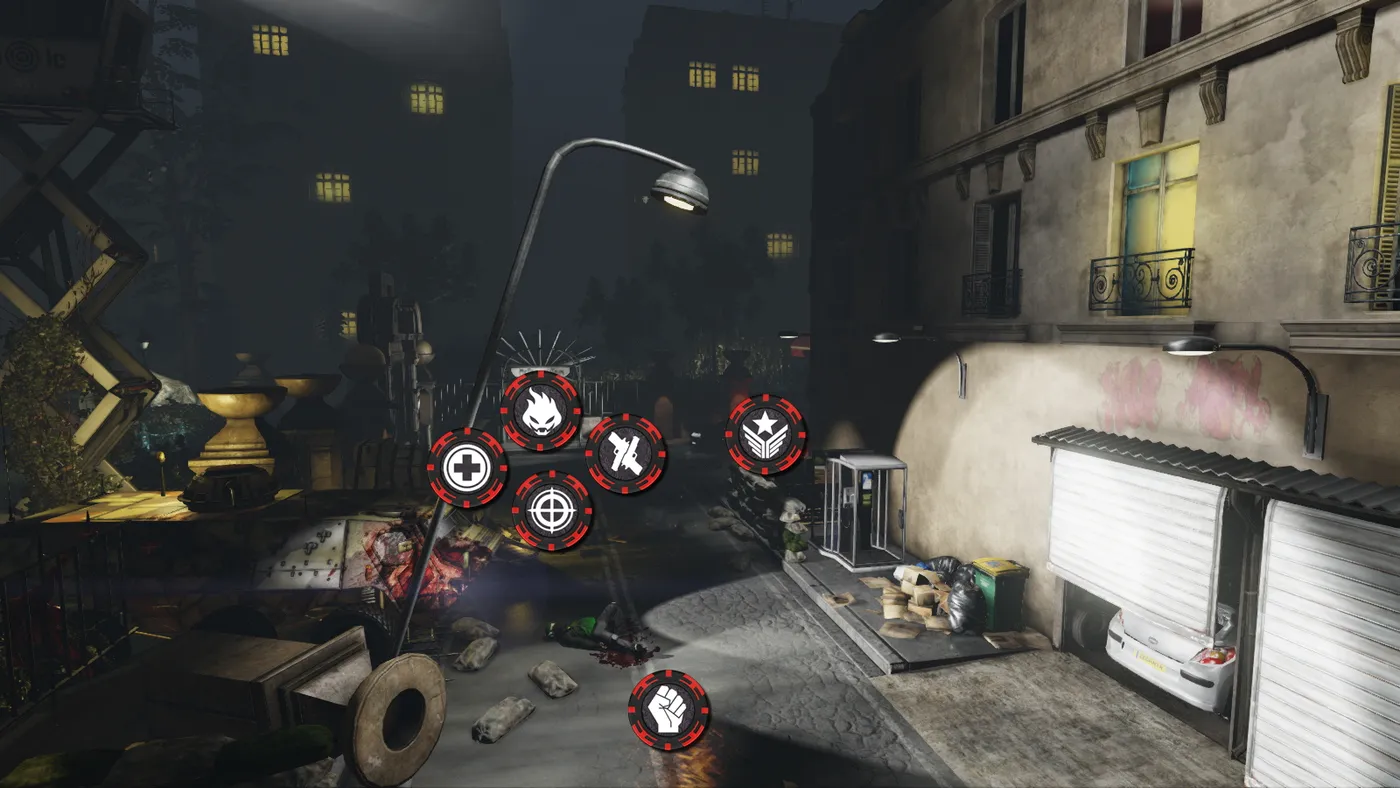 Hostile Grounds, position 1
Position 2: An alternative for a coordinated team.
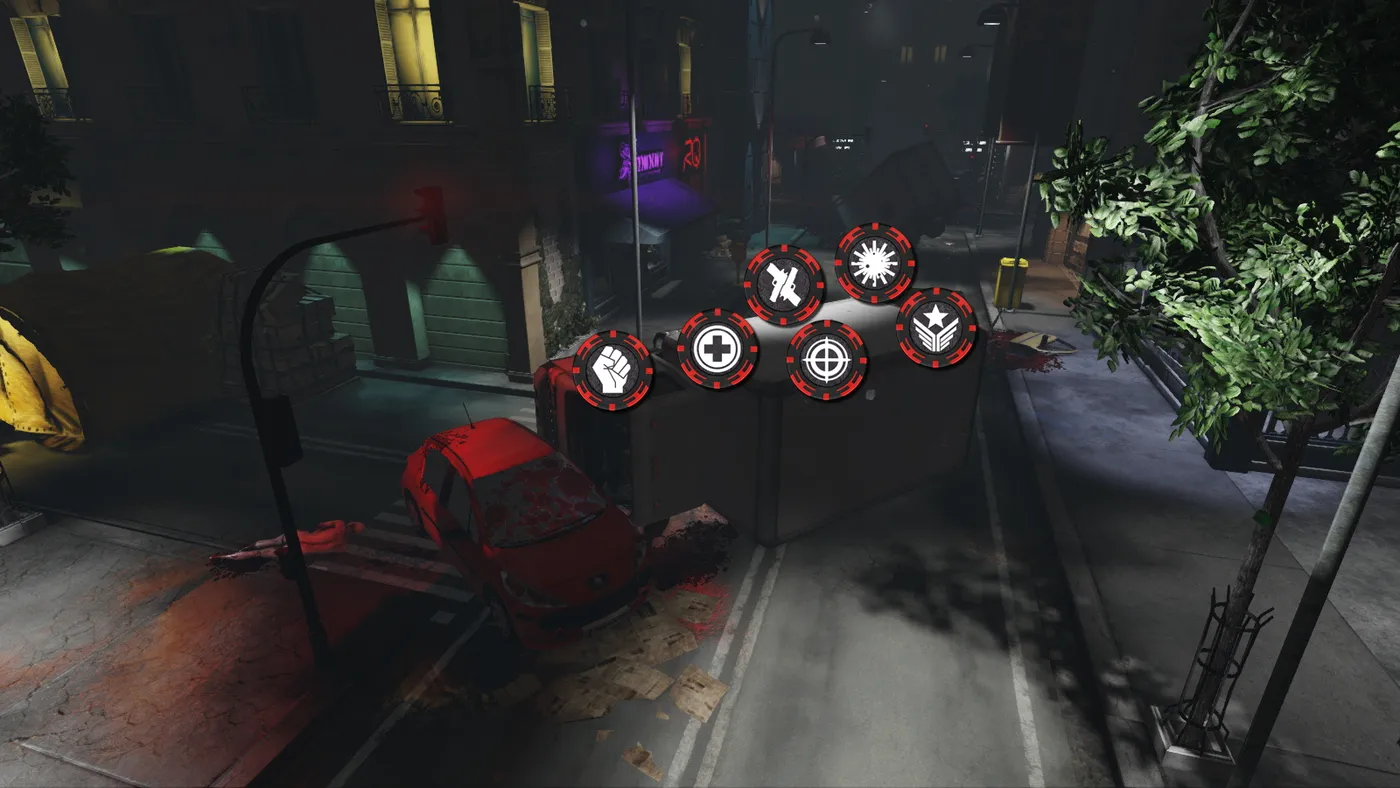 Hostile Grounds, position 2
Infernal Realm
 Infernal Realm
Modes: Standard, Endless. Go to hell, literally. The trader is a totem of bones, which cannot be a good sign.
Position 1: The main spot, good for any class. Its one drawback is that many traders are far away, so one zed has to be left alive until everyone gets back from shopping.
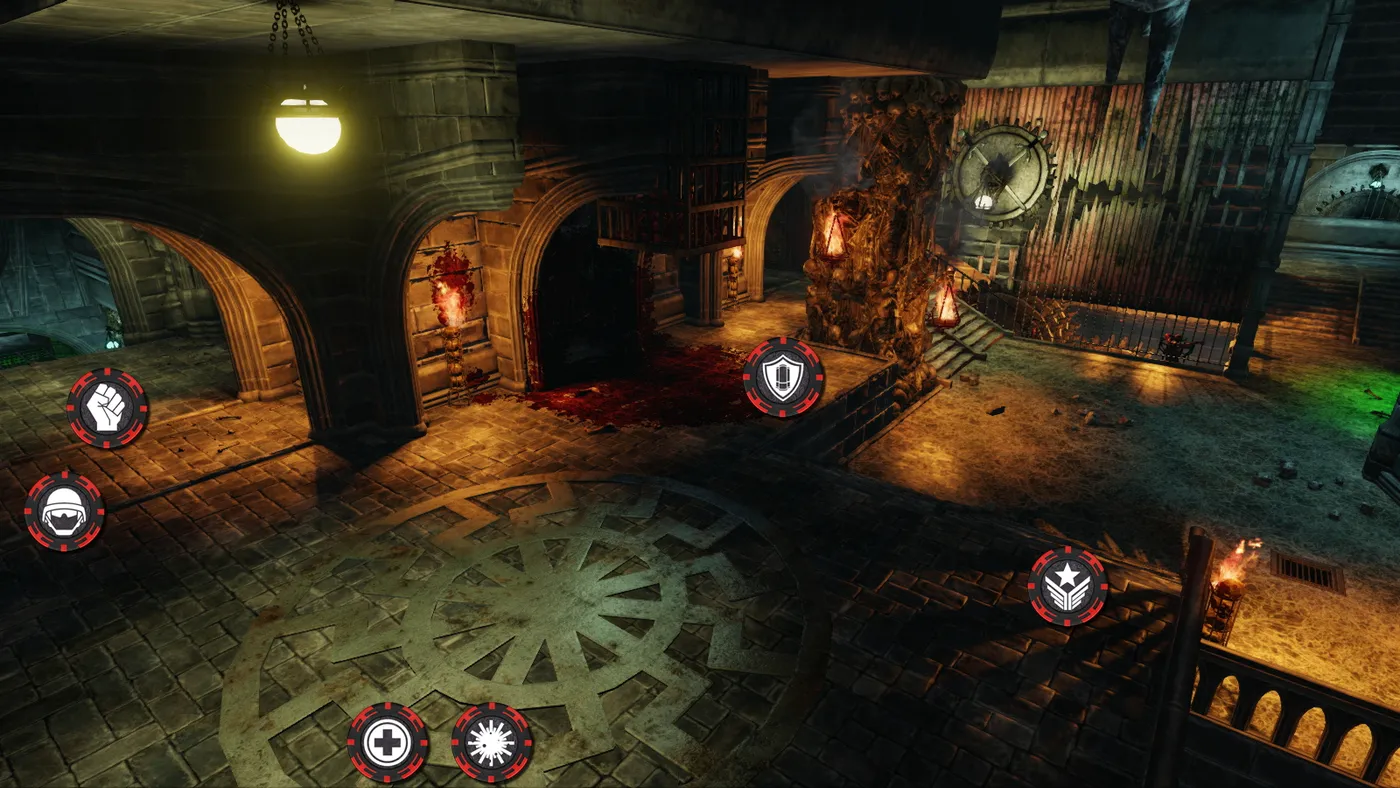 Infernal Realm, position 1
Position 2: An alternative.
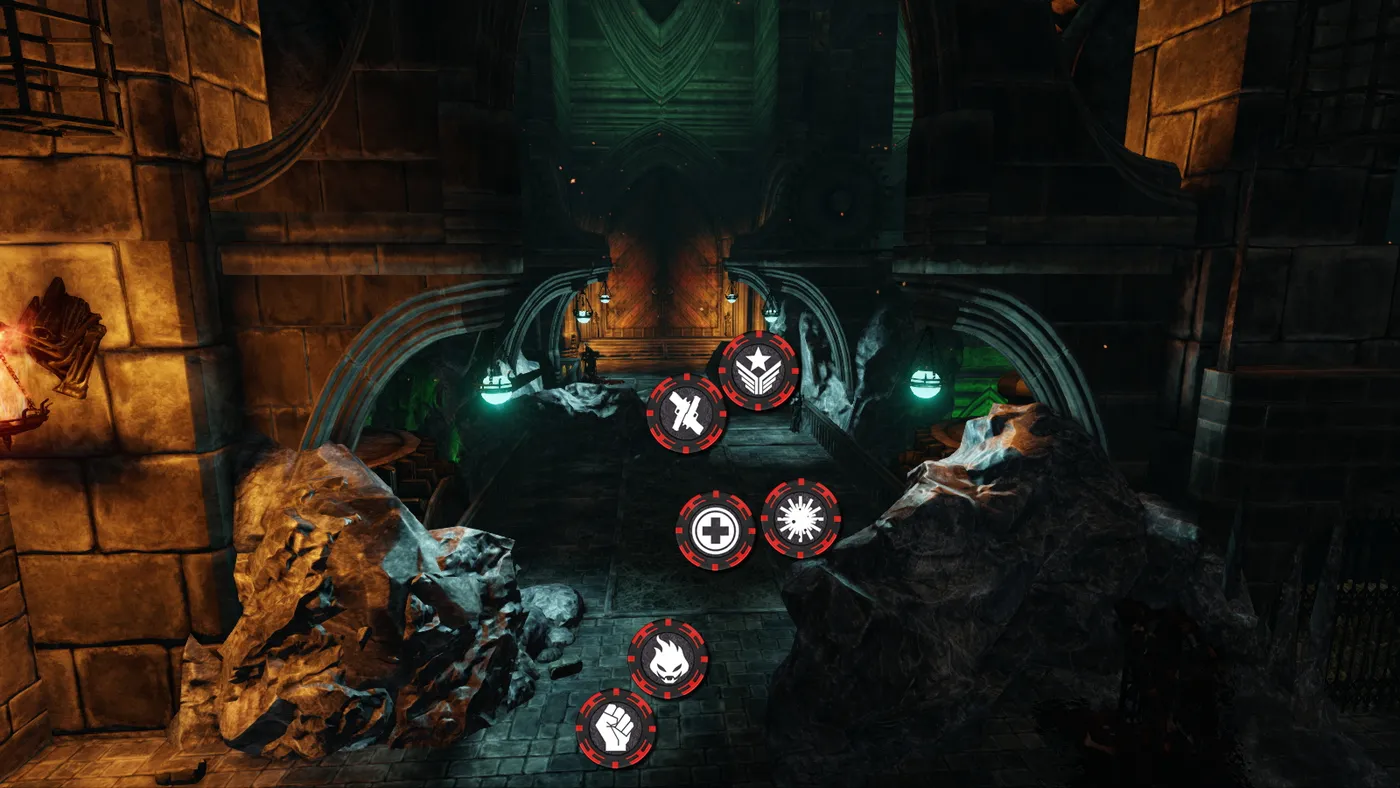 Infernal Realm, position 2
ZED Landing
 ZED Landing
Modes: Standard, Endless, Objectives. A crashed Horzine cargo plane has dumped zeds onto a tropical island while a volcano erupts.
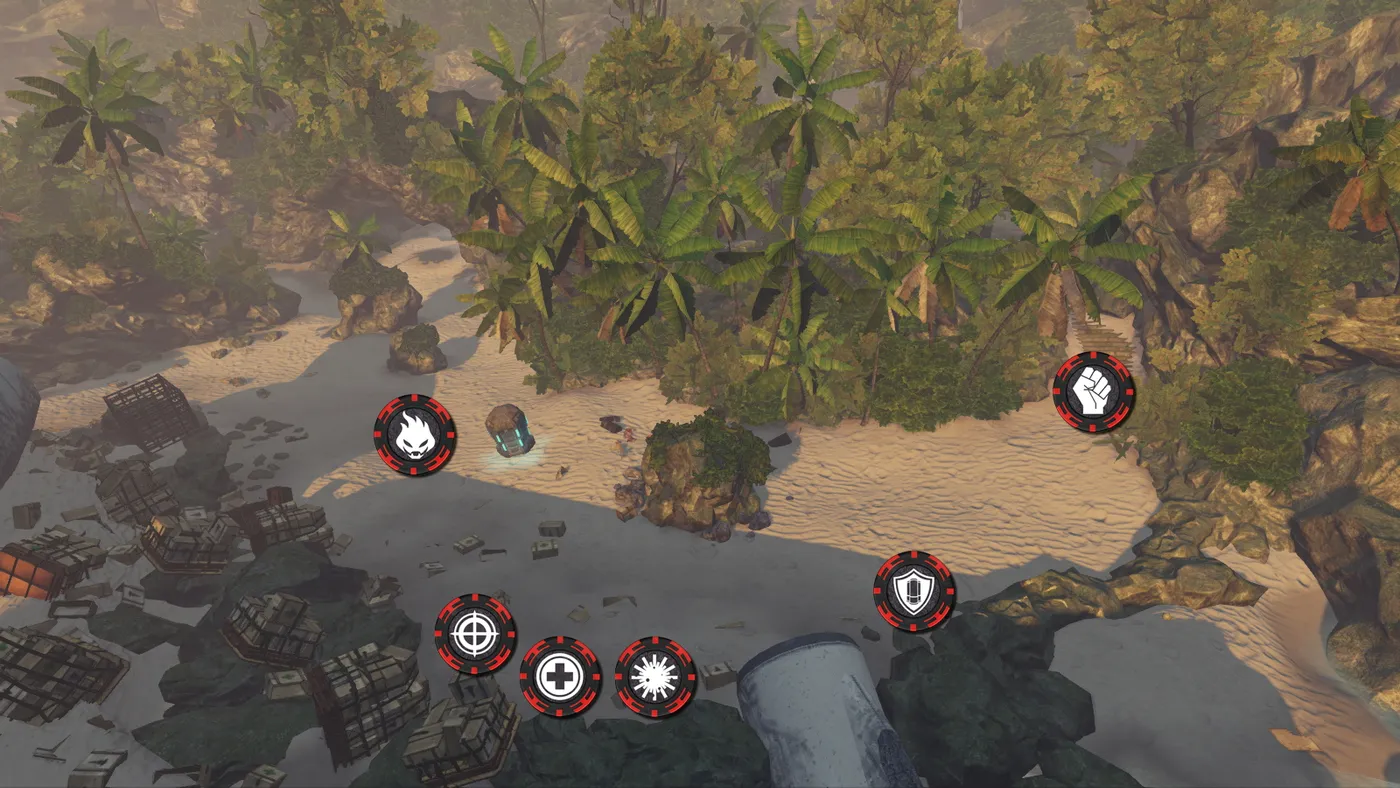
Position 1: The main spot where you cannot be caught off guard. The open stretch of beach levels a Sharpshooter on one side and a Berserker on the other.
 ZED Landing, position 1
Nuked
 Nuked
Modes: Standard, Endless. War never changes.
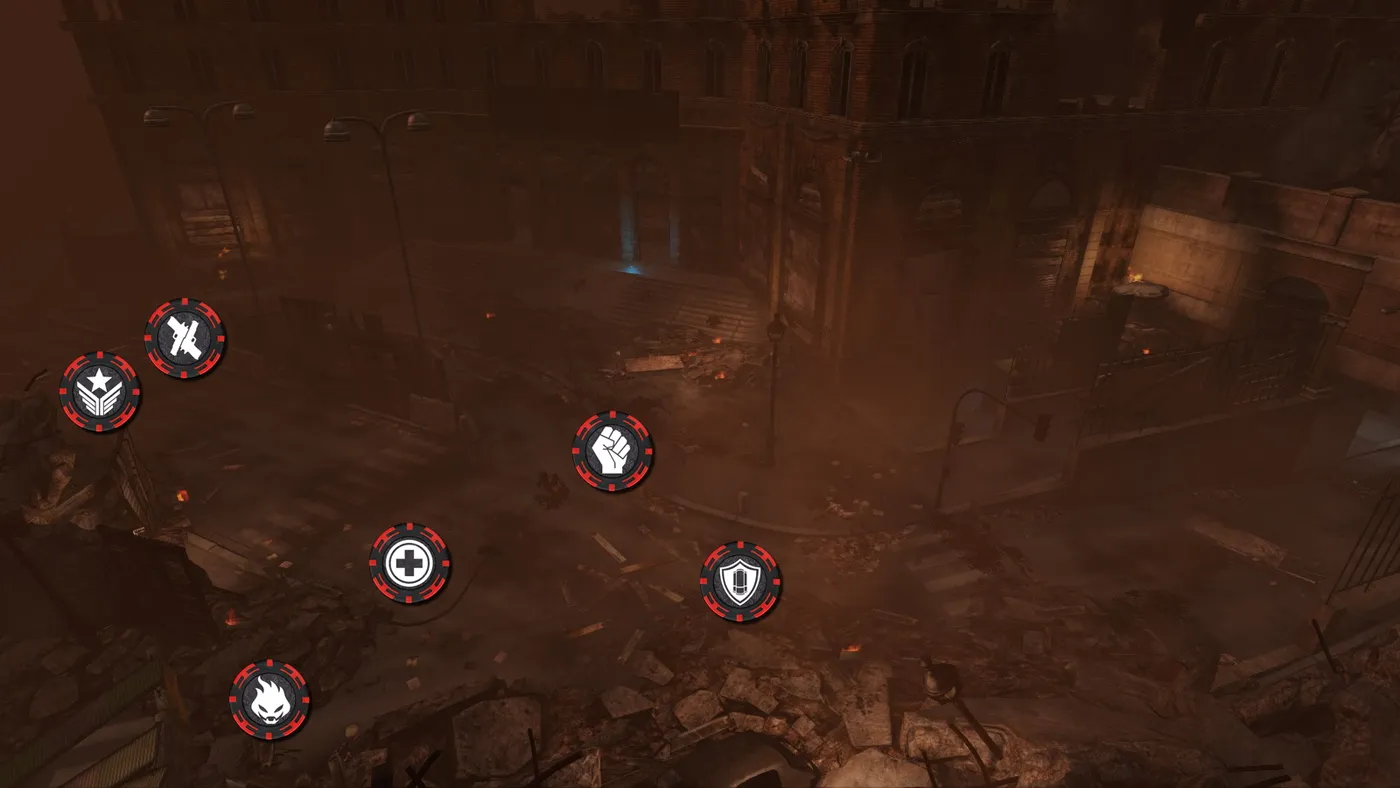
Position 1: The main spot, with good flexibility in perk usage.
 Nuked, position 1
Position 2: After some discussion this position was declared good.
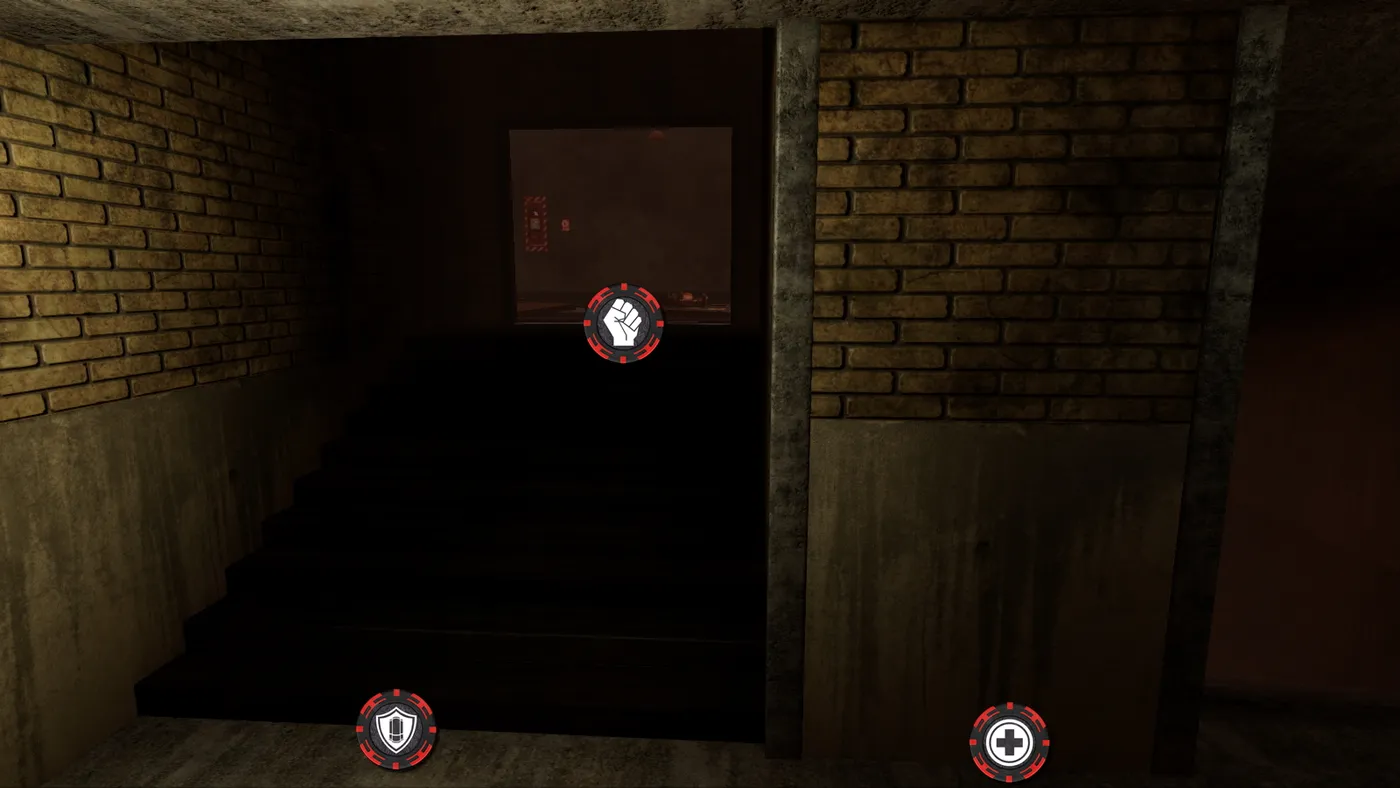
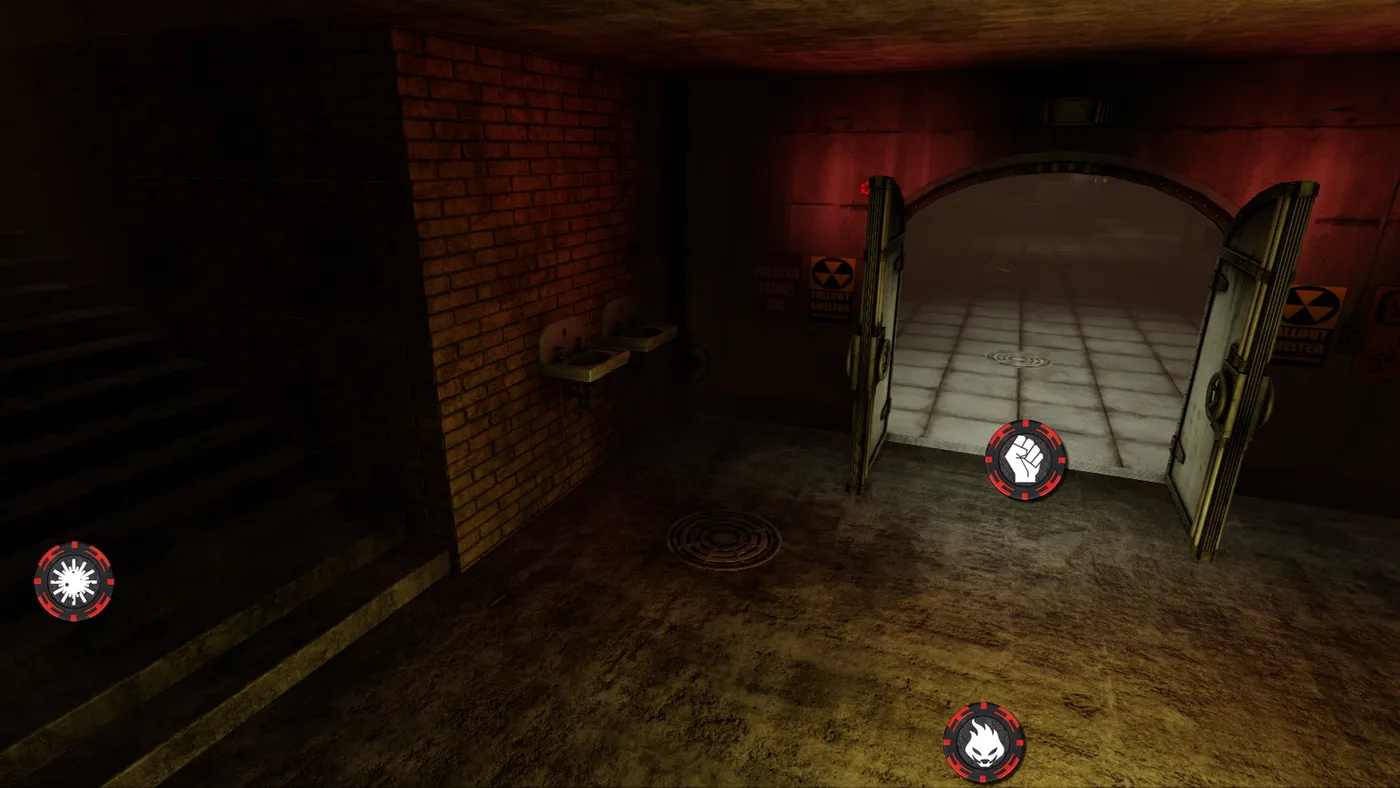 Nuked, position 2
The Descent
 The Descent
Modes: Standard, Endless, Holdout. Safer rooms used by Hans for his experiments that must be cleared to stop his work. Ten positions, one per room.
Position 1
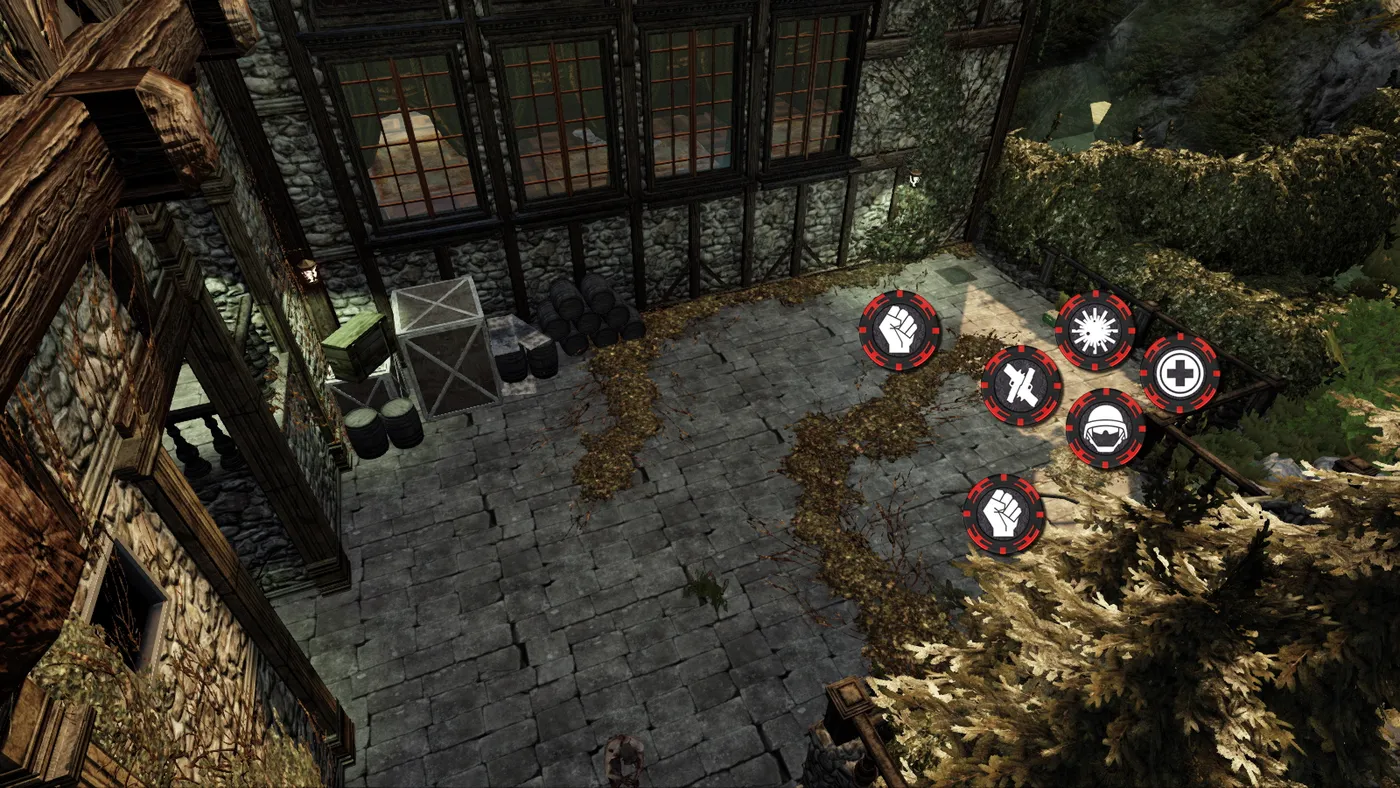 The Descent, position 1
Position 2
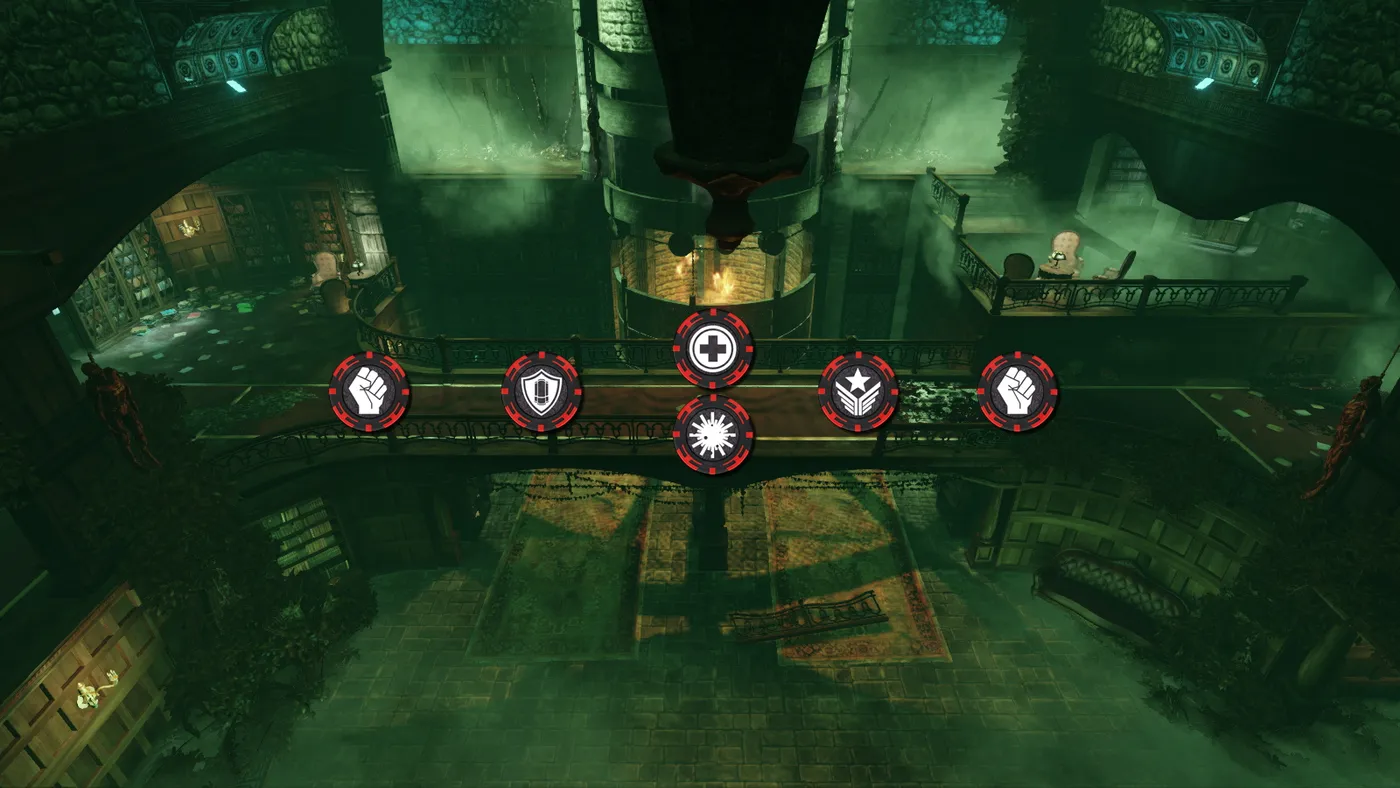 The Descent, position 2
Position 3
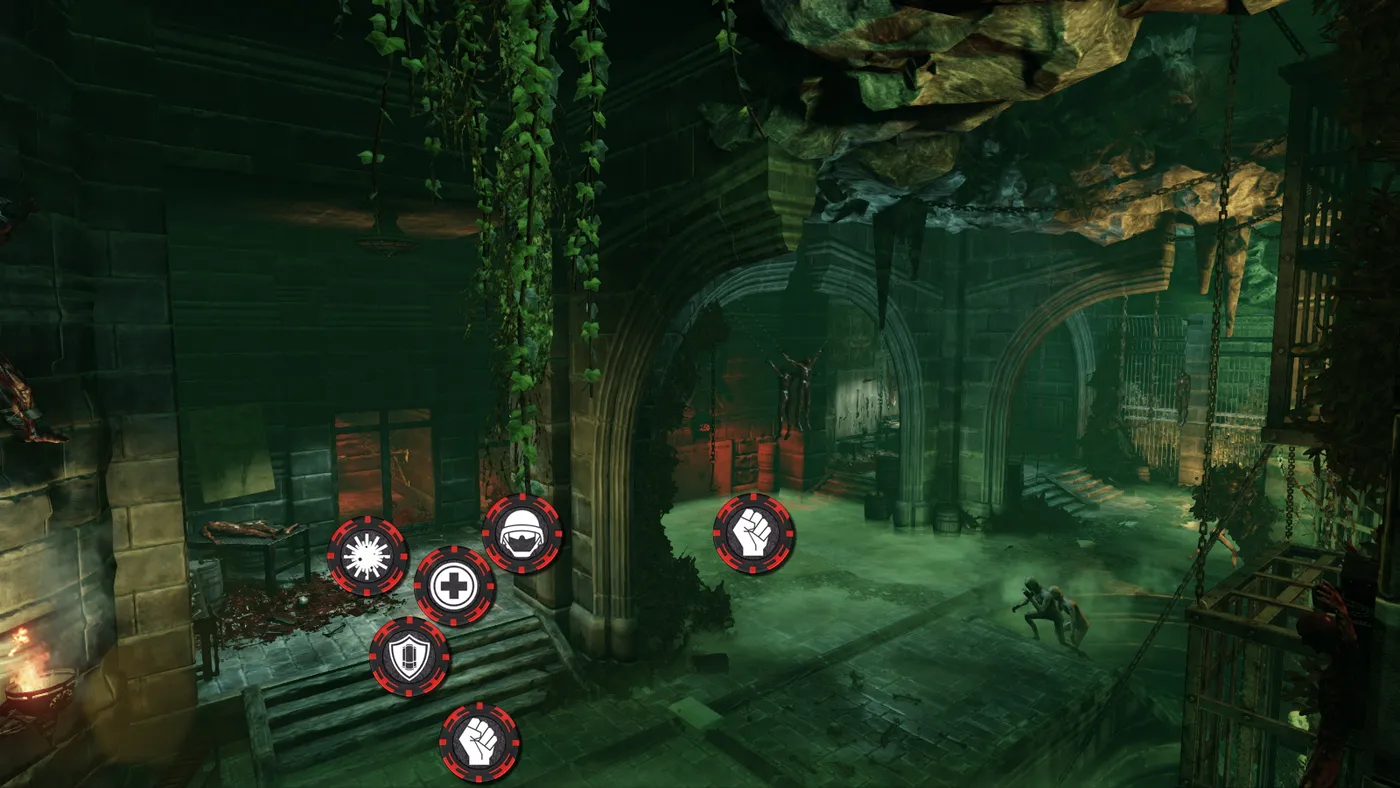 The Descent, position 3
Position 4
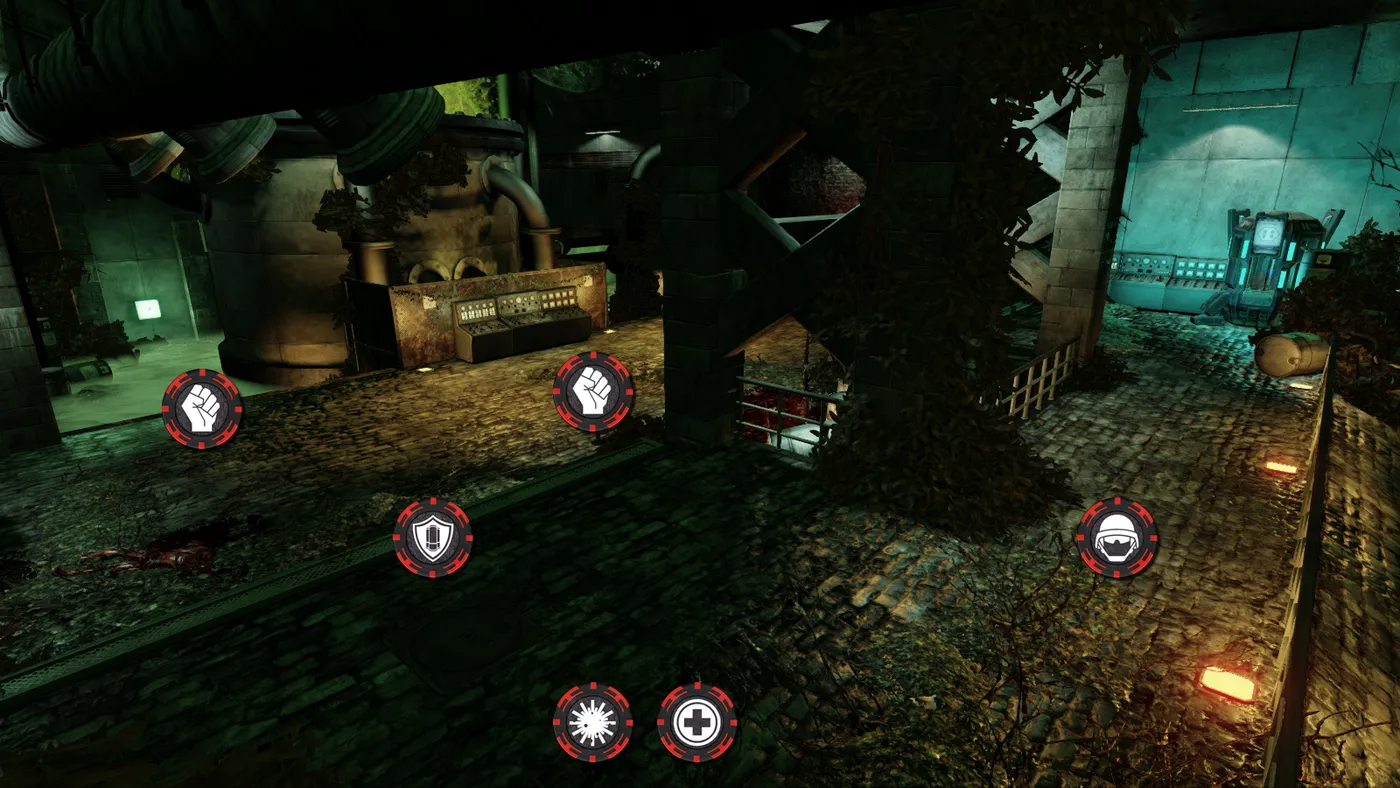 The Descent, position 4
Position 5
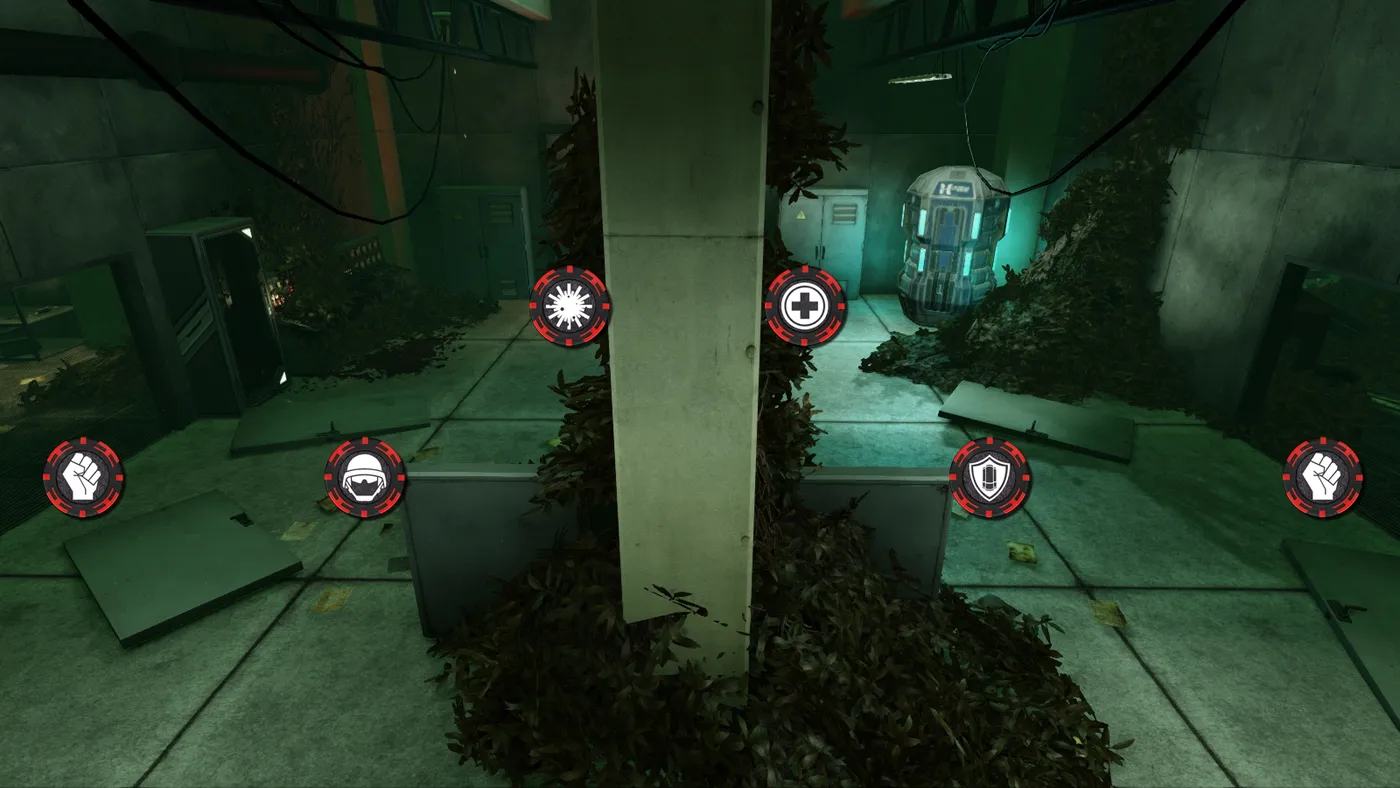 The Descent, position 5
Position 6
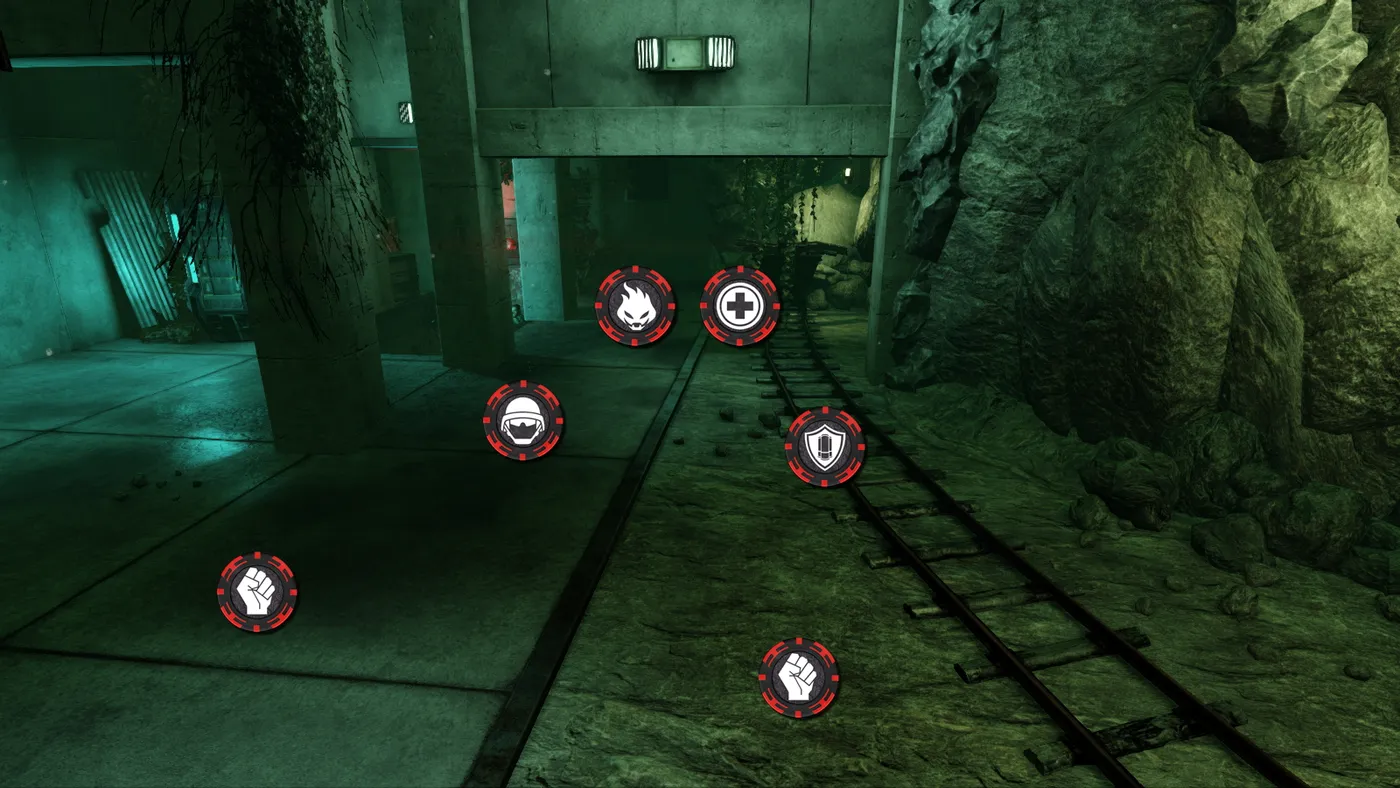 The Descent, position 6
Position 7
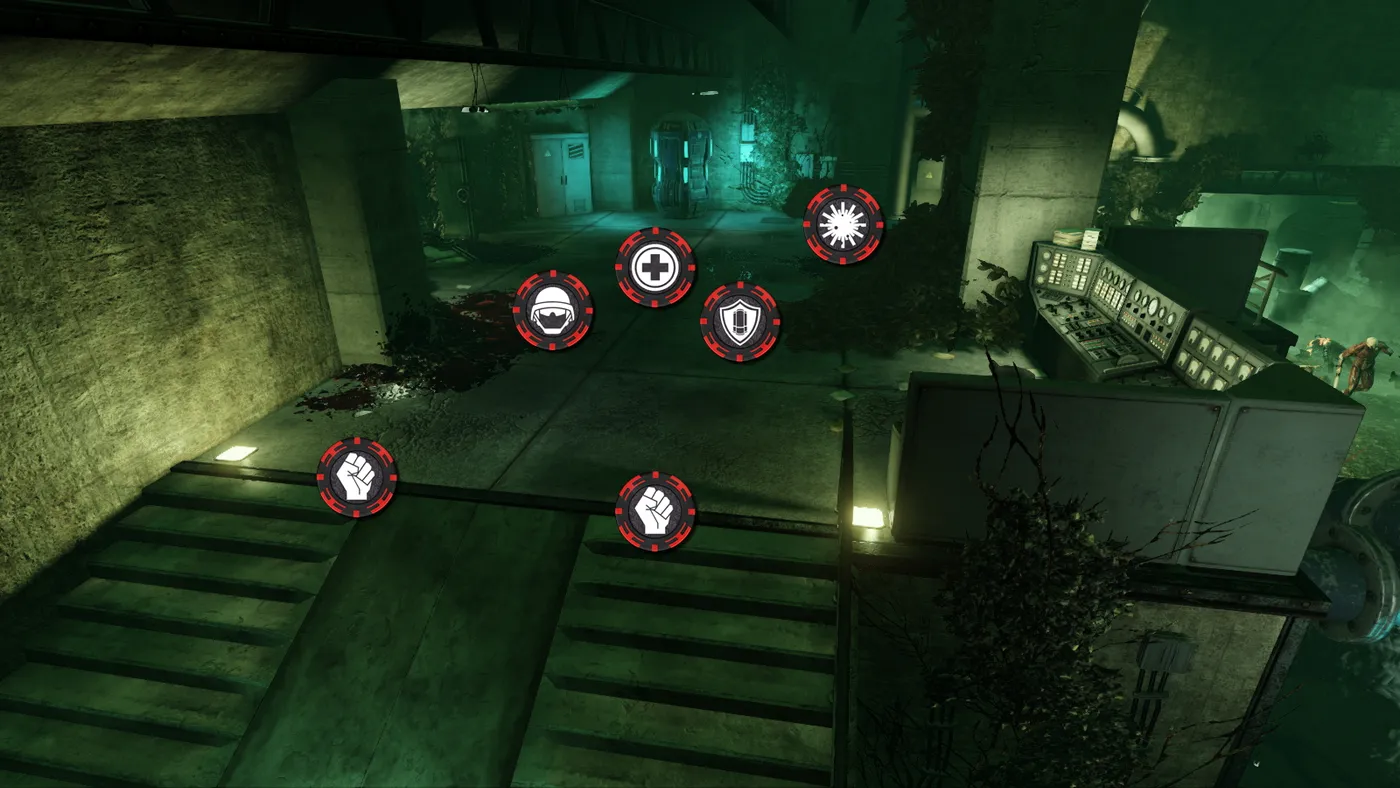 The Descent, position 7
Position 8
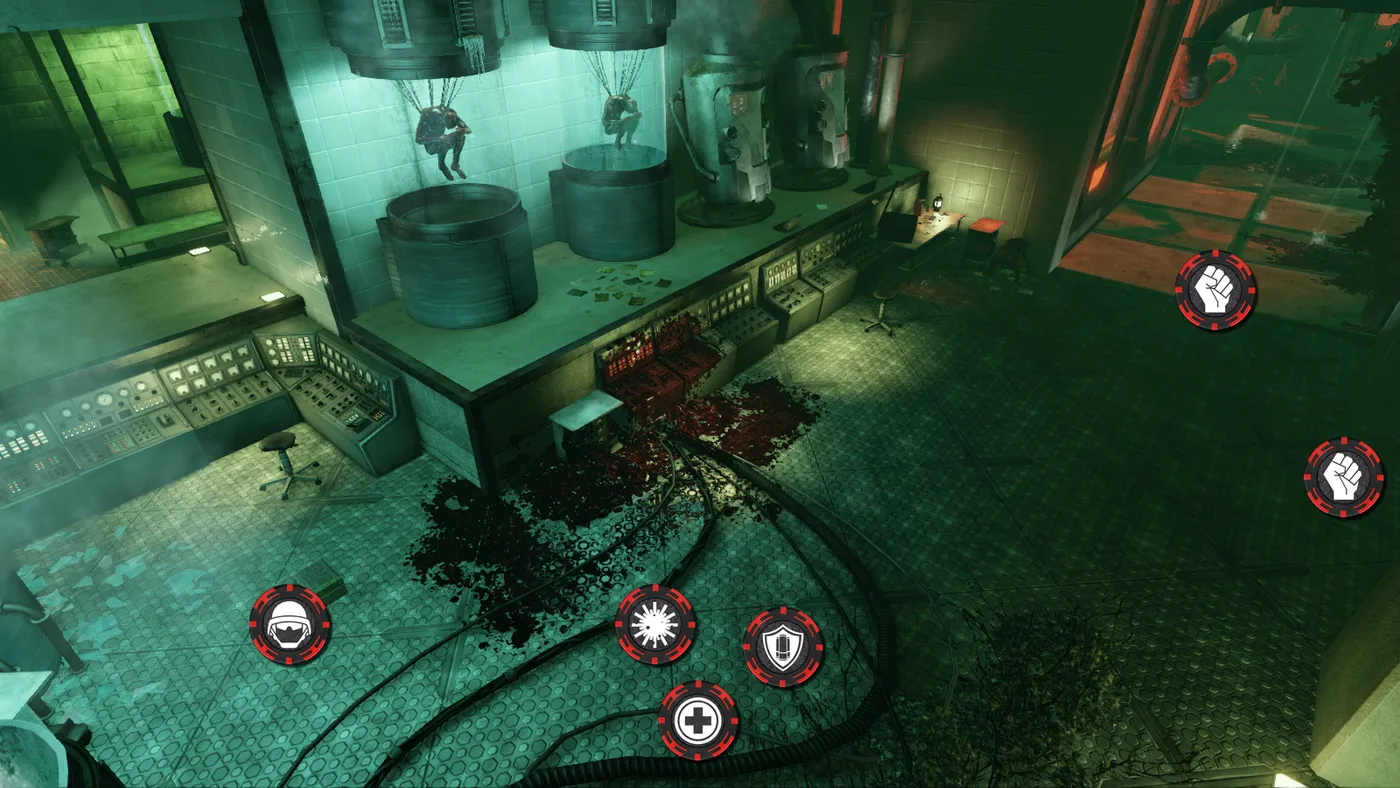 The Descent, position 8
Position 9
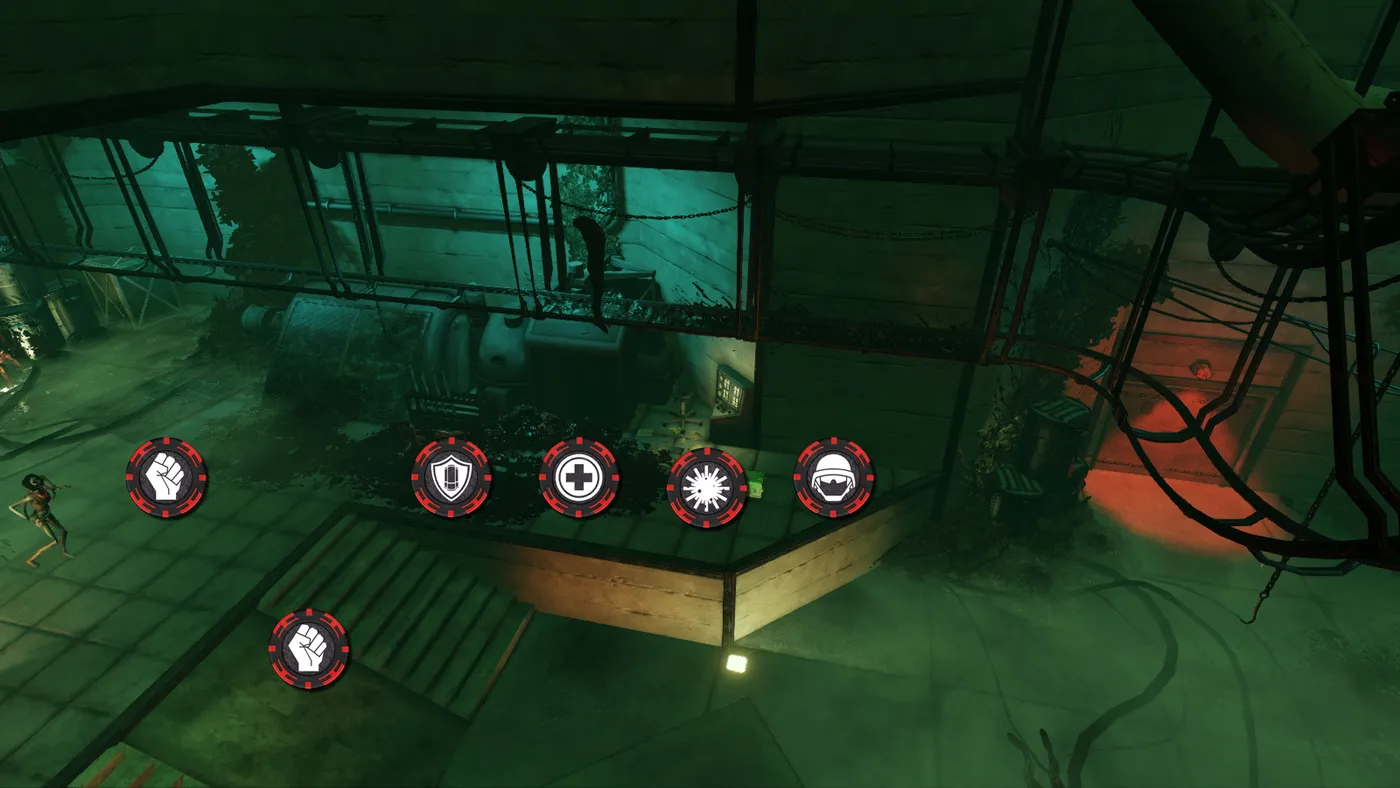 The Descent, position 9
Position 10
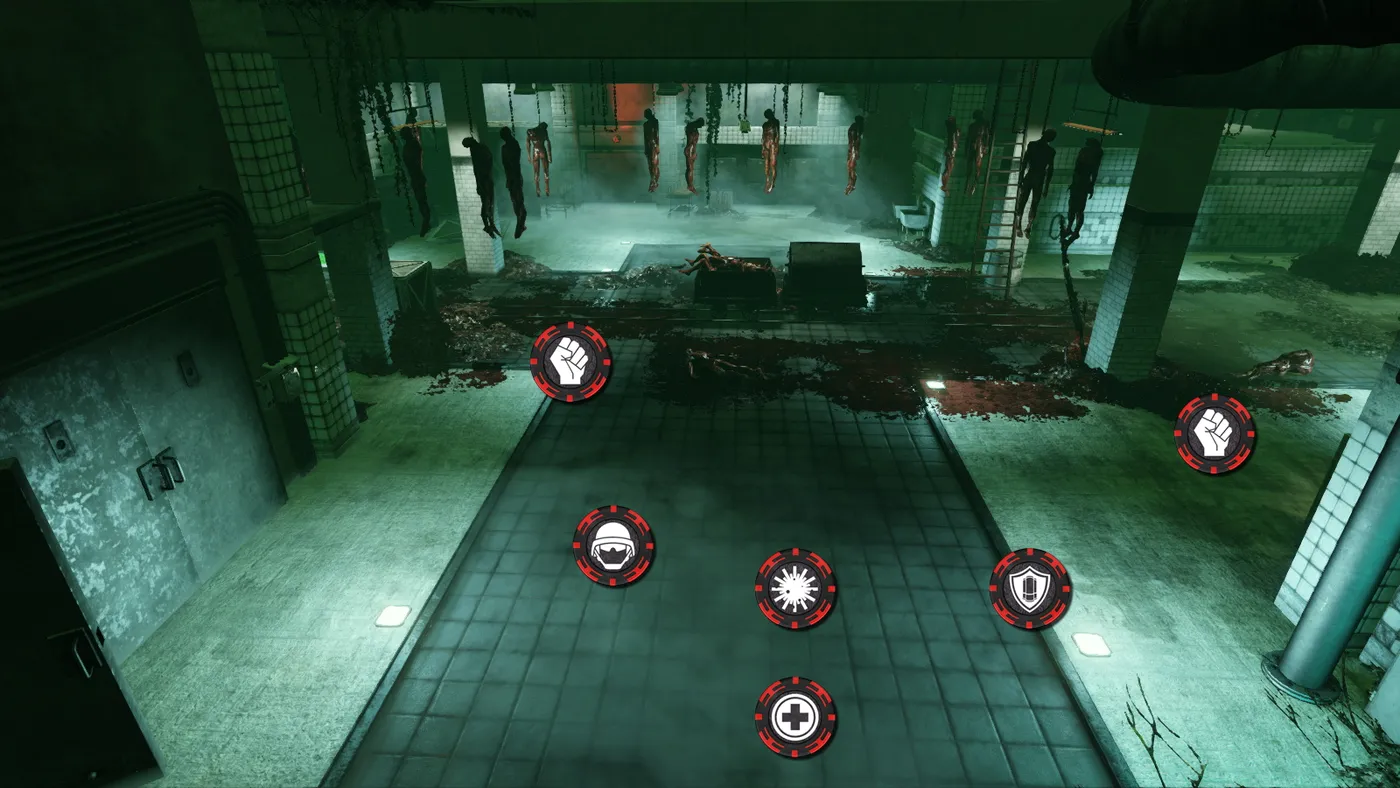 The Descent, position 10
The Tragic Kingdom
 The Tragic Kingdom
Modes: Standard, Endless. A horror amusement park with the Blade Queen and the racing terror of Pound Mountain.
Position 1: The position on the roller coaster is great for levelling many perks: besides the standard Berserker, Firebug, Support and even Sharpshooter find a use here. Be careful on tanky perks not to fall down from the coaster, or you will die surrounded and expose your team.
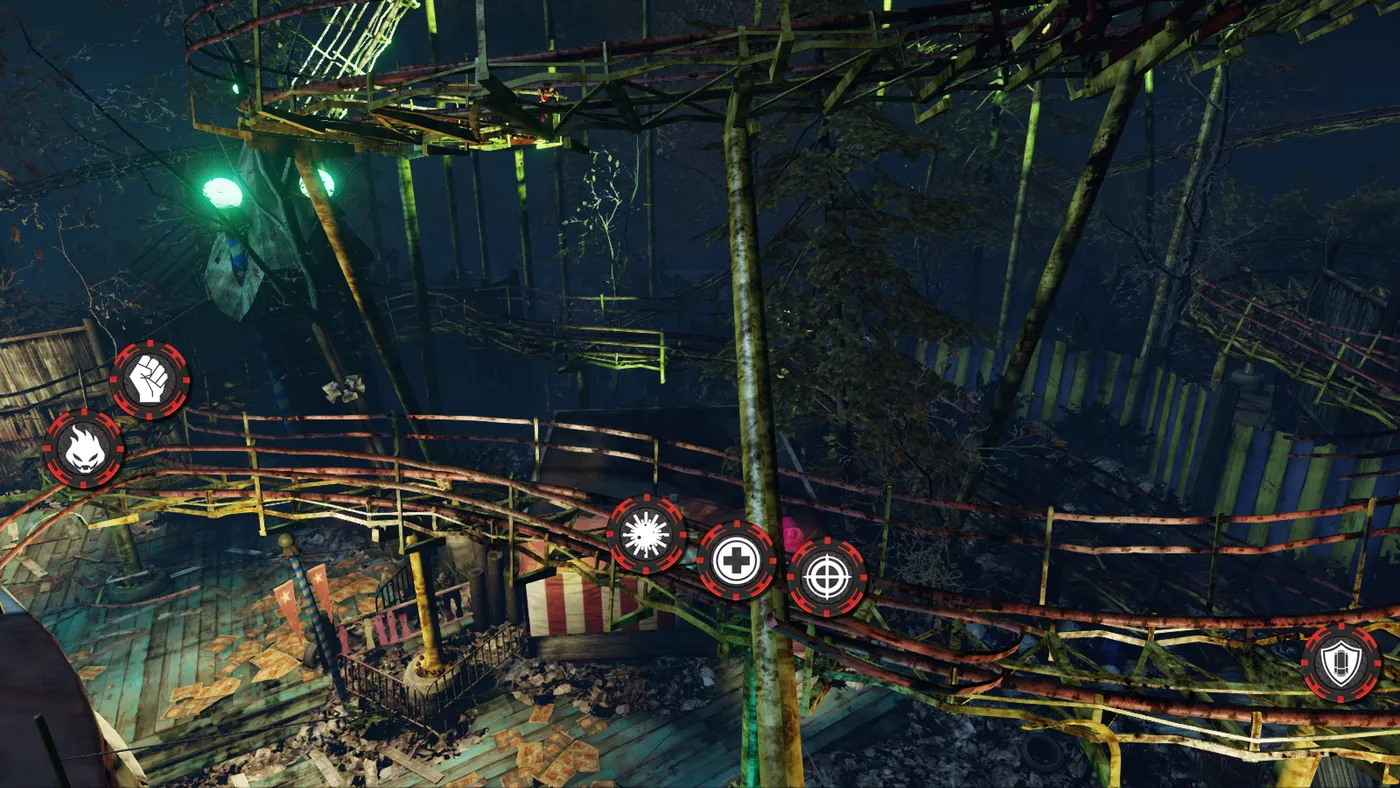 The Tragic Kingdom, position 1
Nightmare
 Nightmare
Modes: Standard, Endless, Holdout. The nightmares of the psychopathic clown Buzo. Six positions across the map, plus an alternative on the last map before the boss.
Position 1
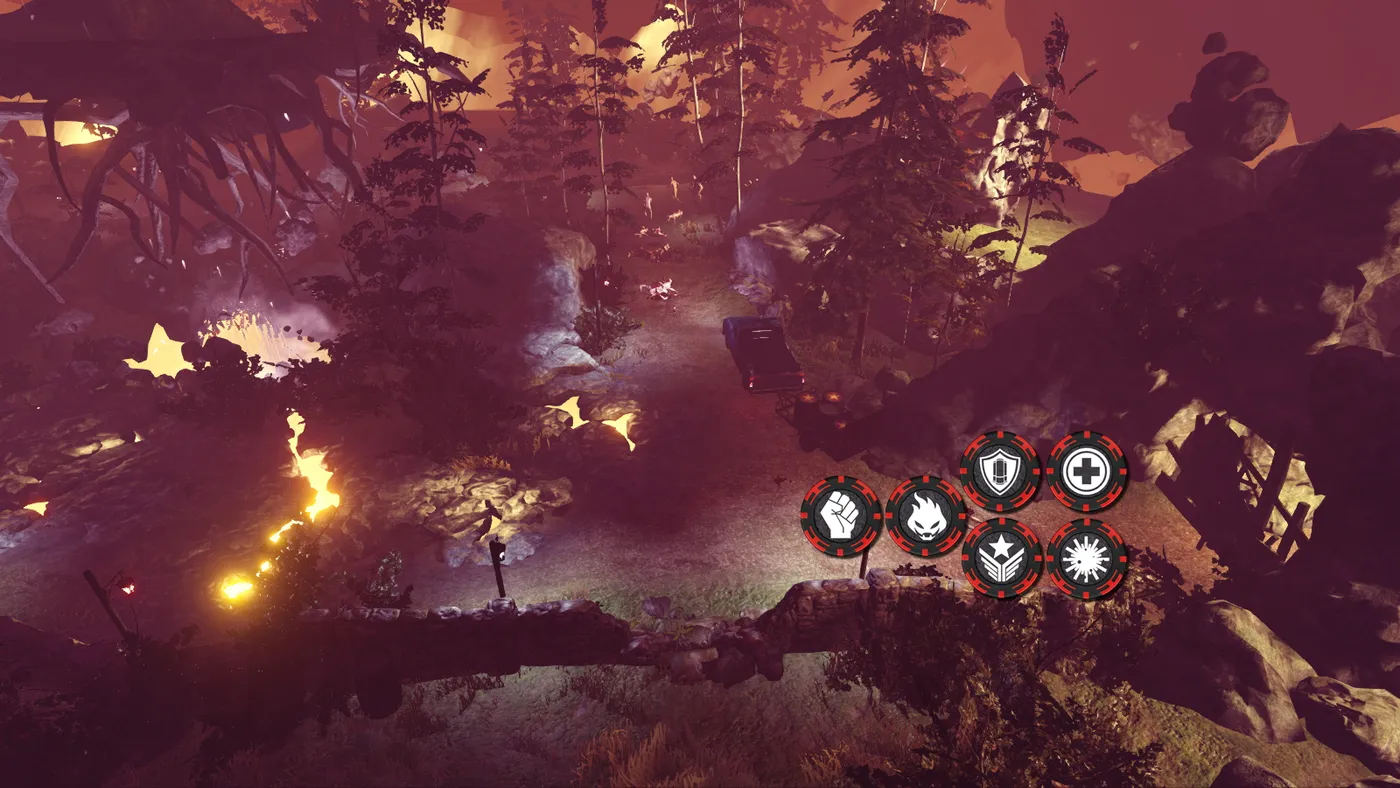 Nightmare, position 1
Position 2
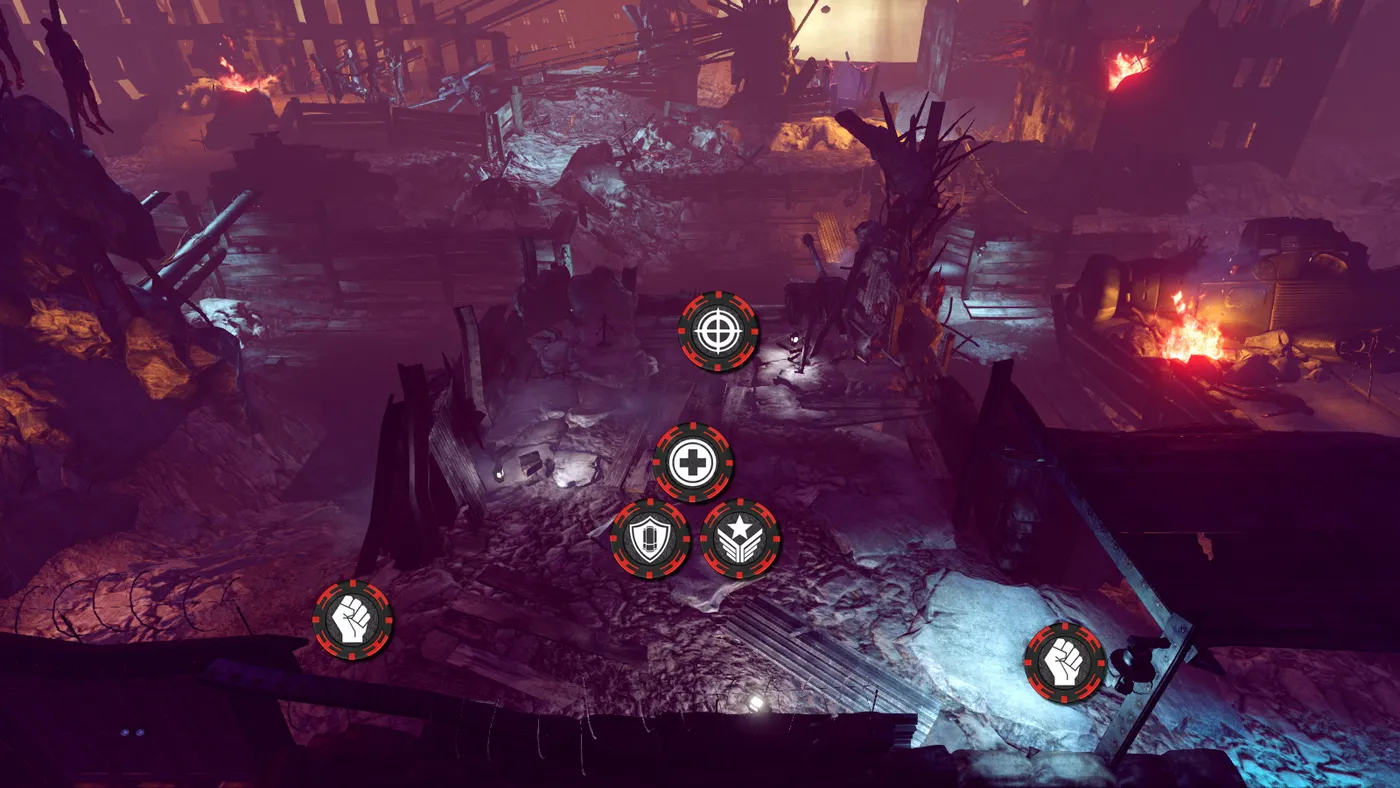 Nightmare, position 2
Position 3
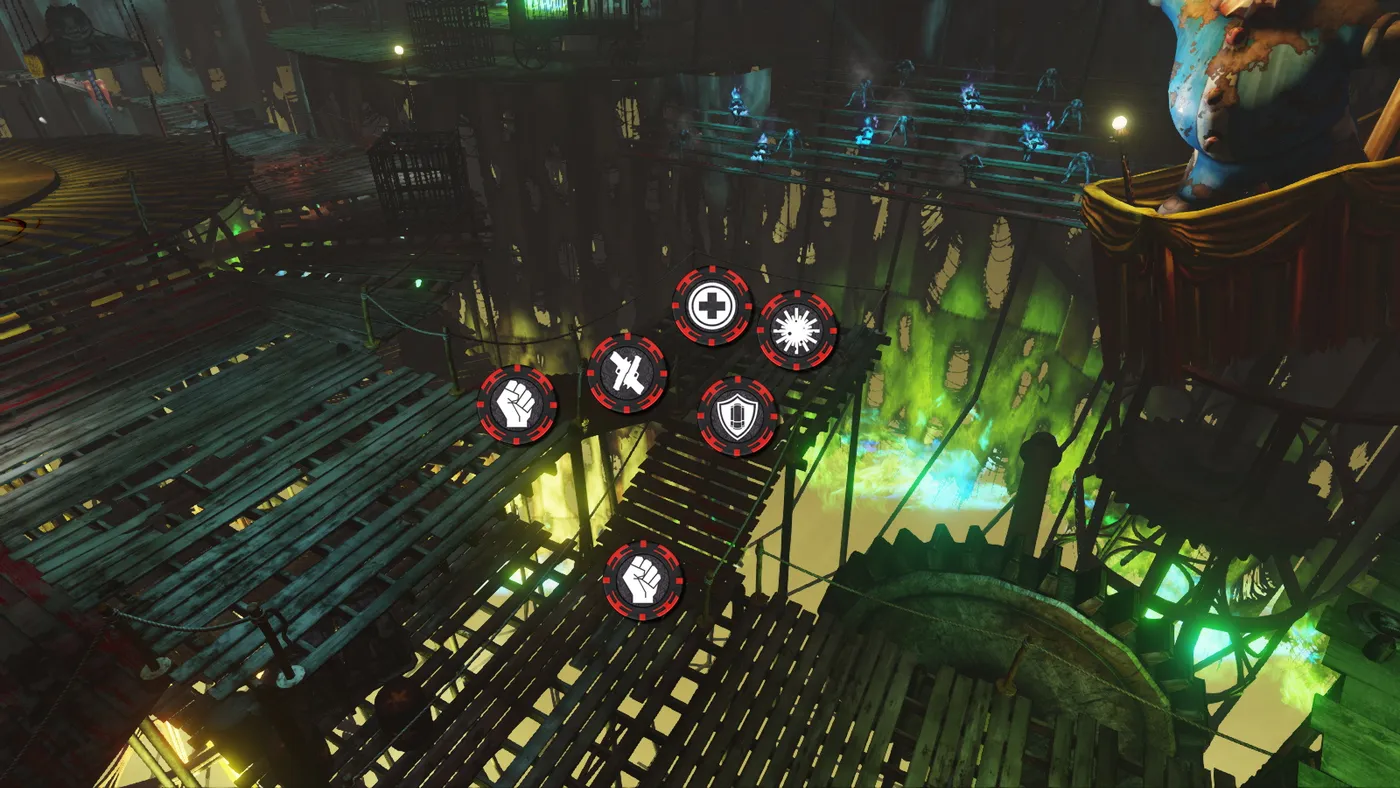 Nightmare, position 3
Position 4
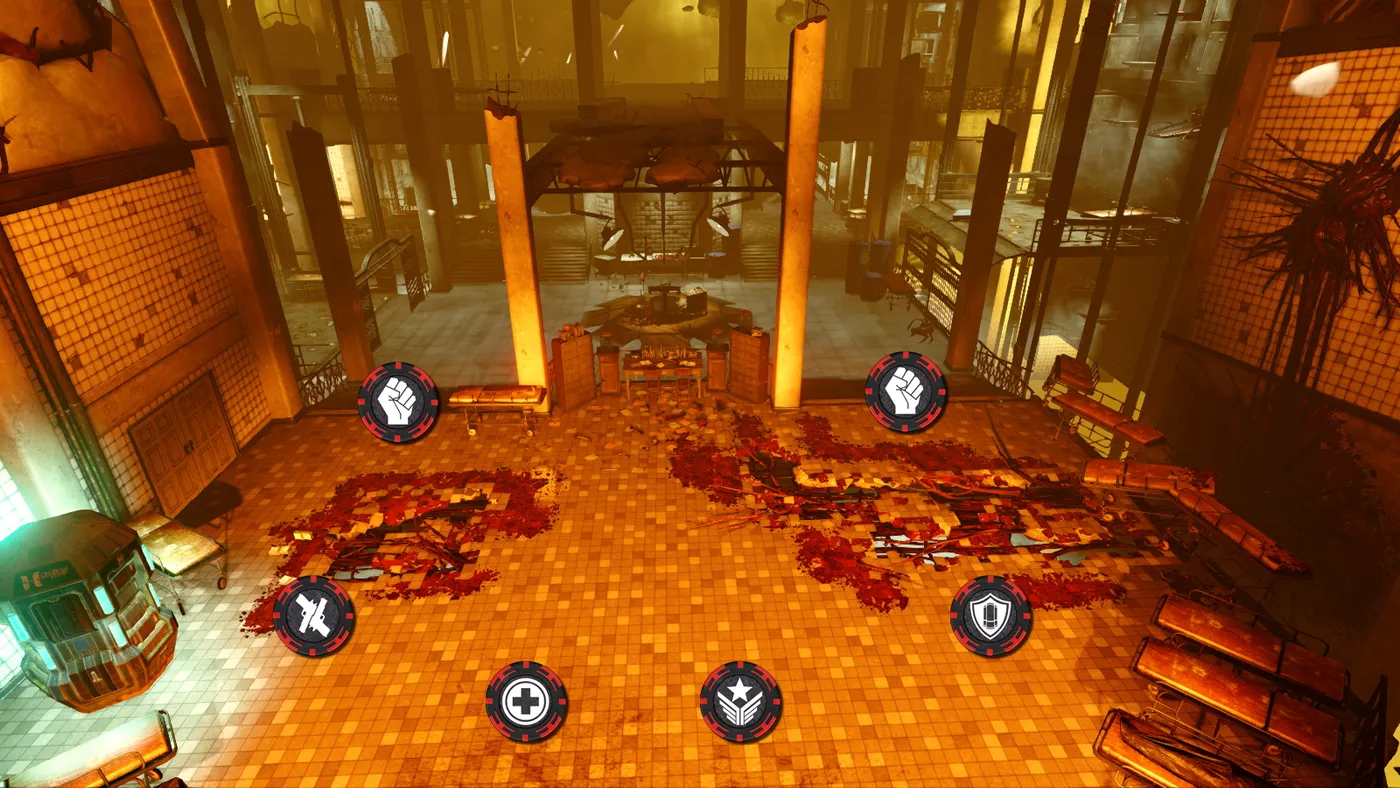 Nightmare, position 4
Position 5
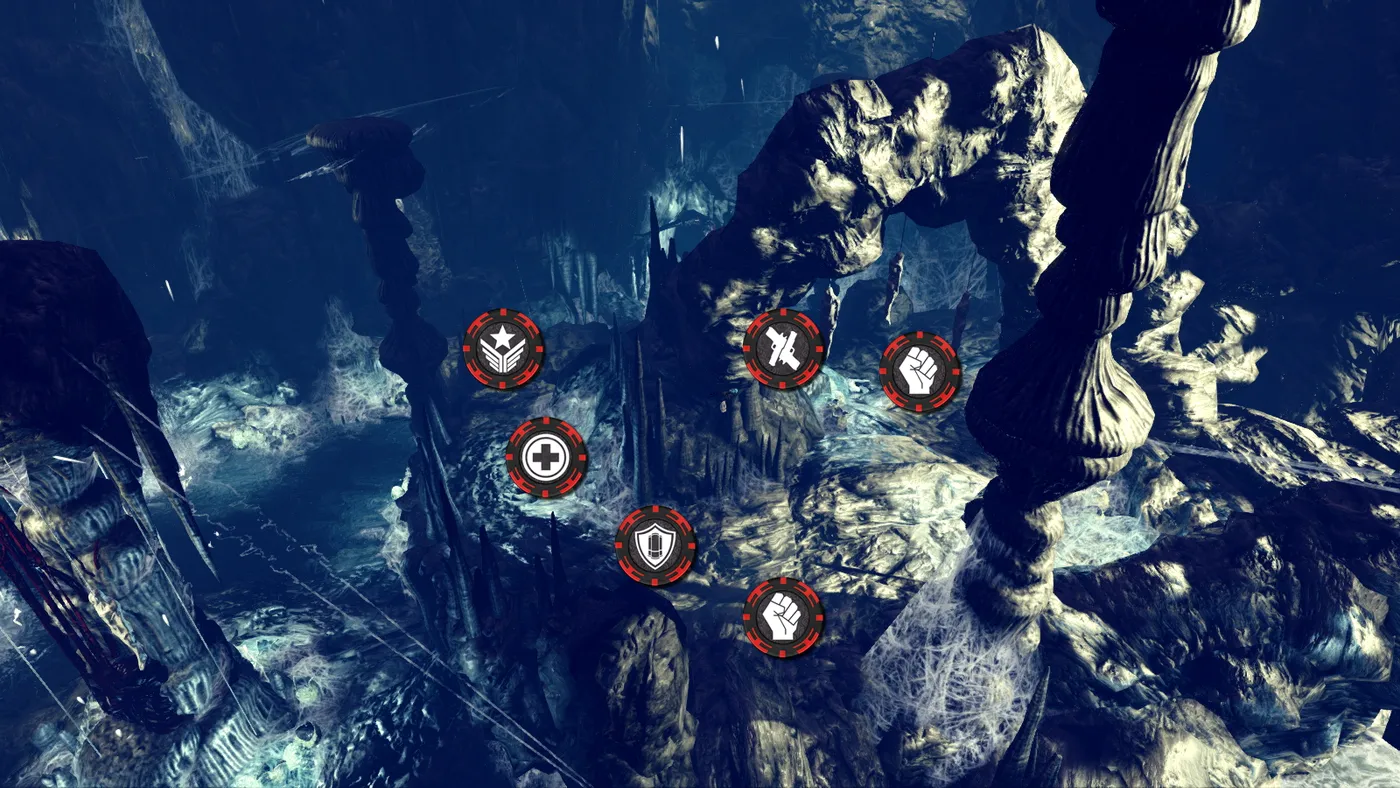 Nightmare, position 5
Position 6
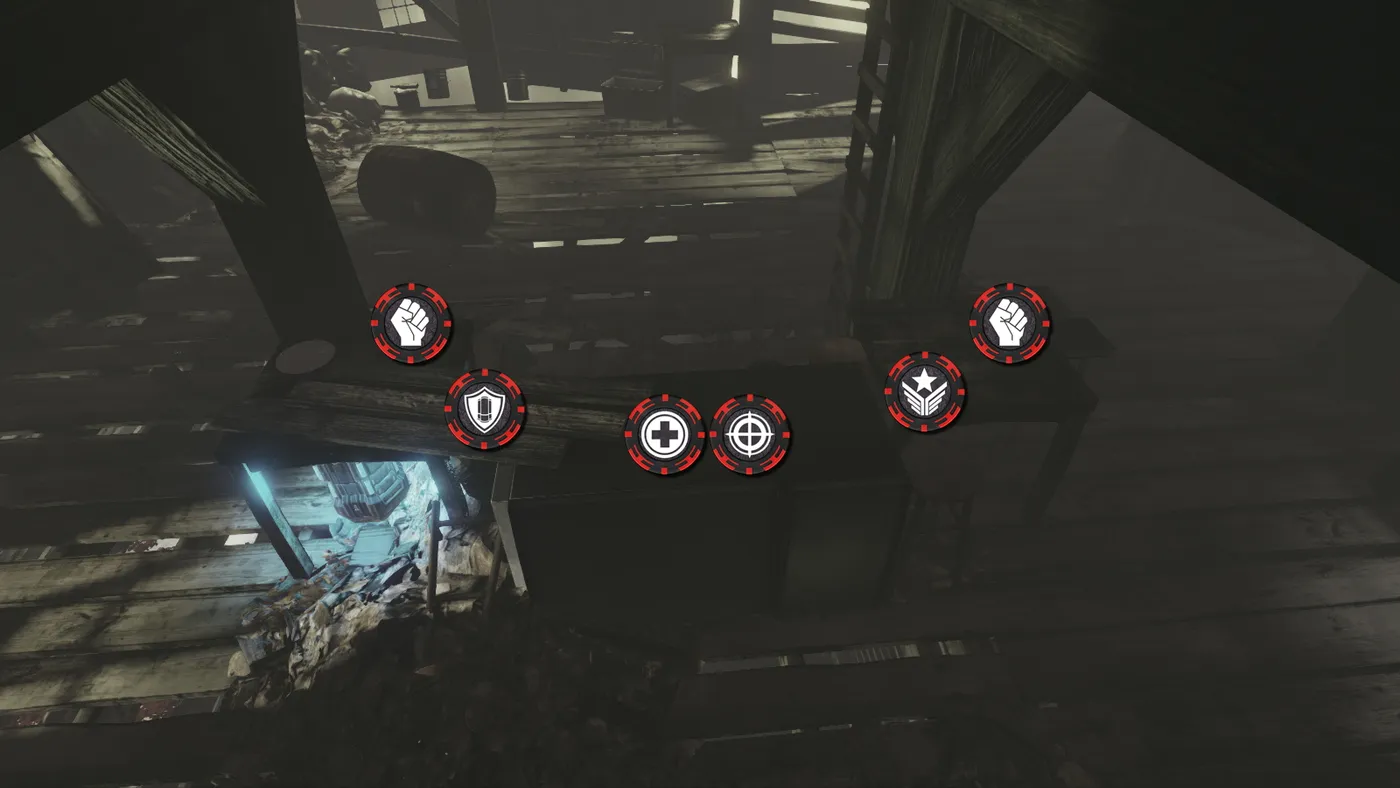 Nightmare, position 6
Alternative before the boss
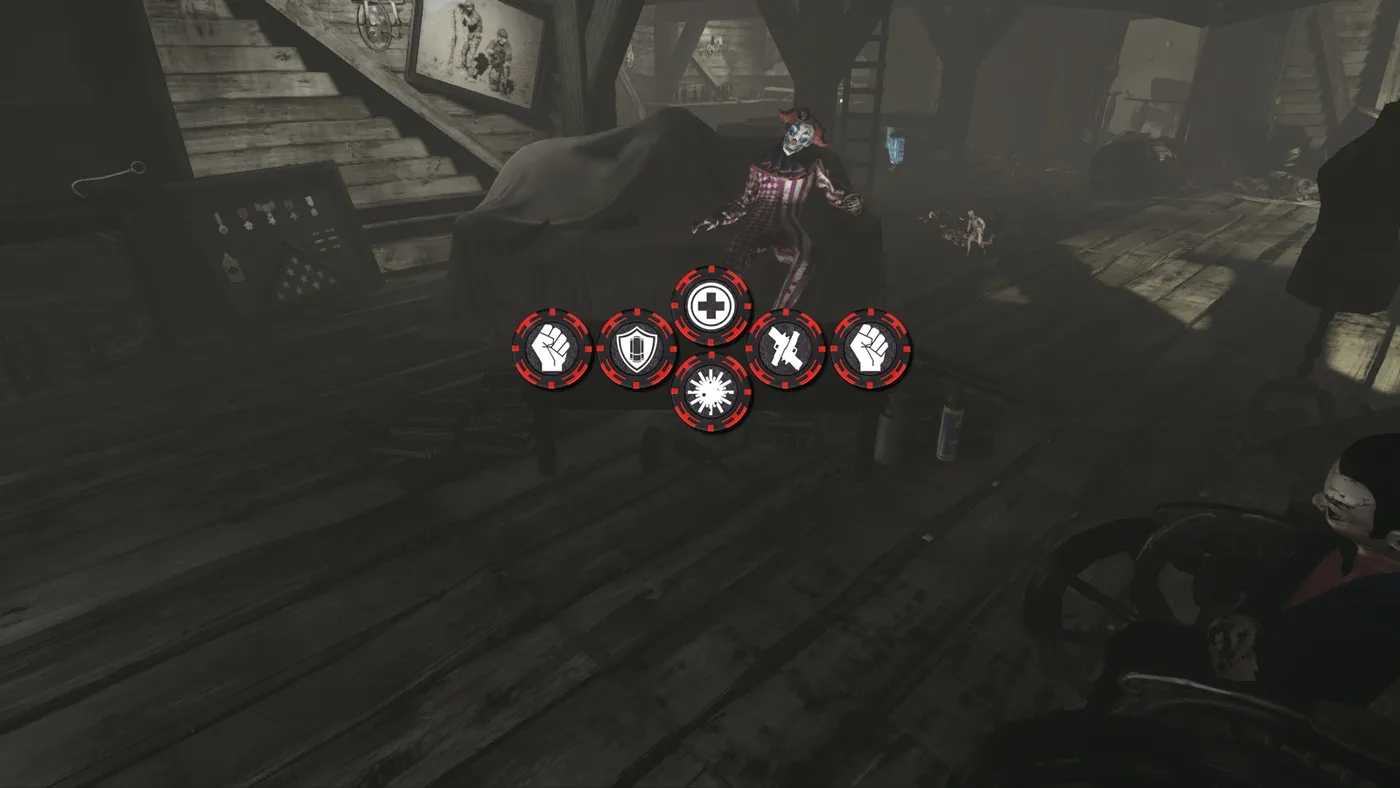 Nightmare, alternative before the boss
Krampus' Lair
 Krampus' Lair
Modes: Standard, Endless, Holdout. You must fight through Krampus' lair to the portal leading to the throne room where he keeps the naughty list. Positions are given per stage.
Stage 1
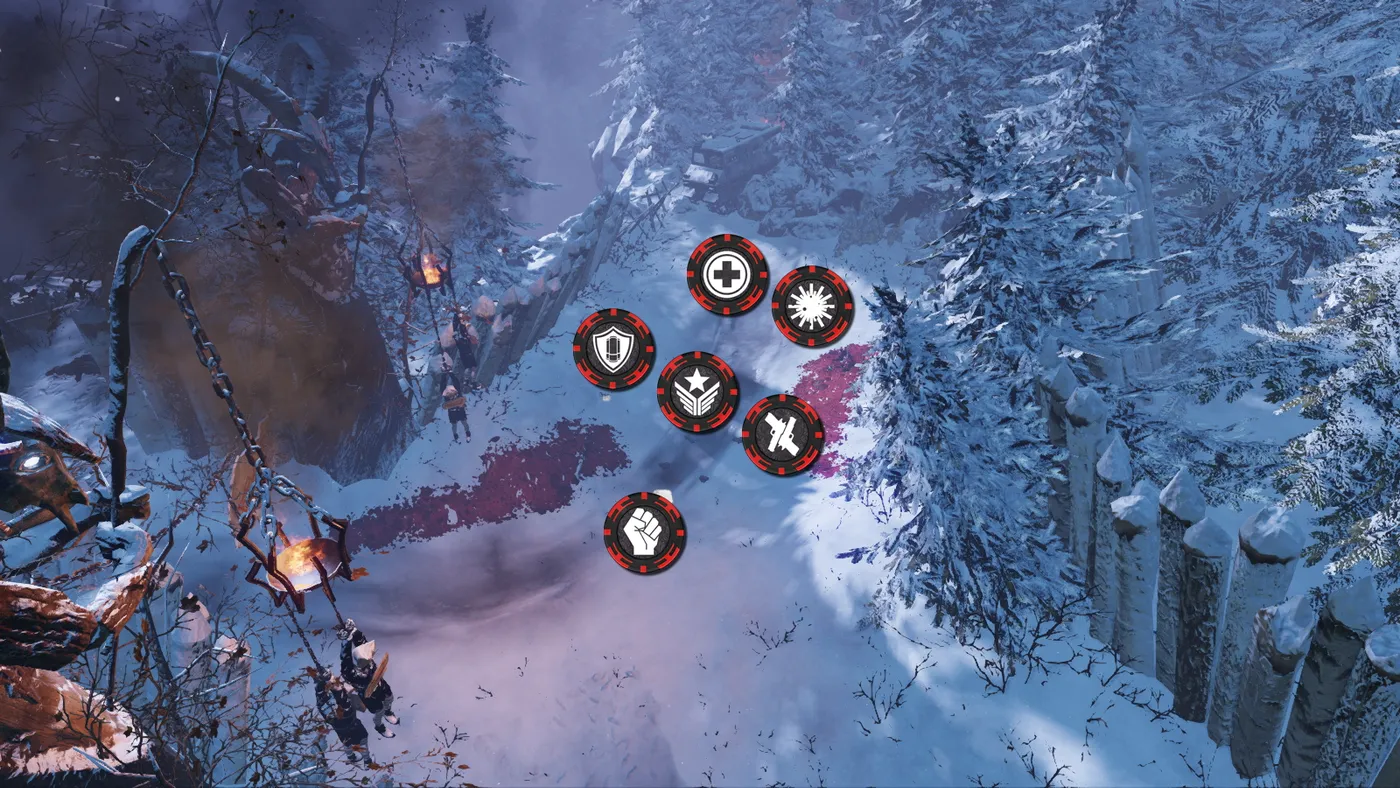 Krampus' Lair, stage 1
Stage 2
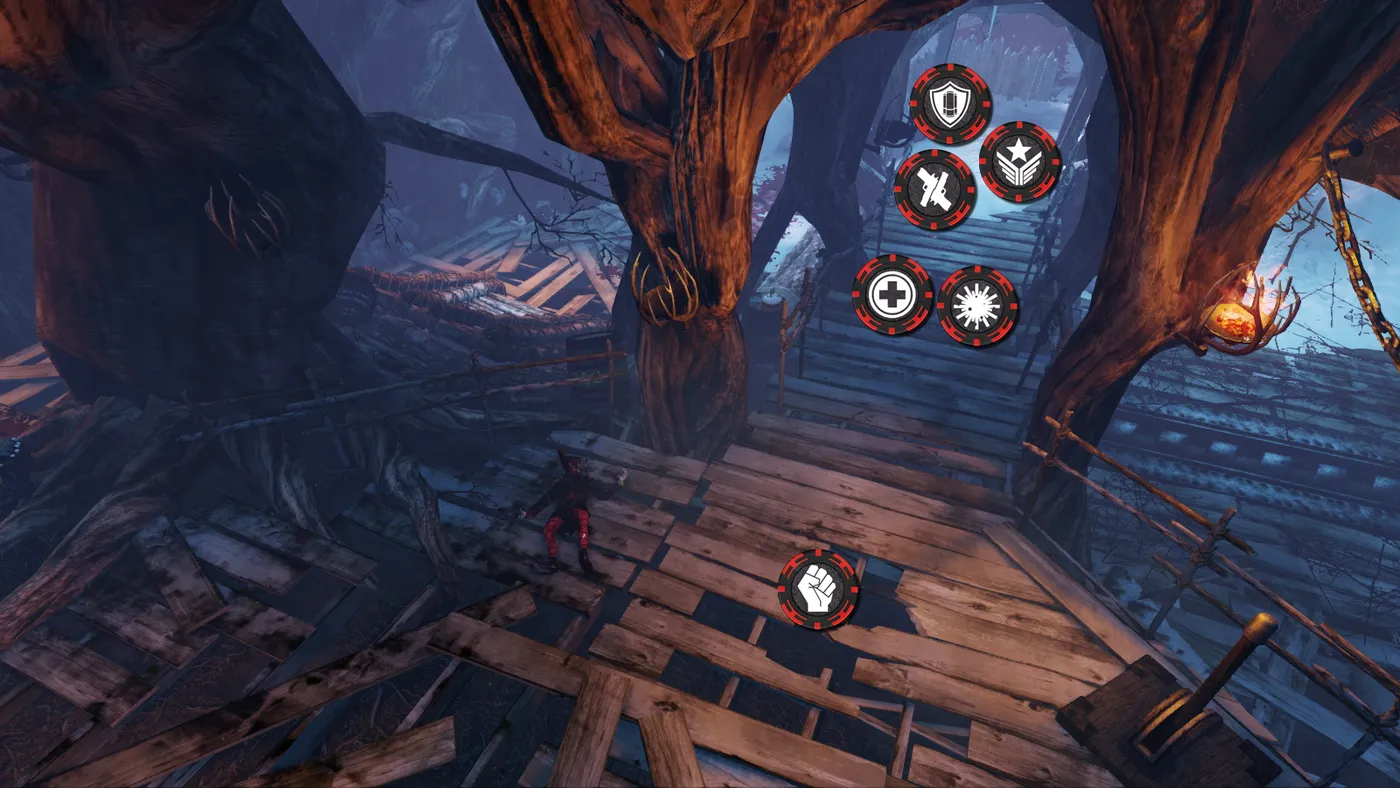 Krampus' Lair, stage 2
Stage 3
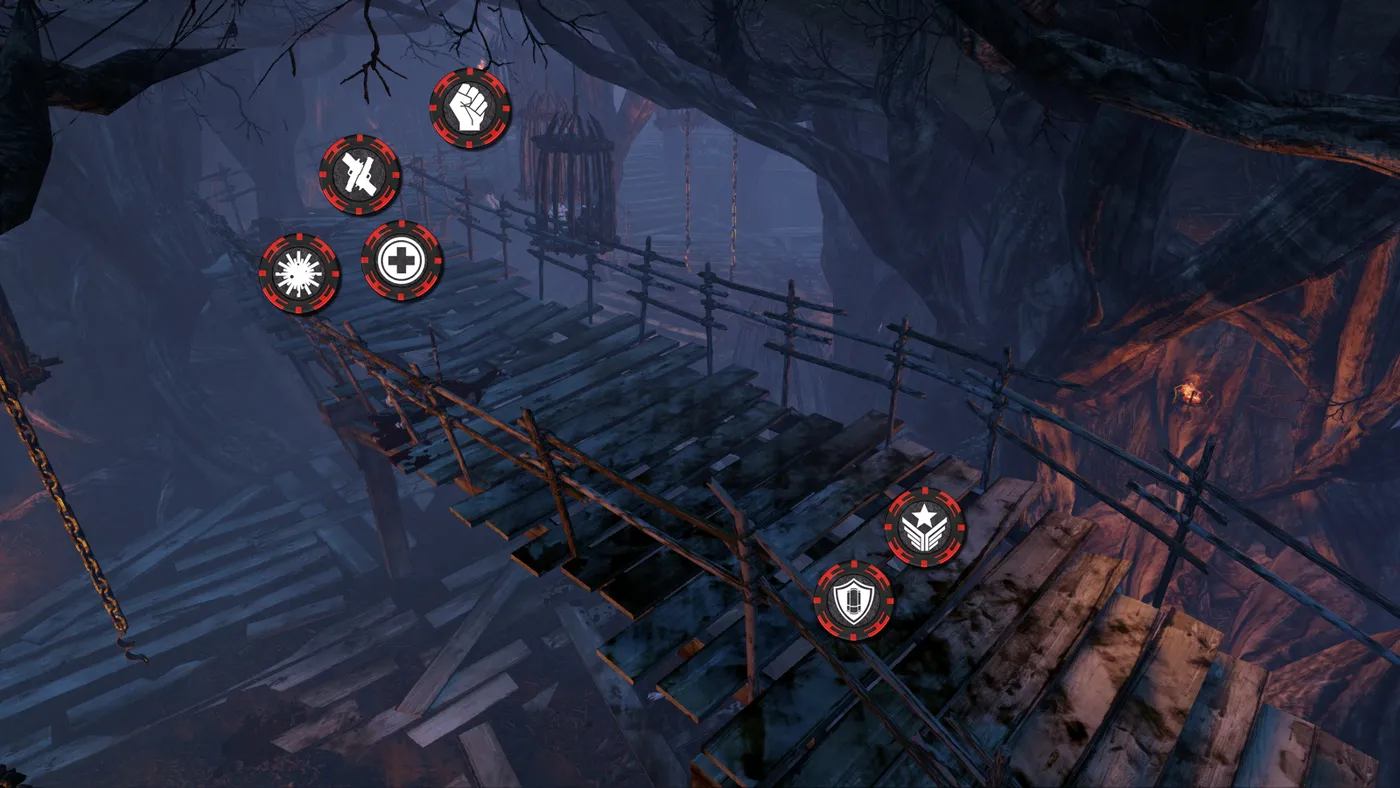 Krampus' Lair, stage 3
Stage 3, alternative
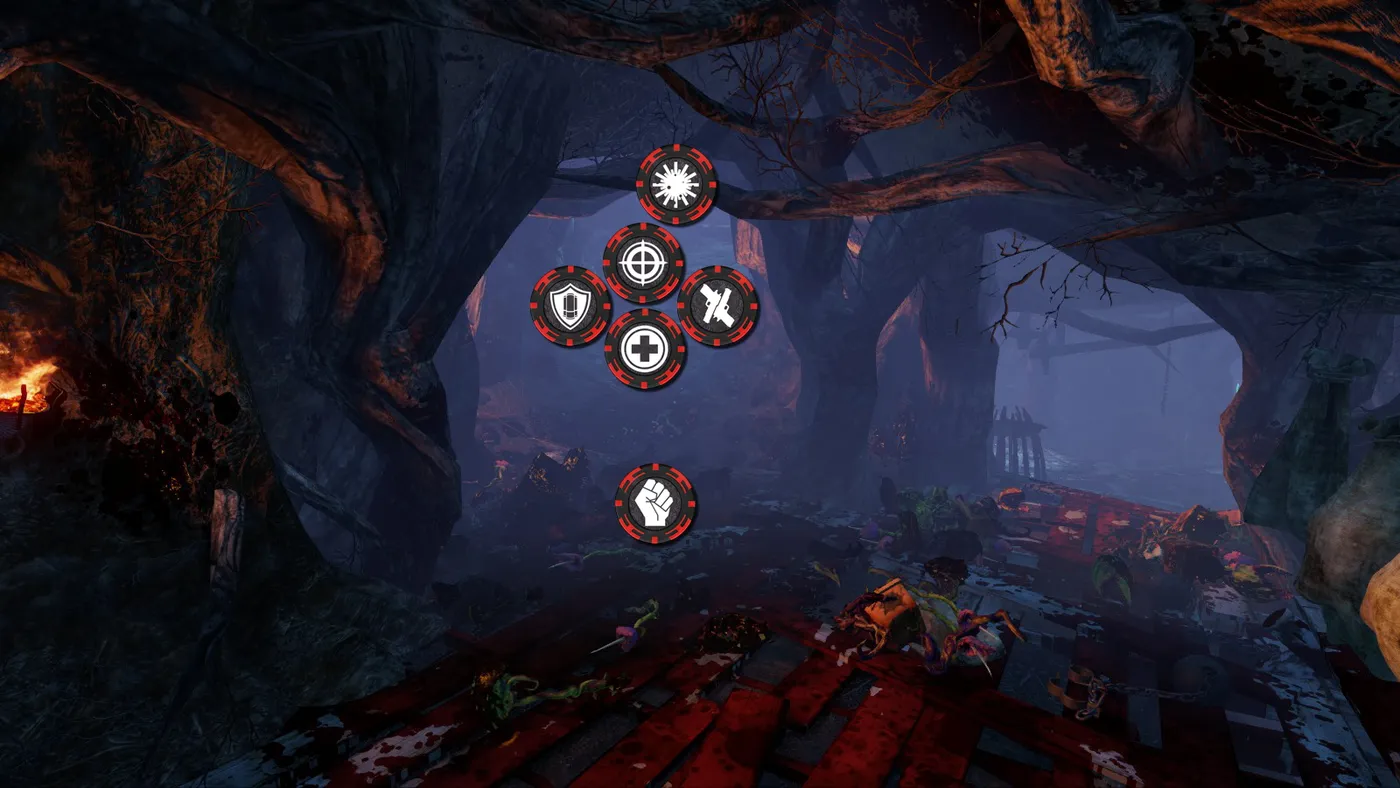 Krampus' Lair, stage 3, alternative
Stage 4
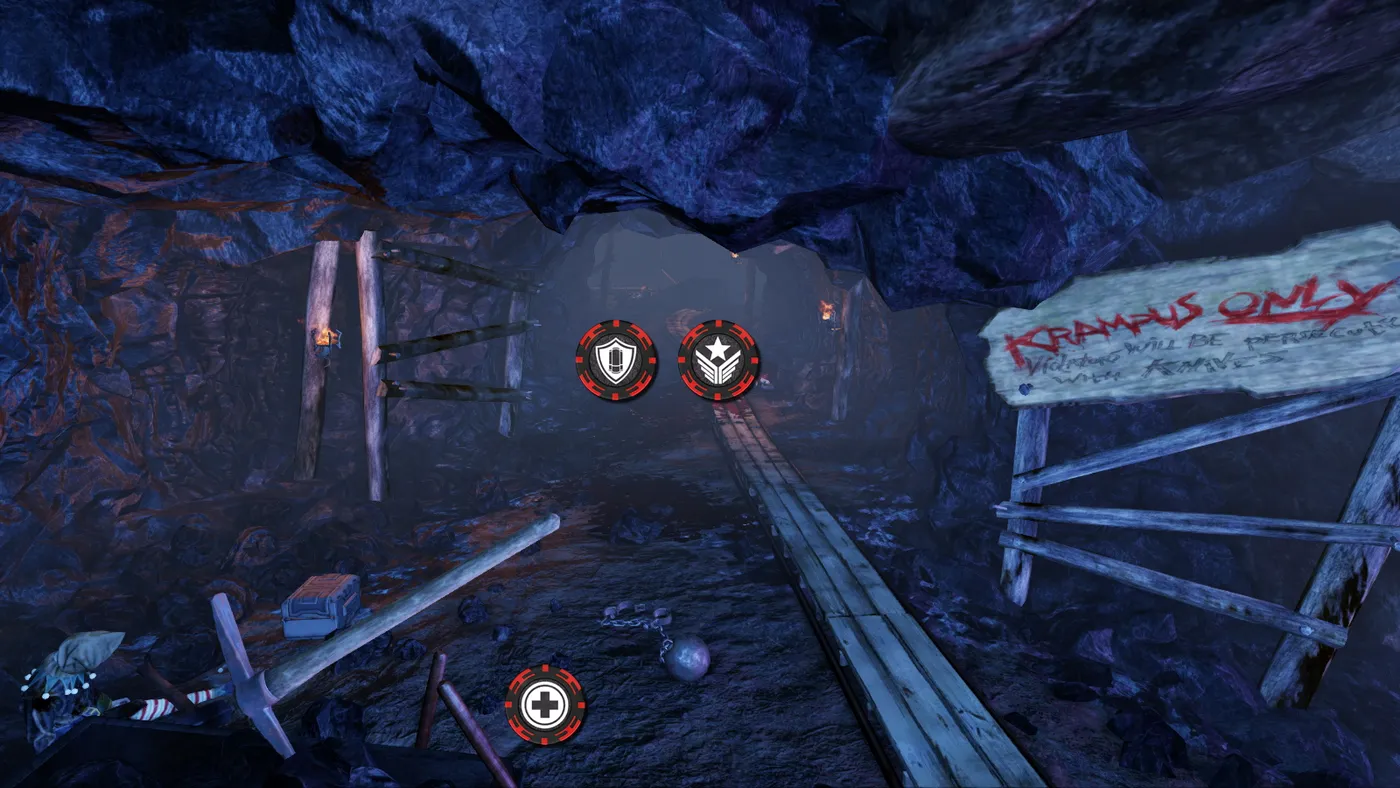
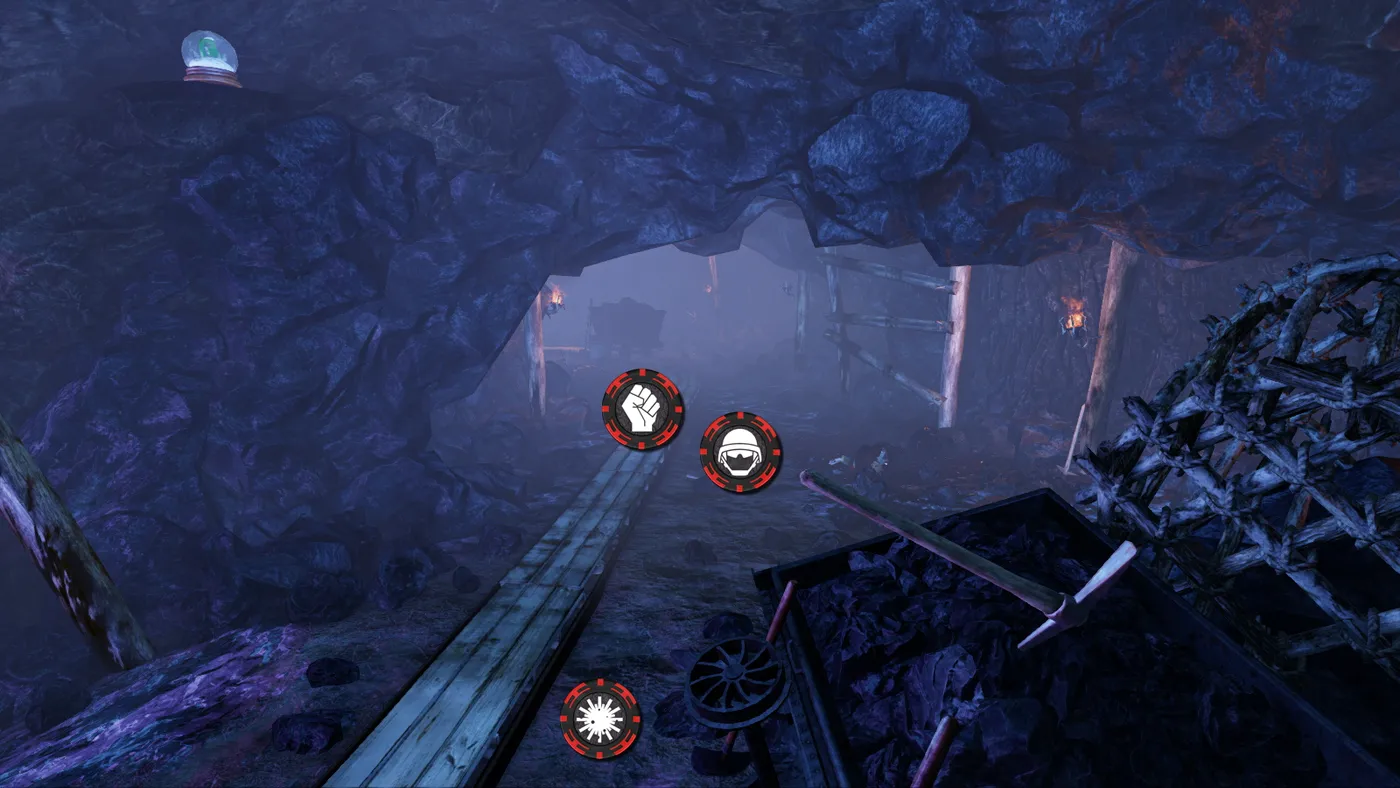 Krampus' Lair, stage 4
Stage 4, alternative
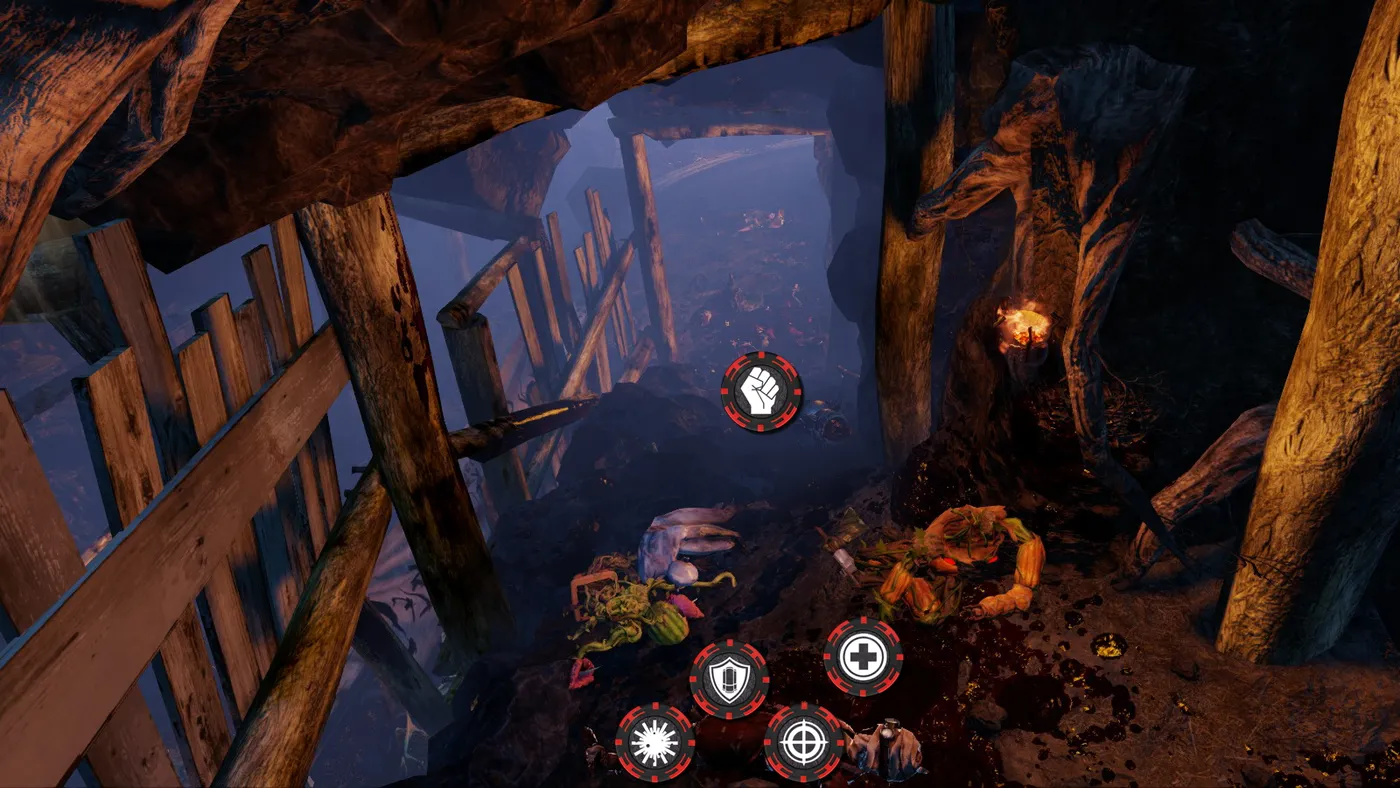
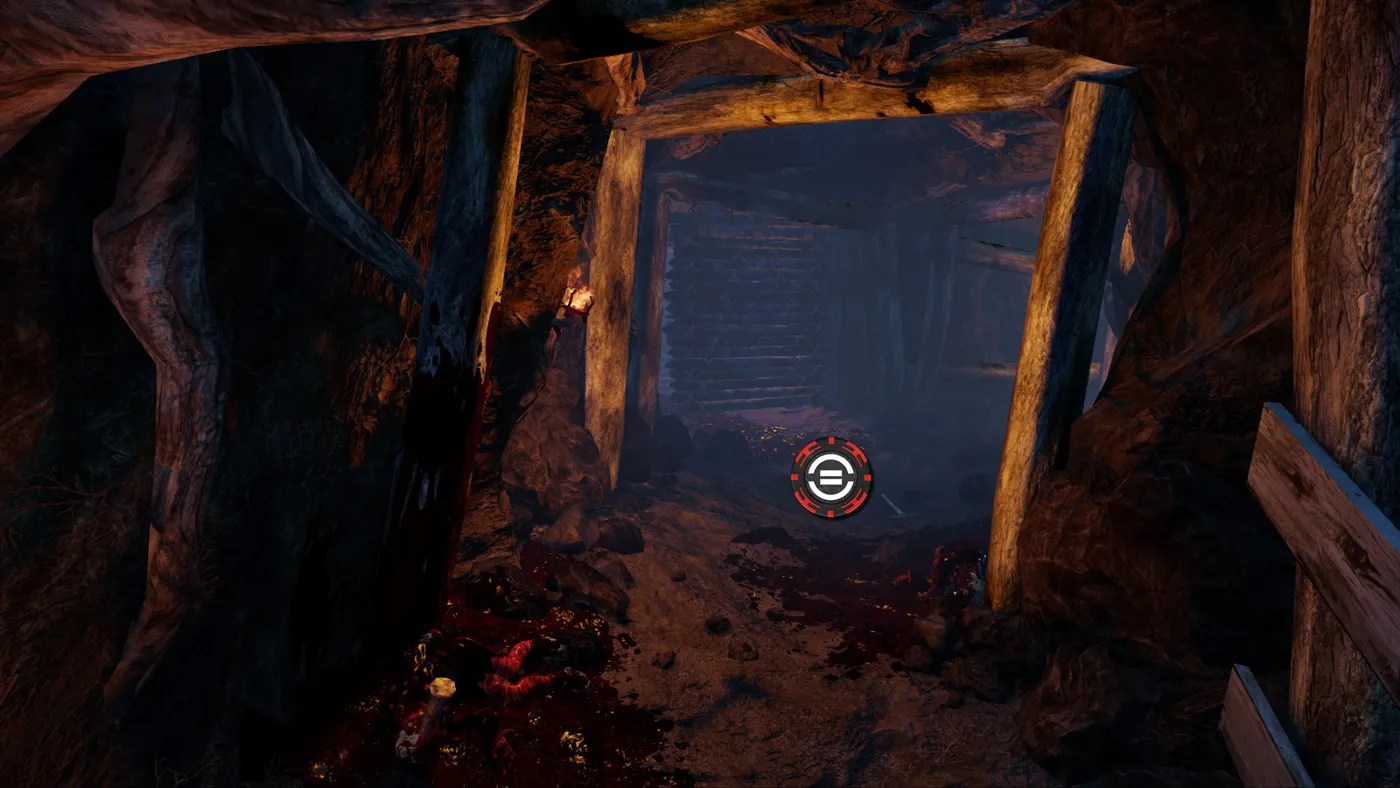 Krampus' Lair, stage 4, alternative
Powercore
 Powercore
Modes: Standard, Endless, Holdout. An abandoned Horzine production facility. If even Horzine left it, is that a good sign? Ten positions.
Position 1
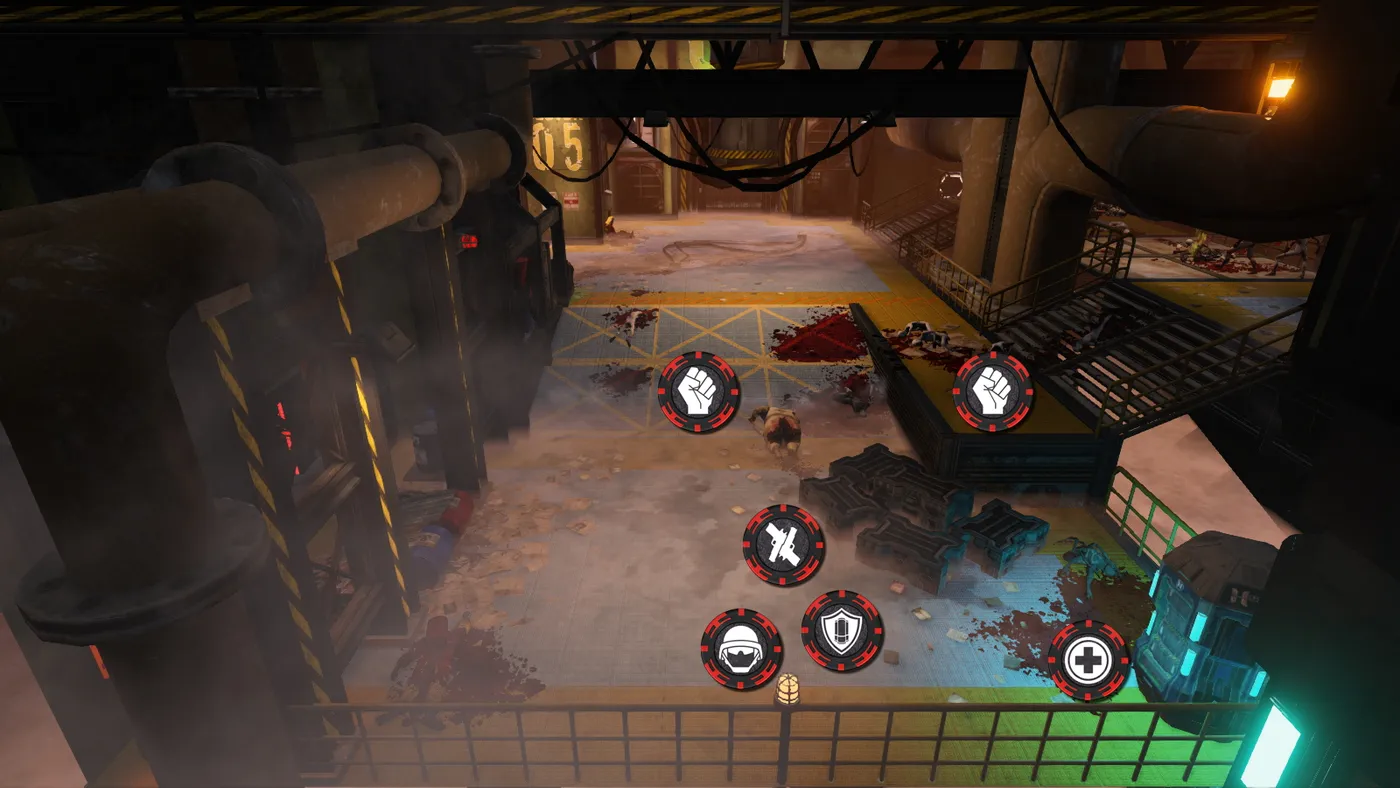 Powercore, position 1
Position 2
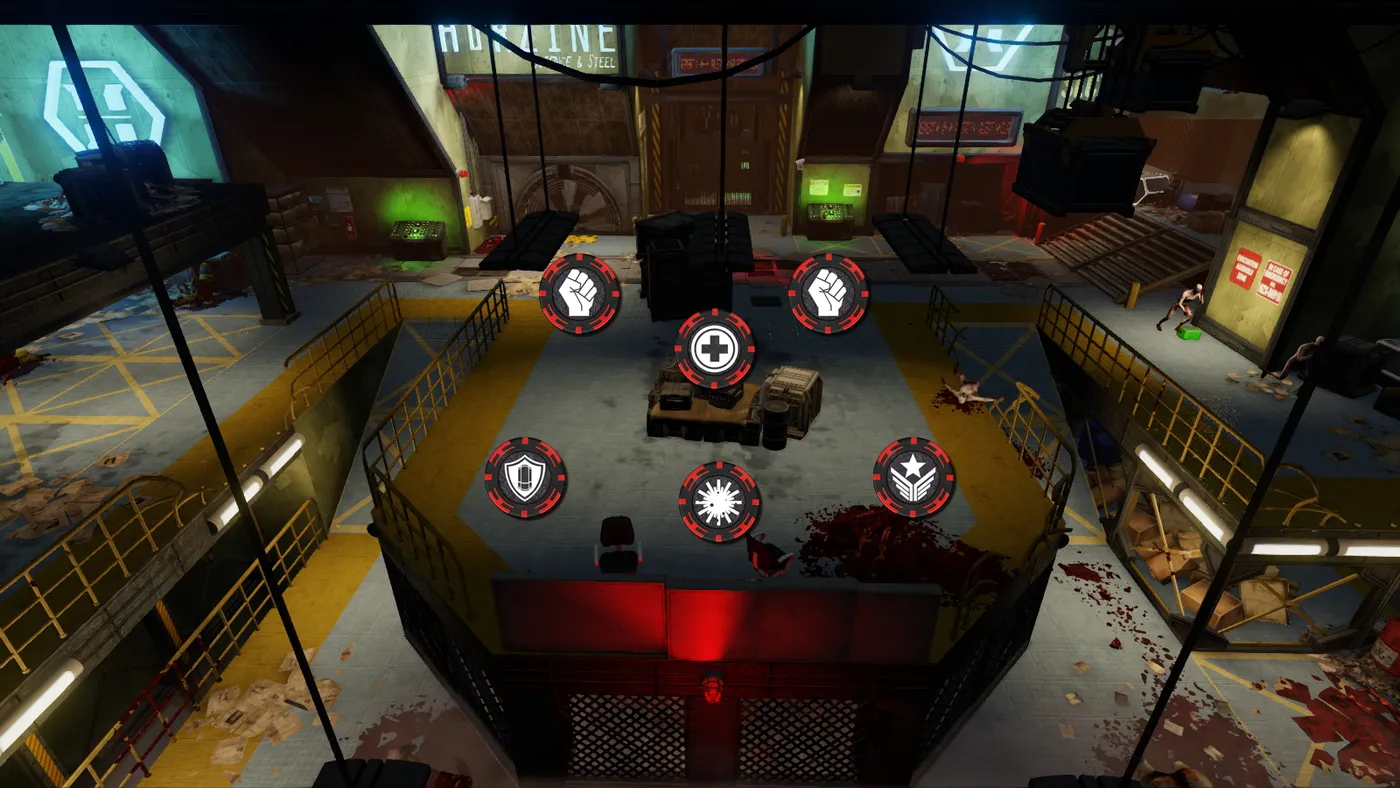 Powercore, position 2
Position 3
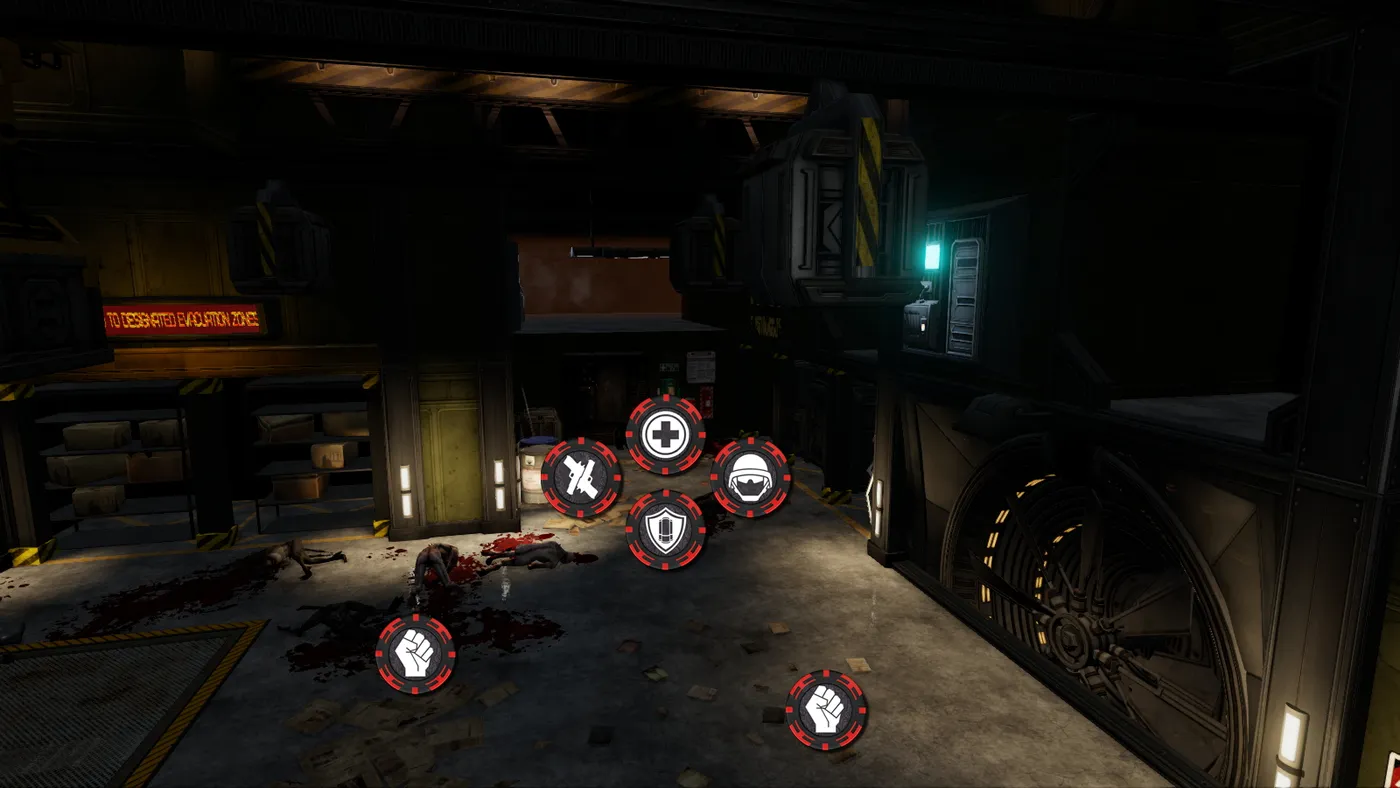 Powercore, position 3
Position 4
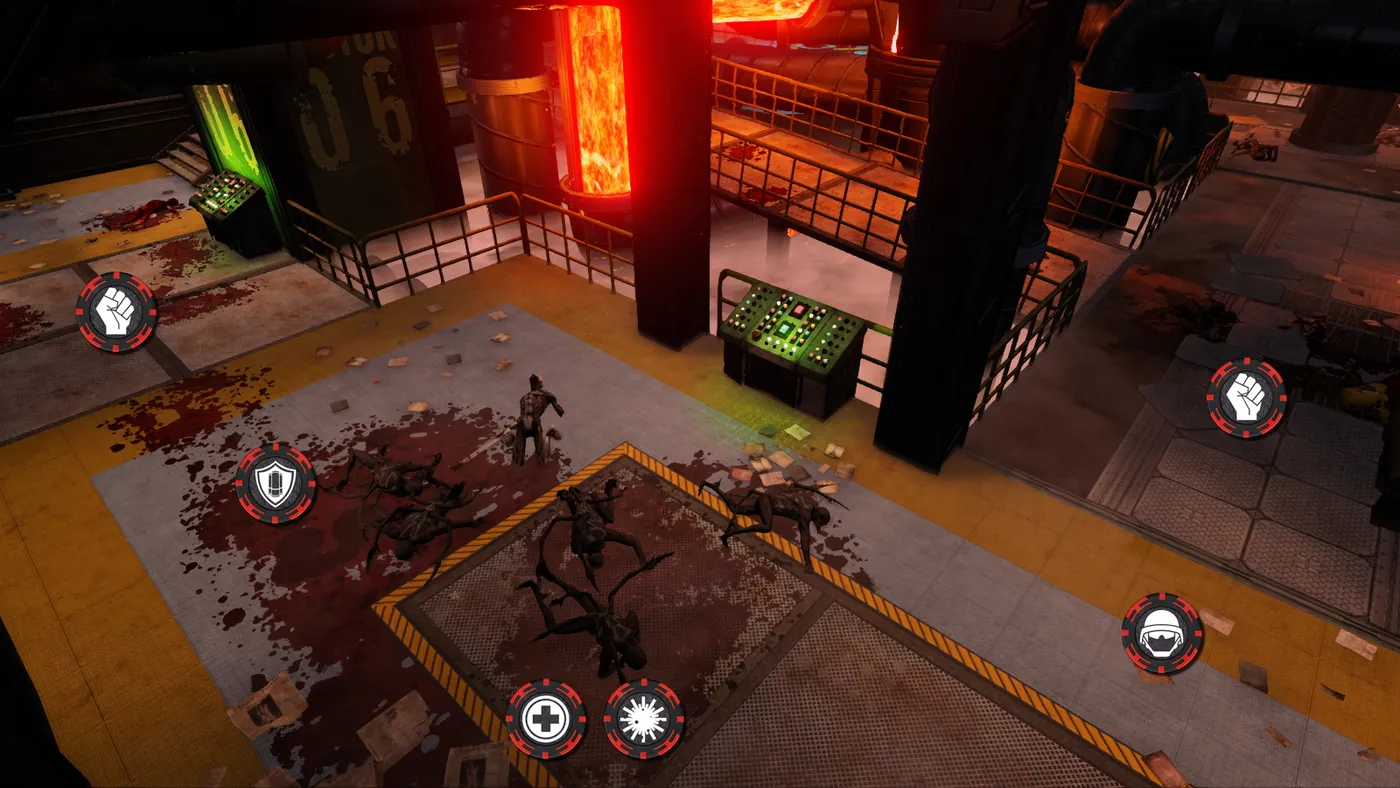 Powercore, position 4
Position 5
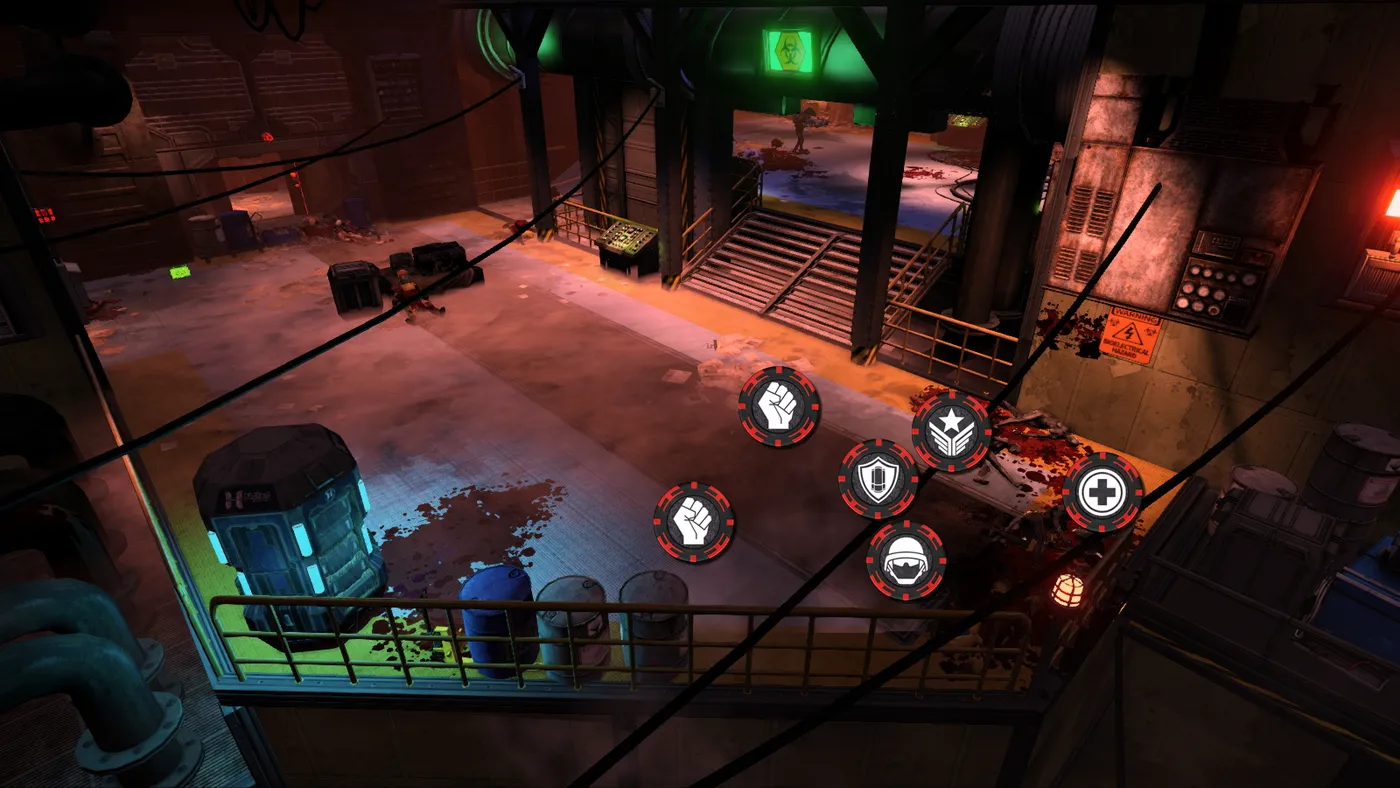 Powercore, position 5
Position 6
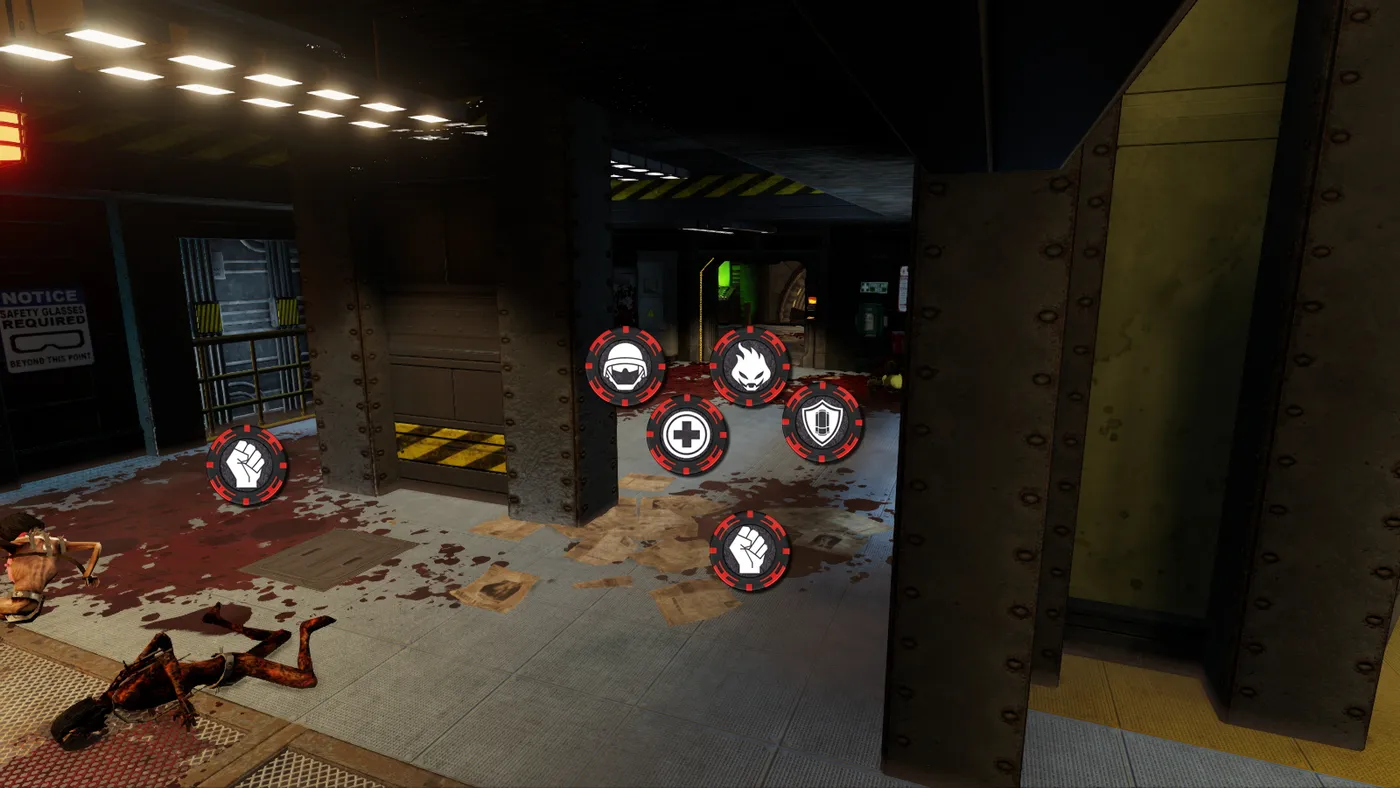 Powercore, position 6
Position 7
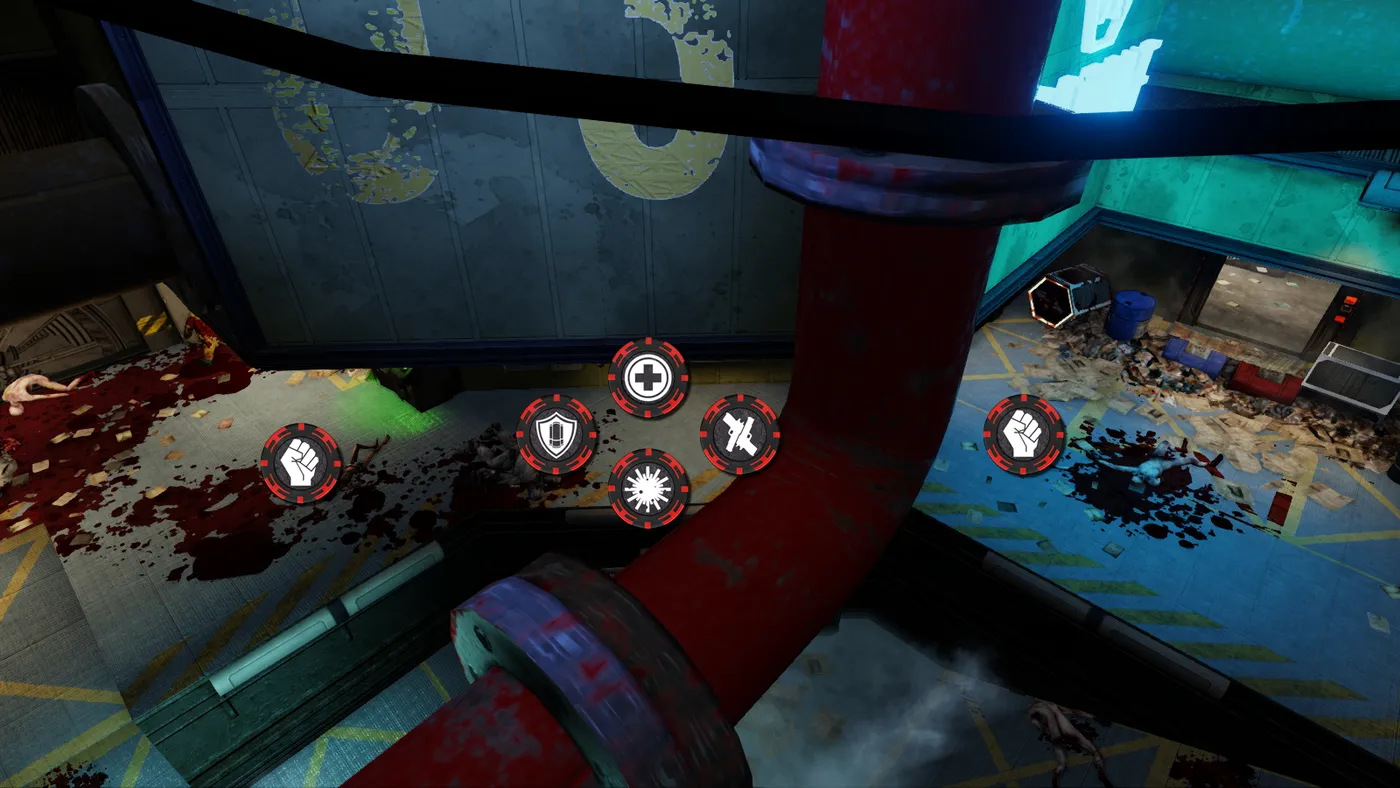 Powercore, position 7
Position 8
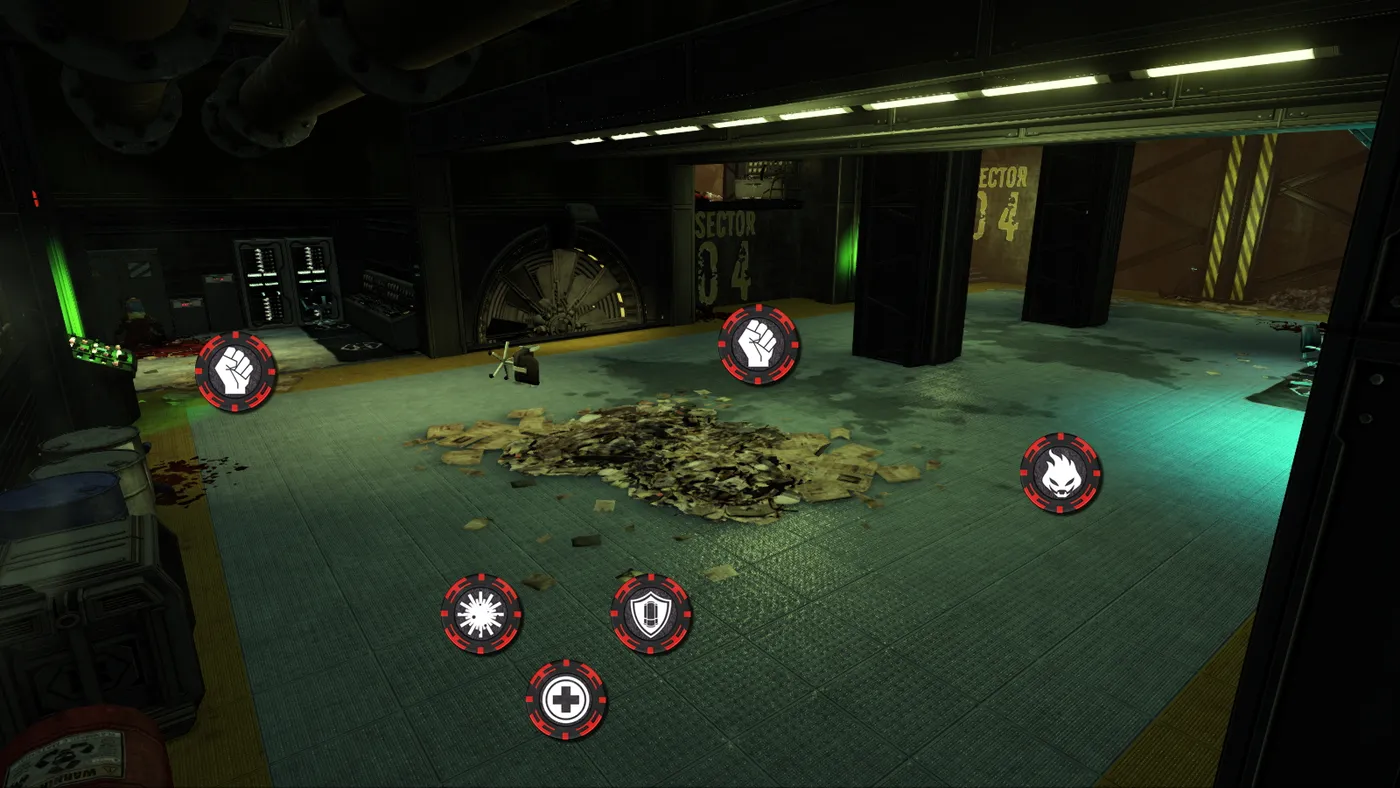 Powercore, position 8
Position 9
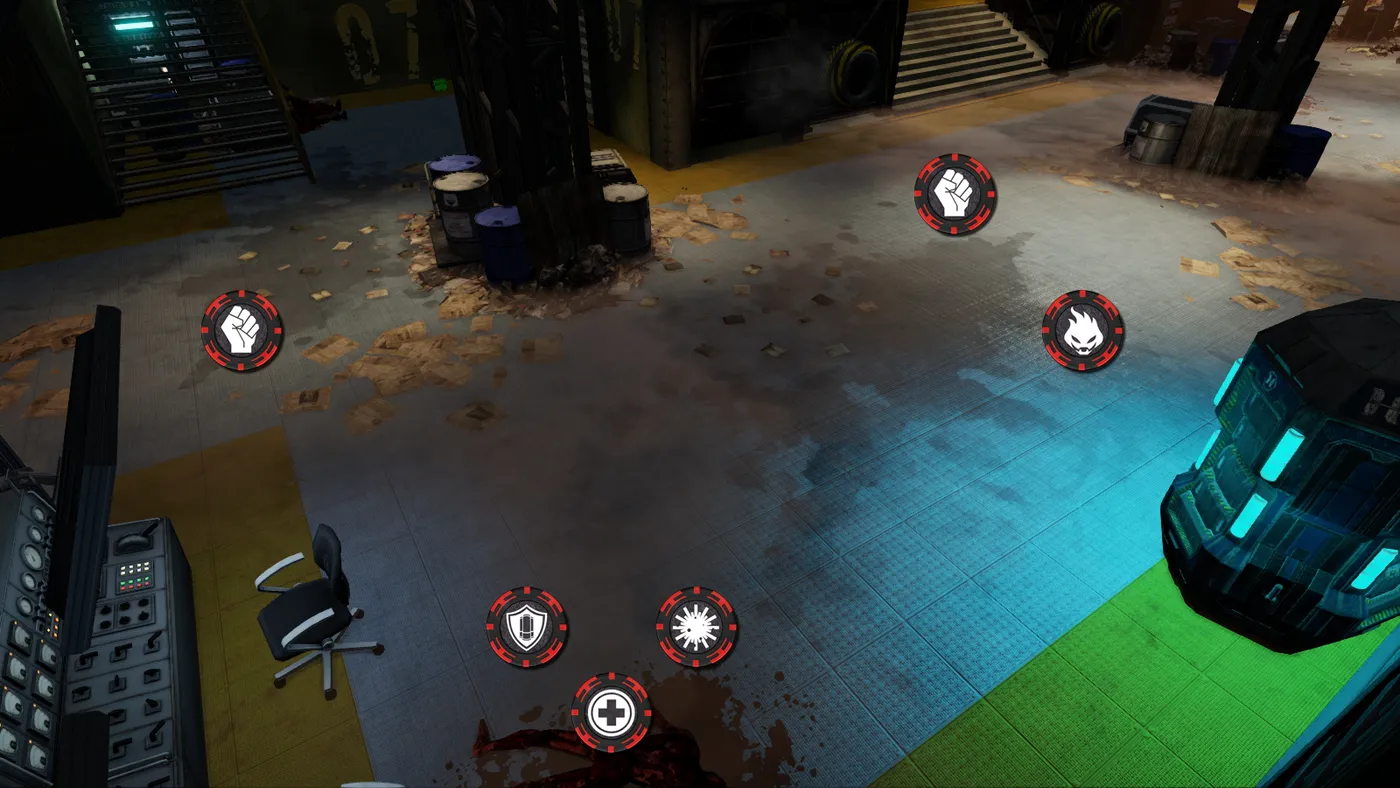 Powercore, position 9
Position 10
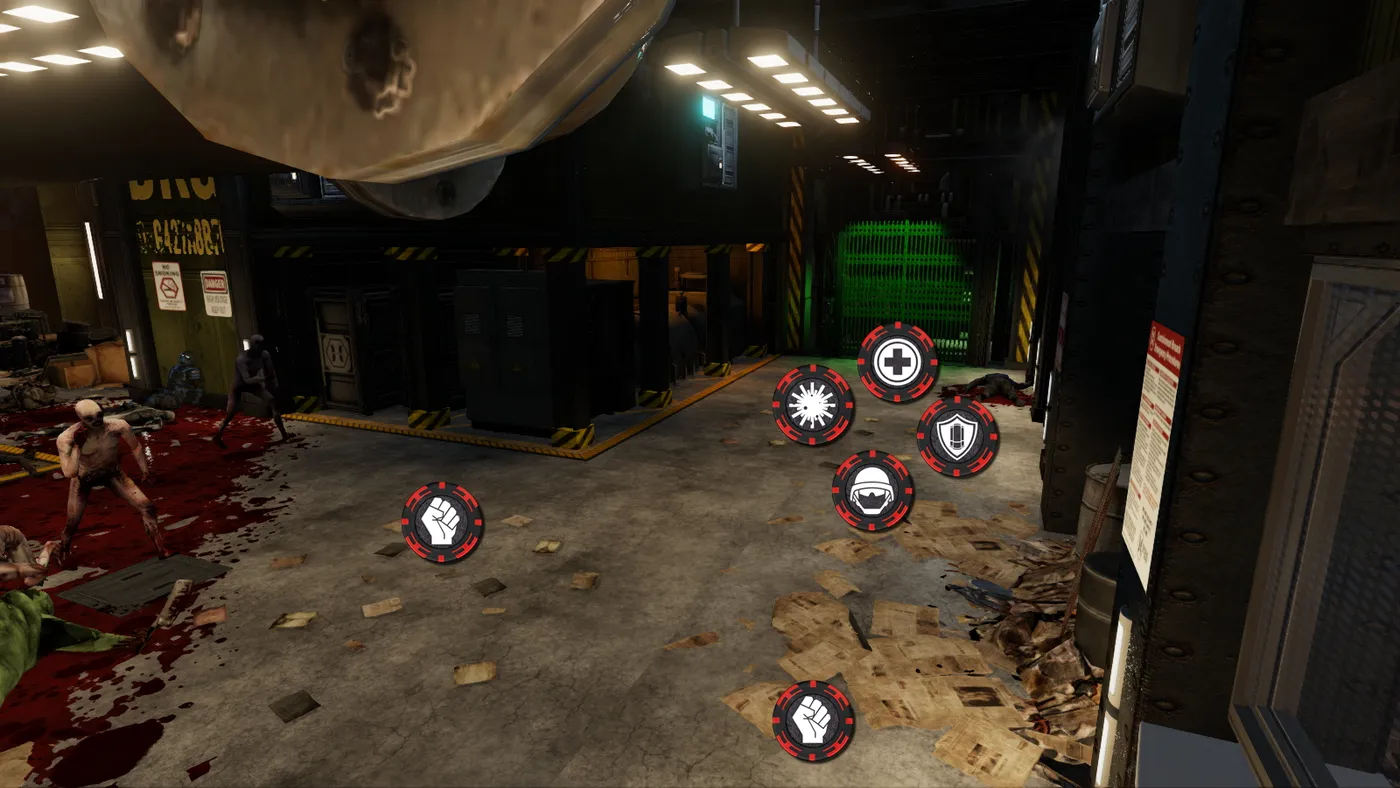 Powercore, position 10
DieSector
 DieSector
Modes: Endless. A Horzine test zone seized by the Patriarch, who added traps from flamethrowers to electric walls. Endless mode only.
Position 1: Available from the start of the game.
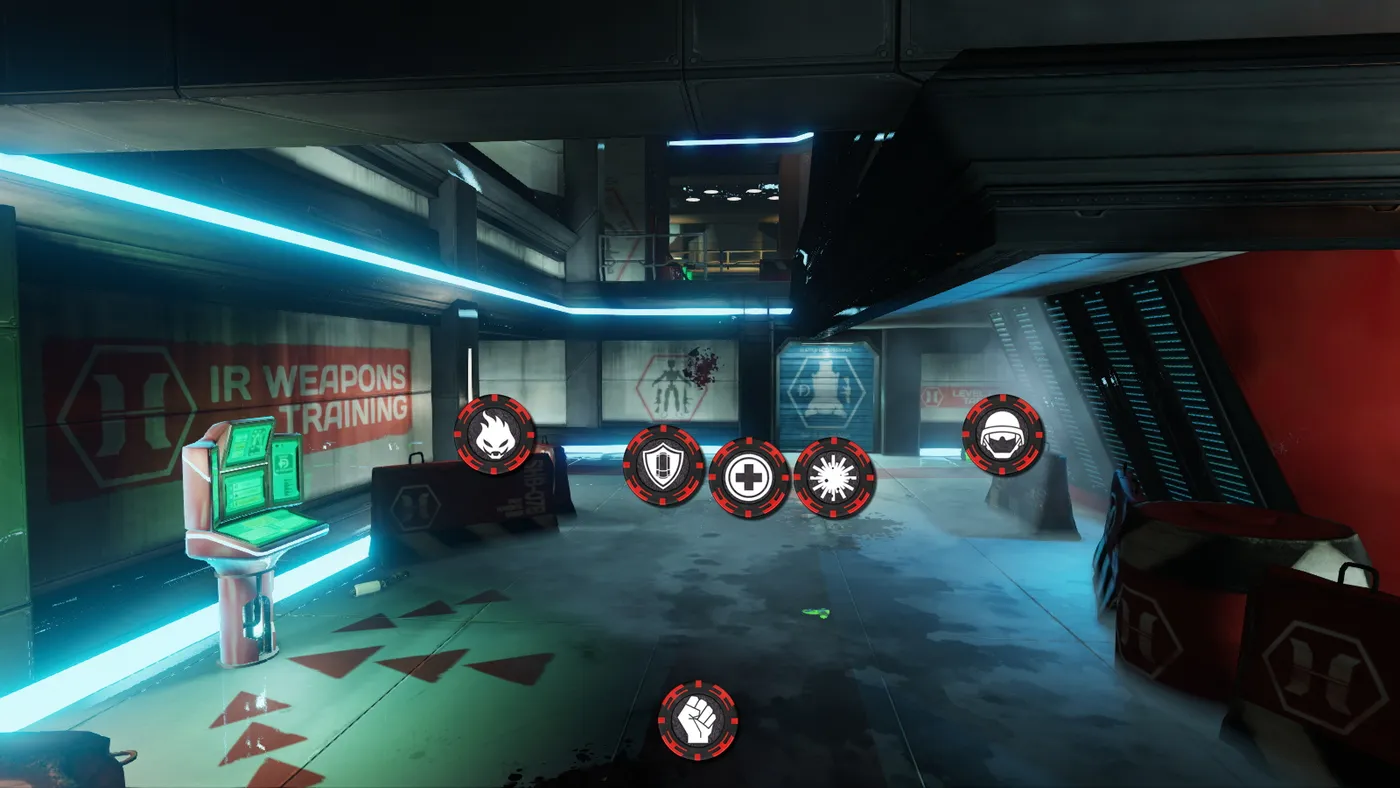 DieSector, position 1
Position 2: Available after wave 5 (after the first boss).
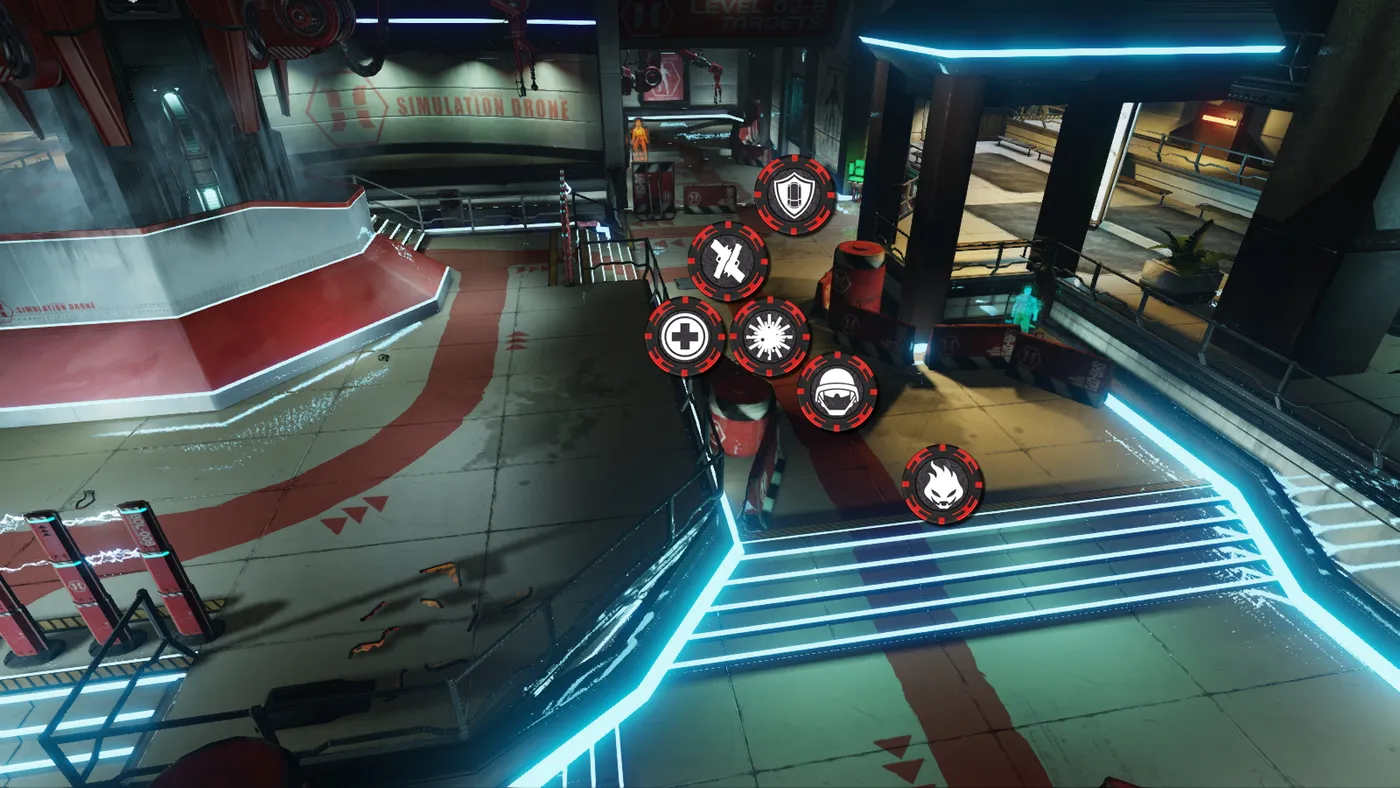 DieSector, position 2
Position 3: Available after wave 8.
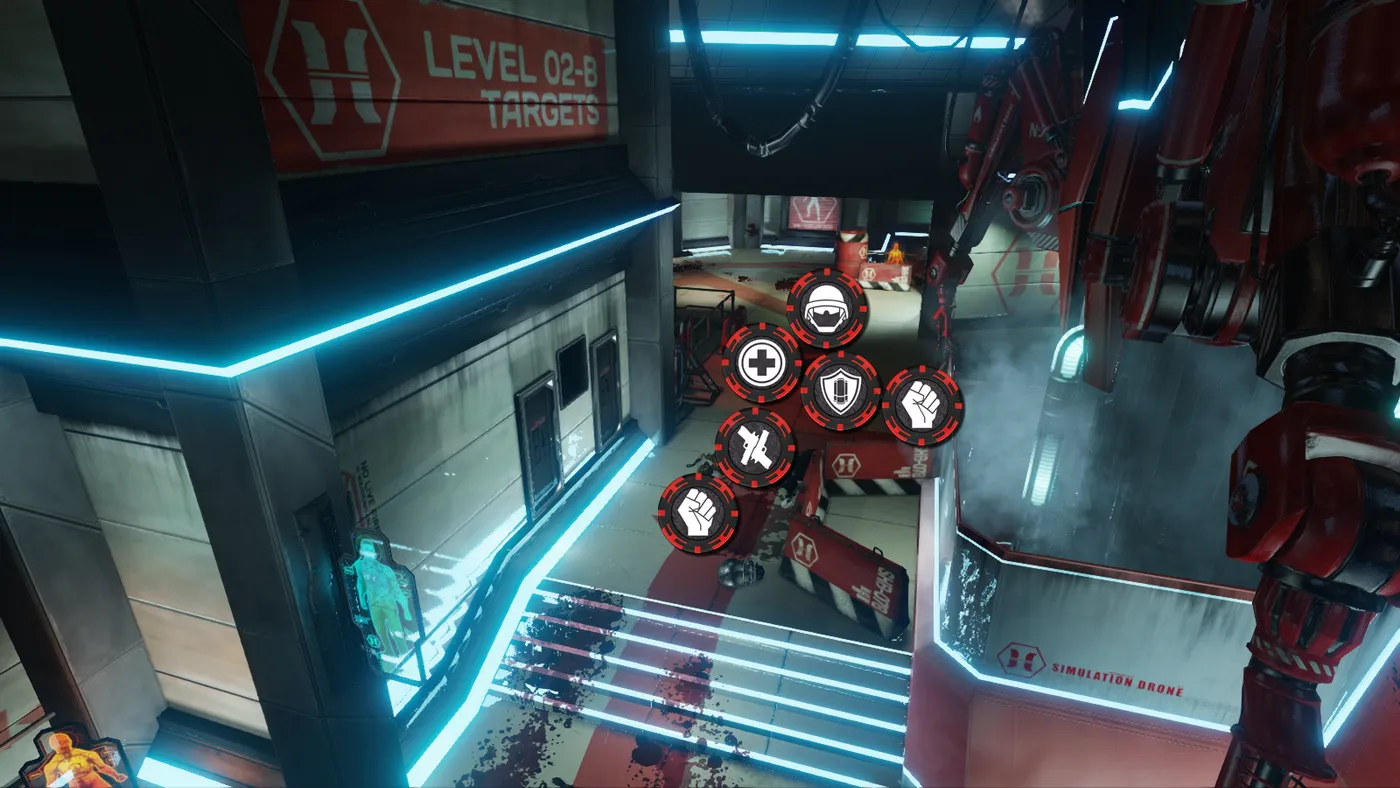 DieSector, position 3
Lockdown
 Lockdown
Modes: Standard, Endless. You wake from cryosleep on a ship orbiting a red giant. Zeds have wrecked every compartment.
Position 1: Narrow doorways and two entrances make this easy to defend and let Demolitionists and Firebugs rack up hundreds of thousands of damage. The danger is small zeds that crawl out of the ceiling and floor vents.
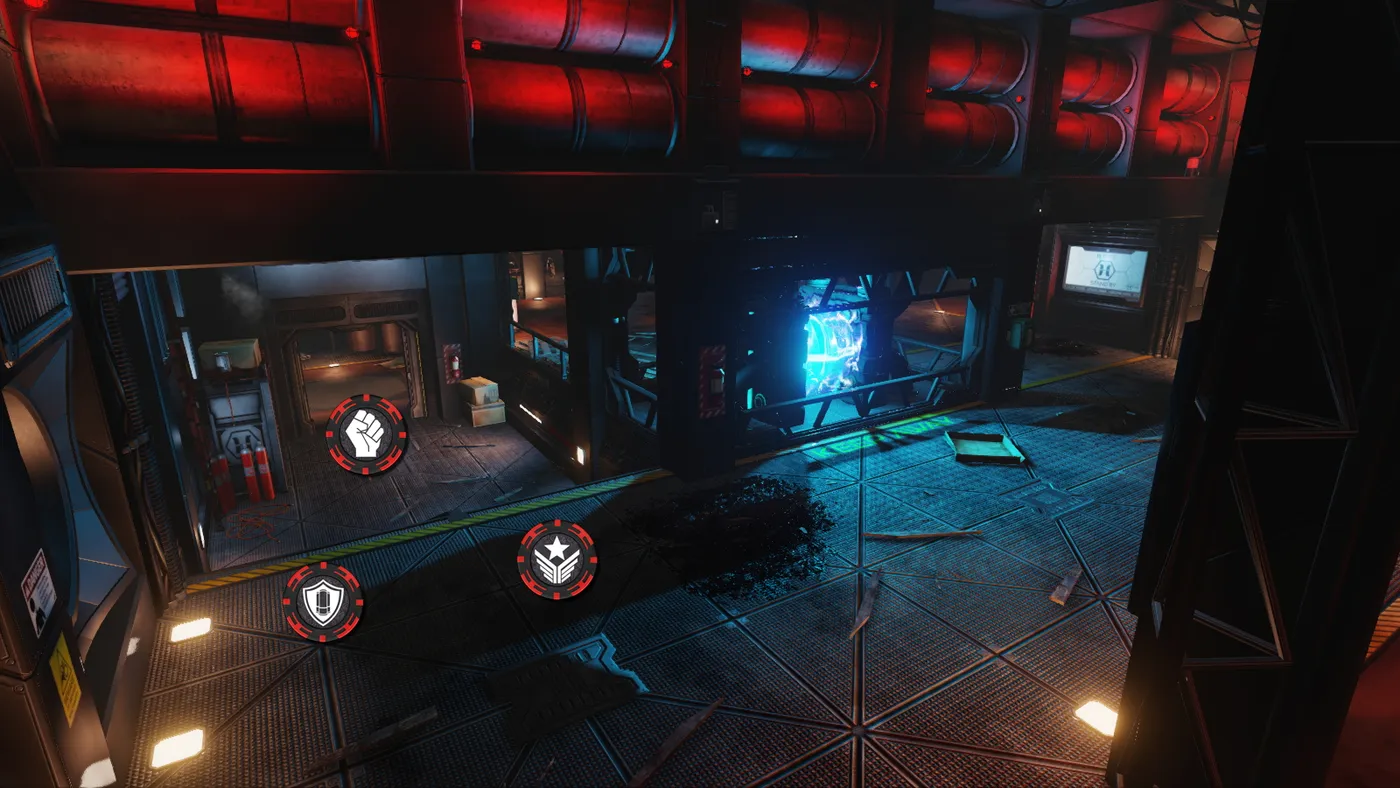
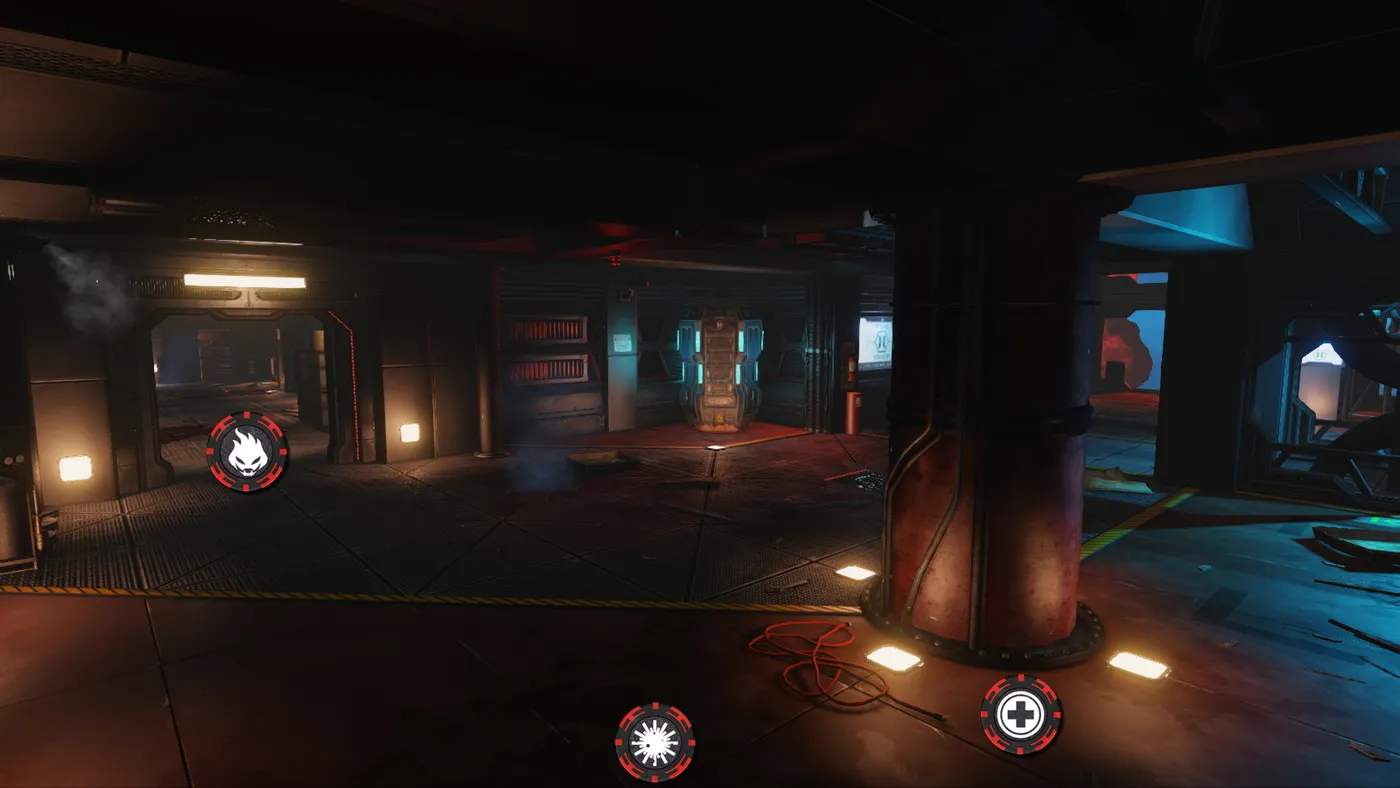 Lockdown, position 1
Airship
 Airship
Modes: Standard, Endless, Objectives. Lockhart is back and his problems never end: the sky is the most dangerous place.
Position 1: A good defence: a Berserker above holds the small passage while the deck below gives a great line of fire for Sharpshooter and Commando.
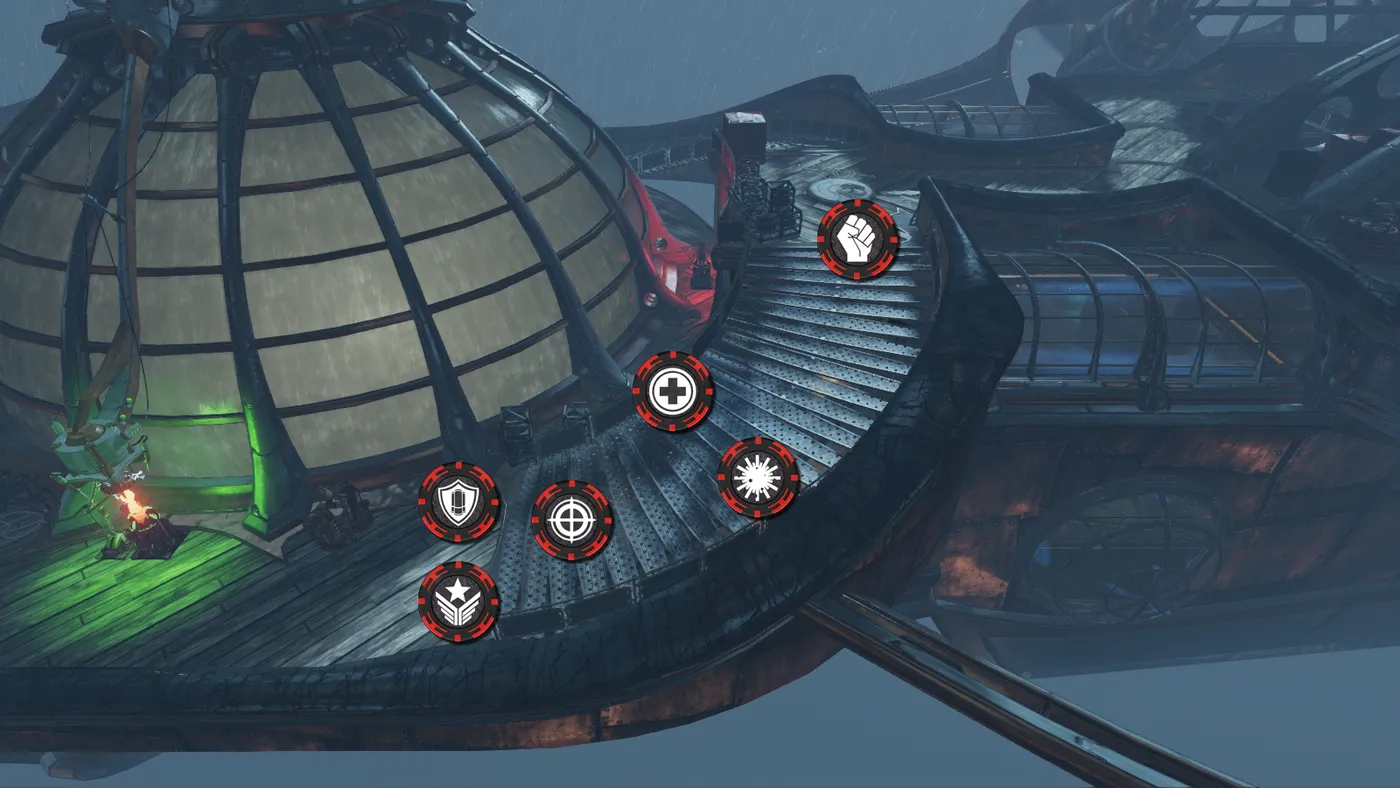 Airship, position 1
Monster Masquerade
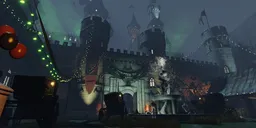 Monster Masquerade
Modes: Standard, Endless. The hottest underground party where nobody has survived yet.
Position 1: A narrow passage makes this a good defence with a Berserker.
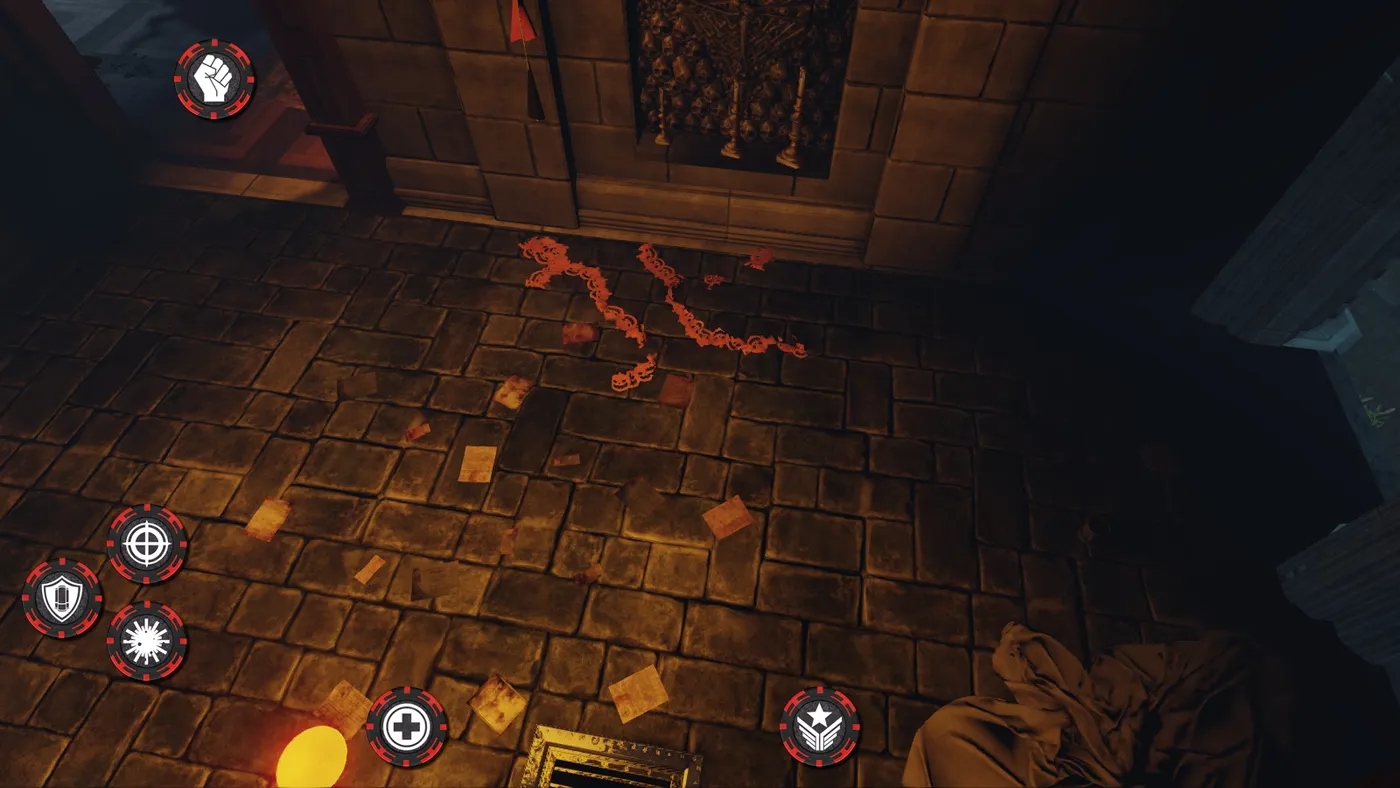 Monster Masquerade, position 1
Position 2: The standard position not far from the start of the map.
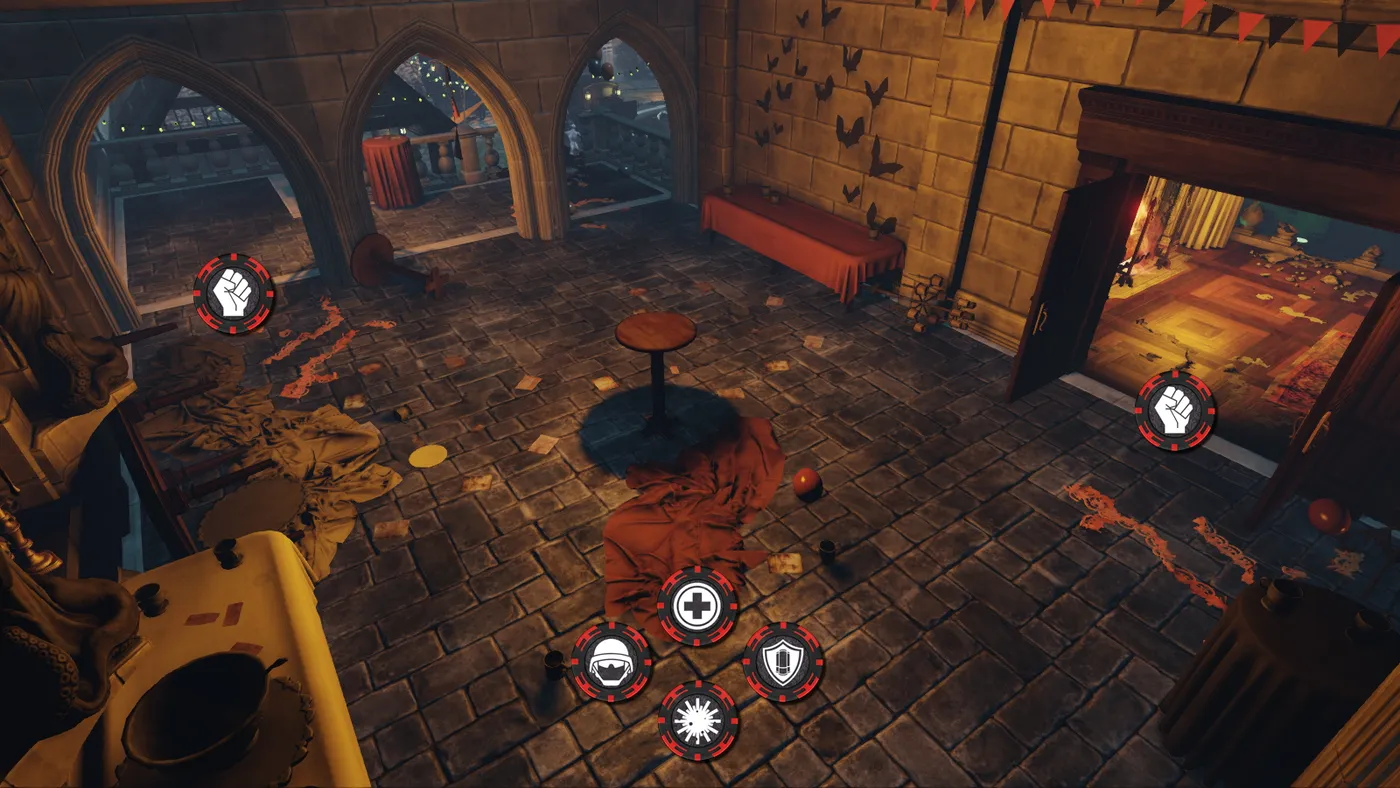 Monster Masquerade, position 2
Position 3: One of the options inside the castle.
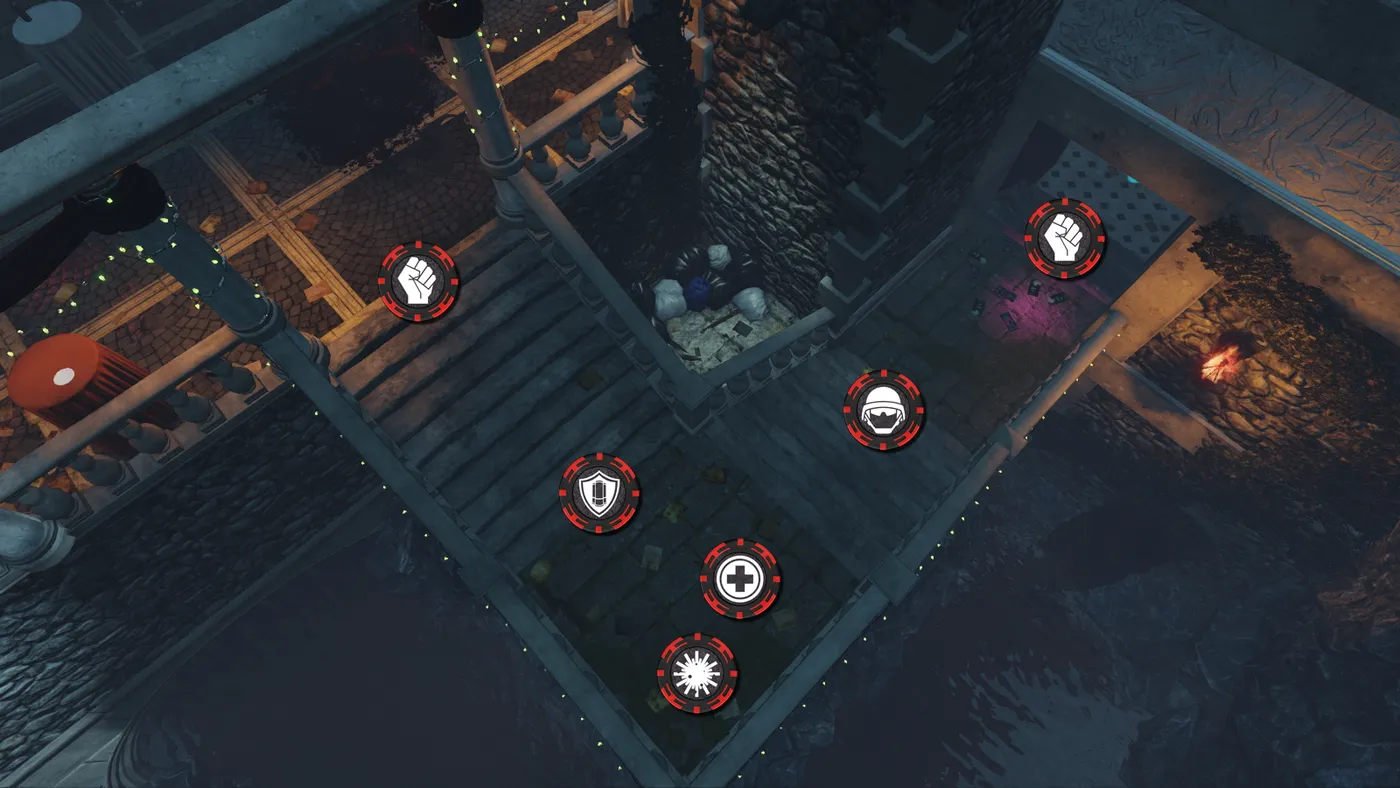 Monster Masquerade, position 3
Position 4: Another option for defending on the dance floor.
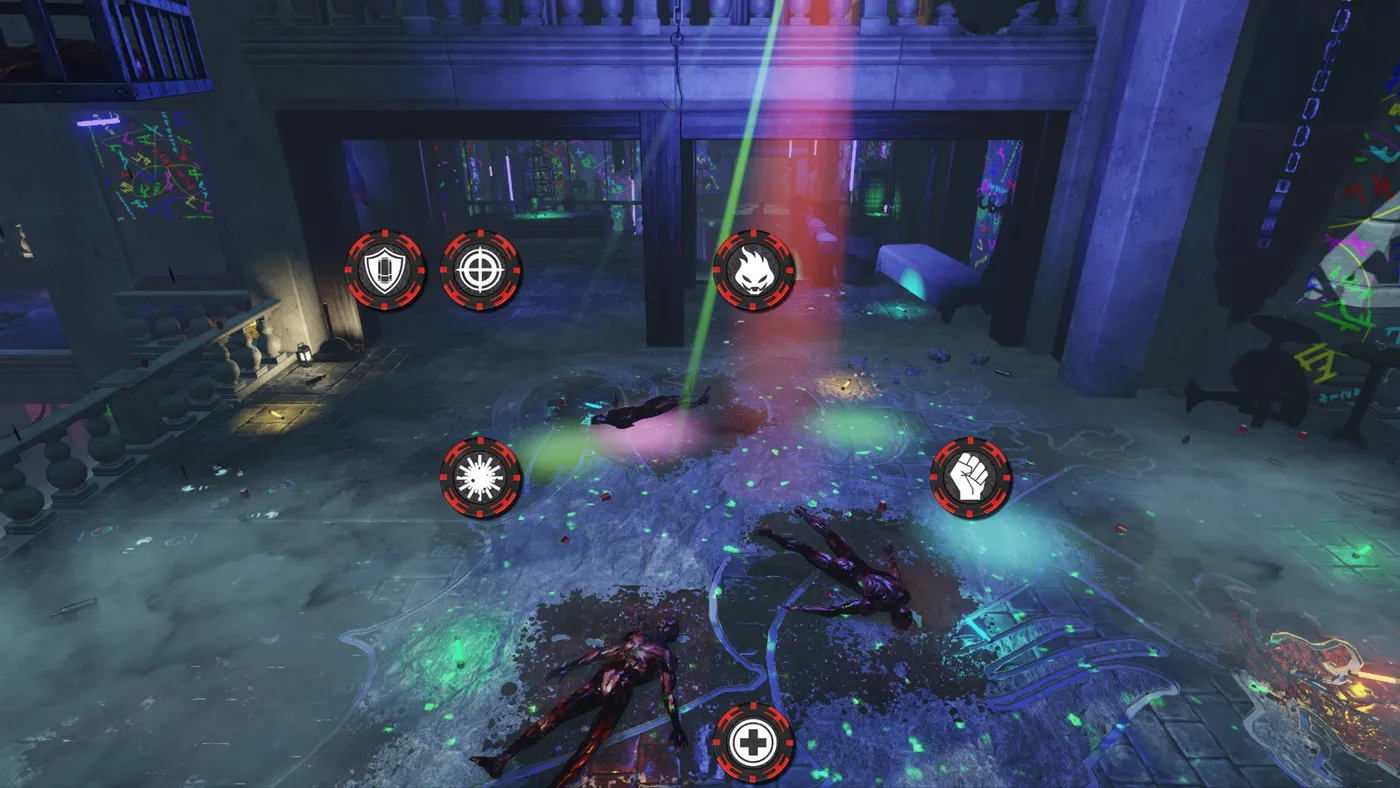 Monster Masquerade, position 4
Position 5: A decent defensive spot for the final waves.
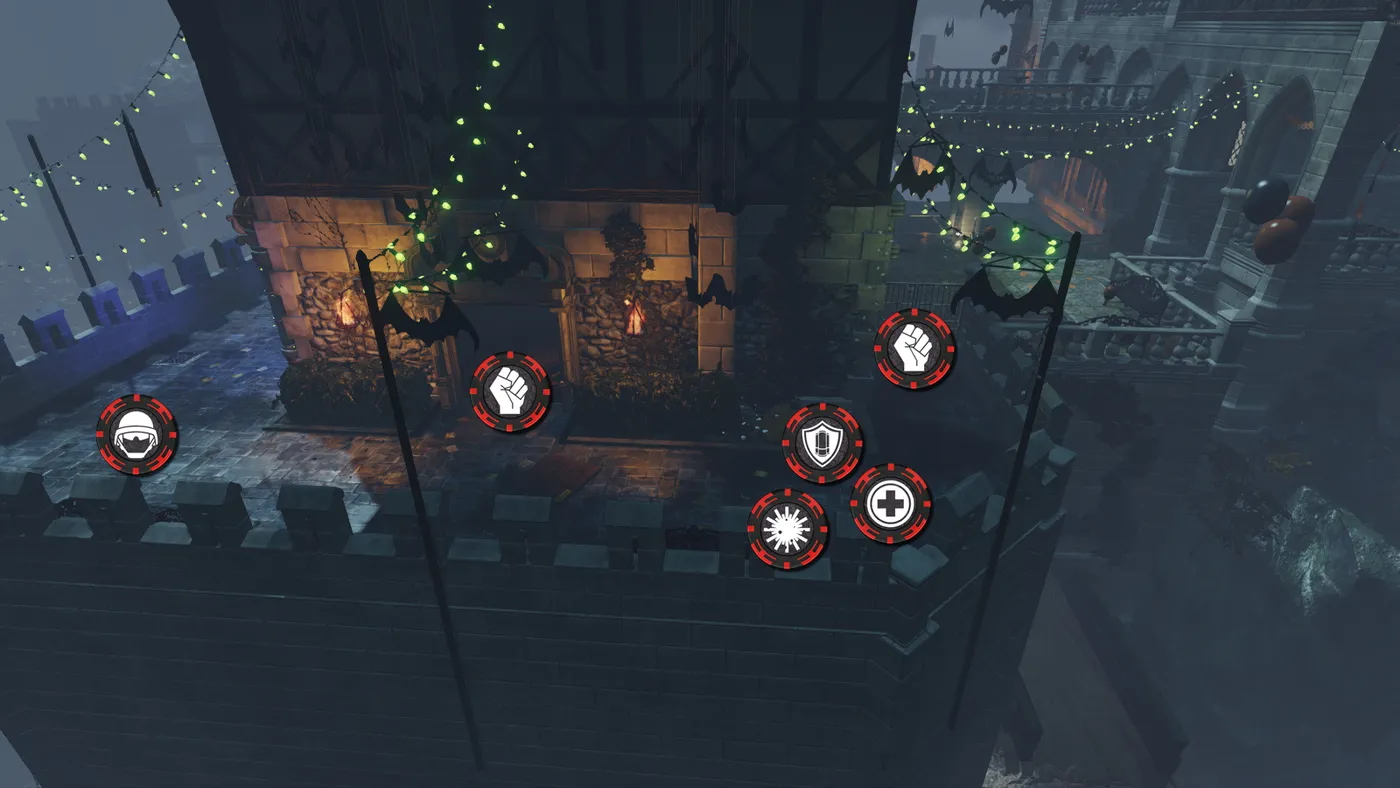 Monster Masquerade, position 5
Shopping Spree
 Shopping Spree
Modes: Standard, Endless. Something bad is hiding in these shopping halls: customers just like you.
Position 1: The standard position in the bar.
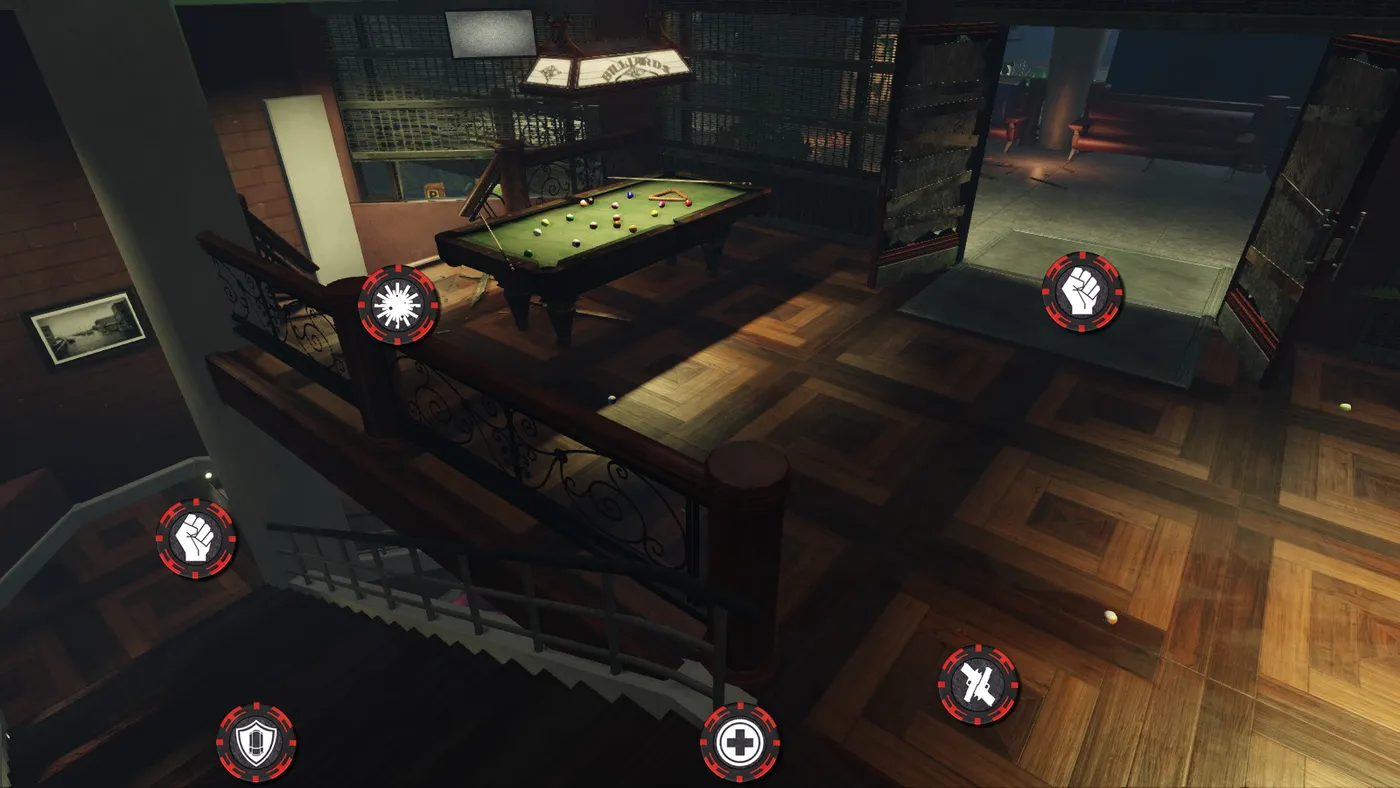 Shopping Spree, position 1
Position 2: The standard position in the cafe.
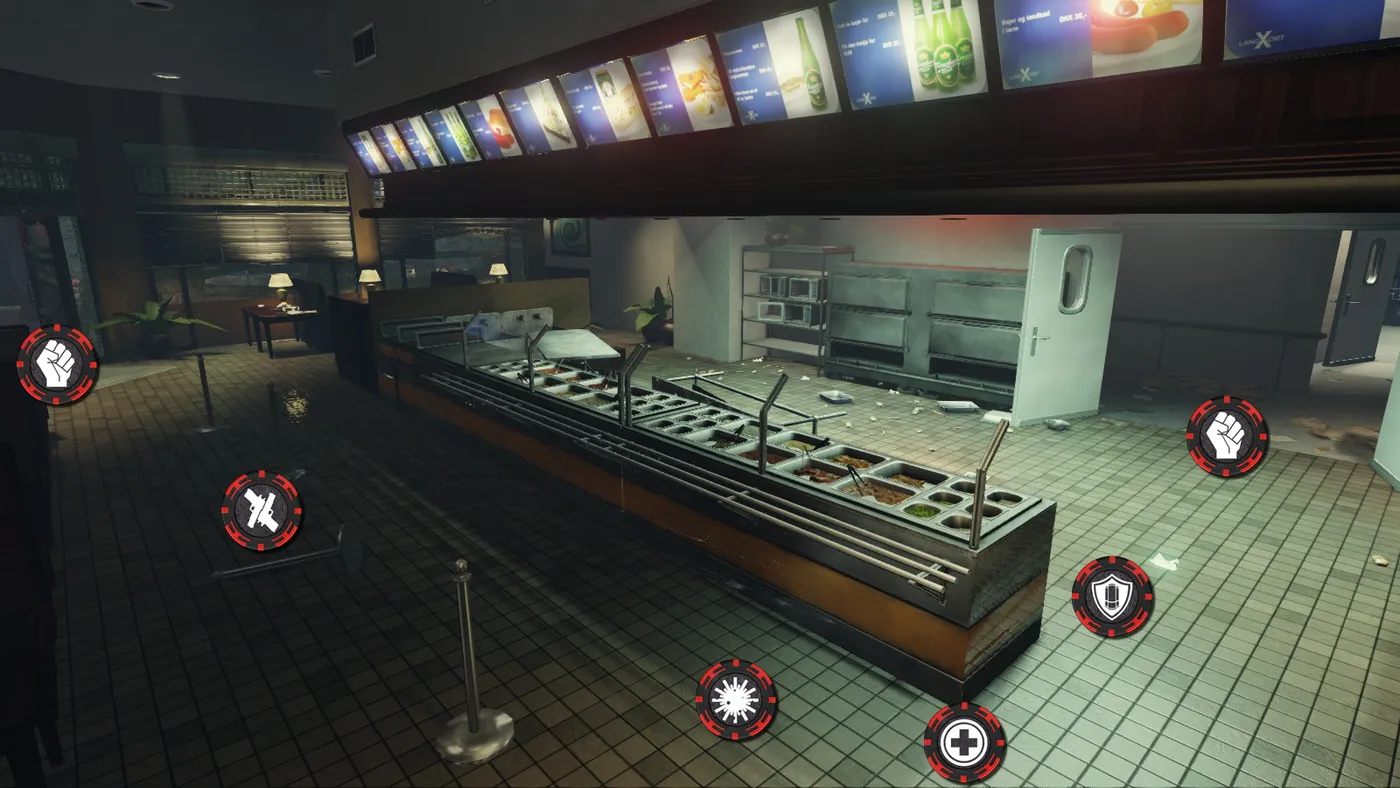 Shopping Spree, position 2
Position 3: A more compact variant in a shop on the second floor.
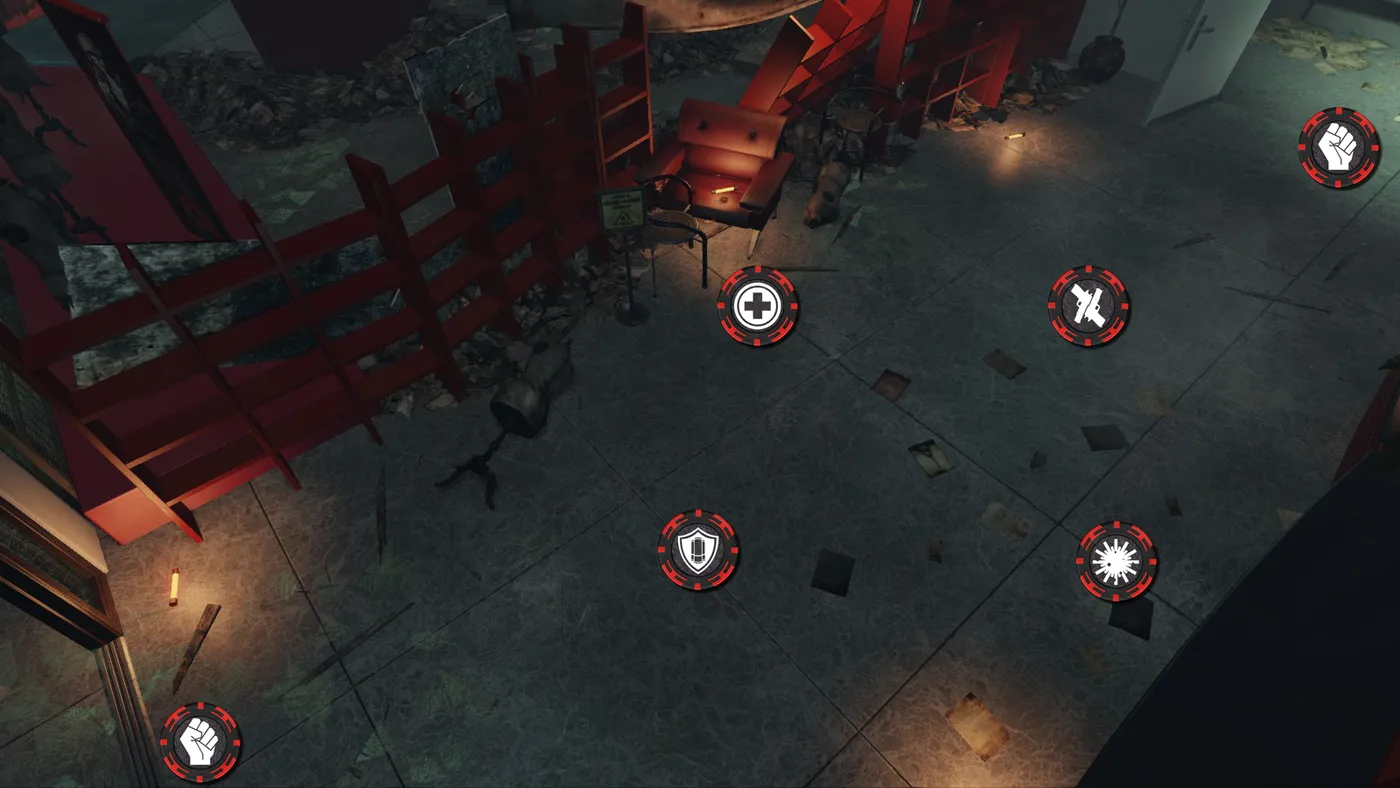 Shopping Spree, position 3
Position 4: Wild stuff: defending in the elevator shaft.
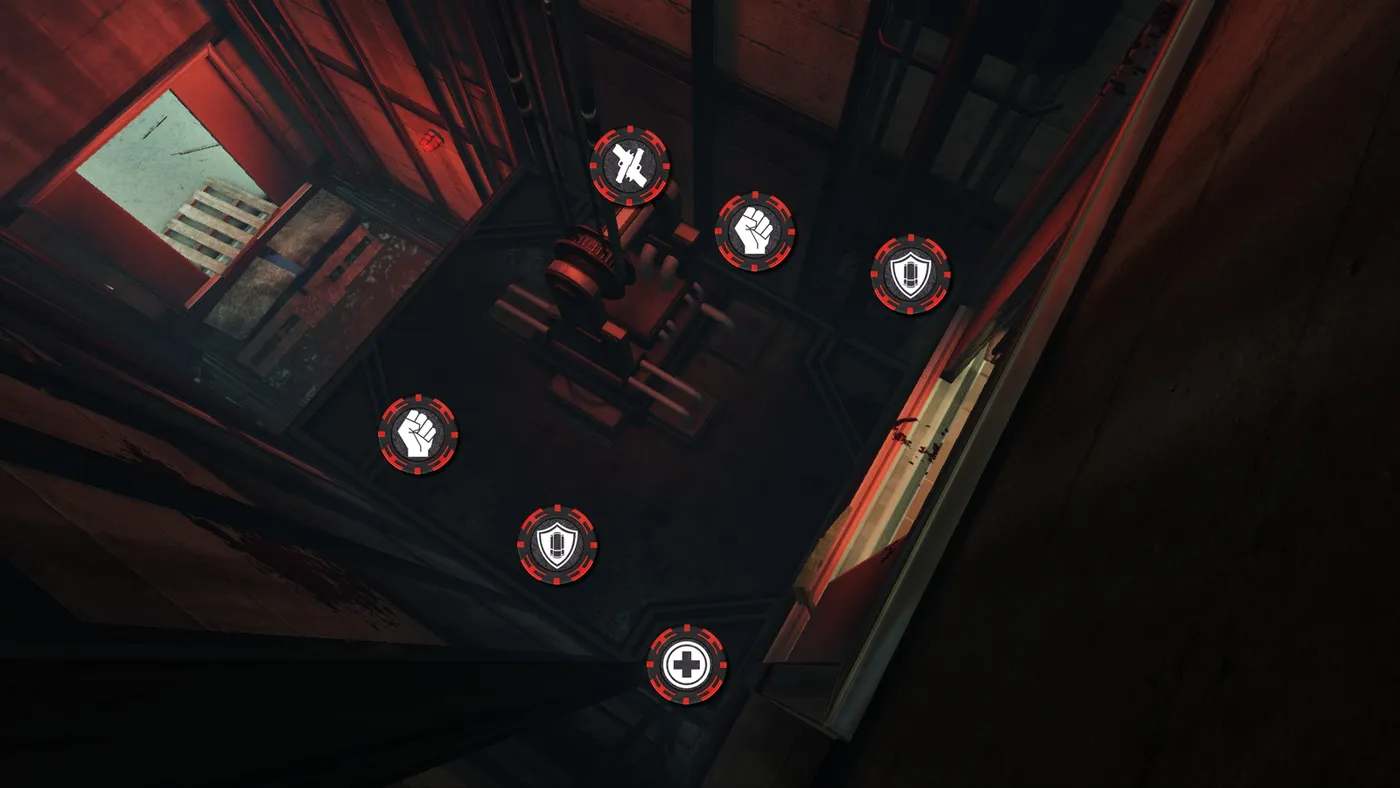 Shopping Spree, position 4
Santa's Workshop
 Santa's Workshop
Modes: Standard, Endless, Objectives. Break into the workshop, fetch the sleigh, and build a special present for Krampus. In Endless there are no objectives and the whole map is open, so positions matter. During the boss wave everyone is teleported to the final location wherever they were.
Position 1
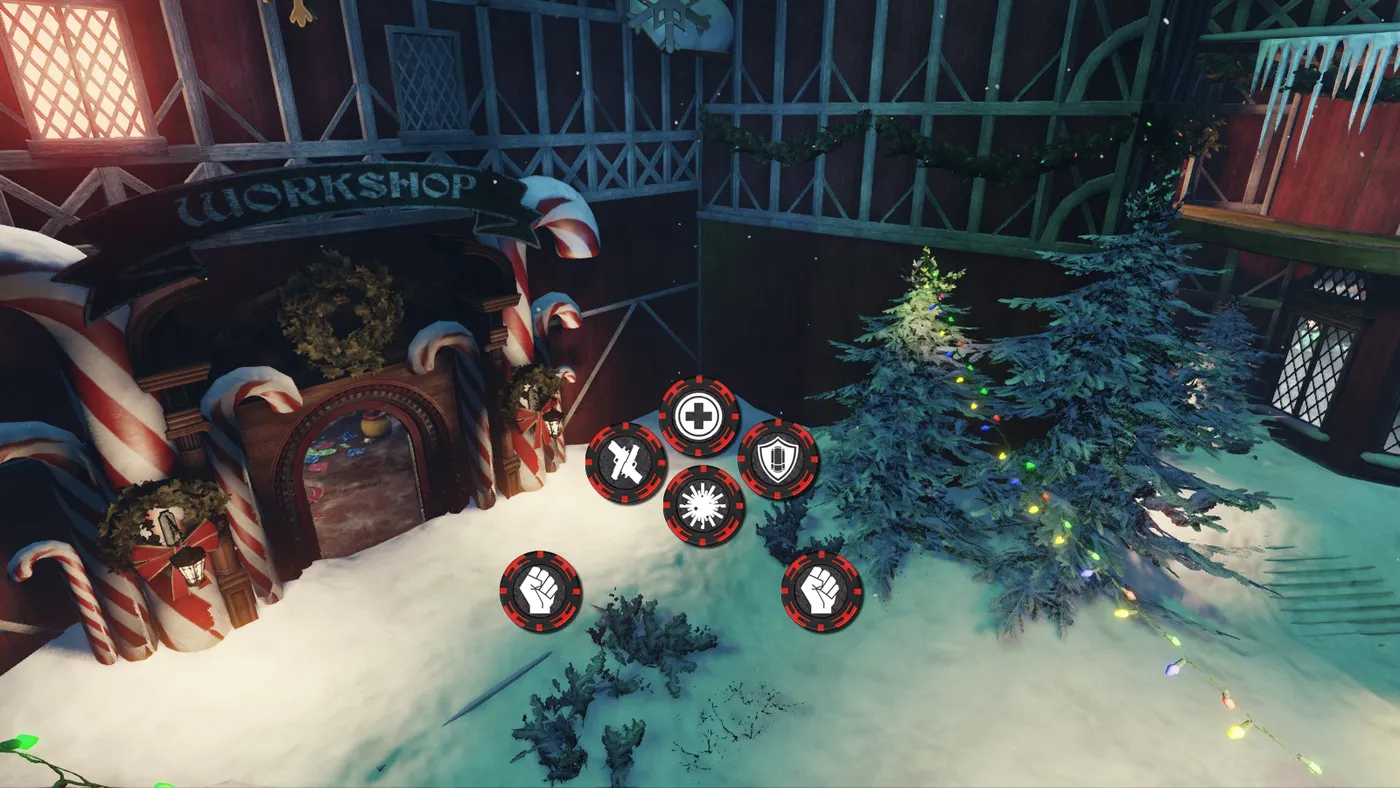 Santa's Workshop, position 1
Position 2
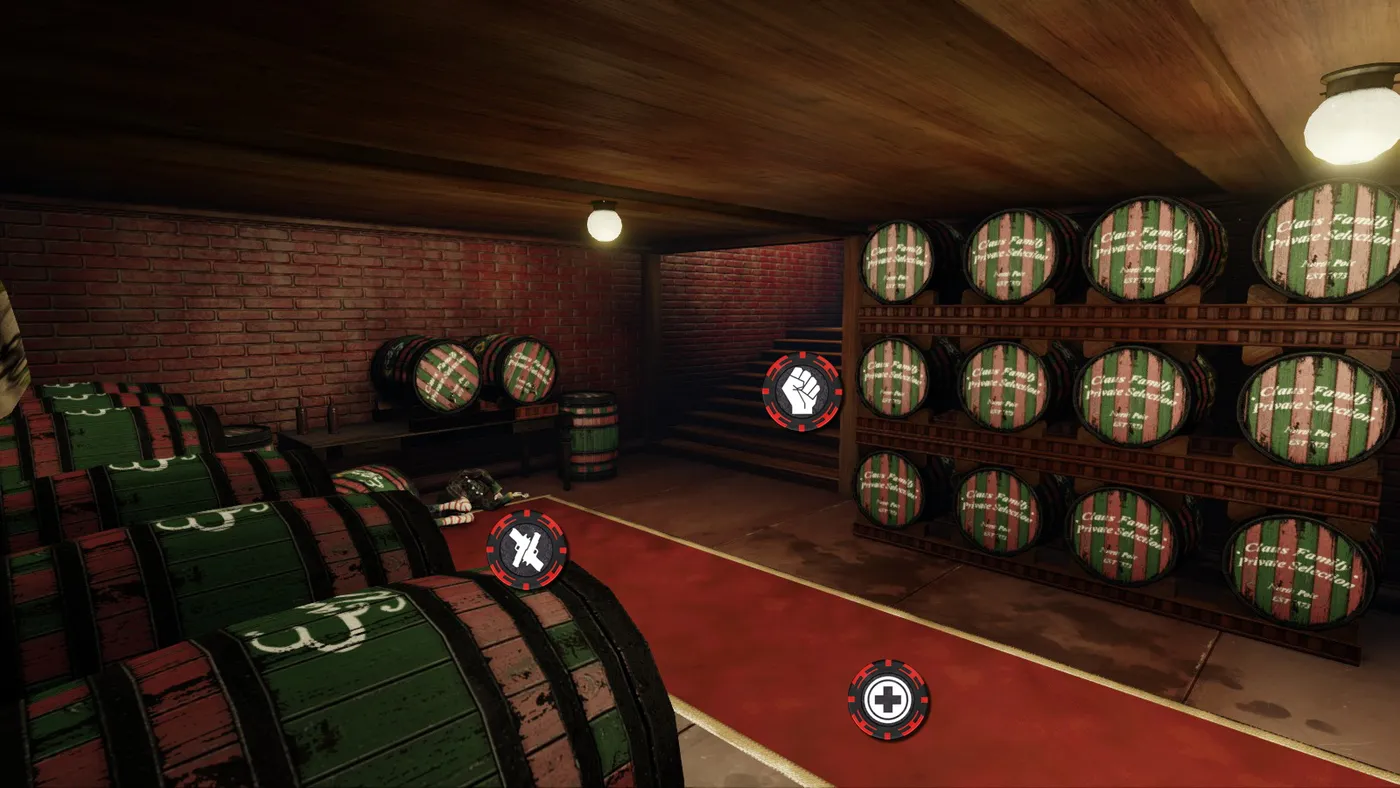
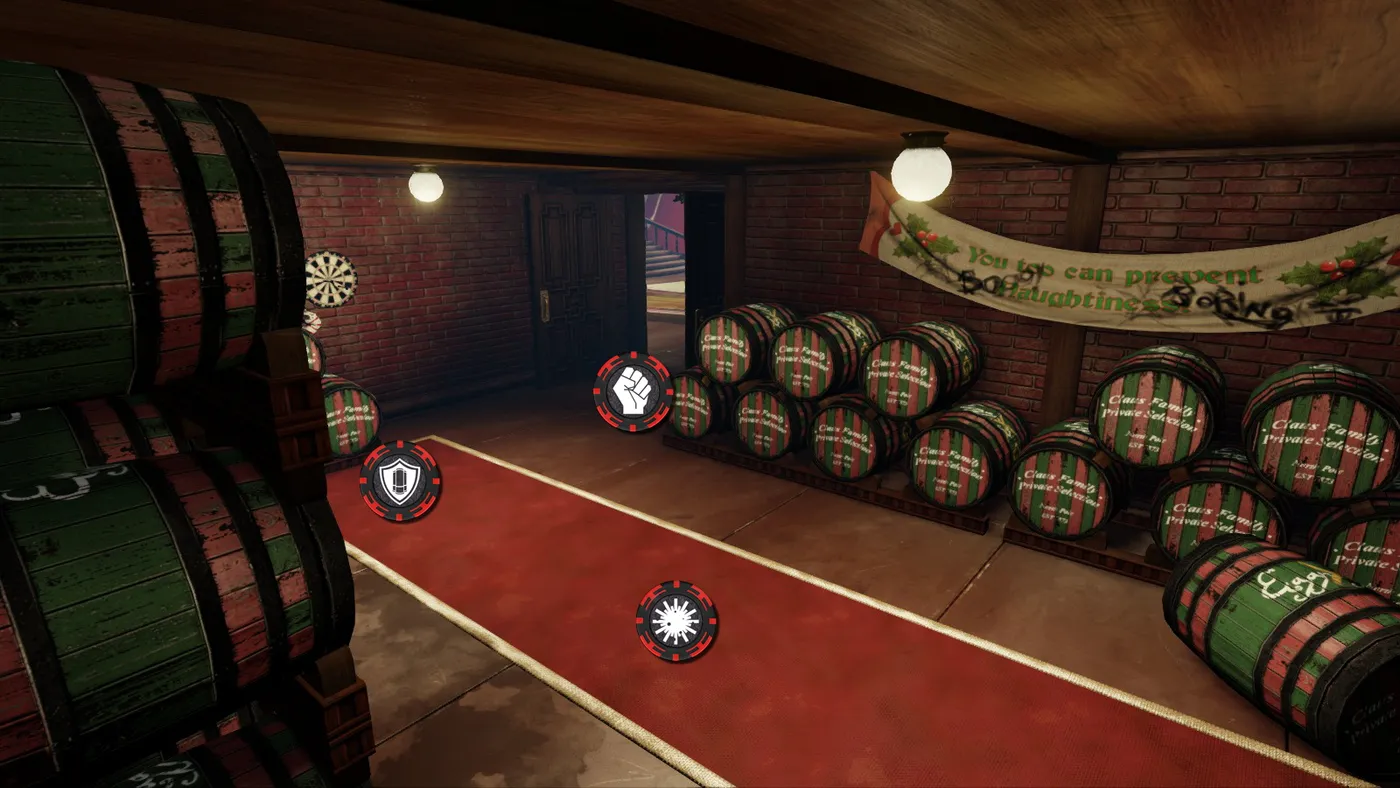 Santa's Workshop, position 2
Position 3
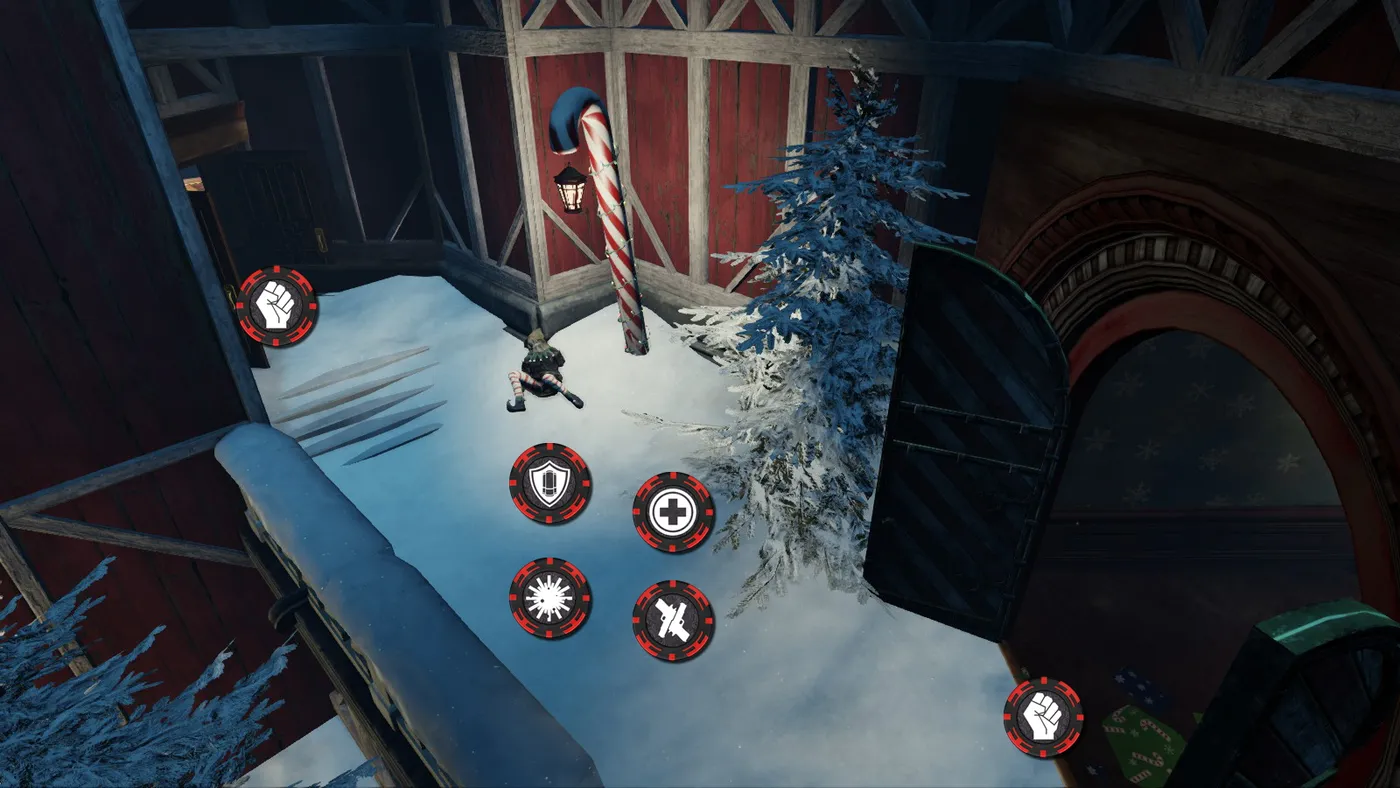 Santa's Workshop, position 3
Position 4
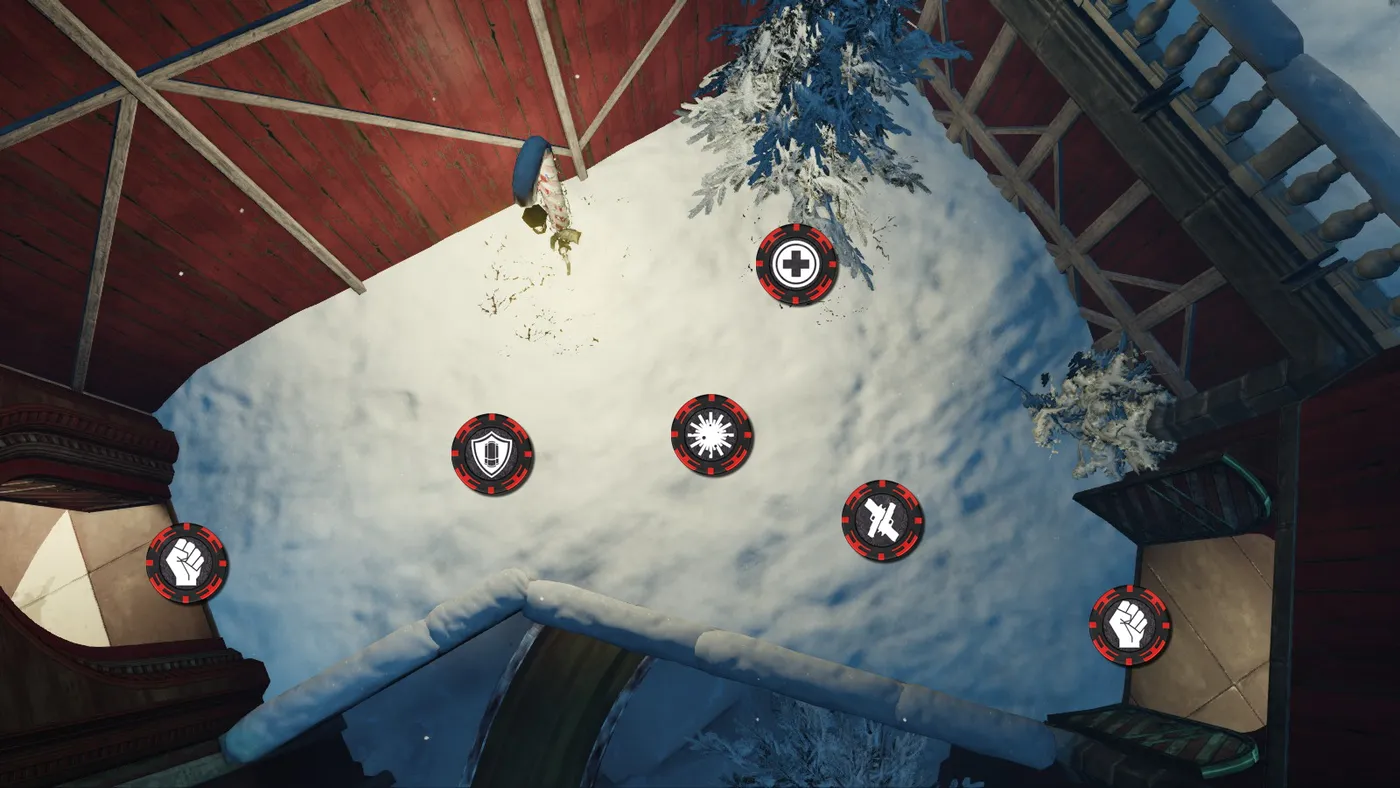 Santa's Workshop, position 4
Position 5
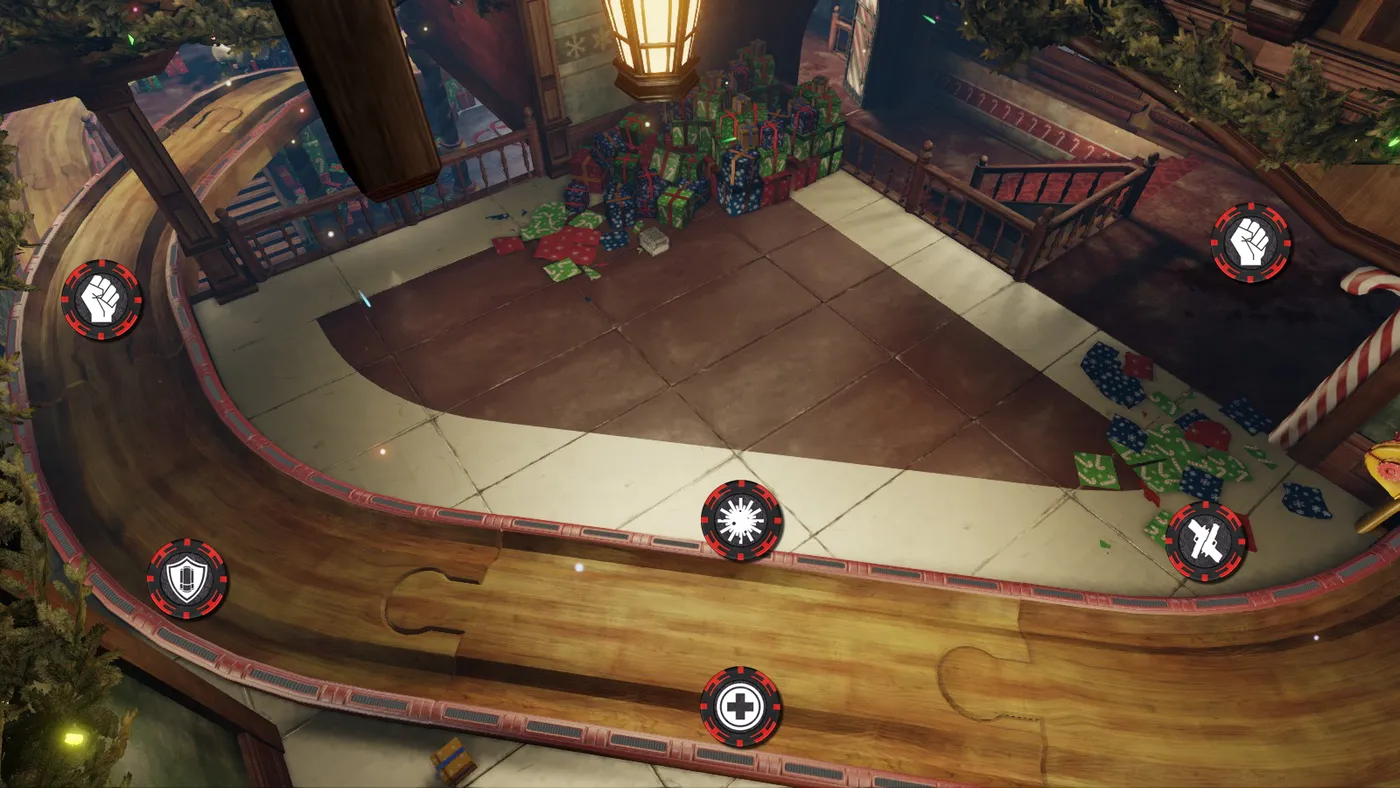 Santa's Workshop, position 5
Position 6
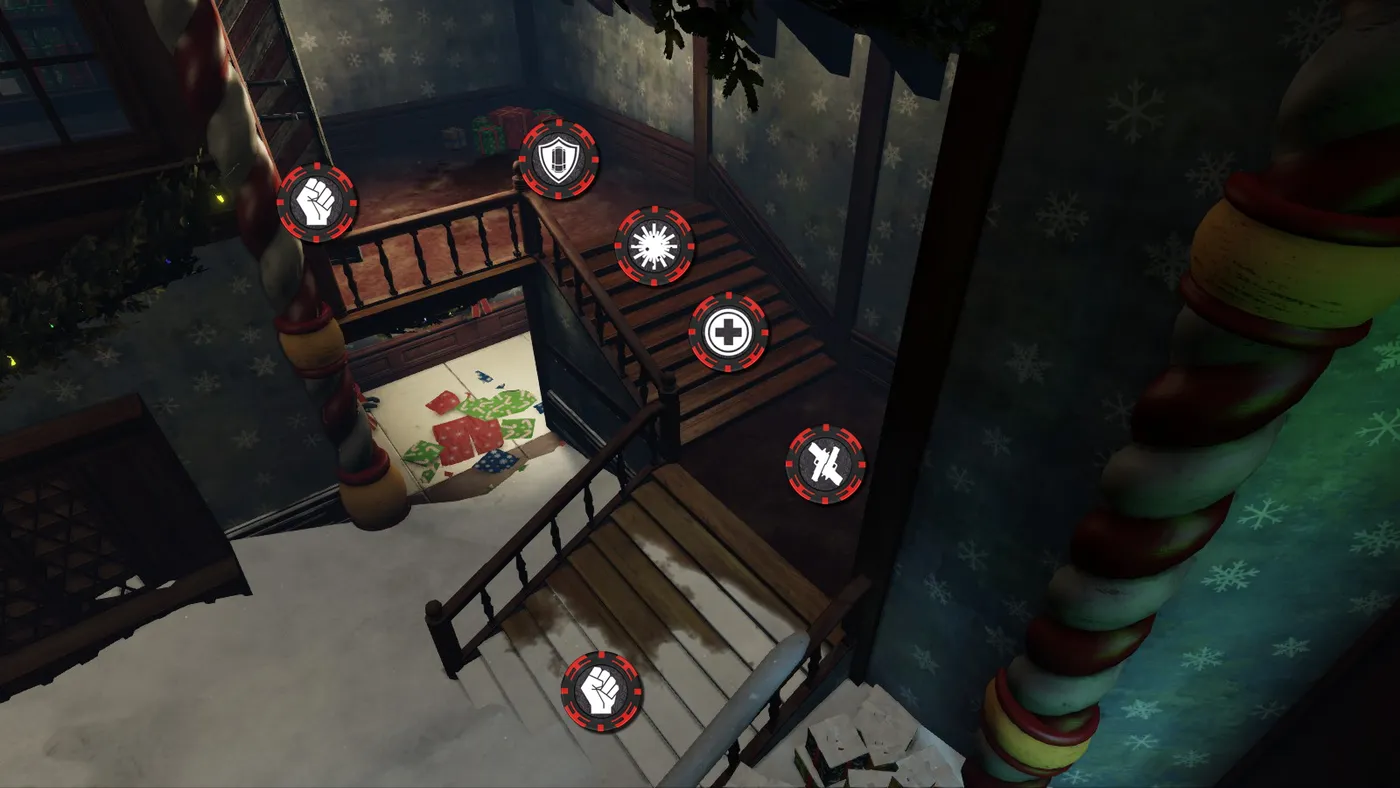 Santa's Workshop, position 6
Spillway
 Spillway
Modes: Standard, Endless. Water flows around you, nearly drowning out the groans of failing machinery, in front of a giant concrete structure built to harness a once-mighty river.
Position 1
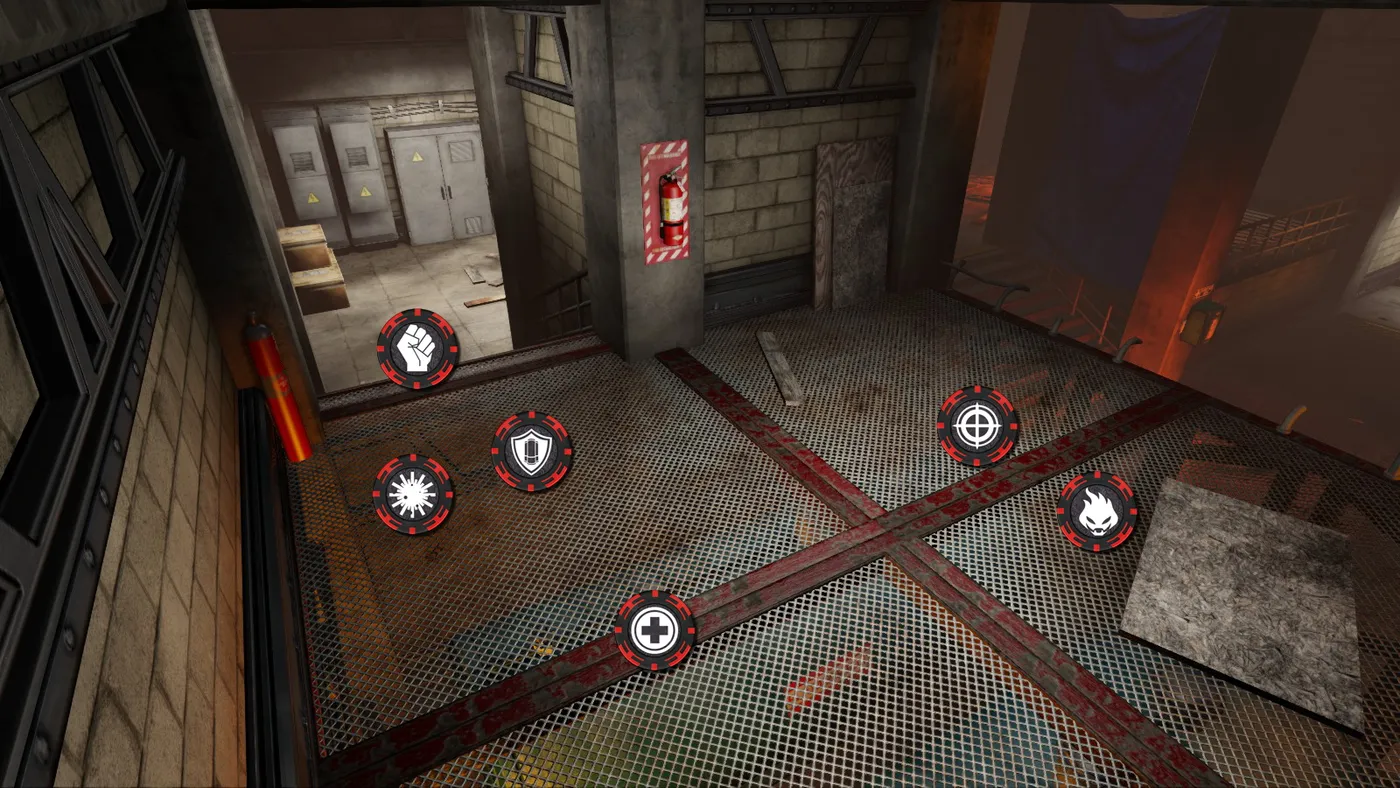 Spillway, position 1
Position 2
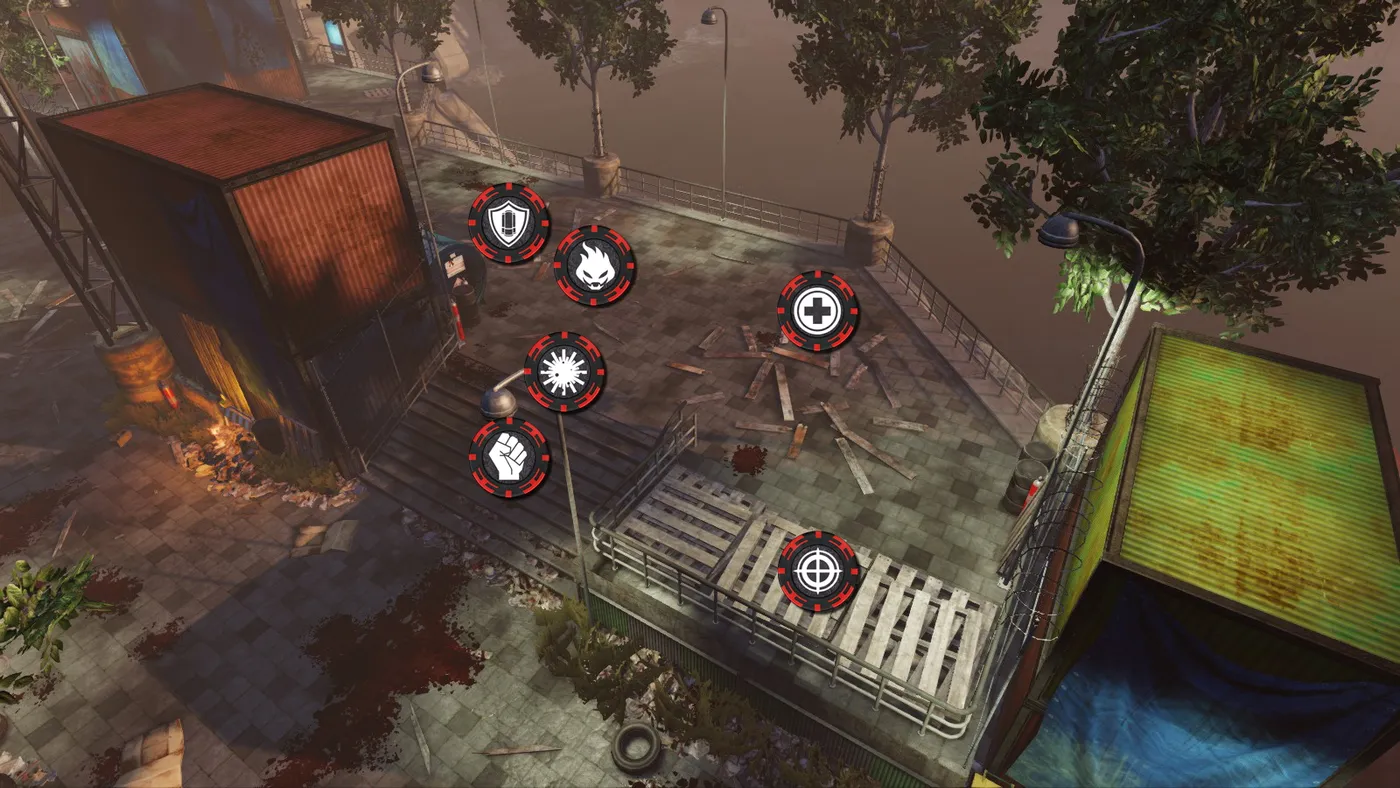 Spillway, position 2
Position 3
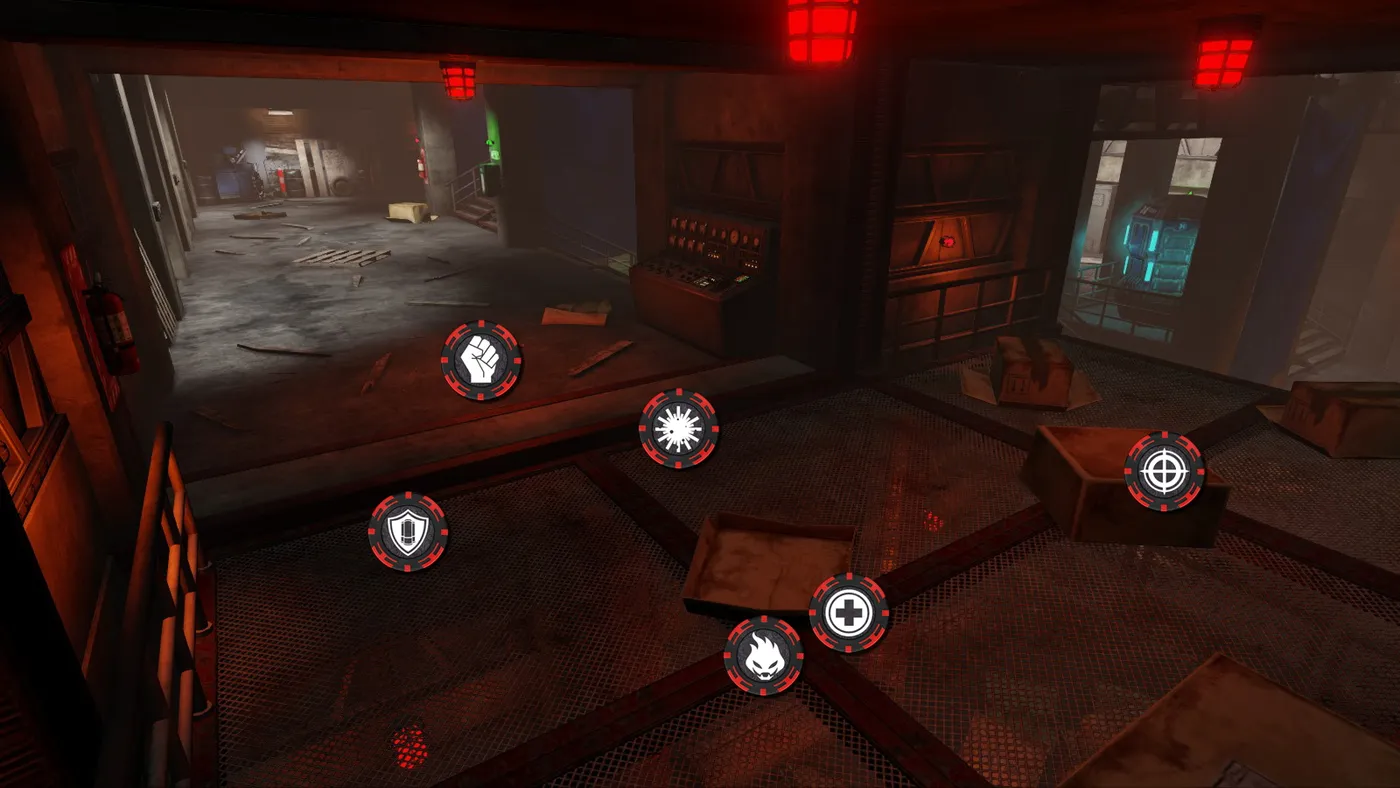 Spillway, position 3
Position 4
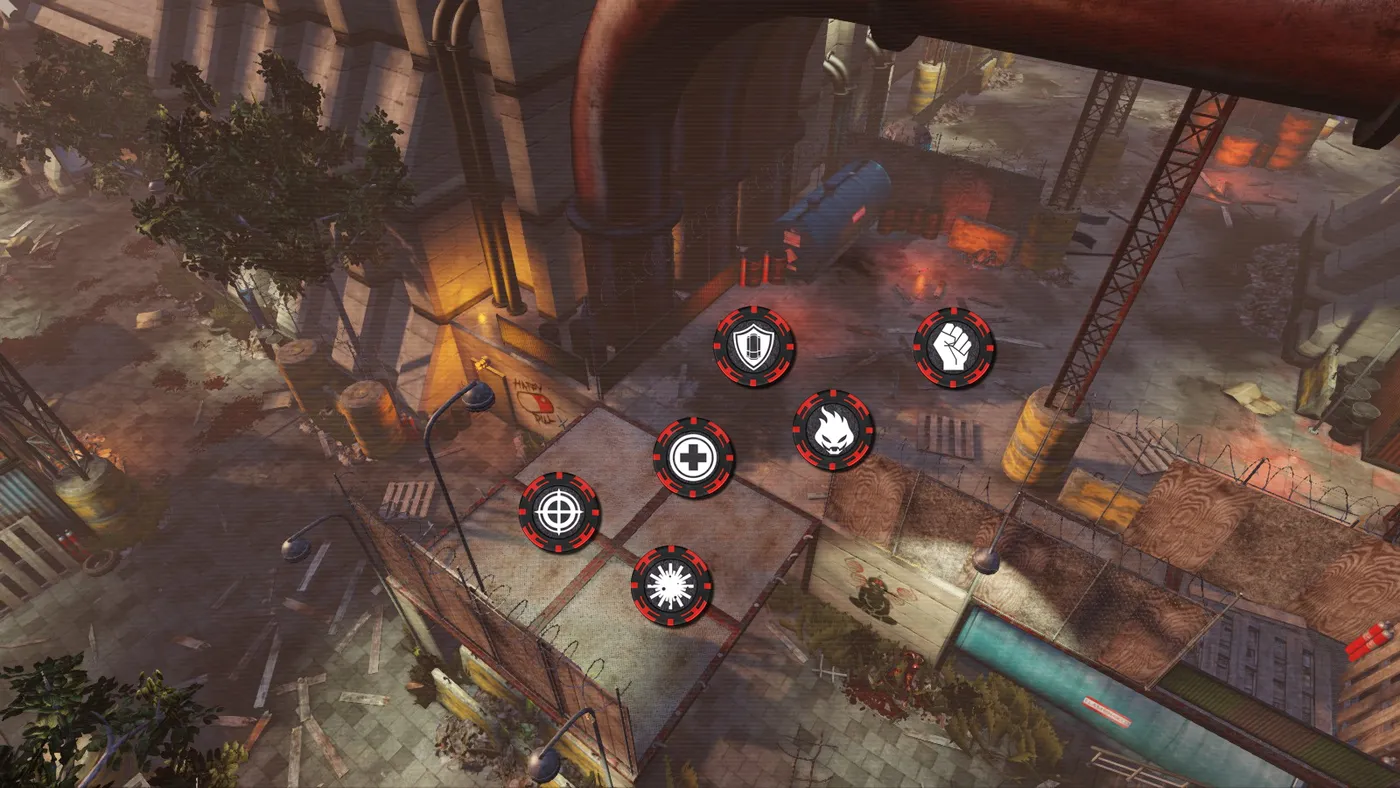 Spillway, position 4
Steam Fortress
 Steam Fortress
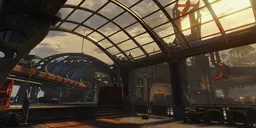
Modes: Standard, Endless, Objectives. Lockhart reaches his fortress lair, Eden, on Cape Corvo, but the stowaways are not gone yet.
Position 1
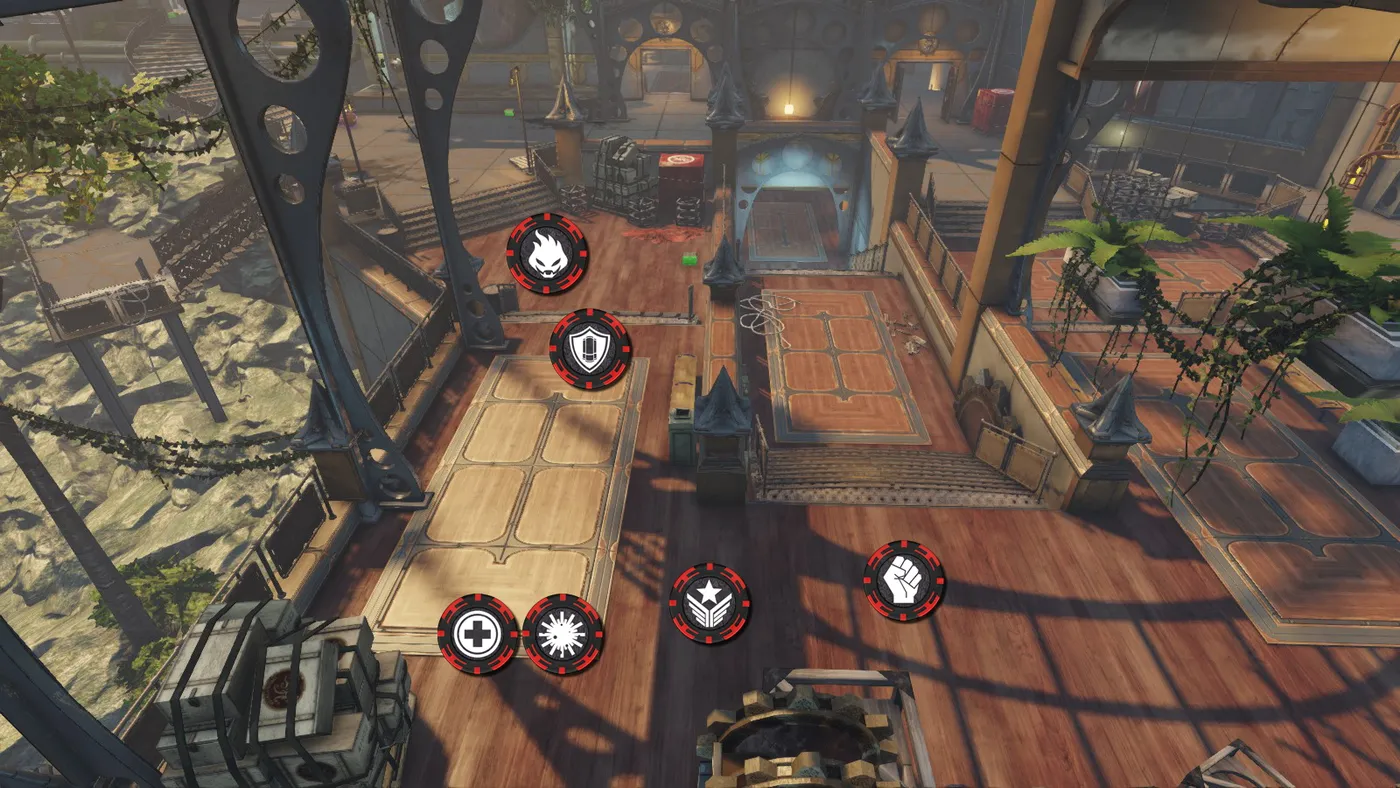 Steam Fortress, position 1
Position 2
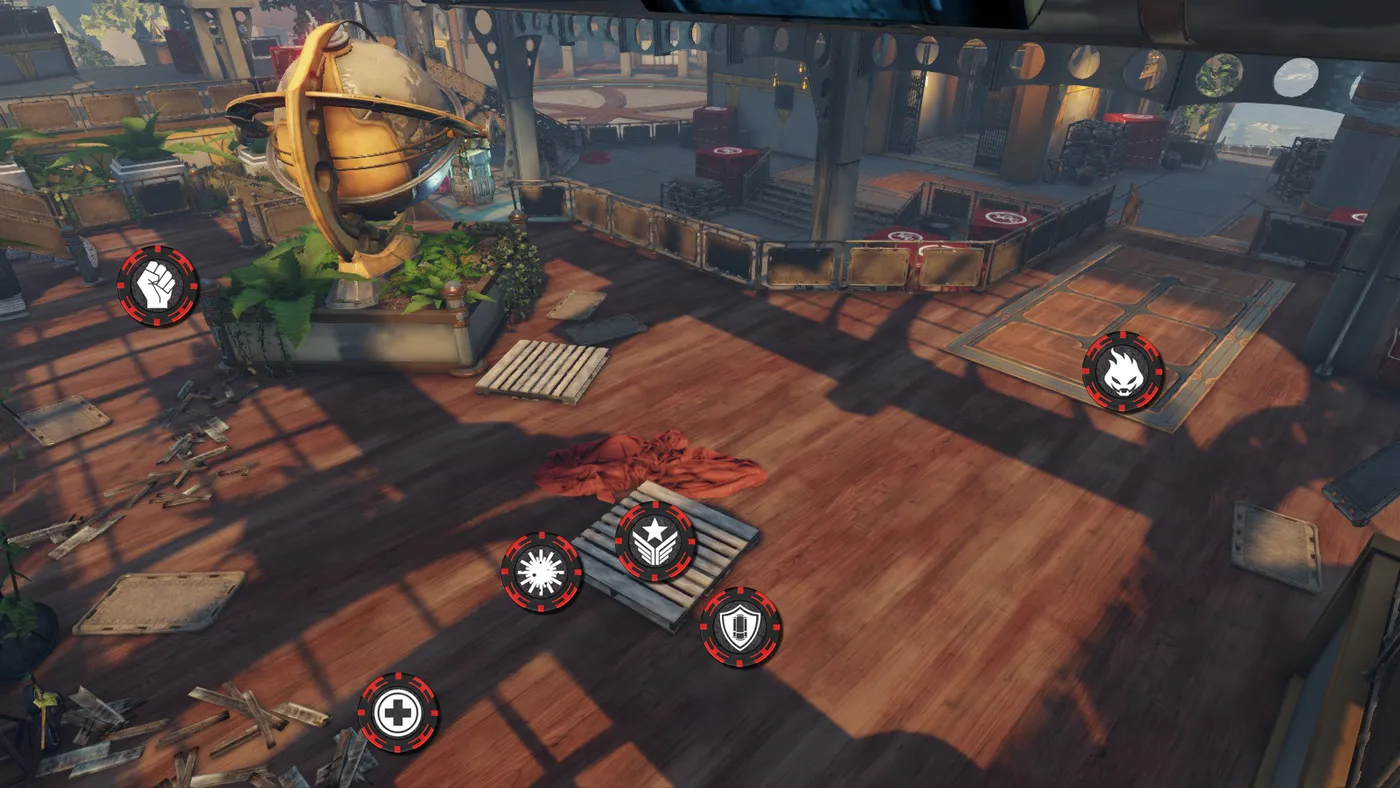 Steam Fortress, position 2
Position 3
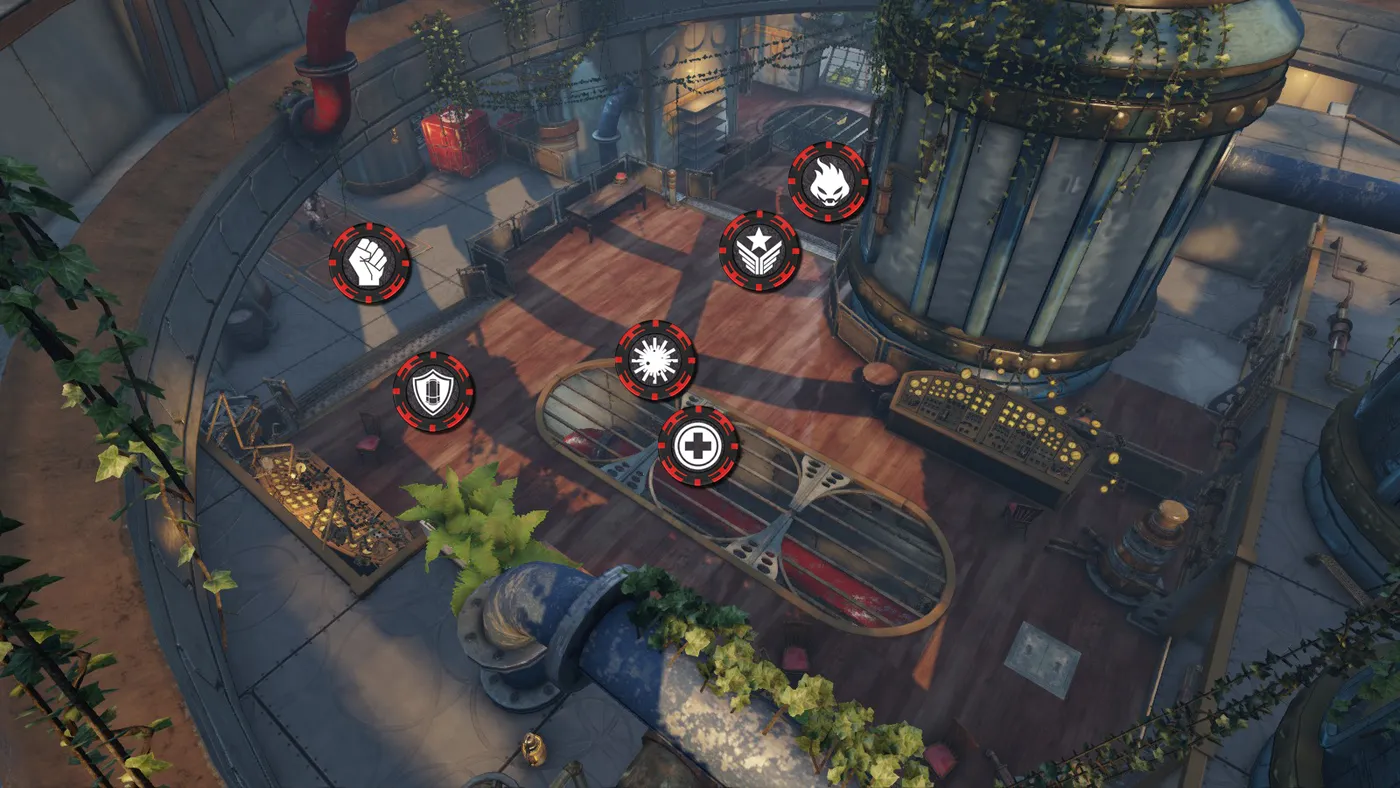 Steam Fortress, position 3
Position 4
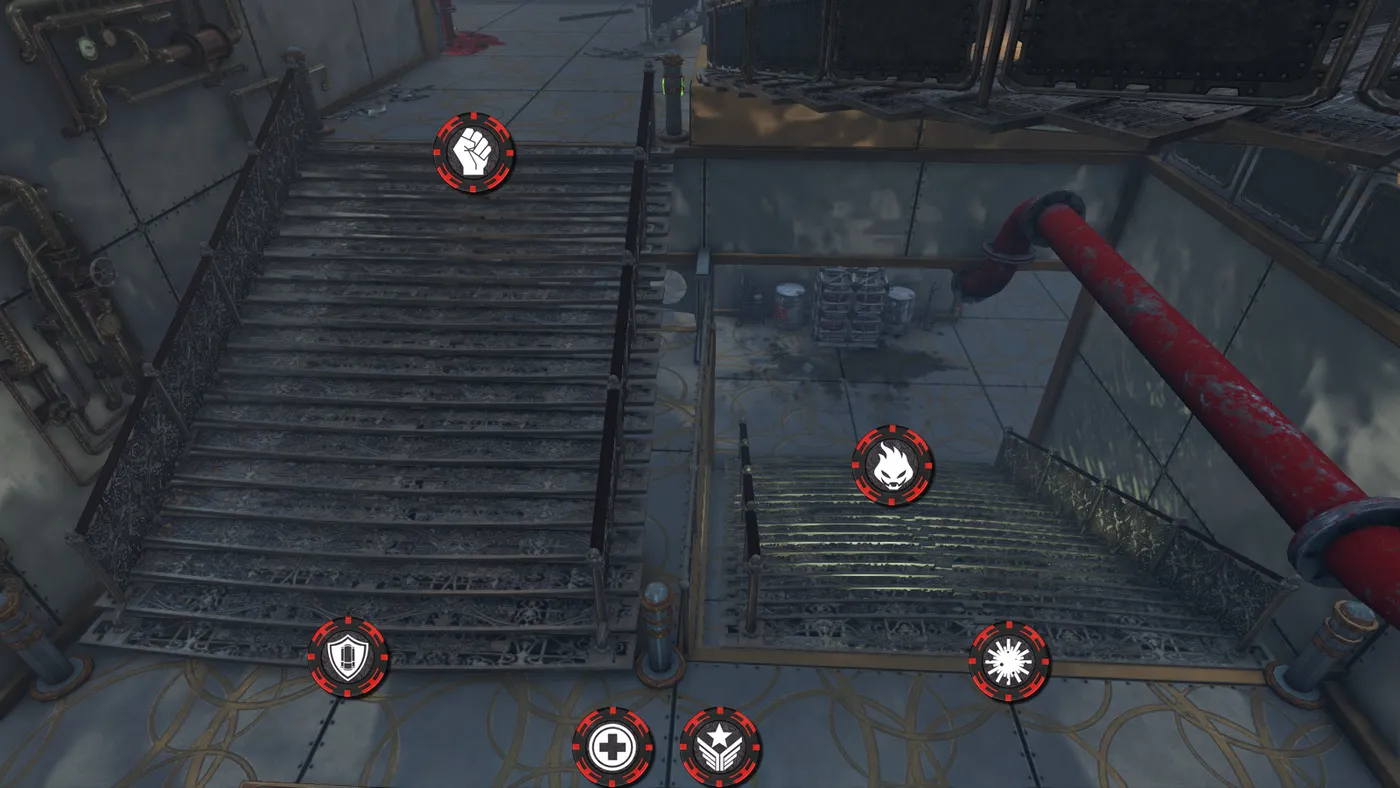 Steam Fortress, position 4
Position 5
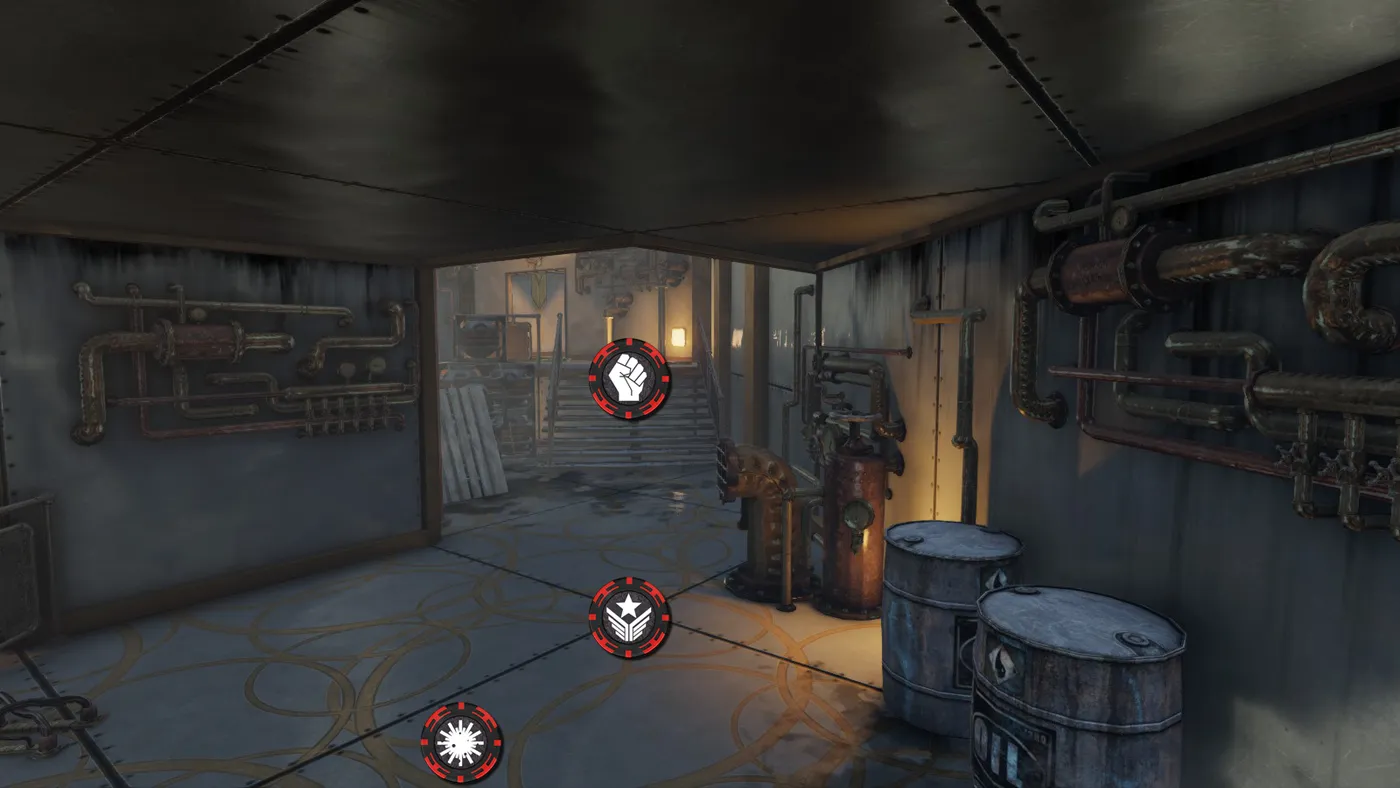
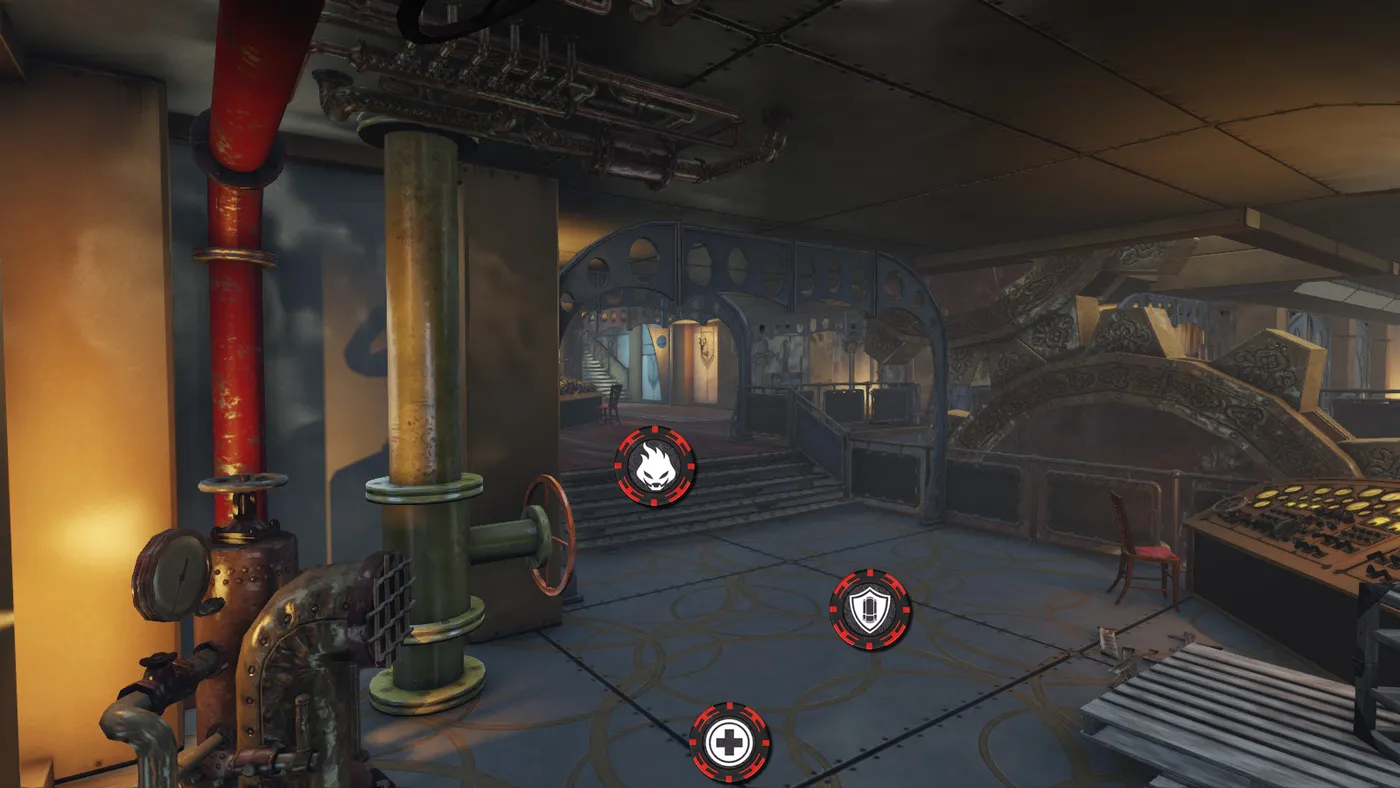 Steam Fortress, position 5
Ashwood Asylum
 Ashwood Asylum
Modes: Standard, Endless. A paranormal investigation team in an abandoned asylum where terrible experiments once took place.
Position 1
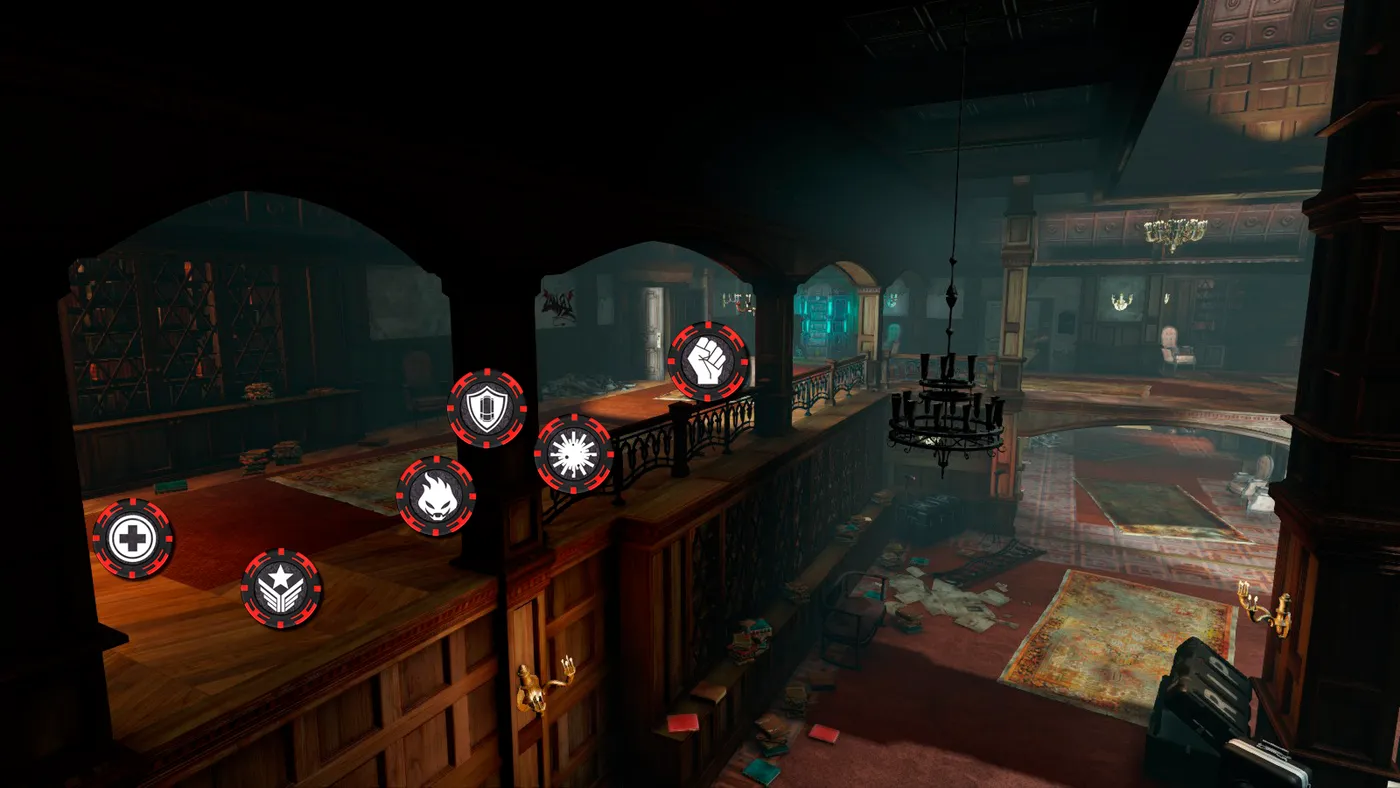 Ashwood Asylum, position 1
Position 2
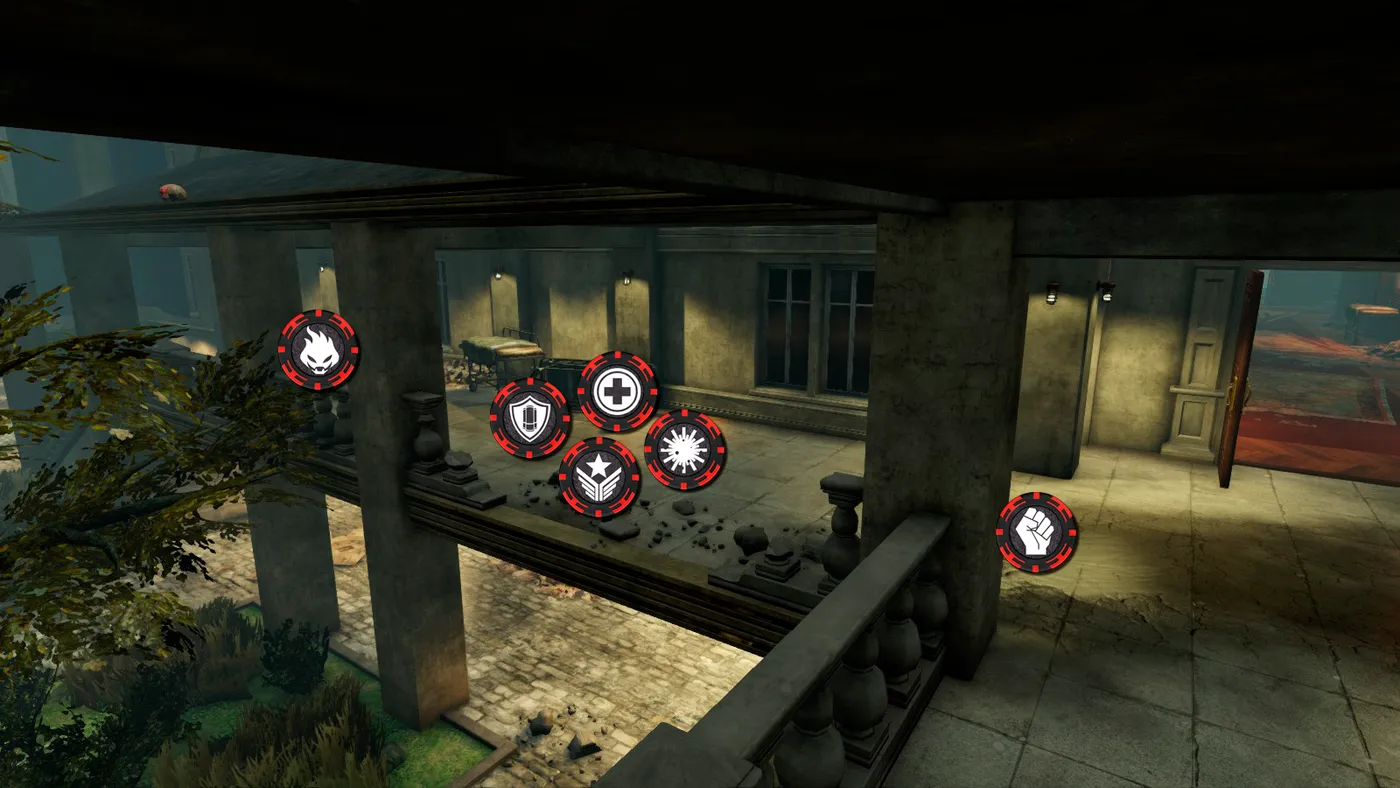 Ashwood Asylum, position 2
Position 3
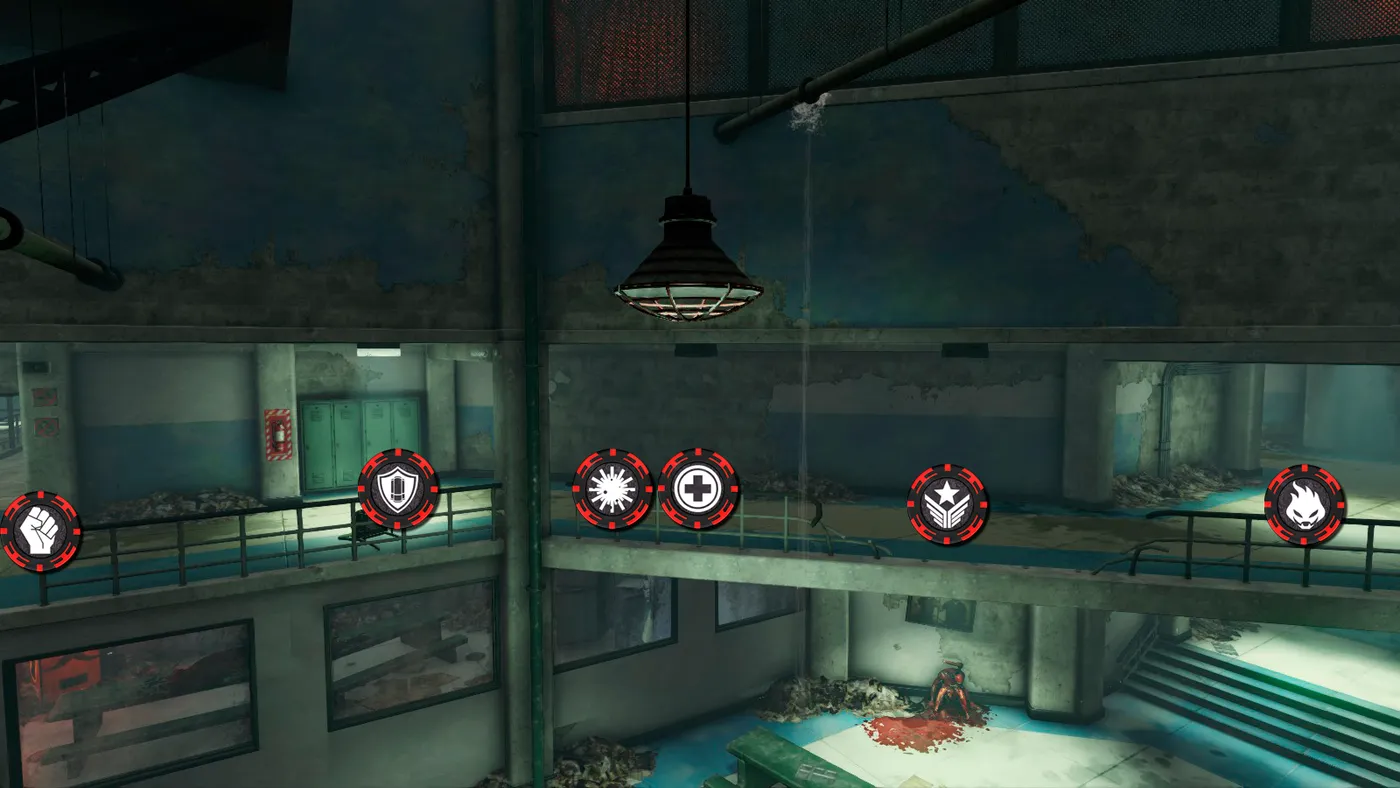 Ashwood Asylum, position 3
Position 4
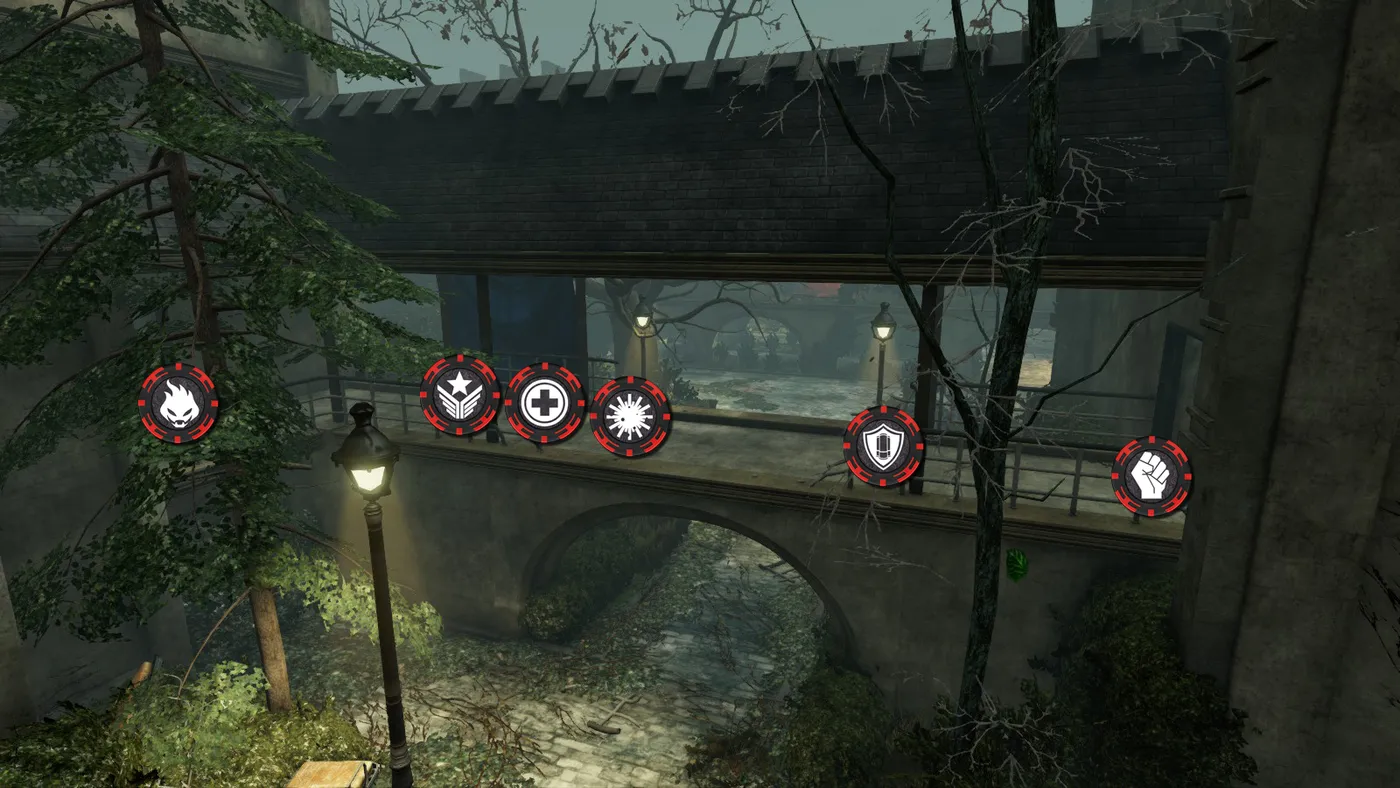 Ashwood Asylum, position 4
Position 5
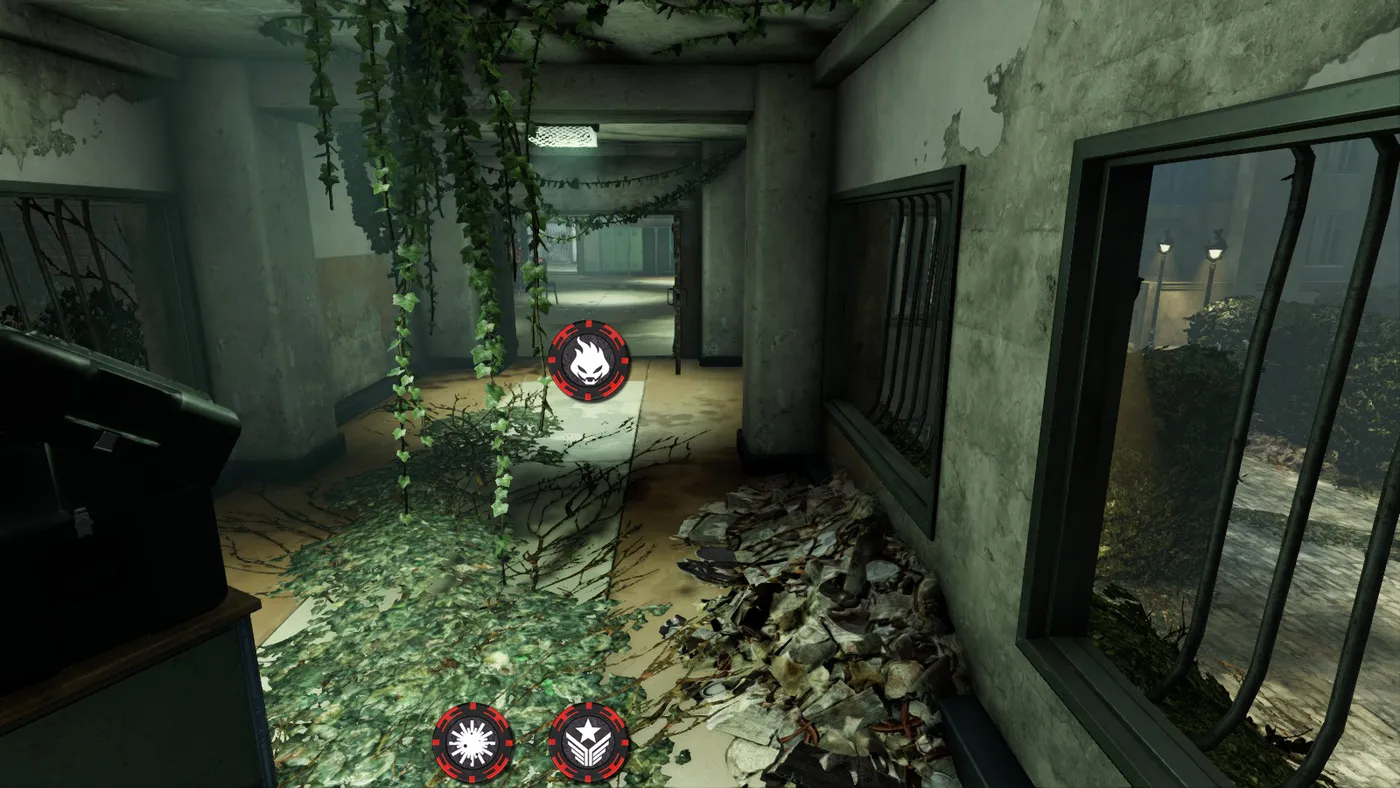
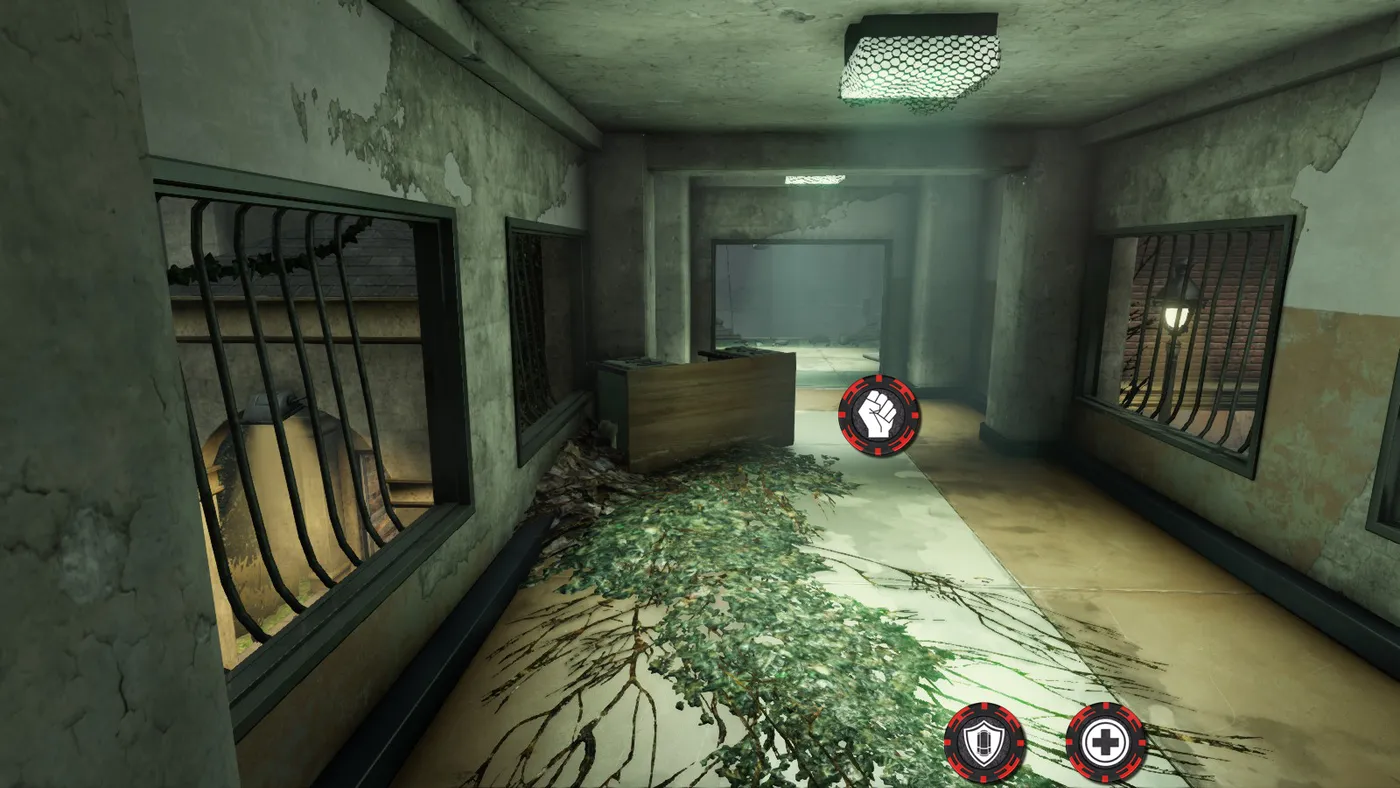 Ashwood Asylum, position 5
From the authors
Several hundred hours on Suicidal and Hell on Earth went into checking and photographing these positions. Source: a Russian-language Steam community guide.
FAQ
- Why hold a position instead of running around the map?
- The guide argues that kiting on high difficulties usually ends with the whole team cornered in a narrow passage, while a good defensive spot lets you shoot zeds from a controlled place.
- Do the positions work in Endless mode?
- Only for standard or light waves (Clots, Crawlers, Stalkers). Standing on a position during Scrake, Fleshpound or Husk waves is suicide, the authors warn.
- Are the class recommendations strict?
- No. They reflect the authors' view and personal skill matters most; a missing Berserker can be replaced by a Firebug or Support in many cases.
