
KF2 General Guide: Perks, XP Table, ZED Weaknesses, Bosses, Versus
This is a rewrite of a Brazilian Portuguese general guide to Killing Floor 2, aimed at beginners and returning players. It focuses on six-player Survival but most of it applies to other modes. It covers game length and difficulty, modes, all ten perks, the XP system, every ZED with a weakness chart, all bosses, Versus controls and core techniques. For more depth see KF2 beginner basics and the Survivalist and Demolitionist perk guides.
Match length and difficulty
There are three match lengths: short (4 waves), medium (7) and long (10). Each ends with an extra boss wave. The ZED count grows every wave and new, bigger ZEDs appear as waves advance. There are four difficulties: Normal, Hard, Suicidal and Hell on Earth (HoE). Higher difficulty means more ZEDs and tougher stats (health, damage, speed), and more players also raises the count and stats.
Game modes
- Survival: the classic mode, one team against AI ZEDs.
- Versus: PvP where one team plays ZEDs and the other humans, then roles swap. Most ZEDs have a white variant in this mode that marks a player.
- Endless: no end; the Patriarch replaces the trader's voice and taunts. A boss every 5 waves, and from wave 7 there is a chance of weekly events or special waves with a single ZED type.
- Objective: a set of tasks to complete while being attacked.
- Weekly: a different challenge each week.
Perks
There are 10 perks, each up to level 25. Recommended difficulty by level: Normal for 0-10, Hard for 10-20, Suicidal for 20-25 and HoE once you are level 25. Prestige: at level 25 you can reset the perk to 0 in exchange for a class weapon skin, a new class icon, 2 million Vosh and an XP bonus that speeds up leveling. Always use weapons of your perk or multi-perk weapons, not other perks' guns unless out of ammo. A multi-perk weapon levels both perks when used with the secondary class.
| Perk | Role | Priority targets |
|---|---|---|
| Medic | Heal, stay behind teammates and kill small ZEDs; grenade heals and damages | Alpha Clot, Cyst, Slasher, Crawler, Stalker |
| Commando | Sees Stalkers and the Patriarch and enemy HP, the only perk that can reset ZED Time (up to 6 times at level 25); assault rifles | Alpha Clot, Cyst, Slasher, Crawler, Stalker |
| SWAT | SMGs with fire rate and low recoil; flashbangs stun | Alpha Clot, Cyst, Slasher, Crawler |
| Firebug | Small and medium ZEDs except the fire-resistant Husk; do not set Scrakes and Fleshpounds on fire unless forced | Alpha Clot, Cyst, Slasher, Bloat |
| Gunslinger | Pistols and revolvers; aim at the head to handle big ZEDs; nail grenade | Siren, Husk, Fleshpound, Scrake, Quarter Pound |
| Sharpshooter | Precision, very offensive, extremely effective against big ZEDs; freeze grenades | Bloat, Fleshpound, Scrake, Quarter Pound |
| Demolitionist | Explosives; the Scrake is vulnerable to bullets but resists explosions; weapons need distance to arm | Husk, Fleshpound, Scrake, Quarter Pound |
| Berserker | Frontline tank, never out of ammo except with the Eviscerator; careful with Bloats and being surrounded; EMP grenade | Stalker, Siren, Fleshpound, Scrake, Quarter Pound |
| Support | Shotguns, more carry weight, effective against nearly everything | Gorefast, Gorefiend, Siren, Husk, Fleshpound |
| Survivalist | Good at everything, master of nothing; any weapon without penalty | Depends on skills and weapons |
Fun fact: at 5 health the Demolitionist explodes and stops any damage; this happens once per wave.
Leveling
Every 5 levels (5, 10, 15, 20, 25) a tier of two skills unlocks, and passive skills grow with each level. You gain XP according to the weapon in your hand.
XP required per level (level: XP to reach it, total, progress): 1: 795 (0.28%); 5: 1556 (total 5718, 2.00%); 10: 3604 (total 18964, 6.65%); 15: 8347 (total 49638, 17.40%); 20: 19332 (total 120683, 42.31%); 21: 22868 (50.33%); 22: 27051 (59.81%); 23: 31999 (71.03%); 24: 37852 (84.30%); 25: 44775 (total 285228, 100%).
XP per kill:
| ZED | Normal | Hard | Suicidal | HoE | Versus |
|---|---|---|---|---|---|
| Clots (all variants) | 8 | 11 | 11 | 11 | 32 |
| Bloat | 17 | 22 | 30 | 34 | 40 |
| Crawler | 8 | 10 | 10 | 10 | 32 |
| Gorefast | 11 | 14 | 14 | 14 | 44 |
| Stalker | 8 | 10 | 10 | 10 | 32 |
| Husk | 15 | 20 | 27 | 31 | 30 |
| E.D.A.R. | 15 | 20 | 27 | 31 | - |
| Siren | 11 | 15 | 15 | 15 | 22 |
| Scrake | 34 | 45 | 60 | 69 | 102 |
| Quarter Pound | 17 | 22 | 30 | 34 | - |
| Fleshpound | 35 | 47 | 63 | 72 | 105 |
| Hans Volter, King FP, Abomination, Matriarch | 1291 | 1694 | 1790 | 1843 | - |
| Patriarch | 1291 | 1694 | 1790 | 1843 | 2500 |
| Abomination Spawn | 8 | 10 | 10 | 10 | - |
ZED Time
Triggered by killing ZEDs or players, it slows the world to 20% for 3 seconds and can be reset; Commando can reset it up to 6 times at level 25. A player far from other players and ZEDs keeps normal speed even while the world is slowed, but enters ZED Time when near a ZED or teammate.
Small ZEDs
Weak individually but numerous, and they stop players focusing on the big ones.
Alpha Clot and Rioter
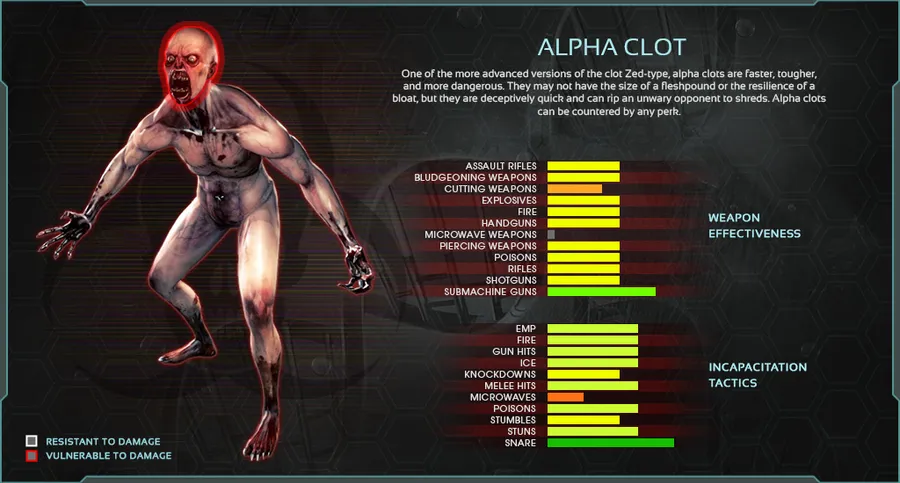 Alpha Clot weaknesses and resistances.
A common specimen that appears with the Cyst and Slasher, which are Clot variants. It hits and grabs, immobilizing you. Resistant to cutting weapons and more so to the Microwave Gun; weakest to SMGs; aim for the head. Its variant the Rioter spawns from Suicidal and gives nearby ZEDs a 10-second bonus of more damage and running.
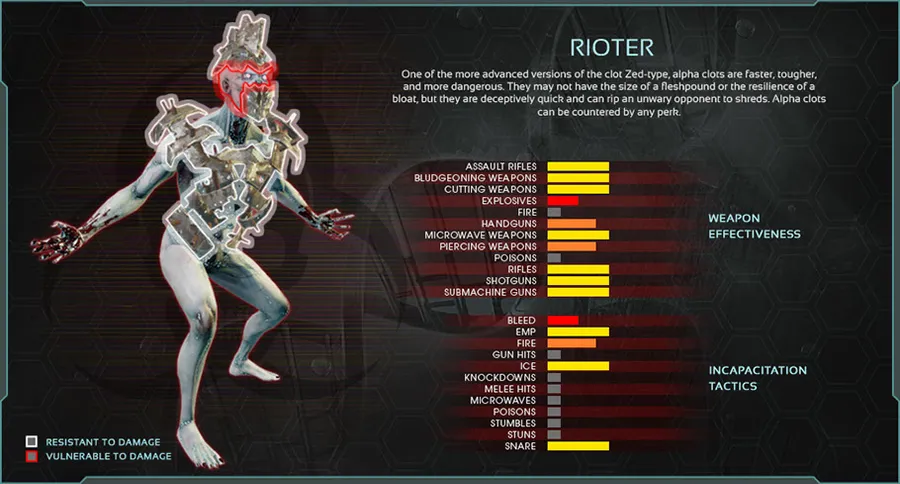 Rioter weaknesses and resistances.
Cyst
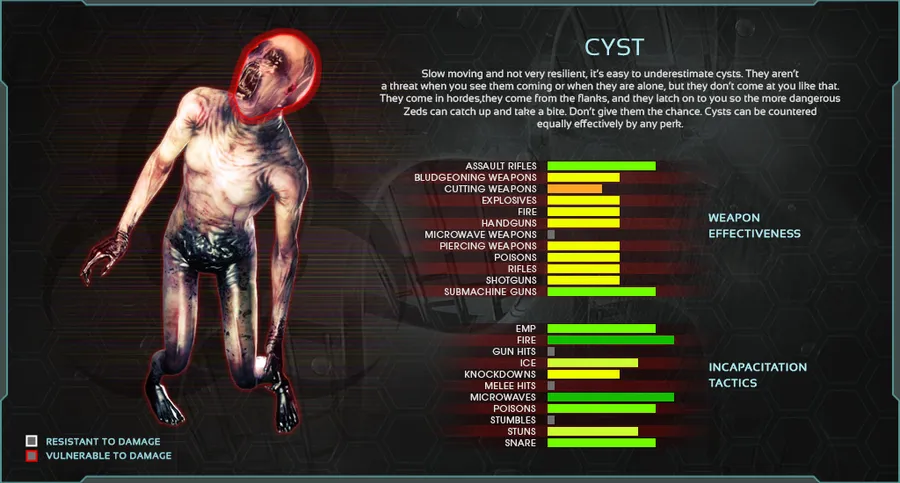 Cyst weaknesses and resistances.
A lesser, slower Clot, weak against assault rifles.
Slasher
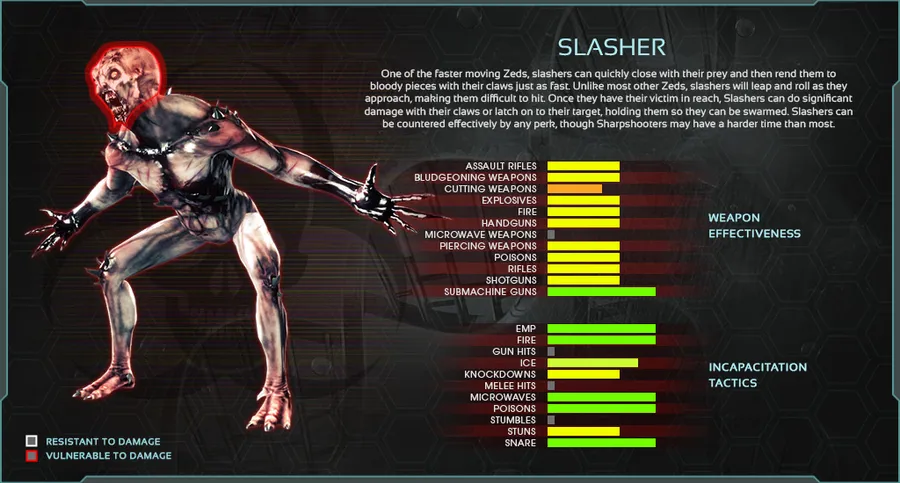 Slasher weaknesses and resistances.
Faster and more aggressive, with the Clot's abilities, and it can dodge attacks. Same weaknesses as the Clot.
Crawler and Elite Crawler
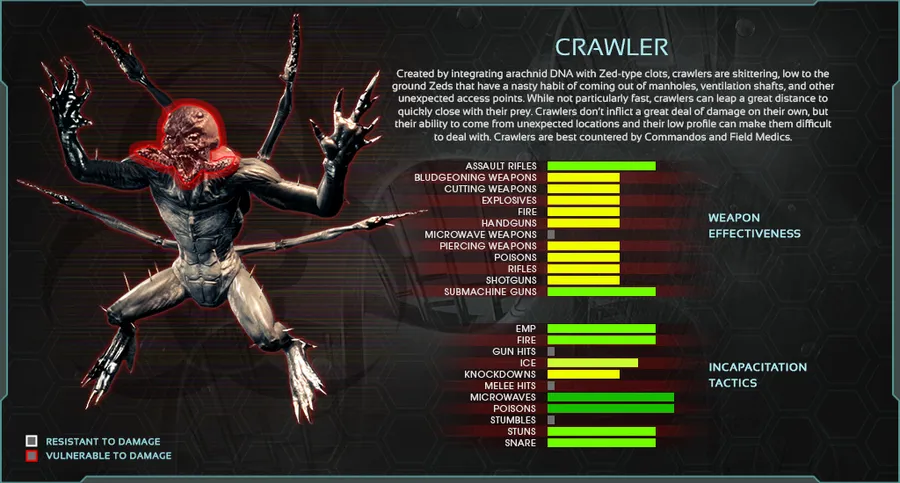 Crawler weaknesses and resistances.
Half spider, half human, though they do not climb walls or ceilings. They often go unnoticed because of their size and color, attack physically and can pounce. You can jump on top of one to stun it briefly. Weak to assault rifles and SMGs. The Elite Crawler releases poison gas when it explodes, and aiming for its head stops it from exploding. Same weaknesses as the Crawler.
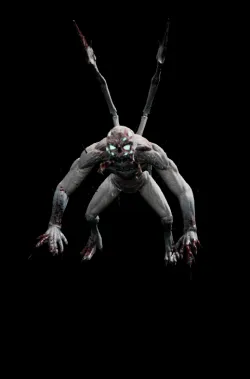 Elite Crawler.
Stalker
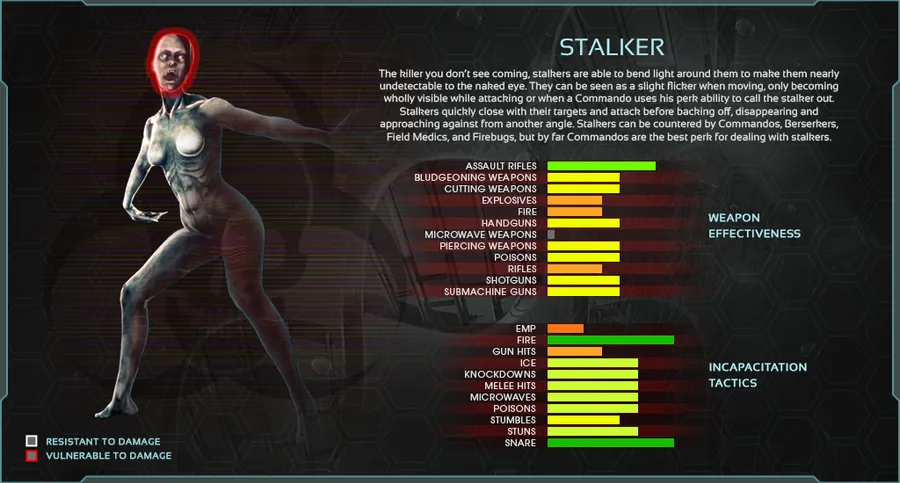 Stalker weaknesses and resistances.
The invisible ZEDs; they reveal themselves when attacking and try to dodge. Hard to notice approaching, but the character usually says something when one is near. Weak to assault rifles, resistant to explosives, fire and precision rifles. Commandos can reveal them.
Gorefast
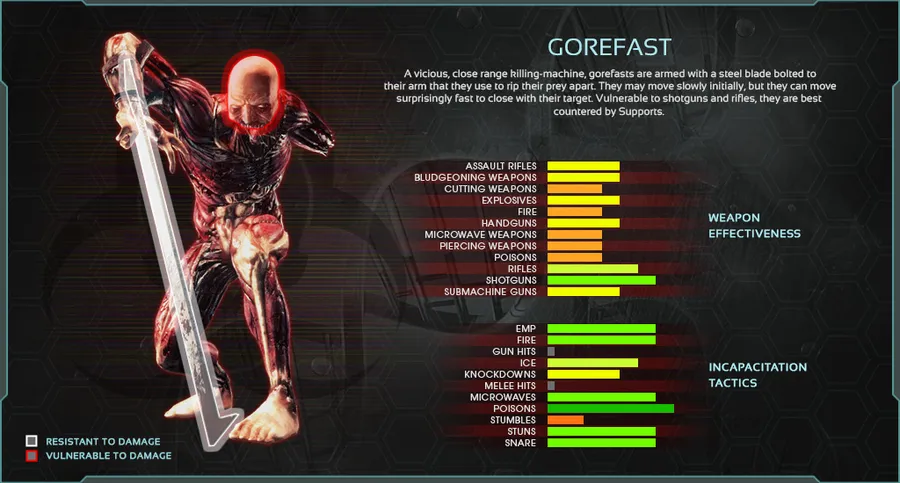 Gorefast weaknesses and resistances.
The strongest small ZED, with a blade for an arm; it attacks even while running and uses the blade to defend. Resistant to cutting weapons, fire, the Microwave Gun and poison. Weak to precision rifles and even more to shotguns.
Medium ZEDs
Gorefiend
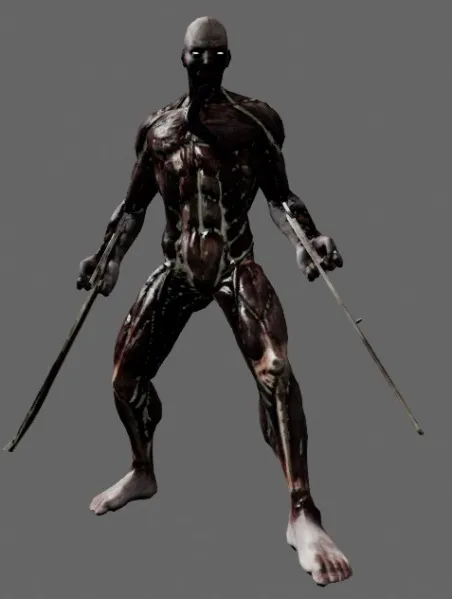 Gorefiend.
A stronger Gorefast with blades on both arms, the terror of Berserkers, with long powerful combos. Same weaknesses and resistances as the Gorefast.
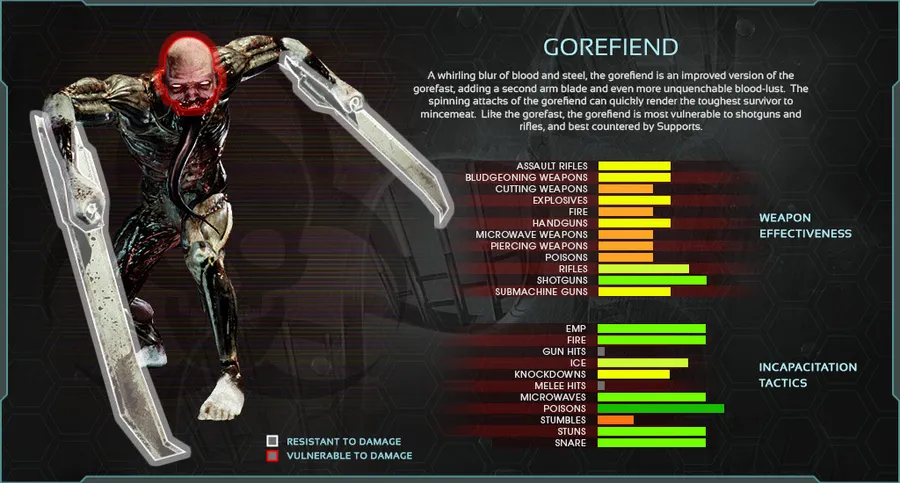 Gorefiend weaknesses and resistances.
Bloat
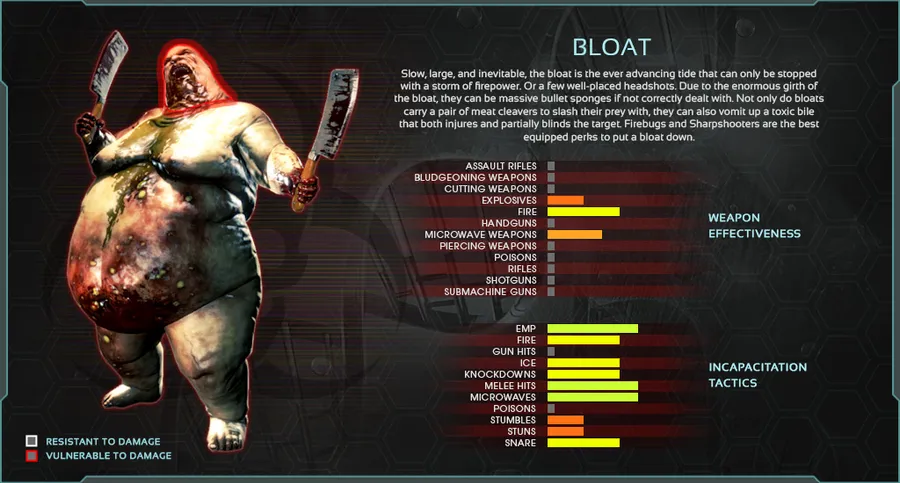 Bloat weaknesses and resistances.
Slow and nasty, it vomits at you (which obscures vision) and attacks physically up close. It resists everything; the best way to kill it is headshots or fire, preferring headshots.
Siren
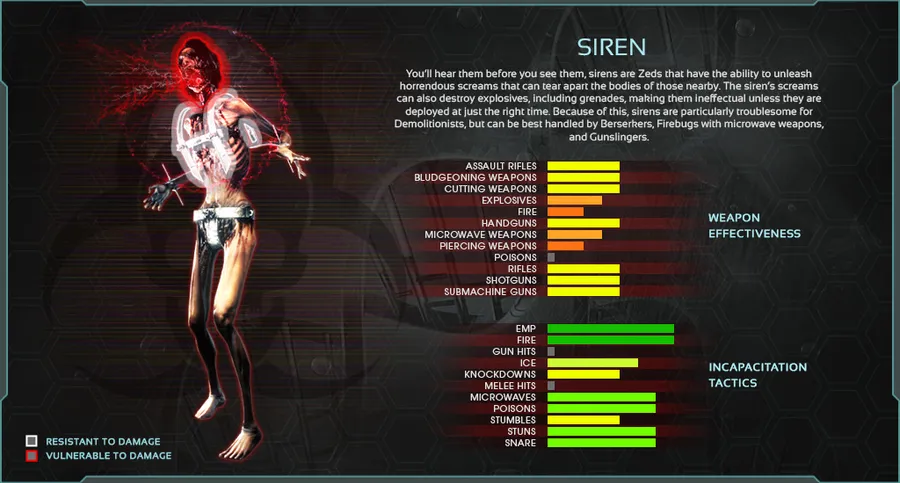 Siren weaknesses and resistances.
Slow, but her screams are dangerous: they deal sonic damage directly to health, ignoring armor, and can disarm explosives, so she is great protection for big ZEDs and usually comes with them. Resistant to explosives and fire, nearly immune to poison, but low health makes her easy to kill.
Husk
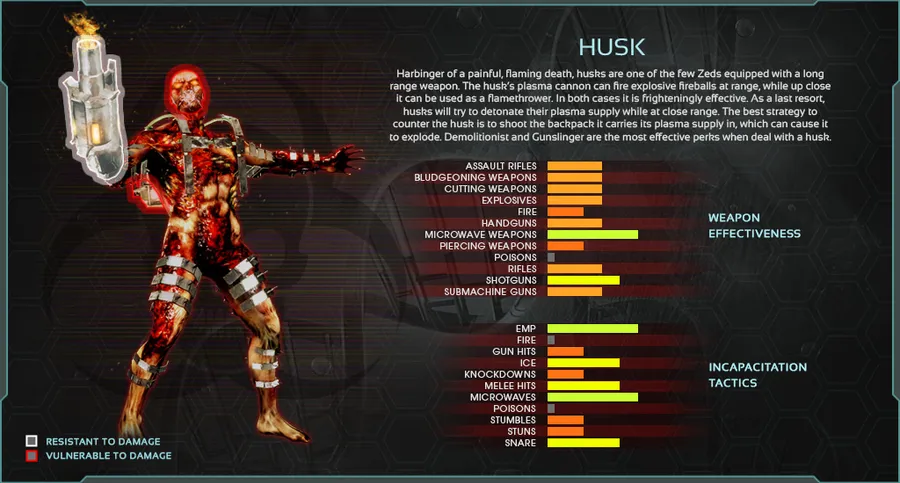 Husk weaknesses and resistances.
One of the most dangerous: it attacks at range with area-damage fireballs and melees. On higher difficulties it uses a flamethrower up close that can kill in seconds, and when nearly dead it runs at you and suicide-explodes. Resistant to nearly everything, especially fire, but vulnerable to the Microwave Gun and shotguns. Shoot the backpack on its back (it is exposed when firing fireballs) for an easy explosion, and sidestep fireballs.
E.D.A.R. (Elite Defense and Assault Robot)
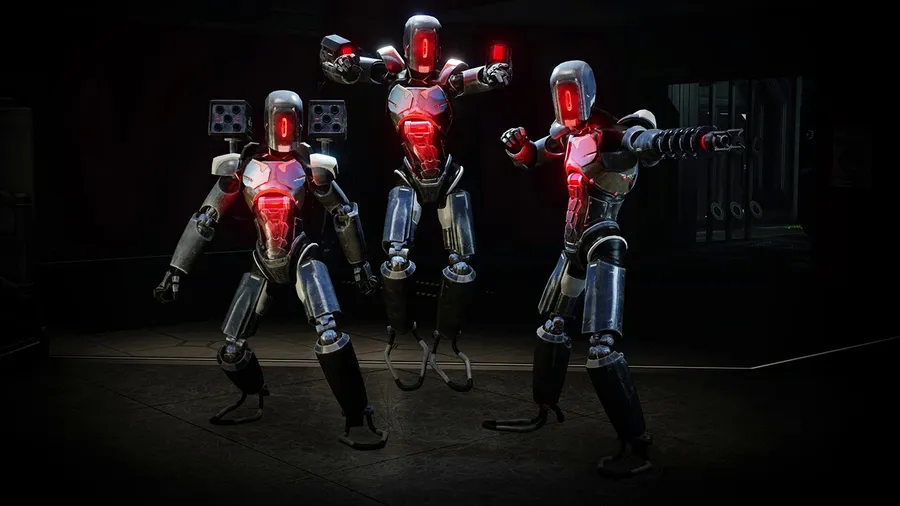 The E.D.A.R. robots.
The first fully robotic enemy, in three variants, with head and torso armor like the Rioter. It may appear in place of a Husk or Stalker. Fast and good at dodging: the Bomber has shoulder rocket launchers, the Blaster shoots from its wrists and the Trapper can immobilize you. Killing it with chest shots makes it explode. Almost no resistance; very weak to the Microwave Gun, then explosives, fire and melee.
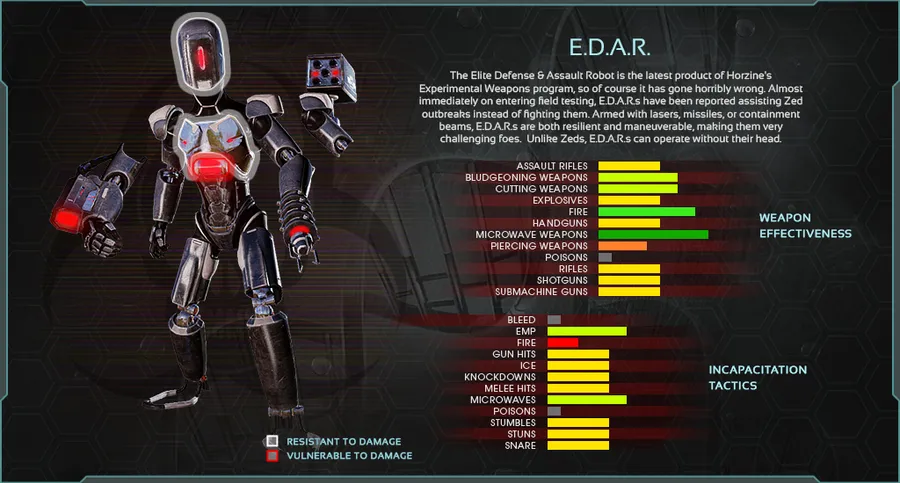 E.D.A.R. weaknesses and resistances.
Large ZEDs
Scrake
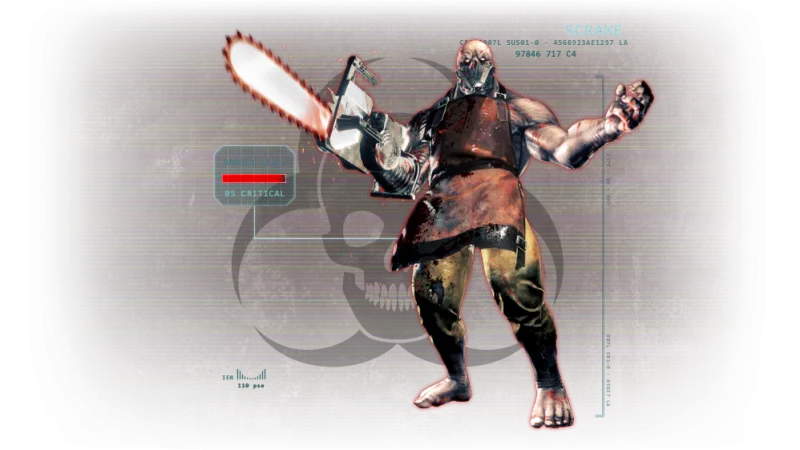 Scrake.
Walks calmly with a chainsaw arm and attacks only if you come close, but after a certain amount of damage (by difficulty) attacks ruthlessly. The biggest mistake is setting it on fire: it gets angrier and harder to hit since its only weak point is the head. It resists explosives, is almost immune to fire and poison, and takes normal damage from bullets, cutting, blunt and Microwave Gun. Its only weakness is the direct impact of the RPG, which does 400% damage. All its attacks can be parried.
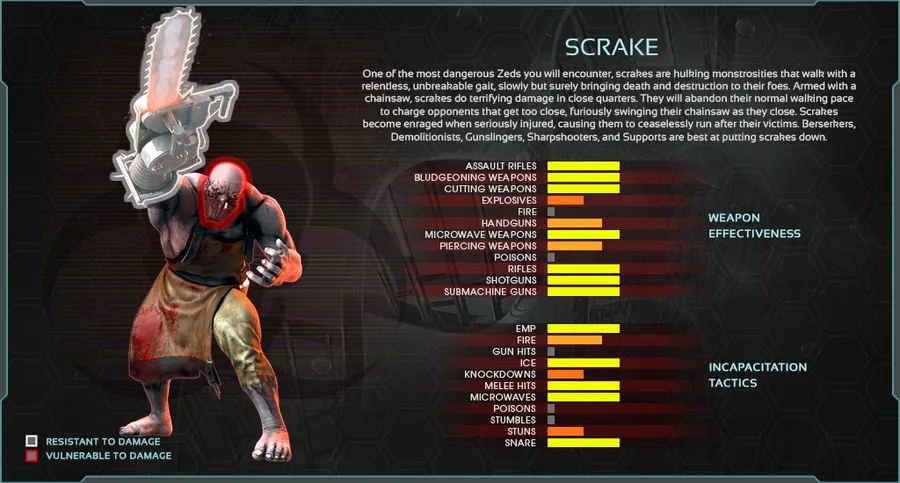 Scrake weaknesses and resistances.
Fleshpound
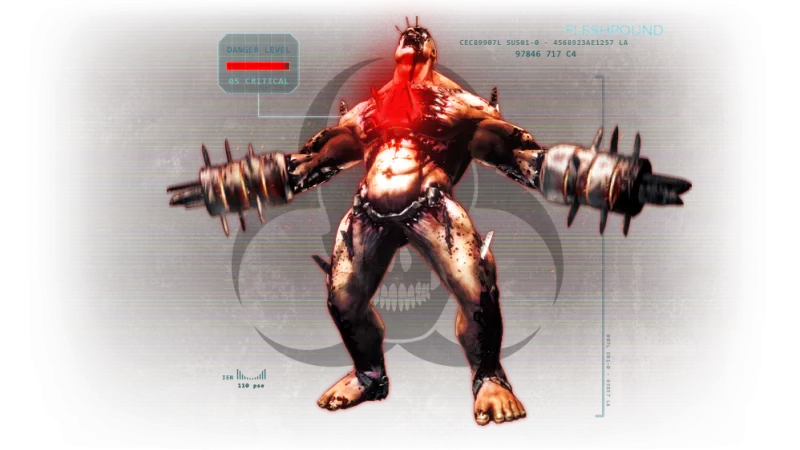 Fleshpound.
The strongest ZED outside the bosses. It can rage without taking damage but, unlike the Scrake, calms down after a while or after hitting a player. Nearly immune to fire and poison and resistant to bullets; weakest to explosives, then the Microwave Gun.
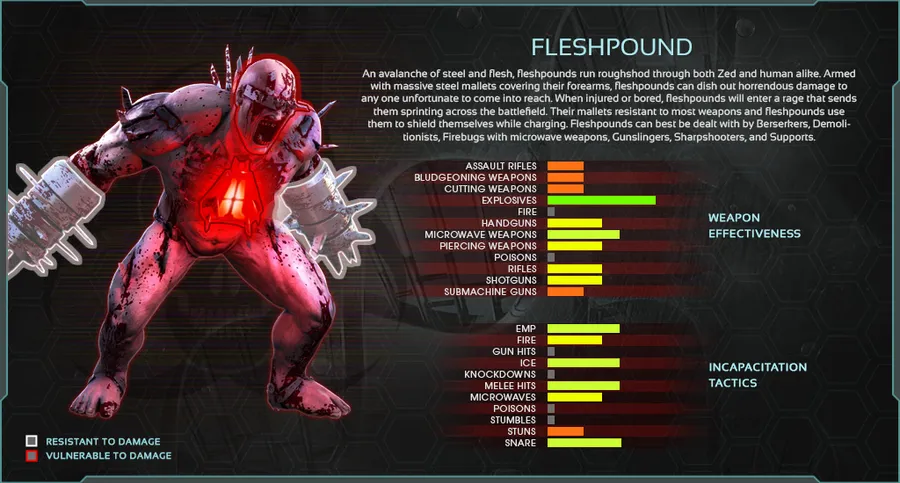 Fleshpound weaknesses and resistances.
Quarter Pound
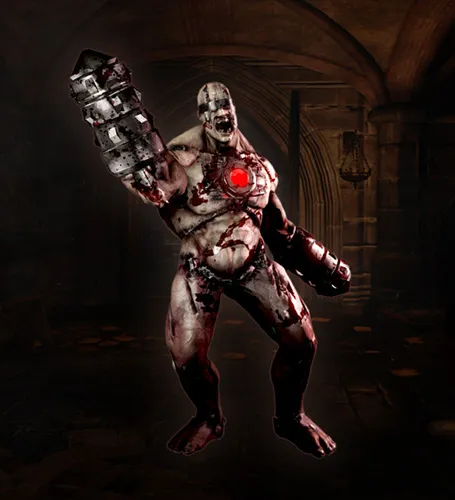 Quarter Pound.
A quarter of a Fleshpound: usually in groups of four, with the same weaknesses; also the King Fleshpound's minions.
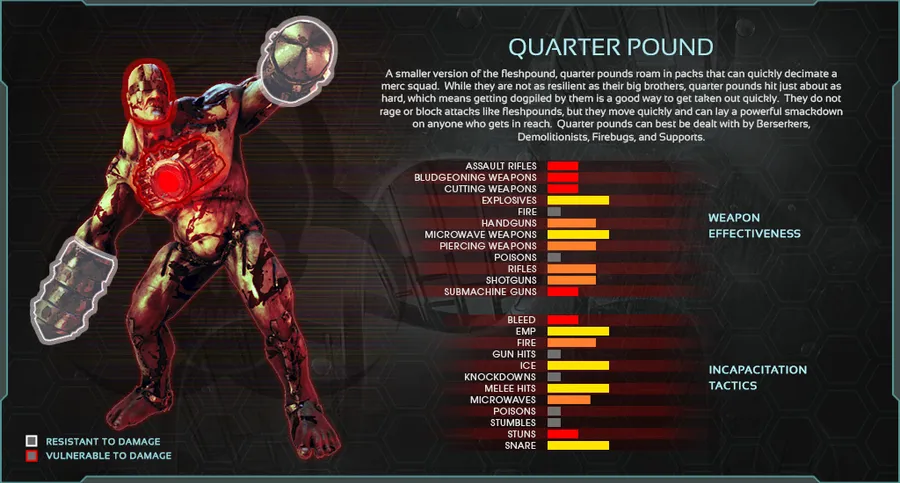 Quarter Pound weaknesses and resistances.
Bosses
Patriarch
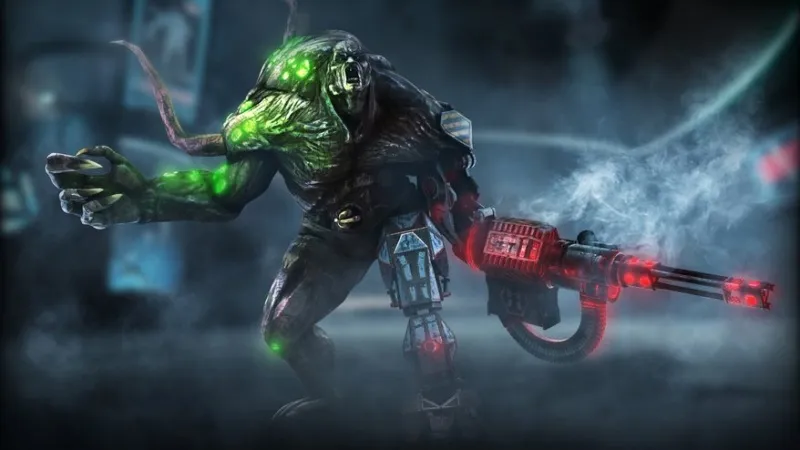 Patriarch.
Kevin Clamely, the father of the ZEDs, who created them and then became his own greatest project. He can turn invisible; his left arm is a weapon platform with a minigun (on Suicidal and HoE he can walk and fire at once) and a missile launcher that fires 3 spiraling missiles at once. He has a chest tentacle and a mortar. He carries 3 healing syringes used when low on health, retreating invisibly to heal. Weak points: the chest tentacle and right arm; resistant: body, right leg, right hand, armored arm and left leg. He takes normal freezing and melee damage.
Syringe heal (percent of max health):
| Normal | Hard | Suicidal | Hell on Earth | |
|---|---|---|---|---|
| First | 75% | 85% | 95% | 99% |
| Second | 65% | 75% | 85% | 95% |
| Third | 55% | 65% | 75% | 85% |
Battle phases (phase changes every time he flees):
| Sprint cooldown | Tentacle grab | Tentacle cooldown | Missiles (cooldown) | Mortar (cooldown) | |
|---|---|---|---|---|---|
| Phase 1 | 3 s | No | - | Yes (10 s) | No |
| Phase 2 | 2.5 s | Yes | 10 s | Yes (8 s) | Yes (10 s) |
| Phase 3 | 2 s | Yes | 9 s | Yes (7 s) | Yes (9 s) |
| Phase 4 | 1.5 s | Yes | 7 s | Yes (5 s) | Yes (7 s) |
Charged attack cooldown: 14 s, 10 s, 9 s, 7 s by phase; minigun cooldown 2.25 s, 2 s, 1.75 s, 1.25 s. Maximum rage attacks 4, 5, 6 in phases 2-4. He can summon minions from phase 2. Walking while firing: phase 2 on HoE only, phase 3 on Suicidal and HoE, phase 4 on Hard and above.
Attacks: missiles (very damaging), mortar (targets 3 different players, 3 shots each, up to 5 times), minigun, chest tentacle pull, charged attack on leaving invisibility, and melee.
Notes: he starts to flee at 35% health and summons ZEDs from 42.5%; fleeing lasts at least 6 and at most 25 seconds; he cancels fleeing and heals automatically after bumping into players several times; he can become enraged at a visible player who killed one of his minions (up to 16 seconds, range 1200 units, once per phase); he breaks unwelded doors by running at them. A trick when there is no cover from the minigun: run up and touch him, since there is a blind spot between him and the minigun, but leave before he kicks.
Dr. Hans Volter
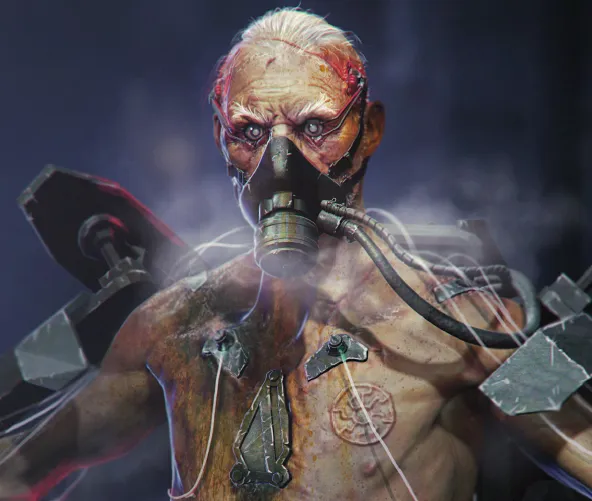 Dr. Hans Volter.
An old-looking, nearly bare scientist kept alive by Horzine technology, with two assault rifles, a gas mask and toxic grenades. His melee attacks cannot be blocked: even a parry takes full damage. At low health he raises a shield, throws smoke grenades and calls ZEDs. Three weak points: the core in his chest, his backpack and his head; the RPG explosion is his biggest weakness.
Shield and hunt-and-heal: when his health drops to certain thresholds he raises his shield (all damage and incapacitation are ineffective), throws smoke grenades and flees, then returns to grab a player and heals for about 5 seconds. You can break the shield during the heal to stop it, which also stuns him. Shield color shows its integrity: green above 75%, yellow 50-75%, red below 50%.
Attacks: assault rifles (cannot run while firing; also bayonets), gas grenade (damage over time, 8 s), explosive grenade (3 s fuse), smoke grenade (8 s) and strong melee. On Suicidal and HoE he can throw grenades while running. Surrounded, he can release a nerve-gas burst that pushes players away. He cannot hurt himself with his own grenades and breaks unwelded doors by running.
Matriarch
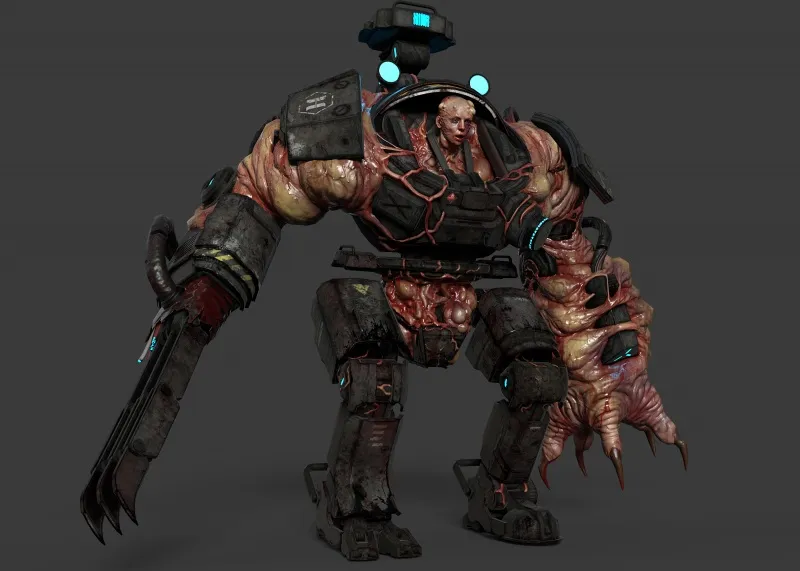 Matriarch.
Rachel Clamely, the Patriarch's daughter, completely mutated and fused into a mech suit with armor, a shield, camouflage tech and a plasma cannon. After a certain amount of damage she switches from long-range to short-range combat, and she is the only boss who changes targets based on damage dealt to her. She appears to be behind the E.D.A.R. incursion, commanding them. Her only weak points are the head and the claw (once armor is destroyed); the tesla device on her head, the left shoulder and the right arm (once armor is destroyed) have no damage reduction, everything else does.
| Phase | Claw | Tesla burst | Plasma cannon | Lightning storm | Siren | Can hide |
|---|---|---|---|---|---|---|
| 1 (100% HP) | Yes | No | Yes | Yes | No | No |
| 2 (75% HP) | Yes | Yes | Yes | Yes | No | No |
| 3 (50% HP) | Yes | No | No | Yes | Yes | No |
| 4 (25% HP) | Yes | No | No | No | Yes | Yes |
Attacks: 360 degree claw sweep, lightning storm, long-range plasma cannon, tesla burst, scorpion whip grab (only once the left-hand armor is destroyed; followed by a possibly lethal melee hit) and a warning siren like the Siren's scream with far greater damage and range. Notes: she is stunned when a shield or armor piece breaks (on phase change); every 8 to 10 seconds she reevaluates targets, usually switching to whoever dealt the most damage; parrying reduces her damage but does not make her stumble; the grab can be interrupted even with a knife.
King Fleshpound
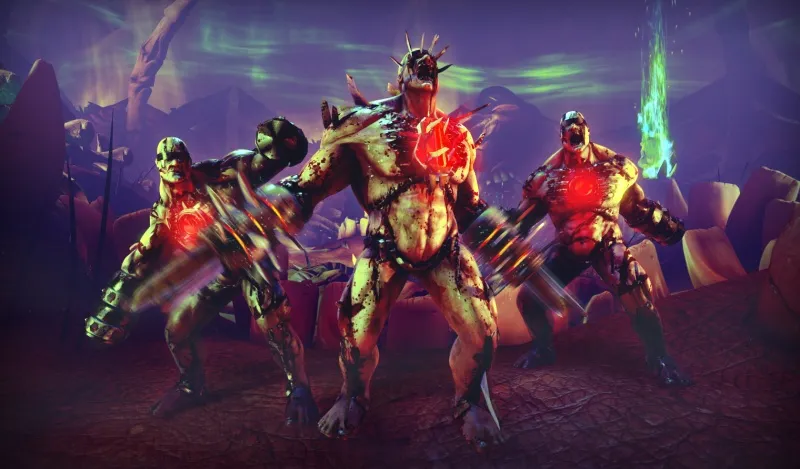 King Fleshpound (the middle ZED in the picture), with Quarter Pounds behind.
A taller, stronger Fleshpound with spinning arm attacks, explosive ground punches and a chest laser that you dodge by crouching. He constantly calls Quarter Pound minions and raises a shield (protection only) when nearly dead. Weak points: head and chest. The best weapons are explosives and the Microwave Gun.
- Phase 1 (65% HP): explosive attacks while taunting (ground punches).
- Phase 2 (50% HP): gains the chest laser (cooldown 10, 9, 7 and 6 s by difficulty).
- Phase 3 (20% HP): activates his shield.
Each phase change (including when he appears) spawns 1 to 12 Quarter Pounds depending on player count. Rage starts after 276 damage; enraged he does not dodge grenades and takes only 25% damage; he calms down after hitting a player or after 30 seconds without seeing any. EMP prevents taunting and rage. He may block damage when someone aims at him.
Abomination
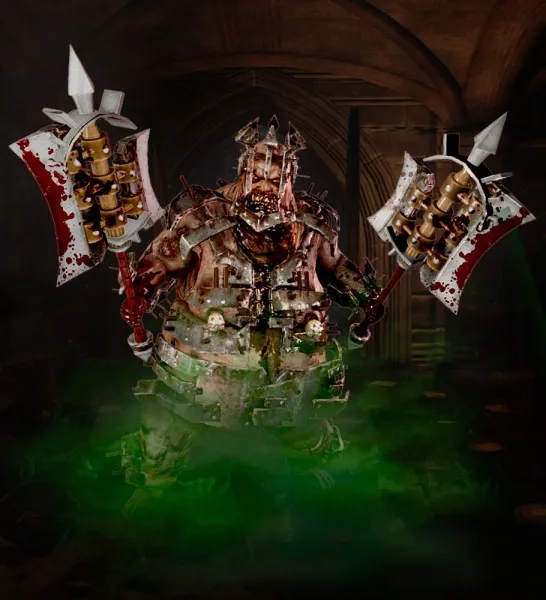 Abomination.
A taller, stronger, armored Bloat that spawns Abomination Spawns, whose only attack is running at you and exploding in poison. His moves: vomit, vomit mines, a poison fart that leaves a 10-second gas cloud (and spawns his minions) and a devour attack that sucks in players and ZEDs with a vortex and bites them; ZEDs eaten become Abomination Spawns. He constantly calls small ZEDs. Only weak point: the head; resistant to all damage except freezing and the direct impact of explosive ammo.
 Abomination Spawns.
He has no true phases but gets more aggressive as health drops, using the devour more often and charging from farther away. He runs when enraged (at 75%, 50% and 20% HP or when losing armor) and blocks attacks with his axes.
Co-op basics
- Know the map and plan good positions and escape routes. Walk slowly, clear ZEDs and look behind you, especially near doors and corners. Avoid corridors and anything that traps you.
- Healing: every player has a syringe (heal 20, 50 solo; 15 s cooldown when healing yourself, 7.5 s when healing allies; regen of 10 HP per second). Healing a teammate earns you Dosh. Heal teammates first and expect the same.
- Returning weapons: if you find a Tier 2 or higher weapon on the ground, say so in chat and return it. Drop weapons with Backspace.
- Chat: hold Z for preset text commands; T for all chat, Y for team; CapsLock for voice. SC is Scrake and FP is Fleshpound.
- Stay with the team; those who go alone usually die on higher difficulties.
- Team composition: ideally a Medic, a Berserker, two for small ZEDs and two for big ones, but that is not a rule.
Versus basics
Both teams are players, but only the ZED team also gets AI help. Playable ZEDs: Alpha Clot, Slasher, Crawler, Stalker, Bloat, Gorefast, Siren, Husk, Scrake, Fleshpound and Patriarch (Scrakes and Fleshpounds are limited to 2 player-controlled at a time). Highlights:
- Alpha Clot: left click attacks, jumping left click pounds the ground, right click grabs; Bash (V) makes nearby AI ZEDs within 10 m rage and run at survivors.
- Slasher: a 5-hit running combo, leaps with right click and a roll dodge on V with no cooldown.
- Crawler: pounce and bite, a spinning attack when running, the grenade key makes it explode into poison gas.
- Stalker: invisible when not attacking or dodging; unlike AI Stalkers, player-controlled ones stay invisible to Commandos while standing or walking.
- Gorefast: blocks with middle mouse, a 3-hit running bash and circular area attack.
- Bloat: vomit, vomit mines on right click and a belly-flop bash.
- Siren: scream, a vortex that pulls survivors in and makes them unable to move or attack, and a bite on V.
- Husk: fireball, flamethrower, a 3-hit melee combo and a suicide attack on the grenade key.
- Scrake: 2-hit strike, a powerful saw slam, Gutbuster and a spin; enraged Scrakes damage survivors just by being near.
- Fleshpound: a calm and a rage move set, can rage at will, 276 damage also triggers rage, rage animation 1.64 s. Strategy: do not attack right away; wait and attack with Sirens and Scrakes (a Siren can trap a player in the vortex for the Fleshpound).
- Patriarch: tentacle, armored arm, minigun on right click, missiles on middle click, mortar on the grenade key, tentacle grab on V, heal on Q (3 uses; automatic below 25%).
Core techniques
- Bash: V by default; it can knock the head off small ZEDs and creates distance from medium and large ones (large ones have about a 3 second cooldown between bashes; Fleshpounds do not animate when enraged).
- Reload cancel: very useful for Gunslinger and Demolitionist, and works for any weapon. Press reload; when the ammo enters the lower right corner, hold fire and press bash (V). A bad timing loses time. See reload cancelling.
- Welding doors: closes a route but also removes an exit. Support can repair broken doors and Demolitionist can set explosive traps. Hold E near a door. Do not weld doors at random.
- Block and parry: block is holding the alt button, reducing damage. Parry means pressing it at the exact moment a ZED attacks; you see a clear glow and the ZED stumbles. It takes practice.
- Swing cancel: after a heavy melee strike press R and swing again to chain heavy attacks faster. See R or V cancel with the Zweihander.
FAQ
- How many waves are in a KF2 match?
- Short games have 4 waves, medium 7 and long 10, each followed by a boss wave.
- What does prestige give?
- At level 25 you can prestige: the perk returns to level 0 but you gain a weapon skin for the class, a new class icon, 2 million Vosh and an XP bonus.
- Which weapon should I use on a Scrake?
- The Scrake resists explosives and is nearly immune to fire and poison; its only real weakness is the RPG's direct impact, which does 400% damage. Never set it on fire.
