
Getting Good at KF2 Controlled Difficulty: Mindset, Lanes, Perk Builds
This page paraphrases a 2021 guide written by an experienced Controlled Difficulty (CD) player who wanted to attract new players to the more serious side of CD. It complements the controlled difficulty beginner guide, the Combined Edition reference and the BrazukaCD guide.
What CD is and why play it
CD (Controlled Difficulty) lets you edit parts of the game's difficulty, mostly to make it harder, while removing much of the frustrating randomness of vanilla such as Zed teleports and irregular spawns. The author has played KF2 almost only with CD for half a year, finds wins far more rewarding than a vanilla Hell on Earth win and says you do not have to use extreme settings; a game slightly above your team's skill is enough.
Commands for playing
!cdr(!cdready): mark yourself ready; the trader countdown resumes when everyone is ready.!cdot(!cdopentrader): open the trader remotely.!cdinfobasic game info;!cdinfo fullprints everything to the console.!cdwhoshows who is ready and who is a spectator;!cdmsshows your stats (do not overuse it);!cdstats damagetaken(or larges, damagedealt) prints a stat and each player's score.
Bind !cdr and !cdot to keys, for example SetBind Y "say !cdot" and SetBind X "say !cdr".
Basic difficulty commands:
!cdmm 32max Zeds alive at once.!cdsc basic_heavyspawn cycle preset (a fixed amount of each Zed type per wave, only the lane is random): basic_heavy, ts_mig_v1, osffi_v1, ts_mig_v3, dtf_v1 and others.!cdsp 1spawn poll interval; higher is slower.!cdcs 7cohort size, Zeds spawned per group.!cdzt vanillaZed type (vanilla, harder or nightcore); vanilla is used almost always, except some EU games.- Other settings are found with
!cdinfo full, for example!cddoshkill 0.8(or!cddk 0.8) to change DoshKill from 1 to 0.8.
Where to play
Servers such as HoE++ and Easy CD are active but only roughly comparable to constructed CD games; good for chill sessions and learning higher difficulty. For real CD the author recommends the CD Hub Discord (mostly EU, recently created and still quiet) and Tamari's Discord (mostly NA).
Common mistakes
- Stats first. Do your job and hold your lane before milking headshot percentage or damage; stats do not hold the lane or fix a raged Fleshpound.
- Rejecting advice. If an experienced player says to stand closer or freeze more often, at least consider it.
- Giving up after a loss. Improvement costs failing; ask for advice.
- Body-blocking shots. A newbie Gunslinger who walks in front of the Sharpshooter makes them useless. Learn positioning.
- Ignoring the team's economy. In harder-dosh games the Sharpshooter is hurt most after wave 1 (stuck with a Winchester, needing about 1300 dosh for an M14 on wave 2), while Commando, Gunslinger and Medic can live with tier 2 weapons. Share money with the Sharpshooter after the first wave.
- Being a meanie. Mistakes of skill are fine; toxicity and refusing to communicate are not. Make the important call-outs.
Positioning
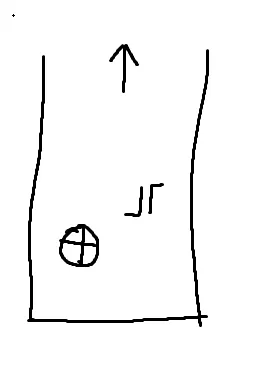 The Gunslinger stays slightly in front within its half of the lane, the Sharpshooter behind it within its half.
- Solo lane: stand in the middle of the lane and let the Medic see you. Solo lanes are mostly Gunslinger lanes, occasionally Sharpshooter (who is punished heavily for mistakes, as he lacks Fan Fire). Commandos rarely solo a lane.
- Gunslinger with Sharpshooter: stand a bit forward so you pull the aggro; two pistols and a shorter effective range make this easier for you.
- Gunslinger with Commando: also a bit forward. A good Commando cleans trash off you so you focus larges, prepare Zed Time extensions on Bloats, weaken Scrakes and sometimes let headless Fleshpounds live for extensions. Do not kill trash that the Commando is clearly saving for an extension.
- Sharpshooter with Gunslinger: stand a bit back so the Gunslinger holds the aggro; shooting off-aggro requires adjusting your aim but your shots come from one place and your effective range is high.
- Commando with Gunslinger and/or Sharpshooter: stay behind your damage perks with a clear view of the lane and push forward a bit in Zed Time to extend. Ensuring extends and clearing trash are your absolute priority; assist with large takedowns when possible.
Mechanics to train
- Aim: use aim trainers, keep the same sensitivity and practice on lane maps. Example console line with Fanta's CD Chokepoints edition:
open kf-corridor?Game=Controlled_Difficulty.CD_Survival?maxmonsters=36?spawncycle=basic_heavy?gamelength=2, then typesolomode, get gear and raise maxmonsters each time you win. - Large takedowns: learn the Fleshpound rage animation and hit the head almost perfectly during it. In solomode use
mutate spawnai fp/nmfp/hhzfp/sc/nmsc/hhzsc 500(500 is the distance; nmfp and nmsc are nightcore, hhz are harder Zeds). - Weapon bashing: a headshot bash one-shots trash (Gorefast needs two), saving ammo. "Making room": bash a Scrake, Bloat or maybe a Husk while passing to interrupt its attack (not reliable on Fleshpounds); it pushes the Zed slightly, so avoid trapping a teammate in a narrow corridor.
- Reload cancelling: bash as soon as the magazine counter shows full to start shooting far sooner than the animation. It becomes muscle memory; the author was once suspected of a macro because of perfect Deagle cancelling.
- Grenades: a Sharpshooter should freeze whenever he feels it is right, ideally using all six in later waves, but never during Zed Time (use Zed Time for damage or stunning Scrakes). A Gunslinger should nail-bomb when reloading in a solo or duo lane, and nail bombs under Scrakes (potentially Fleshpounds) stun them, handy after a freeze to extend stuns; do not nail-bomb when a group of larges arrives, because they become temporarily immune to freezing. A Medic uses the grenade to support a lane under heavy spawns or during a kite. A Commando buys time to reload with grenades but must watch that it does not rage Fleshpounds or Scrakes.
- Fleshpound juking: a last-resort trick: run a close circle around a raged Fleshpound so its slow AI misses; one or two attacks cannot be dodged this way. A community collection of such juking clips is linked in the guide.
Team composition
Classic: 1 Commando, 2 Sharpshooters, 2 Gunslingers, 1 Medic. On maps that do not need a Medic, take a third Sharpshooter; on Nausea use 3 Gunslingers and 1 Sharpshooter because of two solo lanes and one main lane that all need Fan Fire.
Commando
Strengths: best trash killing, low aim demands, plenty of bullets. Weakness: big Zeds and no speed bonus. Priority: extend Zed Time as much as possible and kill trash; one dropped Zed Time can decide late waves.
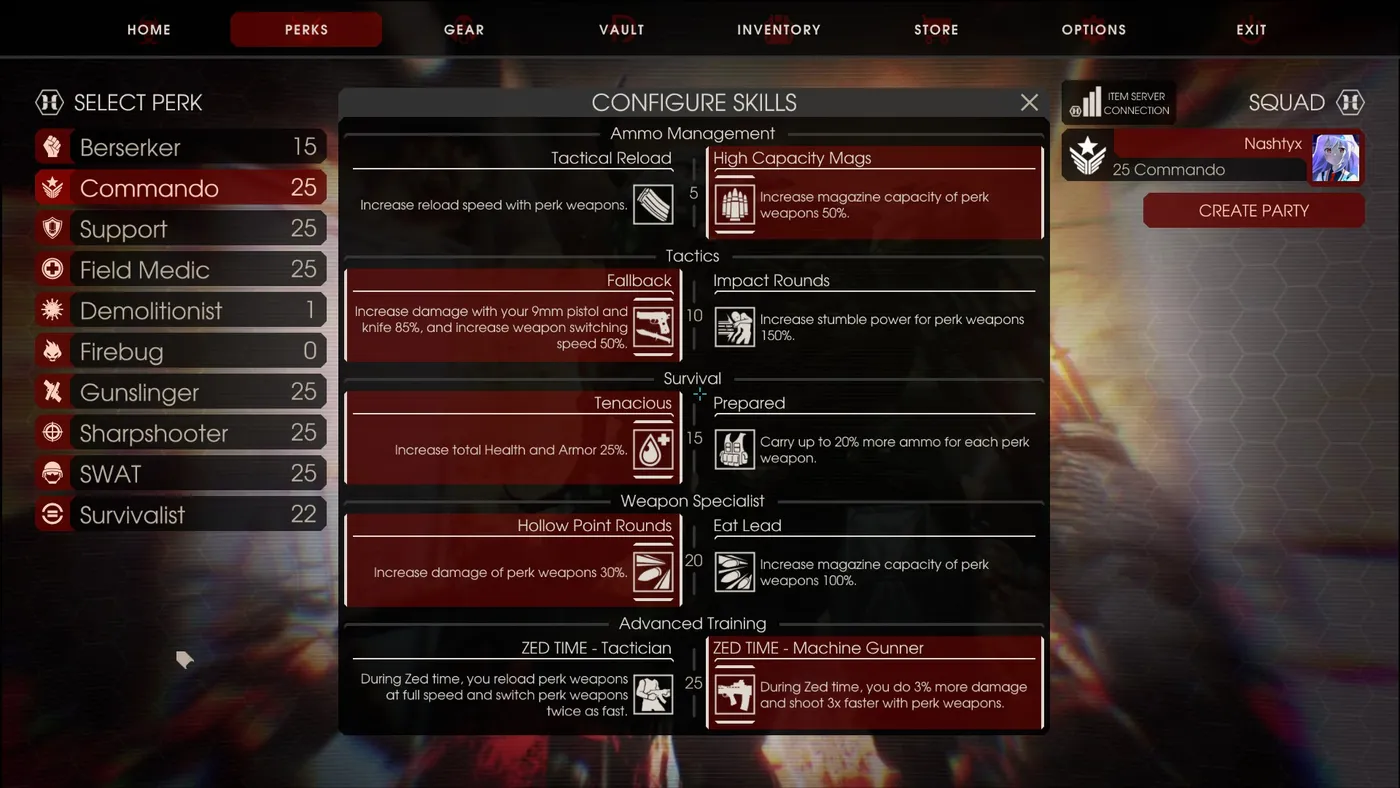 The author's Commando skill set: High Capacity Mags, Fallback, Tenacious, Hollow Point Rounds and Machine Gunner.
Weapons: the most common loadout is Medic 401 plus vanilla FAL (the FAL can one-clip Fleshpounds, the 401 kills trash). In harder CD with custom weapons AK-12, SCAR and FAL are usually better; the 401 is best without a Medic. Overcapping weapons by swapping skills is fixed in many CD versions and considered an exploit.
Gunslinger
Strengths: highest DPS potential, strong close range and Zed Time damage, SPX for mid to long range, Fan Fire melts larges in Zed Time, Deagles are probably the strongest weapon in the game. Weaknesses: no utility besides DPS and an occasional nail bomb; may depend on the Commando extending Zed Time; Fan Fire recoil needs practice. Priority: damage to larges, nail bombs when needed. When laning with a Commando, prepare extensions: for a Scrake 4 headshots and 1 body shot if possible, for a Bloat 1 headshot and 2 body shots, and a headless Fleshpound body shot, ideally with the SPX and clear comms.
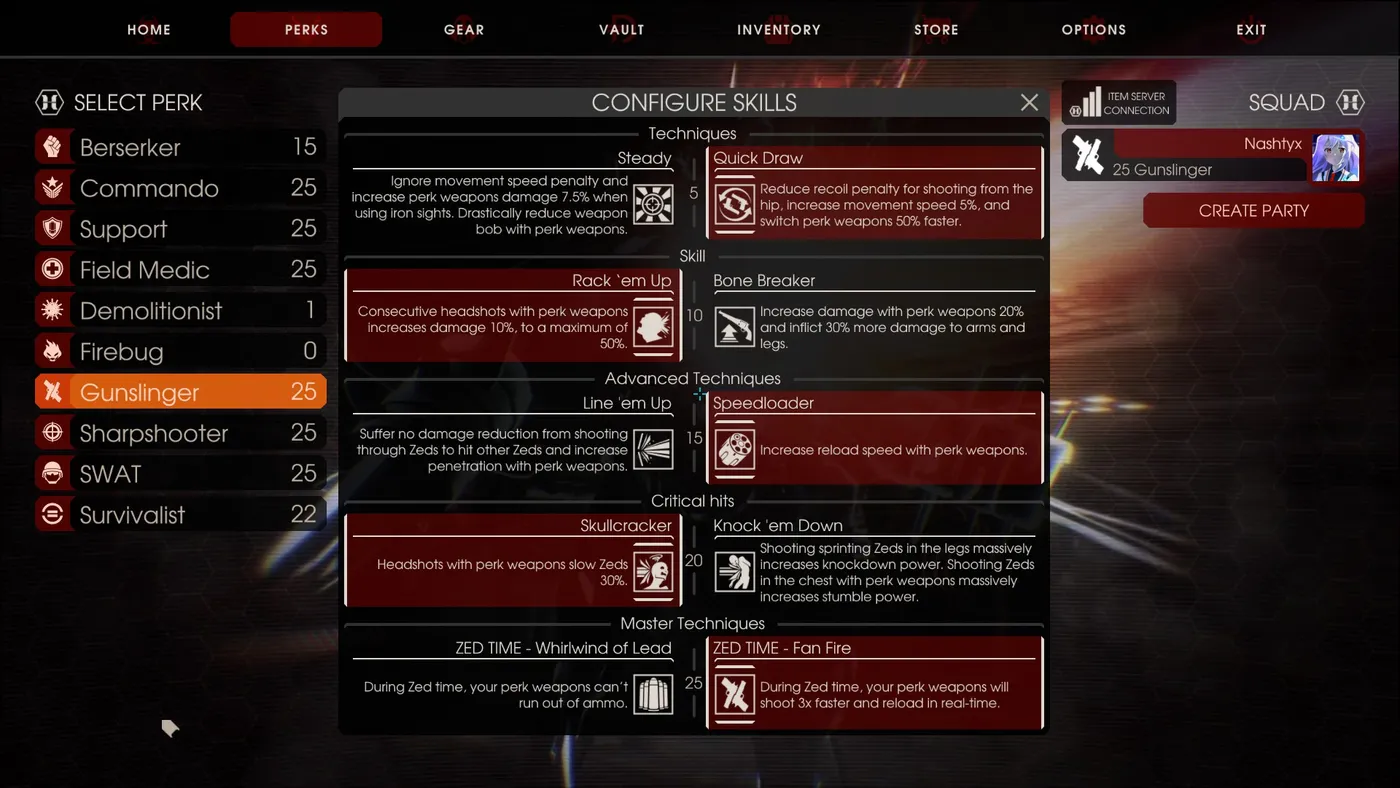 Gunslinger skill set: Quick Draw, Rack 'em Up, Speedloader, Skullcracker and Fan Fire.
Weapons: Deagles, Armed Forces (AF) pistols or Magnums plus the SPX. Deagles for most trash and for high DPS on larges, AFs or Magnums for close range, the SPX for long to mid range (and the easiest Fan Fire recoil). Do not overuse the SPX: it is slow compared to pistols, even in Zed Time.
Sharpshooter
Strengths: highest long-range DPS, freeze grenades, handles trash and larges, generates Zed Time (10 second cooldown), stuns Scrakes during Zed Time. Weaknesses: hard to master, recoil of M14 or FAL at distance, punishing for mistakes, big responsibility for freezes, usually shoots off-aggro. Priorities: damage, stun Scrakes in Zed Time, kill Husks, freeze larges to avoid being pushed.
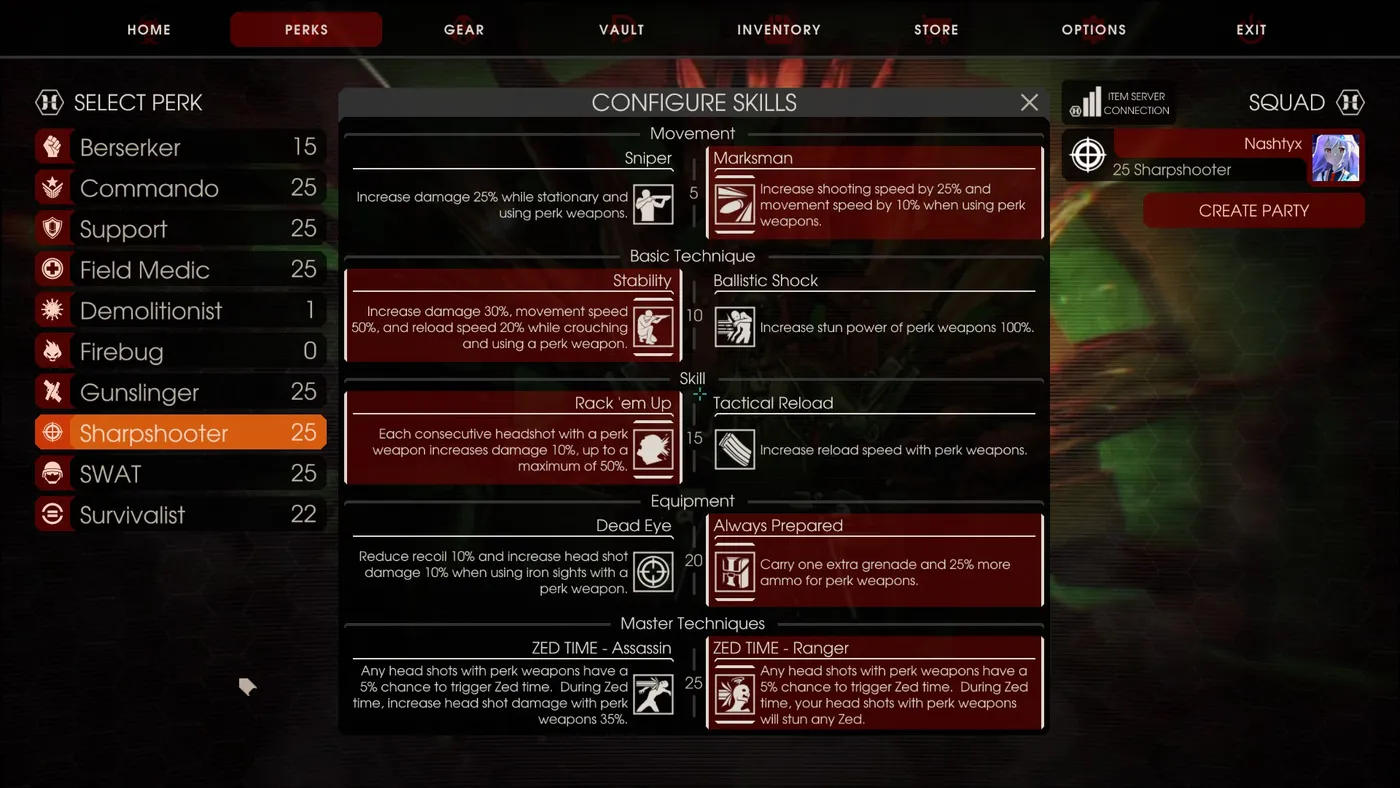 Sharpshooter skill set: Marksman, Stability, Rack 'em Up, Always Prepared and Ranger.
Weapons: M14 or FAL plus an SPX. The M14 gives continuous damage with high stun power and penetration; the FAL can be good at closer ranges; the SPX is the burst tool, rarely reloaded, so use its 10 bullets to finish wounded larges. Crouch whenever possible for reload speed and damage.
Medic
Strengths: healing, buffing, hardly any aim needed, very durable. Weakness: cannot deal with larges and feels underappreciated. Priorities: heal and buff teammates, help non-Commando lanes by killing trash or sniping Husks.
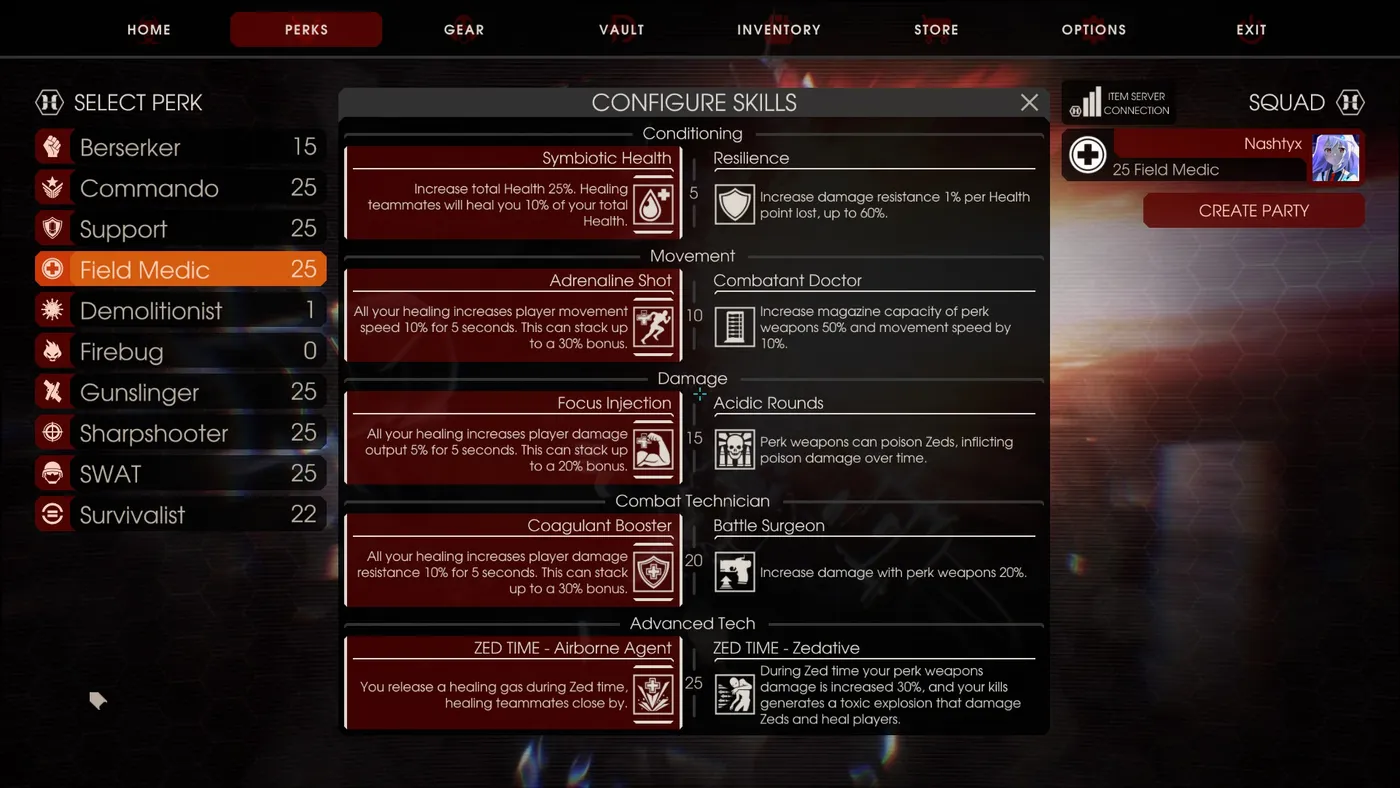 Team-oriented Medic skills: Symbiotic Health, Adrenaline Shot, Focus Injection, Coagulant Booster and Airborne Agent.
Weapons: the Healthrower is considered so broken it is usually banned and absent from custom weapon sets; the 501 is also unbalanced because of many healing grenades. Common picks are 401, 301, Hemogoblin (slows Zeds and snipes Husks) and the HRG crossbow in custom sets.
Closing
The author recommends watching record-level CD runs with Harder Zeds, ts_mig_v3 and challenging MaxMonsters, and not being intimidated by them: work your way up from easier to harder settings.
FAQ
- What is the classic team for serious CD?
- One Commando, two Sharpshooters, two Gunslingers and one Medic. On some maps the Medic is swapped for a third Sharpshooter, and on Nausea three Gunslingers and one Sharpshooter are used.
- What should the Commando prioritize?
- Extending Zed Time as much as possible and killing trash, so that the damage perks can keep working. A dropped Zed Time can decide a late-wave match.
- When should a Sharpshooter throw freeze grenades?
- Whenever your gut says so, ideally using all six grenades in later waves, but not during Zed Time; use Zed Time to deal damage or stun Scrakes.
